Spring 2017 Assignments1
一.作业要求
原版:http://cs231n.github.io/assignments2017/assignment1/
翻译:http://www.mooc.ai/course/268/learn?lessonid=1962#lesson/1962
二.作业收获及代码
完整代码地址:https://github.com/coldyan123/Assignment1
1 KNN
(1)有用的numpy API:
np.flatnonzero:返回展平数组的非零元素索引(结合布尔数组访问可筛选特定条件元素索引)
np.random.choice:随机采样常用(第一个参数可以是一维数组或整数)
np.argsort:返回排序后的索引值
np.argmax: 返回最大元素的索引值
np.array_split: 划分k折交叉验证集常用
np.vstack:纵向把列表中的数组拼起来(要求每个数组列数相同)
np.hstack:横向把列表中的数组拼起来(要求每个数组行数相同)
np.random.randn: 常用来初始化权重矩阵
(2)三种计算训练集与测试集L2距离矩阵的方式(two loop,one loop,no loop):
two loop(很暴力的方法):
def compute_distances_two_loops(self, X):

    """

    Compute the distance between each test point in X and each training point

    in self.X_train using a nested loop over both the training data and the

    test data.

    Inputs:

    - X: A numpy array of shape (num_test, D) containing test data.

    Returns:

    - dists: A numpy array of shape (num_test, num_train) where dists[i, j]

      is the Euclidean distance between the ith test point and the jth training

      point.

    """

    num_test = X.shape[0]

    num_train = self.X_train.shape[0]

    dists = np.zeros((num_test, num_train))

    for i in xrange(num_test):

      for j in xrange(num_train):

        #####################################################################

        # TODO:                                                             #

        # Compute the l2 distance between the ith test point and the jth    #

        # training point, and store the result in dists[i, j]. You should   #

        # not use a loop over dimension.                                    #

        #####################################################################

        dists[i, j] = np.sqrt(np.sum((X[i, :] - self.X_train[j, :]) ** 2))

        #####################################################################

        #                       END OF YOUR CODE                            #

        #####################################################################

    return dists
one loop(用到了numpy数组的广播):
def compute_distances_one_loop(self, X):

    """

    Compute the distance between each test point in X and each training point

    in self.X_train using a single loop over the test data.

    Input / Output: Same as compute_distances_two_loops

    """

    num_test = X.shape[0]

    num_train = self.X_train.shape[0]

    dists = np.zeros((num_test, num_train))

    for i in xrange(num_test):

      #######################################################################

      # TODO:                                                               #

      # Compute the l2 distance between the ith test point and all training #

      # points, and store the result in dists[i, :].                        #

      #######################################################################

      dists[i] += np.sqrt(np.sum((X[i, :] - self.X_train) ** 2, axis=1))

      #######################################################################

      #                         END OF YOUR CODE                            #

      #######################################################################

    return dists
no loop (将L2距离表达式展开,然后使用向量化方式巧妙实现):
def compute_distances_no_loops(self, X):

    """

    Compute the distance between each test point in X and each training point

    in self.X_train using no explicit loops.

    Input / Output: Same as compute_distances_two_loops

    """

    num_test = X.shape[0]

    num_train = self.X_train.shape[0]

    dists = np.zeros((num_test, num_train))

    #########################################################################

    # TODO:                                                                 #

    # Compute the l2 distance between all test points and all training      #

    # points without using any explicit loops, and store the result in      #

    # dists.                                                                #

    #                                                                       #

    # You should implement this function using only basic array operations; #

    # in particular you should not use functions from scipy.                #

    #                                                                       #

    # HINT: Try to formulate the l2 distance using matrix multiplication    #

    #       and two broadcast sums.                                         #

    #########################################################################

    dists += np.sum(X ** 2, axis=1).reshape((num_test, 1))

    dists += np.sum(self.X_train ** 2, axis=1)

    dists += X.dot(self.X_train.T) * (-2)

    dists = np.sqrt(dists)

    #########################################################################

    #                         END OF YOUR CODE                              #

    #########################################################################

    return dists
(3) 完整代码
在这个练习中,我编写了knn的训练和测试步骤并理解基本的图像分类pipeline,交叉验证以及熟练编写高效的向量化代码。
https://nbviewer.jupyter.org/github/coldyan123/Assignments1/blob/master/knn.ipynb
2 多分类SVM
(1)多分类SVM损失函数及梯度:
样本i的损失函数:

(其中yi是样本i的真实标签,sj是该样本在类别j上的线性得分值,三角形是一个常数,表示保护值)
梯度(学会推导):

(2)两种实现SVM损失和解析梯度的方式
朴素法(两重循环):
def svm_loss_naive(W, X, y, reg):

  """

  Structured SVM loss function, naive implementation (with loops).

  Inputs have dimension D, there are C classes, and we operate on minibatches

  of N examples.

  Inputs:

  - W: A numpy array of shape (D, C) containing weights.

  - X: A numpy array of shape (N, D) containing a minibatch of data.

  - y: A numpy array of shape (N,) containing training labels; y[i] = c means

    that X[i] has label c, where 0 <= c < C.

  - reg: (float) regularization strength

  Returns a tuple of:

  - loss as single float

  - gradient with respect to weights W; an array of same shape as W

  """

  dW = np.zeros(W.shape) # initialize the gradient as zero

  # compute the loss and the gradient

  num_classes = W.shape[1]

  num_train = X.shape[0]

  loss = 0.0

  for i in xrange(num_train):

    scores = X[i].dot(W)

    correct_class_score = scores[y[i]]

    for j in xrange(num_classes):

      if j == y[i]:

        continue

      margin = scores[j] - correct_class_score + 1 # note delta = 1

      if margin > 0:

        dW[:, j] += X[i, :]

        dW[:, y[i]] += -X[i, :]

        loss += margin

  # Right now the loss is a sum over all training examples, but we want it

  # to be an average instead so we divide by num_train.

  loss /= num_train

  dW /= num_train

  # Add regularization to the loss.

  loss += reg * np.sum(W * W)

  dW += 2 * reg * W

  #############################################################################

  # TODO:                                                                     #

  # Compute the gradient of the loss function and store it dW.                #

  # Rather that first computing the loss and then computing the derivative,   #

  # it may be simpler to compute the derivative at the same time that the     #

  # loss is being computed. As a result you may need to modify some of the    #

  # code above to compute the gradient.                                       #

  #############################################################################

  return loss, dW
完全向量法:
很有技巧性,使用数组的广播来计算loss。由于观察到每次的梯度是训练集向量的线性叠加,使用计算loss中产生的中间矩阵lossMat来构造该线性权重矩阵H,该权重矩阵H大小为n*10,对于Hij,当样本i的正确分类不为j,如果max(si-syi+1)>0,则Hij为1,否则为0;当样本i的正确分类为j,则Hij为10个分类中max(si-syi+1)大于0的个数的倒数。其中max(si-syi+1)就是lossMat矩阵中的值。
def svm_loss_vectorized(W, X, y, reg):

  """

  Structured SVM loss function, vectorized implementation.

  Inputs and outputs are the same as svm_loss_naive.

  """

  loss = 0.0

  dW = np.zeros(W.shape) # initialize the gradient as zero

  num_classes = W.shape[1]

  num_train = X.shape[0]

  #############################################################################

  # TODO:                                                                     #

  # Implement a vectorized version of the structured SVM loss, storing the    #

  # result in loss.                                                           #

  #############################################################################

  scores = X.dot(W)

  rightClassScores = scores[range(0, num_train), list(y)].reshape(num_train, 1)

  lossMat = scores - rightClassScores + 1

  lossMat[lossMat < 0] = 0.0

  loss = (np.sum(lossMat) - num_train) / num_train

  #############################################################################

  #                             END OF YOUR CODE                              #

  #############################################################################

  #############################################################################

  # TODO:                                                                     #

  # Implement a vectorized version of the gradient for the structured SVM     #

  # loss, storing the result in dW.                                           #

  #                                                                           #

  # Hint: Instead of computing the gradient from scratch, it may be easier    #

  # to reuse some of the intermediate values that you used to compute the     #

  # loss.                                                                     #

  #############################################################################

  lossMat[lossMat > 0] = 1.0

  lossMat[range(0, num_train), list(y)] = -np.sum(lossMat, axis=1) + 1

  dW = X.T.dot(lossMat) / num_train + 2 * reg * W

  #############################################################################

  #                             END OF YOUR CODE                              #

  #############################################################################

  return loss, dW
实验表明完全向量化的代码比朴素法快十几倍。
(3)完整代码
- 实现了解析梯度完全向量化的表达式
- 使用数值梯度检查了解析梯度的正确性
- 使用验证集调参:学习速率和正则化强度
- 实现了优化损失函数的SGD算法
- 可视化最终学习权重,可以看出线性分类器相当于为每个类学出一个模版(对应权重矩阵的一行),进行模版匹配(可视化的方法是将权重进行归一化,然后乘以255)。
3 softmax

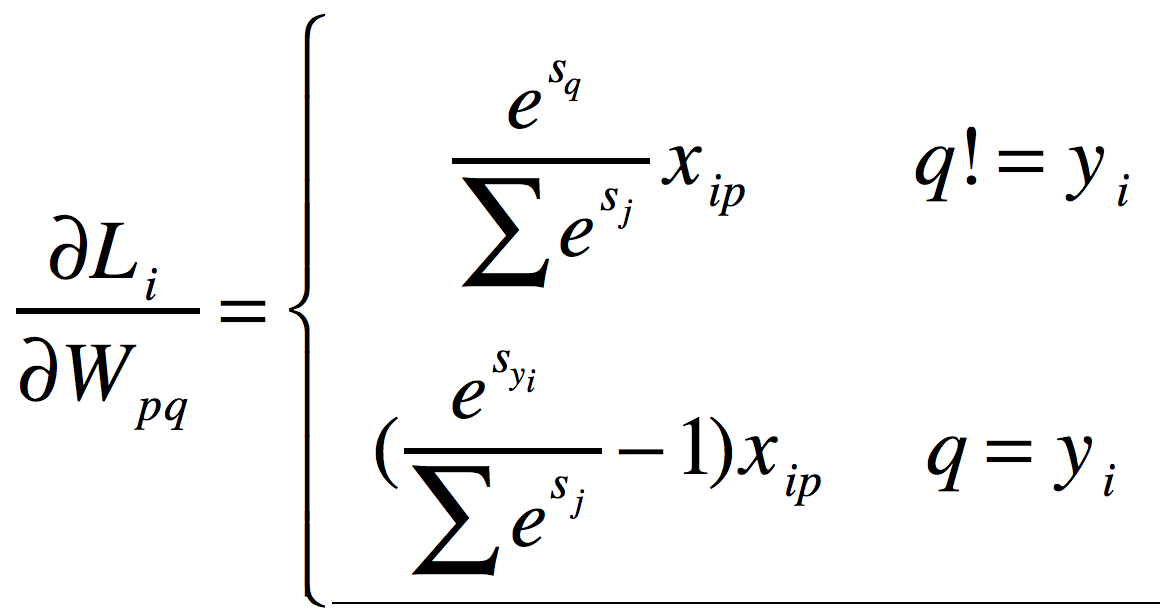
def softmax_loss_naive(W, X, y, reg):

  """

  Softmax loss function, naive implementation (with loops)

  Inputs have dimension D, there are C classes, and we operate on minibatches

  of N examples.

  Inputs:

  - W: A numpy array of shape (D, C) containing weights.

  - X: A numpy array of shape (N, D) containing a minibatch of data.

  - y: A numpy array of shape (N,) containing training labels; y[i] = c means

    that X[i] has label c, where 0 <= c < C.

  - reg: (float) regularization strength

  Returns a tuple of:

  - loss as single float

  - gradient with respect to weights W; an array of same shape as W

  """

  # Initialize the loss and gradient to zero.

  loss = 0.0

  dW = np.zeros_like(W)

  #############################################################################

  # TODO: Compute the softmax loss and its gradient using explicit loops.     #

  # Store the loss in loss and the gradient in dW. If you are not careful     #

  # here, it is easy to run into numeric instability. Don't forget the        #

  # regularization!                                                           #

  #############################################################################

  train_num = X.shape[0]

  dim = X.shape[1]

  class_num = W.shape[1]

  for i in range(0, train_num):

      scores = X[i].dot(W)

      Sum = 0

      for j in range(0, class_num):

          Sum += math.exp(scores[j])

      for j in range(0, class_num):

          if j == y[i]:

              dW[:, j] += (math.exp(scores[y[i]]) / Sum - 1) * X[i]

          else:

              dW[:, j] += math.exp(scores[j]) / Sum * X[i]

      loss += -math.log(math.exp(scores[y[i]]) / Sum)

  loss /= train_num

  dW /= train_num

  dW += 2 * reg * W

  #############################################################################

  #                          END OF YOUR CODE                                 #

  #############################################################################

  return loss, dW
完全向量法:
这里与SVM的完全向量实现思路基本相同,都是构造出样本对于梯度的权重贡献矩阵H。搞懂了SVM的再来写这个简直易如反掌。
def softmax_loss_vectorized(W, X, y, reg):

  """

  Softmax loss function, vectorized version.

  Inputs and outputs are the same as softmax_loss_naive.

  """

  # Initialize the loss and gradient to zero.

  loss = 0.0

  dW = np.zeros_like(W)

  #############################################################################

  # TODO: Compute the softmax loss and its gradient using no explicit loops.  #

  # Store the loss in loss and the gradient in dW. If you are not careful     #

  # here, it is easy to run into numeric instability. Don't forget the        #

  # regularization!                                                           #

  #############################################################################

  train_num = X.shape[0]

  dim = X.shape[1]

  class_num = W.shape[1]

  scores = X.dot(W)

  exp_scores = np.exp(scores)

  tmp = exp_scores[range(0, train_num), y] / np.sum(exp_scores, axis=1)

  loss = np.sum(-np.log(tmp)) / train_num

  H = exp_scores / np.sum(exp_scores, axis=1).reshape((train_num, 1))

  H[range(0, train_num), y] -= 1

  dW = X.T.dot(H) / train_num + 2 * reg * W

  #############################################################################

  #                          END OF YOUR CODE                                 #

  #############################################################################

  return loss, dW
(3)完整代码
- 实现了Softmax分类器完全向量化的损失函数
- 实现了解析梯度完全向量化的代码
- 用数值梯度检查了实现
- 使用验证集调整学习速度和正则化强度
- 使用SGD优化损失函数
- 可视化最终学习权重
https://nbviewer.jupyter.org/github/coldyan123/Assignments1/blob/master/softmax.ipynb
4 两层神经网络
(1)softMax loss和梯度的计算(完全向量法)
loss的计算非常简单:
# Compute the loss

    loss = None

    #############################################################################

    # TODO: Finish the forward pass, and compute the loss. This should include  #

    # both the data loss and L2 regularization for W1 and W2. Store the result  #

    # in the variable loss, which should be a scalar. Use the Softmax           #

    # classifier loss.                                                          #

    #############################################################################

    exp_scores = np.exp(scores)

    loss = np.sum(-np.log(exp_scores[range(0, N), y] / np.sum(exp_scores, axis=1)))

    loss /= N

    loss += reg * (np.sum(W1 * W1) + np.sum(W2 * W2))

    #############################################################################

    #                              END OF YOUR CODE                             #

    ############################################################################
梯度的计算比较复杂,主要难在涉及到了矩阵对矩阵的导数(WX+B对W或X的导数),以及Relu层的导数。
a 矩阵线性变换的导数是一个常用的结论,需要记住(使用平铺矩阵jocabian法可以推出这个结论):

(等式右边是左乘右乘还是转置不用记忆,根据维度相容的方法可以现推出来)
b ReLu层的导数
Relu层表示为:

其中是对矩阵A进行逐元素地max(0,Aij)操作的,所以很容易得出:
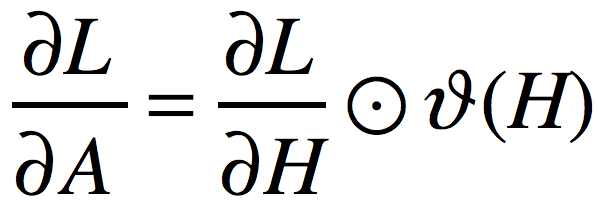
其中,运算符 表示逐元素想乘,函数
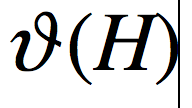 表示将矩阵H中的元素大于0的置为1,其余置为0。
因此梯度的计算代码如下:
# Backward pass: compute gradients

    grads = {}

    #############################################################################

    # TODO: Compute the backward pass, computing the derivatives of the weights #

    # and biases. Store the results in the grads dictionary. For example,       #

    # grads['W1'] should store the gradient on W1, and be a matrix of same size #

    #############################################################################

    #cal gradsOfLossByScore

    gradsOfLossByScore = exp_scores / np.sum(exp_scores, axis=1).reshape((N,1))

    gradsOfLossByScore[range(0, N), y] -= 1

    #cal grads['b2']

    gradsOfLossByb2 = gradsOfLossByScore

    grads['b2'] = np.sum(gradsOfLossByb2, axis=0) / N

    #

    grads['W2'] = h.T.dot(gradsOfLossByScore) / N + 2 * reg * W2

    #

    gradsOfLossByh = gradsOfLossByScore.dot(W2.T)

    gradsOfLossBya1 = gradsOfLossByh * (h > 0)

    gradsOfLossByb1 = gradsOfLossBya1

    grads['b1'] = np.sum(gradsOfLossByb1, axis=0) / N

    grads['W1'] = X.T.dot(gradsOfLossBya1) / N + 2 * reg * W1

    #############################################################################

    #                              END OF YOUR CODE                             #

    #############################################################################
(2)完整代码
在这项练习中,我使用了高效的向量化代码实现了两层全连接神经网络的前向传播,反向传播,训练以及预测。并通过调节超参数,在验证集上达到了0.525的准确率,测试集上达到了0.519的准确率。
https://nbviewer.jupyter.org/github/coldyan123/Assignments1/blob/master/two_layer_net.ipynb
(3)关于反向传播的心得体会
在反向传播中,我们使用上游传过来的梯度乘以jocabian矩阵,得到特定参数的梯度,或者是使梯度往下传。但是注意,jocobian矩阵的定义是向量对向量的导数结果,如果遇到向量对矩阵,或者矩阵对矩阵的时候,我们应该用什么来乘以上游梯度呢?考察下面一个例子:
问题:已知上游传过来的梯度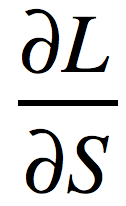 (或称为G),并且有
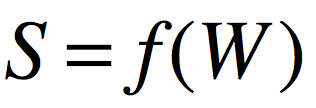 ,要求梯度
,要求梯度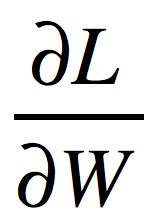 。其中
。其中 。
。
解法:在这个例子中,我们仍然使用雅可比矩阵进行传播,但是首先需要将S矩阵平展成一个(1,mn)的向量,将W矩阵平展成一个(1,pq)的向量,得到的雅可比矩阵是(mn,pq)大小的。然后我们将上游梯度 平展成(1,mn)的向量,使用这个向量乘以雅可比矩阵,得到(1,pq)的向量,将这个向量恢复成(p,q)的形状,就是我们要求的梯度矩阵
 。
。
证明:现在证明上面解法的正确性。
记 分别为三个矩阵平展开之后的第i个元素,那么,得到的(mn,pq)的雅可比矩阵如下:
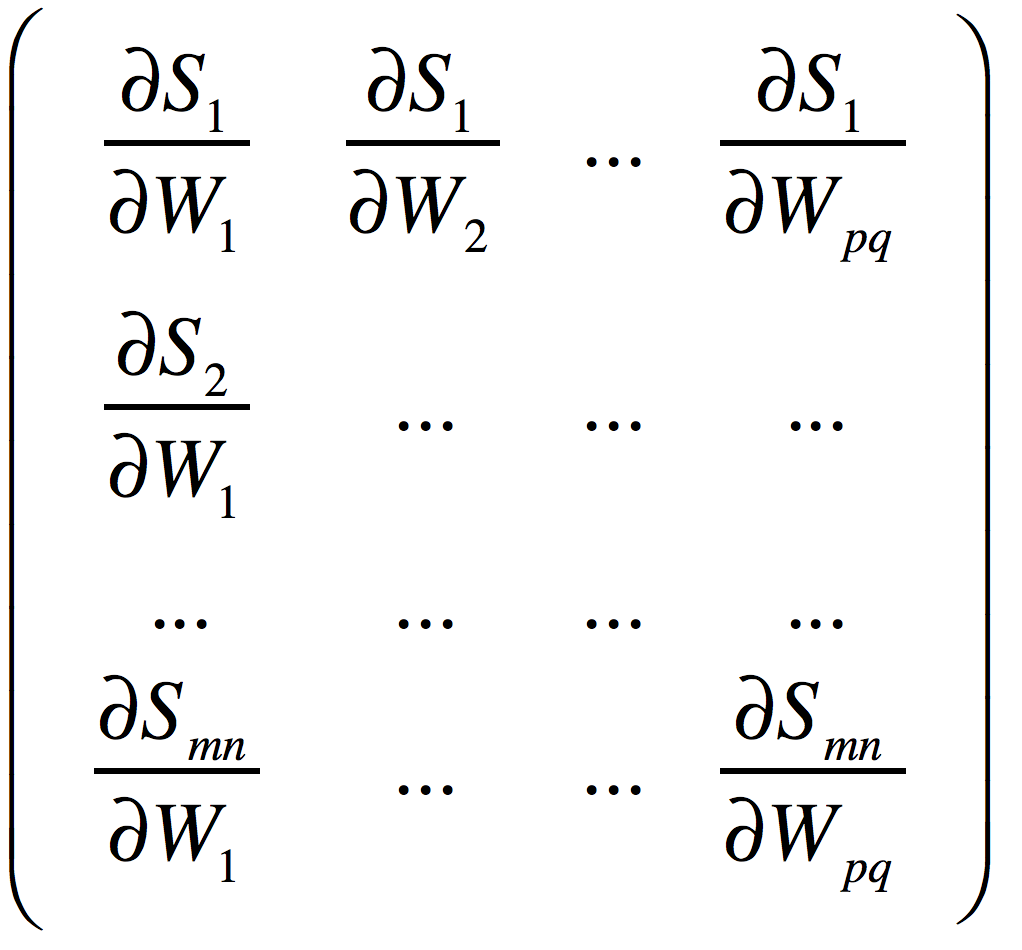
而G展开后为 。将其乘以雅可比矩阵,得到向量:
 。
。
这个向量中的第k个元素为:

很明显,将其恢复成(p,q)的形状就是要求的梯度矩阵 。
。
5 图像特征实验
这一部分验证了提取一些图像特征能够达到更高的分类准确率。提取的特征有HOG和color histogram,用到已经实现的SVM和两层神经网络上。经过调参,神经网络在验证集上准确率超过了60%,测试集上达到了58.3%。
完整代码:
https://nbviewer.jupyter.org/github/coldyan123/Assignments1/blob/master/features.ipynb
Spring 2017 Assignments1的更多相关文章
- cs231n spring 2017 lecture13 Generative Models 听课笔记
1. 非监督学习 监督学习有数据有标签,目的是学习数据和标签之间的映射关系.而无监督学习只有数据,没有标签,目的是学习数据额隐藏结构. 2. 生成模型(Generative Models) 已知训练数 ...
- cs231n spring 2017 lecture11 Detection and Segmentation 听课笔记
1. Semantic Segmentation 把每个像素分类到某个语义. 为了减少运算量,会先降采样再升采样.降采样一般用池化层,升采样有各种"Unpooling"." ...
- cs231n spring 2017 lecture9 CNN Architectures 听课笔记
参考<deeplearning.ai 卷积神经网络 Week 2 听课笔记>. 1. AlexNet(Krizhevsky et al. 2012),8层网络. 学会计算每一层的输出的sh ...
- cs231n spring 2017 lecture7 Training Neural Networks II 听课笔记
1. 优化: 1.1 随机梯度下降法(Stochasitc Gradient Decent, SGD)的问题: 1)对于condition number(Hessian矩阵最大和最小的奇异值的比值)很 ...
- cs231n spring 2017 lecture13 Generative Models
1. 非监督学习 监督学习有数据有标签,目的是学习数据和标签之间的映射关系.而无监督学习只有数据,没有标签,目的是学习数据额隐藏结构. 2. 生成模型(Generative Models) 已知训练数 ...
- cs231n spring 2017 lecture11 Detection and Segmentation
1. Semantic Segmentation 把每个像素分类到某个语义. 为了减少运算量,会先降采样再升采样.降采样一般用池化层,升采样有各种“Unpooling”.“Transpose Conv ...
- cs231n spring 2017 lecture9 CNN Architectures
参考<deeplearning.ai 卷积神经网络 Week 2 听课笔记>. 1. AlexNet(Krizhevsky et al. 2012),8层网络. 学会计算每一层的输出的sh ...
- cs231n spring 2017 lecture7 Training Neural Networks II
1. 优化: 1.1 随机梯度下降法(Stochasitc Gradient Decent, SGD)的问题: 1)对于condition number(Hessian矩阵最大和最小的奇异值的比值)很 ...
- cs231n spring 2017 lecture16 Adversarial Examples and Adversarial Training 听课笔记
(没太听明白,以后再听) 1. 如何欺骗神经网络? 这部分研究最开始是想探究神经网络到底是如何工作的.结果人们意外的发现,可以只改变原图一点点,人眼根本看不出变化,但是神经网络会给出完全不同的答案.比 ...
随机推荐
- windows切换mac遇到的问题
1. 前端代码需要安装npm包 所以需要对整个文件夹都赋予管理员权限 2. 在npm i的时候如果权限不足 查看是哪一行调用了哪个文件夹,赋予权限 3. Dsp-fe 本地环境 除了需要配置host ...
- JS代码实现复制功能
本人没什么基础看了好久百度,不知道为什么在百度上问一个js实现copy功能会多出那么多代码出来,感觉废话一堆效果还没能达到需要复制 的效果. 然而在我看来,js复制代码 无非就那么几句罢了.原生cop ...
- 【朝花夕拾】Android自定义View篇之(十一)View的滑动,弹性滑动与自定义PagerView
前言 由于手机屏幕尺寸有限,但是又经常需要在屏幕中显示大量的内容,这就使得必须有部分内容显示,部分内容隐藏.这就需要用一个Android中很重要的概念——滑动.滑动,顾名思义就是view从一个地方移动 ...
- request 中url拼接排序参数与签名算法
一.参数要求: { appId:应用在后台创建应用时分配的应用编号,与应用密钥一一对应 sign:按照当前请求参数名的字母序进行升序排列(排序时区分大小写,除sign外,其它值不为空的参数都参与签名) ...
- python爬虫笔记之re.IGNORECASE
re.IGNORECASE有什么用?re.IGNORECASE是什么意思?(原谅我抓下seo..) 这里自己总结下: re.IGNORECASE是compile函数中的一个匹配模式. re.IGNOR ...
- linux初学者-普通磁盘分区篇
linux初学者-普通磁盘分区篇 磁盘是计算机的重要组成部分,是记录数据的场所.在使用磁盘时,经常需要对其进行分区来实现不同的用途.下文将介绍在linux系统中普通磁盘分区的方法. "fdi ...
- typescript 公共,私有与受保护的修饰符
public理解 当你在程序中没有指明修饰符时,默认为public,也就是在类内类外都可以访问,我们以下面的例子来解释. class Person{ name:string sex:string ag ...
- spark 源码分析之九--Spark RPC剖析之StreamManager和RpcHandler
StreamManager StreamManager类说明 StreamManager 官方说明如下: The StreamManager is used to fetch individual c ...
- LeetCode: 3 无重复字符的最长子串 (Java)
3. 无重复字符的最长子串 https://leetcode-cn.com/problems/longest-substring-without-repeating-characters/ 最初始的解 ...
- 实现跳转的jsp小例子
<%@page import="java.io.UnsupportedEncodingException"%> <%@ page language="j ...
