WebGPU学习(六):学习“rotatingCube”示例
大家好,本文学习Chrome->webgpu-samplers->rotatingCube示例。
上一篇博文:
WebGPU学习(五): 现代图形API技术要点和WebGPU支持情况调研
下一篇博文:
WebGPU学习(七):学习“twoCubes”和“instancedCube”示例
学习rotatingCube.ts
我们已经学习了“绘制三角形”的示例,与它相比,本示例增加了以下的内容:
- 增加一个uniform buffer object(简称为ubo),用于传输“model矩阵 乘以 view矩阵 乘以 projection矩阵”的结果矩阵(简称为mvp矩阵),并在每帧被更新
- 设置顶点
- 开启面剔除
- 开启深度测试
下面,我们打开rotatingCube.ts文件,依次来看下新增内容:
增加一个uniform buffer object
介绍
在WebGL 1中,我们通过uniform1i,uniform4fv等函数传递每个gameObject对应的uniform变量(如diffuseMap, diffuse color, model matrix等)到shader中。
其中很多相同的值是不需要被传递的,举例如下:
如果gameObject1和gameObject3使用同一个shader1,它们的diffuse color相同,那么只需要传递其中的一个diffuse color,而在WebGL 1中我们一般把这两个diffuse color都传递了,造成了重复的开销。
WebGPU使用uniform buffer object来传递uniform变量。uniform buffer是一个全局的buffer,我们只需要设置一次值,然后在每次draw之前,设置使用的数据范围(通过offset, size来设置),从而复用相同的数据。如果uniform值有变化,则只需要修改uniform buffer对应的数据。
在WebGPU中,我们可以把所有gameObject的model矩阵设为一个ubo,所有相机的view和projection矩阵设为一个ubo,每一种material(如phong material,pbr material等)的数据(如diffuse color,specular color等)设为一个ubo,每一种light(如direction light、point light等)的数据(如light color、light position等)设为一个ubo,这样可以有效减少uniform变量的传输开销。
另外,我们需要注意ubo的内存布局:
默认的布局为std140,我们可以粗略地理解为,它约定了每一列都有4个元素。
我们来举例说明:
下面的ubo对应的uniform block,定义布局为std140:
layout (std140) uniform ExampleBlock

{

    float value;

    vec3  vector;

    mat4  matrix;

    float values[3];

    bool  boolean;

    int   integer;

};
它在内存中的实际布局为:
layout (std140) uniform ExampleBlock

{

                     // base alignment  // aligned offset

    float value;     // 4               // 0

    vec3 vector;     // 16              // 16  (must be multiple of 16 so 4->16)

    mat4 matrix;     // 16              // 32  (column 0)

                     // 16              // 48  (column 1)

                     // 16              // 64  (column 2)

                     // 16              // 80  (column 3)

    float values[3]; // 16              // 96  (values[0])

                     // 16              // 112 (values[1])

                     // 16              // 128 (values[2])

    bool boolean;    // 4               // 144

    int integer;     // 4               // 148

};
也就是说,这个ubo的第一个元素为value,第2-4个元素为0(为了对齐);
第5-7个元素为vector的x、y、z的值,第8个元素为0;
第9-24个元素为matrix的值(列优先);
第25-27个元素为values数组的值,第28个元素为0;
第29个元素为boolean转为float的值,第30-32个元素为0;
第33个元素为integer转为float的值,第34-36个元素为0。
分析本示例对应的代码
- 在vertex shader中定义uniform block
代码如下:
  const vertexShaderGLSL = `#version 450

  layout(set = 0, binding = 0) uniform Uniforms {

    mat4 modelViewProjectionMatrix;

  } uniforms;

  ...

  void main() {

    gl_Position = uniforms.modelViewProjectionMatrix * position;

    fragColor = color;

  }

  `;
布局为默认的std140,指定了set和binding,包含一个mvp矩阵
其中set和binding用来对应相应的数据,会在后面说明
- 创建uniformsBindGroupLayout
代码如下:
  const uniformsBindGroupLayout = device.createBindGroupLayout({

    bindings: [{

      binding: 0,

      visibility: 1,

      type: "uniform-buffer"

    }]

  });
binding对应vertex shader中uniform block的binding,意思是bindings数组的第一个元素的对应binding为0的uniform block
visibility为GPUShaderStage.VERTEX(等于1),指定type为“uniform-buffer”
- 创建uniform buffer
代码如下:
  const uniformBufferSize = 4 * 16; // BYTES_PER_ELEMENT(4) * matrix length(4 * 4 = 16)

  const uniformBuffer = device.createBuffer({

    size: uniformBufferSize,

    usage: GPUBufferUsage.UNIFORM | GPUBufferUsage.COPY_DST,

  });
- 创建uniform bind group
代码如下:
  const uniformBindGroup = device.createBindGroup({

    layout: uniformsBindGroupLayout,

    bindings: [{

      binding: 0,

      resource: {

        buffer: uniformBuffer,

      },

    }],

  });
binding对应vertex shader中uniform block的binding,意思是bindings数组的第一个元素的对应binding为0的uniform block
- 每一帧更新uniform buffer的mvp矩阵数据
代码如下:
  //因为是固定相机,所以只需要计算一次projection矩阵

  const aspect = Math.abs(canvas.width / canvas.height);

  let projectionMatrix = mat4.create();

  mat4.perspective(projectionMatrix, (2 * Math.PI) / 5, aspect, 1, 100.0);

  ...

  //计算mvp矩阵

  function getTransformationMatrix() {

    let viewMatrix = mat4.create();

    mat4.translate(viewMatrix, viewMatrix, vec3.fromValues(0, 0, -5));

    let now = Date.now() / 1000;

    mat4.rotate(viewMatrix, viewMatrix, 1, vec3.fromValues(Math.sin(now), Math.cos(now), 0));

    let modelViewProjectionMatrix = mat4.create();

    mat4.multiply(modelViewProjectionMatrix, projectionMatrix, viewMatrix);

    return modelViewProjectionMatrix;

  }

  ...

  return function frame() {

    //使用setSubData更新uniform buffer,后面分析

    uniformBuffer.setSubData(0, getTransformationMatrix());

    ...

  }
- draw之前设置bind group
代码如下:
  return function frame() {

    ...

    //“0”对应vertex shader中uniform block的“set = 0”

    passEncoder.setBindGroup(0, uniformBindGroup);

    passEncoder.draw(36, 1, 0, 0);

    ...

  }
详细分析“更新uniform buffer”
本示例使用setSubData来更新uniform buffer:
  return function frame() {

    uniformBuffer.setSubData(0, getTransformationMatrix());

    ...

  }
我们在WebGPU学习(五): 现代图形API技术要点和WebGPU支持情况调研->Approaching zero driver overhead->persistent map buffer中,提到了WebGPU目前有两种方法实现“CPU把数据传输到GPU“,即更新GPUBuffer的值:
1.调用GPUBuffer->setSubData方法
2.使用persistent map buffer技术
这里使用了第1种方法。
我们看下如何在本示例中使用第2种方法:
function setBufferDataByPersistentMapBuffer(device, commandEncoder, uniformBufferSize, uniformBuffer, mvpMatricesData) {

    const [srcBuffer, arrayBuffer] = device.createBufferMapped({

        size: uniformBufferSize,

        usage: GPUBufferUsage.COPY_SRC

    });

    new Float32Array(arrayBuffer).set(mvpMatricesData);

    srcBuffer.unmap();

    commandEncoder.copyBufferToBuffer(srcBuffer, 0, uniformBuffer, 0, uniformBufferSize);

    const commandBuffer = commandEncoder.finish();

    const queue = device.defaultQueue;

    queue.submit([commandBuffer]);

    srcBuffer.destroy();

}

return function frame() {

    //uniformBuffer.setSubData(0, getTransformationMatrix());

     ...

    const commandEncoder = device.createCommandEncoder({});

    setBufferDataByPersistentMapBuffer(device, commandEncoder, uniformBufferSize, uniformBuffer, getTransformationMatrix());

     ...

}
为了验证性能,我做了benchmark测试,创建一个包含160000个mat4的ubo,使用这2种方法来更新uniform buffer,比较它们的js profile:
使用setSubData(调用setBufferDataBySetSubData函数):
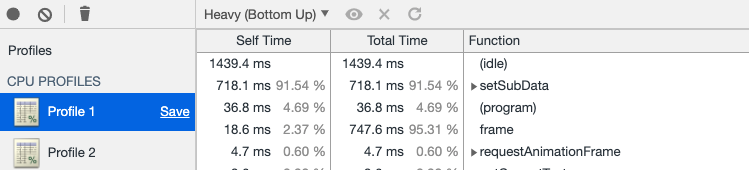
setSubData占91.54%
使用persistent map buffer(调用setBufferDataByPersistentMapBuffer函数):
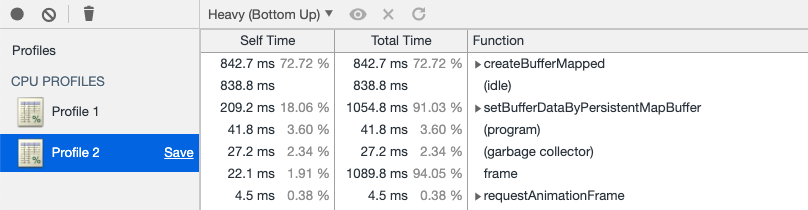
createBufferMapped和setBufferDataByPersistentMapBuffer占72.72+18.06=90.78%
可以看到两个的性能差不多。但考虑到persistent map buffer从实现原理上要更快(cpu和gpu共用一个buffer,不需要copy),因此应该优先使用该方法。
另外,WebGPU社区现在还在讨论如何优化更新buffer数据(如有人提出增加GPUUploadBuffer pass),因此我们还需要继续关注该方面的进展。
参考资料
Advanced-GLSL->Uniform buffer objects
设置顶点
- 传输顶点的position和color数据到vertex shader的attribute(在glsl 4.5中用“in”表示attribute)中
代码如下:
  const vertexShaderGLSL = `#version 450

  ...

  layout(location = 0) in vec4 position;

  layout(location = 1) in vec4 color;

  layout(location = 0) out vec4 fragColor;

  void main() {

    gl_Position = uniforms.modelViewProjectionMatrix * position;

    fragColor = color;

  }

  const fragmentShaderGLSL = `#version 450

  layout(location = 0) in vec4 fragColor;

  layout(location = 0) out vec4 outColor;

  void main() {

    outColor = fragColor;

  }

  `;
在vertex shader中设置color为fragColor(在glsl 4.5中用“out”表示WebGL 1的varying变量),然后在fragment shader中接收fragColor,将其设置为outColor,从而将fragment的color设置为对应顶点的color
- 创建vertices buffer,设置立方体的顶点数据
代码如下:
cube.ts:

//每个顶点包含position,color,uv数据

//本示例没用到uv数据

export const cubeVertexArray = new Float32Array([

    // float4 position, float4 color, float2 uv,

    1, -1, 1, 1,   1, 0, 1, 1,  1, 1,

    -1, -1, 1, 1,  0, 0, 1, 1,  0, 1,

    -1, -1, -1, 1, 0, 0, 0, 1,  0, 0,

    1, -1, -1, 1,  1, 0, 0, 1,  1, 0,

    1, -1, 1, 1,   1, 0, 1, 1,  1, 1,

    -1, -1, -1, 1, 0, 0, 0, 1,  0, 0,

    1, 1, 1, 1,    1, 1, 1, 1,  1, 1,

    1, -1, 1, 1,   1, 0, 1, 1,  0, 1,

    1, -1, -1, 1,  1, 0, 0, 1,  0, 0,

    1, 1, -1, 1,   1, 1, 0, 1,  1, 0,

    1, 1, 1, 1,    1, 1, 1, 1,  1, 1,

    1, -1, -1, 1,  1, 0, 0, 1,  0, 0,

    -1, 1, 1, 1,   0, 1, 1, 1,  1, 1,

    1, 1, 1, 1,    1, 1, 1, 1,  0, 1,

    1, 1, -1, 1,   1, 1, 0, 1,  0, 0,

    -1, 1, -1, 1,  0, 1, 0, 1,  1, 0,

    -1, 1, 1, 1,   0, 1, 1, 1,  1, 1,

    1, 1, -1, 1,   1, 1, 0, 1,  0, 0,

    -1, -1, 1, 1,  0, 0, 1, 1,  1, 1,

    -1, 1, 1, 1,   0, 1, 1, 1,  0, 1,

    -1, 1, -1, 1,  0, 1, 0, 1,  0, 0,

    -1, -1, -1, 1, 0, 0, 0, 1,  1, 0,

    -1, -1, 1, 1,  0, 0, 1, 1,  1, 1,

    -1, 1, -1, 1,  0, 1, 0, 1,  0, 0,

    1, 1, 1, 1,    1, 1, 1, 1,  1, 1,

    -1, 1, 1, 1,   0, 1, 1, 1,  0, 1,

    -1, -1, 1, 1,  0, 0, 1, 1,  0, 0,

    -1, -1, 1, 1,  0, 0, 1, 1,  0, 0,

    1, -1, 1, 1,   1, 0, 1, 1,  1, 0,

    1, 1, 1, 1,    1, 1, 1, 1,  1, 1,

    1, -1, -1, 1,  1, 0, 0, 1,  1, 1,

    -1, -1, -1, 1, 0, 0, 0, 1,  0, 1,

    -1, 1, -1, 1,  0, 1, 0, 1,  0, 0,

    1, 1, -1, 1,   1, 1, 0, 1,  1, 0,

    1, -1, -1, 1,  1, 0, 0, 1,  1, 1,

    -1, 1, -1, 1,  0, 1, 0, 1,  0, 0,

]);
rotatingCube.ts:

  const verticesBuffer = device.createBuffer({

    size: cubeVertexArray.byteLength,

    usage: GPUBufferUsage.VERTEX | GPUBufferUsage.COPY_DST

  });

  verticesBuffer.setSubData(0, cubeVertexArray);
因为只需要设置一次顶点数据,所以这里可以使用setSubData来设置GPUBuffer的数据,对性能影响不大
- 创建render pipeline时,指定vertex shader的attribute
代码如下:
cube.ts:

export const cubeVertexSize = 4 * 10; // Byte size of one cube vertex.

export const cubePositionOffset = 0;

export const cubeColorOffset = 4 * 4; // Byte offset of cube vertex color attribute.
rotatingCube.ts:

  const pipeline = device.createRenderPipeline({

    ...

    vertexState: {

      vertexBuffers: [{

        arrayStride: cubeVertexSize,

        attributes: [{

          // position

          shaderLocation: 0,

          offset: cubePositionOffset,

          format: "float4"

        }, {

          // color

          shaderLocation: 1,

          offset: cubeColorOffset,

          format: "float4"

        }]

      }],

    },

    ...

  });
- render pass->draw指定顶点个数为36
代码如下:
  return function frame() {

    ...

    const passEncoder = commandEncoder.beginRenderPass(renderPassDescriptor);

    ...

    passEncoder.draw(36, 1, 0, 0);

    passEncoder.endPass();

    ...

  }
开启面剔除
相关代码为:
  const pipeline = device.createRenderPipeline({

    ...

    rasterizationState: {

      cullMode: 'back',

    },

    ...

  });
相关的定义为:
enum GPUFrontFace {

    "ccw",

    "cw"

};

enum GPUCullMode {

    "none",

    "front",

    "back"

};

...

dictionary GPURasterizationStateDescriptor {

    GPUFrontFace frontFace = "ccw";

    GPUCullMode cullMode = "none";

    ...

};
其中ccw表示逆时针,cw表示顺时针;frontFace用来设置哪个方向是“front”(正面);cullMode用来设置将哪一面剔除掉。
因为本示例没有设置frontFace,因此frontFace为默认的ccw,即将顶点连接的逆时针方向设置为正面;
又因为本示例设置了cullMode为back,那么反面的顶点(即顺时针连接的顶点)会被剔除掉。
参考资料
[WebGL入门]六,顶点和多边形
Investigation: Rasterization State
开启深度测试
现在分析相关代码,忽略与模版测试相关的代码:
- 创建render pipeline时,设置depthStencilState
代码如下:
  const pipeline = device.createRenderPipeline({

    ...

    depthStencilState: {

      //开启深度测试

      depthWriteEnabled: true,

      //设置比较函数为less,后面会说明

      depthCompare: "less",

      //设置depth为24bit

      format: "depth24plus-stencil8",

    },

    ...

  });
- 创建depth texture(注意它的size->depth为1),将它的view设置为render pass -> depthStencilAttachment -> attachment
代码如下:
  const depthTexture = device.createTexture({

    size: {

      width: canvas.width,

      height: canvas.height,

      depth: 1

    },

    format: "depth24plus-stencil8",

    usage: GPUTextureUsage.OUTPUT_ATTACHMENT

  });

  const renderPassDescriptor: GPURenderPassDescriptor = {

    ...

    depthStencilAttachment: {

      attachment: depthTexture.createView(),

      depthLoadValue: 1.0,

      depthStoreOp: "store",

      ...

    }

  };
其中,depthStencilAttachment的定义为:
dictionary GPURenderPassDepthStencilAttachmentDescriptor {

    required GPUTextureView attachment;

    required (GPULoadOp or float) depthLoadValue;

    required GPUStoreOp depthStoreOp;

    ...

};
depthLoadValue和depthStoreOp与WebGPU学习(二): 学习“绘制一个三角形”示例->分析render pass->colorAttachment的loadOp和StoreOp类似,我们来看下相关的代码:
  const pipeline = device.createRenderPipeline({

    ...

    depthStencilState: {

      ...

      depthCompare: "less",

      ...

    },

    ...

  });

  ...

  const renderPassDescriptor: GPURenderPassDescriptor = {

    ...

    depthStencilAttachment: {

      ...

      depthLoadValue: 1.0,

      depthStoreOp: "store",

      ...

    }

  };
在深度测试时,gpu会将fragment的z值(范围为[0.0-1.0])与这里设置的depthLoadValue值(这里为1.0)比较。其中使用depthCompare定义的函数(这里为less,意思是所有z值大于等于1.0的fragment会被剔除)进行比较。
参考资料
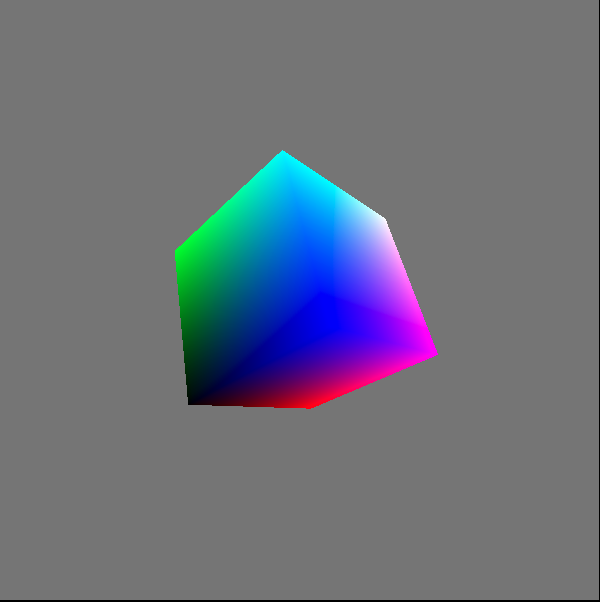
最终渲染结果
参考资料
WebGPU规范
webgpu-samplers Github Repo
WebGPU-5
WebGPU学习(六):学习“rotatingCube”示例的更多相关文章
- WebGPU学习(七):学习“twoCubes”和“instancedCube”示例
大家好,本文学习Chrome->webgpu-samplers->twoCubes和instancedCube示例. 这两个示例都与"rotatingCube"示例差不 ...
- C#多线程学习(六) 互斥对象
如何控制好多个线程相互之间的联系,不产生冲突和重复,这需要用到互斥对象,即:System.Threading 命名空间中的 Mutex 类. 我们可以把Mutex看作一个出租车,乘客看作线程.乘客首先 ...
- Hbase深入学习(六) Java操作HBase
Hbase深入学习(六) ―― Java操作HBase 本文讲述如何用hbase shell命令和hbase java api对hbase服务器进行操作. 先看以下读取一行记录hbase是如何进行工作 ...
- TweenMax动画库学习(六)
目录 TweenMax动画库学习(一) TweenMax动画库学习(二) TweenMax动画库学习(三) Tw ...
- Deep Learning(深度学习)学习笔记整理系列之(六)
Deep Learning(深度学习)学习笔记整理系列 zouxy09@qq.com http://blog.csdn.net/zouxy09 作者:Zouxy version 1.0 2013-04 ...
- SVG 学习<六> SVG的transform
目录 SVG 学习<一>基础图形及线段 SVG 学习<二>进阶 SVG世界,视野,视窗 stroke属性 svg分组 SVG 学习<三>渐变 SVG 学习<四 ...
- Angular 快速学习笔记(1) -- 官方示例要点
创建组件 ng generate component heroes {{ hero.name }} {{}}语法绑定数据 管道pipe 格式化数据 <h2>{{ hero.name | u ...
- SQL 数据库 学习 007 通过一个示例简单介绍什么是字段、属性、列、元组、记录、表、主键、外键 (上)
SQL 数据库 学习 007 通过一个示例简单介绍什么是字段.属性.列.元组.记录.表.主键.外键 (上) 我们来介绍一下:数据库是如何存储数据的. 数据库是如何存储数据的 来看一个小例子 scott ...
- Unity学习(六)5.x依赖打包
http://blog.sina.com.cn/s/blog_89d90b7c0102w2ox.html unity5已经封装好了接口,所以依赖打包并没有那么神秘和复杂了. 打包: 1.定义好资源的a ...
随机推荐
- 小白学 Python 爬虫(4):前置准备(三)Docker基础入门
人生苦短,我用 Python 前文传送门: 小白学 Python 爬虫(1):开篇 小白学 Python 爬虫(2):前置准备(一)基本类库的安装 小白学 Python 爬虫(3):前置准备(二)Li ...
- JVM 问题排查和性能优化常用的 JDK 工具
JDK 提供了一系列用于监控.诊断 Java 进程的工具,它们在 JDK 安装目录的 bin 目录下,有 jps.jcmd.jstack.jinfo.jmap 等.其中jmc.jconsole.jvi ...
- python遍历所有盘符下的图片并拷贝下来
最近在学习python,闲着无聊就试着写啦这个小的脚本,虽然有很多不足,但是还是收获不少. 该脚本的功能: ①遍历本地计算机中的所有盘符,并将名称记录下来: ②循环遍历盘符下的所有图片(当然这里可以根 ...
- MySql 表索引设计原则
索引的优点 1.加快数据的检索速度,这是创建索引的最主要的原因; 2.通过创建唯一性索引,可以保证数据库表中每一行数据的唯一性; 3.加速表和表之间的连接; 4.在使用分组和排序子句进行数据检索时,可 ...
- 算法上机题目mergesort,priority queue,Quicksort,divide and conquer
1.Implement exercise 2.3-7. 2. Implement priority queue. 3. Implement Quicksort and answer the follo ...
- JS 输出指定范围内的随机数
/* 自定义函数 */ function GetRandomNum(Min,Max){ var Range = Max - Min; var Rand = Math.random(); return( ...
- 【网络流相关】最大流的Dinic算法实现
Luogu P3376 于\(EK\)算法求最大流时每一次只求一条增广路,时间复杂度会比较高.尽管实际应用中表现比较优秀,但是有一些题目还是无法通过. 那么我们就会使用\(Dinic\)算法实现多路增 ...
- Leecode_98_Validate_Binary_Search_Tree
Given a binary tree, determine if it is a valid binary search tree (BST). Assume a BST is defined as ...
- 一道题反映Java的类初始化过程
Java的类初始化过程: 1. 父类的static成员变量,static语句块. 2. 子类的static成员变量,static语句块. 3. 父类的普通成员变量,构造函数. 4. 子类的普通成员变量 ...
- std::unique_ptr的用法
std::ofstream("demo.txt") << 'x'; // 准备要读的文件 { std::unique_ptr<std::FILE, decltyp ...