微服务SpringCloud之Spring Cloud Config配置中心Git
微服务以单个接口为颗粒度,一个接口可能就是一个项目,如果每个项目都包含一个配置文件,一个系统可能有几十或上百个小项目组成,那配置文件也会有好多,对后续修改维护也是比较麻烦,就和前面的服务注册一样,服务注册与发现是将服务从分散到中心化,而今天的配置中心是将配置文件从分散到中心化,这样便于后续维护。本篇主要以git为例学习使用Spring Cloud Config配置中心。
一、配置中心介绍
在我们了解spring cloud config之前,我可以想想一个配置中心提供的核心功能应该有什么
- 提供服务端和客户端支持
- 集中管理各环境的配置文件
- 配置文件修改之后,可以快速的生效
- 可以进行版本管理
- 支持大的并发查询
- 支持各种语言
Spring Cloud Config可以完美的支持以上所有的需求。
Spring Cloud Config项目是一个解决分布式系统的配置管理方案。它包含了Client和Server两个部分,server提供配置文件的存储、以接口的形式将配置文件的内容提供出去,client通过接口获取数据、并依据此数据初始化自己的应用。Spring cloud使用git或svn存放配置文件,默认情况下使用git,我们先以git为例做一套示例。
二、Server 端
1.准备配置文件
为了演示spring cloud config的使用,这里在github()上创建了config-repo(https://github.com/ywcui/config-repo)仓库.然后在该仓库下创建了3个配置文件neo-config-dev.properties、neo-config-pro.properties、neo-config-test.properties,每个配置文件都设置了属性neo.hello,value分别对应i am dev,i am pro,i am test。
2.创建Spring Cloud Config Server
创建Spring Boot项目并引入Spring Cloud Config Server,具体pom.xml如下:
<?xml version="1.0" encoding="UTF-8"?>

<project xmlns="http://maven.apache.org/POM/4.0.0" xmlns:xsi="http://www.w3.org/2001/XMLSchema-instance"

    xsi:schemaLocation="http://maven.apache.org/POM/4.0.0 http://maven.apache.org/xsd/maven-4.0.0.xsd">

    <modelVersion>4.0.0</modelVersion>

    <parent>

        <groupId>org.springframework.boot</groupId>

        <artifactId>spring-boot-starter-parent</artifactId>

        <version>2.1.6.RELEASE</version>

        <relativePath/> <!-- lookup parent from repository -->

    </parent>

    <groupId>com.example</groupId>

    <artifactId>SpringCloudConfigServer</artifactId>

    <version>0.0.1-SNAPSHOT</version>

    <packaging>war</packaging>

    <name>SpringCloudConfigServer</name>

    <description>Demo project for Spring Boot</description>

    <properties>

        <java.version>1.8</java.version>

        <spring-cloud.version>Greenwich.SR2</spring-cloud.version>

    </properties>

    <dependencies>

        <dependency>

            <groupId>org.springframework.boot</groupId>

            <artifactId>spring-boot-starter-web</artifactId>

        </dependency>

        <dependency>

            <groupId>org.springframework.cloud</groupId>

            <artifactId>spring-cloud-config-server</artifactId>

        </dependency>

        <dependency>

            <groupId>org.springframework.boot</groupId>

            <artifactId>spring-boot-starter-tomcat</artifactId>

            <scope>provided</scope>

        </dependency>

        <dependency>

            <groupId>org.springframework.boot</groupId>

            <artifactId>spring-boot-starter-test</artifactId>

            <scope>test</scope>

        </dependency>

    </dependencies>

    <dependencyManagement>

        <dependencies>

            <dependency>

                <groupId>org.springframework.cloud</groupId>

                <artifactId>spring-cloud-dependencies</artifactId>

                <version>${spring-cloud.version}</version>

                <type>pom</type>

                <scope>import</scope>

            </dependency>

        </dependencies>

    </dependencyManagement>

    <build>

        <plugins>

            <plugin>

                <groupId>org.springframework.boot</groupId>

                <artifactId>spring-boot-maven-plugin</artifactId>

            </plugin>

        </plugins>

    </build>

</project>
3.设置配置文件
在配置文件中做如下配置:
server.port=8001

spring.application.name=spring-cloud-config-server

spring.cloud.config.server.git.uri=https://github.com/ywcui/config-repo

spring.cloud.config.server.git.search-paths=

spring.cloud.config.server.git.username=用户名

spring.cloud.config.server.git.password=密码
Spring Cloud Config也提供本地存储配置的方式。我们只需要设置属性spring.profiles.active=native,Config Server会默认从应用的src/main/resource目录下检索配置文件。也可以通过spring.cloud.config.server.native.searchLocations=file:E:/properties/属性来指定配置文件的位置。虽然Spring Cloud Config提供了这样的功能,但是为了支持更好的管理内容和版本控制的功能,还是推荐使用git的方式。
4.启动类设置
只需在启动类中添加@EnableConfigServer即可。
5.测试
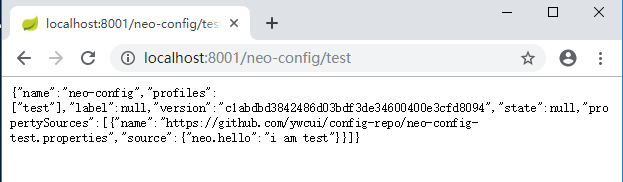
首先我们先要测试server端是否可以读取到github上面的配置信息,直接访问:http://localhost:8001/neo-config/test
返回信息如下:
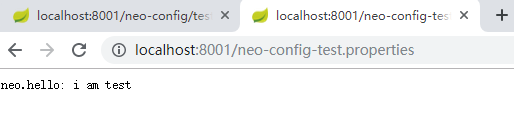
如果直接查看配置文件中的配置信息可访问:http://localhost:8001/neo-config-test.properties,返回:neo.hello: i am test
仓库中的配置文件会被转换成web接口,访问可以参照以下的规则:
- /{application}/{profile}[/{label}]
- /{application}-{profile}.yml
- /{label}/{application}-{profile}.yml
- /{application}-{profile}.properties
- /{label}/{application}-{profile}.properties
三、Client端
1.创建创建Spring Cloud Config Client
创建Spring Boot项目并引入Spring Cloud Config Client,具体pom.xml如下:
<?xml version="1.0" encoding="UTF-8"?>

<project xmlns="http://maven.apache.org/POM/4.0.0" xmlns:xsi="http://www.w3.org/2001/XMLSchema-instance"

    xsi:schemaLocation="http://maven.apache.org/POM/4.0.0 http://maven.apache.org/xsd/maven-4.0.0.xsd">

    <modelVersion>4.0.0</modelVersion>

    <parent>

        <groupId>org.springframework.boot</groupId>

        <artifactId>spring-boot-starter-parent</artifactId>

        <version>2.1.6.RELEASE</version>

        <relativePath/> <!-- lookup parent from repository -->

    </parent>

    <groupId>com.example</groupId>

    <artifactId>SpringCloudConfigClient</artifactId>

    <version>0.0.1-SNAPSHOT</version>

    <packaging>war</packaging>

    <name>SpringCloudConfigClient</name>

    <description>Demo project for Spring Boot</description>

    <properties>

        <java.version>1.8</java.version>

        <spring-cloud.version>Greenwich.SR2</spring-cloud.version>

    </properties>

    <dependencies>

        <dependency>

            <groupId>org.springframework.boot</groupId>

            <artifactId>spring-boot-starter-web</artifactId>

        </dependency>

        <dependency>

            <groupId>org.springframework.cloud</groupId>

            <artifactId>spring-cloud-starter-config</artifactId>

        </dependency>

        <dependency>

            <groupId>org.springframework.boot</groupId>

            <artifactId>spring-boot-starter-tomcat</artifactId>

            <scope>provided</scope>

        </dependency>

        <dependency>

            <groupId>org.springframework.boot</groupId>

            <artifactId>spring-boot-starter-test</artifactId>

            <scope>test</scope>

        </dependency>

    </dependencies>

    <dependencyManagement>

        <dependencies>

            <dependency>

                <groupId>org.springframework.cloud</groupId>

                <artifactId>spring-cloud-dependencies</artifactId>

                <version>${spring-cloud.version}</version>

                <type>pom</type>

                <scope>import</scope>

            </dependency>

        </dependencies>

    </dependencyManagement>

    <build>

        <plugins>

            <plugin>

                <groupId>org.springframework.boot</groupId>

                <artifactId>spring-boot-maven-plugin</artifactId>

            </plugin>

        </plugins>

    </build>

</project>
2.设置配置文件
准备application.properties、bootstrap.properties两个配置文件
application.properties:
spring.application.name=spring-cloud-config-client

server.port=8002
bootstrap.properties:
spring.cloud.config.name=neo-config

spring.cloud.config.profile=test

spring.cloud.config.uri=http://localhost:8001/

spring.cloud.config.label=master
spring.application.name:对应{application}部分
spring.cloud.config.profile:对应{profile}部分
spring.cloud.config.label:对应git的分支。如果配置中心使用的是本地存储,则该参数无用
spring.cloud.config.uri:配置中心的具体地址
spring.cloud.config.discovery.service-id:指定配置中心的service-id,便于扩展为高可用配置集群。
上面这些与spring-cloud相关的属性必须配置在bootstrap.properties中,config部分内容才能被正确加载。因为config的相关配置会先于application.properties,而bootstrap.properties的加载也是先于application.properties。
3.创建HelloController
在HelloController中使用@Value注入属性neo.hello。
package com.example.demo;

import org.springframework.beans.factory.annotation.Value;

import org.springframework.web.bind.annotation.RequestMapping;

import org.springframework.web.bind.annotation.RestController;

@RestController

public class HelloController {

    @Value("${neo.hello}")

    private String hello;

    @RequestMapping("/hello")

    public String from() {

        return this.hello;

    }

}
4.测试
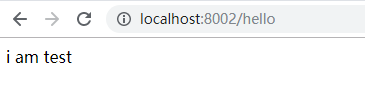
在浏览器中输入http://localhost:8002/hello,则显示下图所示。
参考:http://www.ityouknow.com/springcloud/2017/05/22/springcloud-config-git.html
微服务SpringCloud之Spring Cloud Config配置中心Git的更多相关文章
- 微服务SpringCloud之Spring Cloud Config配置中心服务化
在前面两篇Spring Cloud Config配置中心的博客中都是需要指定配置服务的地址url:spring.cloud.config.uri,客户端都是直接调用配置中心的server端来获取配置文 ...
- 微服务SpringCloud之Spring Cloud Config配置中心SVN
在回来的路上看到一个个的都抱着花,吃了一路的狗粮,原本想着去旁边的工业园里跑跑步呢,想想还是算了,人家过七夕,俺们过巴西.上一博客学习了Spring Cloud Config使用git作为配置中心,本 ...
- 跟我学SpringCloud | 第七篇:Spring Cloud Config 配置中心高可用和refresh
SpringCloud系列教程 | 第七篇:Spring Cloud Config 配置中心高可用和refresh Springboot: 2.1.6.RELEASE SpringCloud: Gre ...
- spring cloud --- config 配置中心 [本地、git获取配置文件]
spring boot 1.5.9.RELEASE spring cloud Dalston.SR1 1.前言 spring cloud config 配置中心是什么? 为了统一管理配 ...
- SpringCloud学习笔记(7):使用Spring Cloud Config配置中心
简介 Spring Cloud Config为分布式系统中的外部化配置提供了服务器端和客户端支持,服务器端统一管理所有配置文件,客户端在启动时从服务端获取配置信息.服务器端有多种配置方式,如将配置文件 ...
- Spring Cloud Config 配置中心实践过程中,你需要了解这些细节!
本文导读: Spring Cloud Config 基本概念 Spring Cloud Config 客户端加载流程 Spring Cloud Config 基于消息总线配置 Spring Cloud ...
- Spring Cloud Config 配置中心高可用
详细参见 <Spring Cloud 与 Docker微服务架构实战> p163-9.10 Spring Cloud Config 与 Eureka 配合使用 p163-9.12 Conf ...
- Spring Cloud Config 配置中心 自动加解密功能 jasypt方式
使用此种方式会存在一种问题:如果我配置了自动配置刷新,则刷新过后,加密过后的密文无法被解密.具体原因分析,看 SpringCloud 详解配置刷新的原理 使用 jasypt-spring-boot- ...
- Spring Cloud Config 配置中心
请将远程配置文件的格式写对: 比如使用 *.yml 或者 *.properties yml: testconfig: testvalue properties: testconfig=testvalu ...
随机推荐
- 【Linux】一步一步学Linux——VMware虚拟机三种网络模式详解(07)
目录 00. 目录 01. 虚拟网络连接组件 02. 常见网络连接配置 03. 桥接模式 04. NAT 模式 05. 仅主机模式 06. 自定义模式 07. 附录 00. 目录 @ 01. 虚拟网络 ...
- TCP UDP (转)
互连网早期的时候,主机间的互连使用的是NCP协议.这种协议本身有很多缺陷,如:不能互连不同的主机,不能互连不同的操作系统,没有纠错功能.为了改善这种缺点,大牛弄出了TCP/IP协议.现在几乎所有的操作 ...
- java高并发系列-第1天:必须知道的几个概念
java高并发系列-第1天:必须知道的几个概念 同步(Synchronous)和异步(Asynchronous) 同步和异步通常来形容一次方法调用,同步方法调用一旦开始,调用者必须等到方法调用返回后, ...
- Autocad2017破解版下载|Autodesk Autocad 2017中文破解版下载 64位(附注册机/序列号)
Autocad2017是Autodesk公司开发的自动计算机辅助设计软件,可用于二维绘图.详细绘制.设计文档和基本三维设计,它具有良好的用户界面,允许用户通过交互菜单或命令行方式来进行各种操作,包括图 ...
- 9.22考试 crf的视察 题解
这道题当时第一反应就是一道典型的NOIP第一题的难度,绝对要A掉,不然分数一定会被拉开. 然后就开始分析,暴力是一开始想的是用二维树状数组打加上暴力枚举长度,然而这道题满足二分性质,所以时间复杂度就是 ...
- Vue状态管理之Bus
一般在项目中,状态管理都是使用Vue官方提供的Vuex 当在多组件之间共享状态变得复杂时,使用Vuex,此外也可以使用Bus来进行简单的状态管理 1.1 父组件与子组件之间的通信 vue.config ...
- linux下运行python3出现TypeError: a bytes-like object is required, not 'str'
目标:用python将中文存入csv,且中文正常显示. 环境:linux,python3 百度N久,方法都不行或是比较复杂. 以上代码用python3运行后,出现TypeError: a bytes- ...
- [原创]Rsync搭建和使用
rsync服务的搭建和使用 ***下载安装: #wget https://download.samba.org/pub/rsync/src/rsync-3.1.2.tar.gz #tar -zxvf ...
- <a>标签 IOS 安卓 亲测有效
一.普通链接 <a href="http://www.baidu.com">百度</a> 二.邮件链接 1.标签最简式 <a href="m ...
- UVA1152- 枚举 /二分查找
The SUM problem can be formulated as follows: given four lists A,B,C,D of integer values, compute ho ...