Spring入门配置(一) - IOC
一、初始命名空间配置
<beans xmlns="http://www.springframework.org/schema/beans"

       xmlns:xsi="http://www.w3.org/2001/XMLSchema-instance"

       xsi:schemaLocation:"

           http://www.springframework.org/schema/beans

       http://www.springframework.org/schema/beans/spring-beans.xsd">

</beans>
xsi:xml schema instance,schema的作用是用来对xml文档做约束保证xml文档的正确性。(对XML部分重新学习)
参考:schema的几个重要知识:https://blog.csdn.net/weixin_39366489/article/details/78115306
二、Spring开发基本包坐标
<properties>

    <spring.version>5.0.5.RELEASE</spring.version>

</properties>

<dependencies>

<!--导入spring的context坐标,context依赖core、beans、expression-->

    <dependency>

        <groupId>org.springframework</groupId>

        <artifactId>spring-context</artifactId>

        <version>${spring.version}</version>

    </dependency>

</dependencies>
三、Bean标签配置
Spring中Bean的命名
- 每个Bean可以有一个id属性,并可以根据该id在IoC容器中查找该Bean,该id属性值必须在IoC容器中唯一;
- 可以不指定id属性,只指定全限定类名,如:
<bean class="com.zyh.spring3.hello.StaticBeanFactory"></bean>此时需要通过接口getBean(Class<T> requiredType)来获取Bean;
如果该Bean找不到则抛异常:NoSuchBeanDefinitionException
如果该类型的Bean有多个则抛异常:NoUniqueBeanDefinitionException- 如果不指定id,只指定name,那么name为Bean的标识符,并且需要在容器中唯一;
- 同时指定name和id,此时id为标识符,而name为Bean的别名,两者都可以找到目标Bean;
--------------------------------------------------------------------------------------------------------------
原文:https://blog.csdn.net/guan3515/article/details/85675419
无参构造实例化对象
<!--id为Bean在Spring容器中的唯一标识-->

<bean id="userService" class="GroupId.ArtifactId.service.impl.UserServiceImpl" scope="singleton">

<!--class为Bean全限定名-->

<!--scope指定对象作用范围,singleton为默认值单例,prototype为多例,request、session、global session表示WEB项目中Spring创建一个Bean对象并存到相应的域中-->

<!--init-method、destroy-method用于指定类中的初始化方法和销毁方法-->
</bean>
工厂静态方法实例化
<bean id="userDao" class="GroupId.ArtifactId.factory.StaticFactoryBean" factory-method="createUserDao" />
工厂实例方法实例化
<bean id="factoryBean" class="GroupId.ArtifactId.factory.DynamicFactoryBean" />

<bean id="userDao" factory-bean="factoryBean" factory-method="createUserDao" />
关于GroupId和ArtifactId(参考:https://blog.csdn.net/qq_30137611/article/details/76762070)
GroupId和ArtifactId统称为“坐标”,保证项目的唯一性
GroupId:一般分多段,主要有两段,第一段为域,第二段为公司名称或其他。域org(非盈利组织)、com(商业组织)、cn(中国)等
ArtifactId:项目名称
四、Bean依赖注入
依赖注入(Dependency Injection),Spring核心 IOC(Inversion Of Control) 的具体实现,程序中由Spring创建对象,降低耦合关系。
set方式依赖注入及简单的set方式 >> P命名空间注入
<!--UserServiceImpl中添加USerDaoImpl私有属性,设置set方法-->

<!--将UserDaoImpl注入到Spring容器中-->

<bean id="userDao" class="UserDaoImpl全限定名(fully-qualified name)">

<!--将UserServiceImpl注入到Spring,将USerDaoImpl注入到UserServiceImpl-->

<bean id="userService" class="UserServiceImpl fully-qualified name">

    <property name="userDao" ref="userDao" />

    <!--name值为set方法出去set并将首字母小写转换后的字符串,ref表示注入到UserServiceImpl类在容器中的id-->

</bean>

-------------------------------------------------------------------------------------

<!--P命名空间注入也是set方法注入,但比较方便,需要引入P命名空间-->

<beans xmlns="http://www.springframework.org/schema/beans"

       xmlns:p="http://www.springframework.org/schema/p"

       xsi:schemaLocation:"

           http://www.springframework.org/schema/beans

           http://www.springframework.org/schema/beans/spring-beans.xsd

           http://www.springframework.org/schema/p

           http://www.springframework.org/schema/p/spring-p.xsd">

  <bean id="userService" class="UserService fully-qualified name" p:userDao-ref="userDao" />

</beans>
1.1 注入普通数据类型
<bean id="userDao" class="UserDaoImpl fully-qualified name">

    <property name="set方法转换后的值" value="注入变量值" />

</bean>
1.2 注入引用数据类型
1.3 注入集合数据类型 --> 主要决定于集合中存储的类型,基本数据类型或String等配置value相关,对象配置ref相关引用Spring容器中的对象<!--list集合存储String或基本数据类型-->
<bean id="userDao" class="UserDaoImpl fully-qualified name">
<property name="set方法转换值">
<list>
<value>aaa</value>
<value>bbb</value>
</list>
</property>
</bean> -------------------------------------------------------------------- <!--list集合存储实例对象 User-->
<!--集合中存储实例对象其实都是Spring容器中的引用,即id标识-->
<bean id="u1" class="User fully-qualified name">
<bean id="u2" class="User fully-qualified name">
<bean id="userDao" class="UserDaoImpl fully-qualified name">
<property name="set方法转换值">
<list>
<bean class="User fully-qualified name" />
<bean class="User fully-qualified name" />
<ref bean="u1" />
<ref bean="u2" />
</list>
</property>
</bean> -------------------------------------------------------------------- <!--Map集合的注入-->
<bean id="u1" class="User fully-qualified name">
<bean id="u2" class="User fully-qualified name">
<bean id="userDao" class="UserDaoImpl fully-qualified name">
<property name="set方法转换值">
<map>
<entry key="user1" value-ref="u1" />
<entry key="user2" value-ref="u2" />
</map>
</property>
</bean> -------------------------------------------------------------------- <!--properties 集合-->
<bean id="userDao" class="UserDaoImpl fully-qualified name">
<property name="set方法转换值">
<props>
<prop key="p1">aaa</prop>
<prop key="p2">bbb</prop>
<prop key="p3">ccc</prop>
</props>
</property>
</bean>构造方法依赖注入
<!--不再配置property,配置如下标签-->

<constructor-arg name="有参构造函数形参变量名" ref="注入Spring容器的形参id"></constructor-arg>
五、应用 --> 数据源的配置及JdbcTemplate基本使用
数据源的相关参数设置方法均为setXxx方法,数据源对象利用空参构造函数生成,具备此特性可将对象交由Spring管理。将数据源的数据配置到配置文件中
Druid和C3P0参数设置方法
Druid C3P0 setDriverClassName("com.mysql.jdbc.Driver")
setUrl("jdbc:mysql://localhost:3306/test")
setUsername("root")
setPassword("root")
setDriverClass("com.mysql.jdbc.Driver")
setJdbcUrl("jdbc:mysql://localhost:3306/test")
setUser("root")
setPassword("root")
导入数据源和数据库驱动相关坐标:Druid/C3P0 + mysql-connector-java
提取jdbc配置到文件jdbc.properties
jdbc.driver=com.mysql.jdbc.Driver

jdbc.url=jdbc:mysql://localhost:3306/test

jdbc.username=root

jdbc.password=root
在Spring配置文件中加载jdbc.properties文件,获取jdbc配置文件信息,需要引入context命名空间和约束路径
命名空间:

xmlns:context="http://www.springframework.org/schema/context"

约束路径:

http://www.springframework.org/schema/context

http://www.springframework.org/schema/context/spring-context.xsd
配置数据源
<!--配置C3P0-->

<context:property-placeholder location="classpath:jdbc.properties"/> <!--placeholder:占位符-->

<bean id="dataSource" class="com.mchange.v2.c3p0.ComboPooledDataSource">

    <property name="driverClass" value="${jdbc.driver}"/>

    <property name="jdbcUrl" value="${jdbc.url}"/>

    <property name="user" value="${jdbc.username}"/>

    <property name="password" value="${jdbc.password}"/>

</bean>

<context:property-placeholder location="classpath:jdbc.properties"/> <!--placeholder:占位符-->

<!--配置Druid-->

<bean id="dataSource" class="com.alibaba.druid.pool.DruidDataSource">

    <property name="driverClassName" value="${jdbc.driver}"/>

    <property name="url" value="${jdbc.url}"/>

    <property name="username" value="${jdbc.username}"/>

    <property name="password" value="${jdbc.password}"/>

</bean>
JdbcTemplate基本使用
- 导入坐标:spring-jdbc & spring-tx
- 配置JdbcTemplate向其注入DataSource
<bean id="jdbcTemplate" class="org.springframework.jdbc.core.JdbcTemplate">

    <property name="dataSource" ref="dataSource"></property>

</bean>
六、配置文件及创建ApplicationContext实现类对象时参数的抽取
配置文件抽取
实际开发中,Spring的配置内容非常多,这就导致Spring配置很繁杂且体积很大,所以,可以将部分配置拆解到其他配置文件中,而在Spring主配置文件通过import标签进行加载
<import resource="applicationContext-xxx.xml"/>
参数抽取
ApplicationContext实现类主要有以下三种:
1)ClassPathXmlApplicationContext 它是从类的根路径下加载配置文件 推荐使用这种;
2)FileSystemXmlApplicationContext 它是从磁盘路径上加载配置文件,配置文件可以在磁盘的任意位置;
3)AnnotationConfigApplicationContext 当使用注解配置容器对象时,需要使用此类来创建 spring 容器。它用来读取注解。
可以通过其实例的getBean()方法获得 Spring 容器中的 Bean 对象:
① 当参数的数据类型是字符串时,表示根据Bean的id从容器中获得Bean实例,返回是Object,需要强转。
② 当参数的数据类型是Class类型时,表示根据类型从容器中匹配Bean实例,当容器中相同类型的Bean有多个时,则此方法会报错。
开发中每次获取实例对象前都需要进行ApplicationContext实现类实例的创建获取,且参数名为配置文件名与代码耦合度较高,Spring中进行抽取。
在Web项目中,可以使用ServletContextListener监听Web应用的启动,我们可以在Web应用启动时,就加载Spring的配置文件,创建应用上下文对象ApplicationContext,在将其存储到最大的域servletContext域中,这样就可以在任意位置从域中获得应用上下文ApplicationContext实现类对象了。Spring提供了一个监听器ContextLoaderListener就是对上述功能的封装,该监听器内部加载Spring配置文件,创建应用上下文对象,并存储到ServletContext域中,提供了一个客户端工具WebApplicationContextUtils供使用者获得应用上下文对象。
Ⅰ. 导包:spring-web
Ⅱ. web.xml中配置监听器 ContextLoaderListener
<!--全局参数-->

<context-param>

  <param-name>contextConfigLocation</param-name>

  <param-value>classpath:applicationContext.xml</param-value>

</context-param>

<!--Spring的监听器-->

<listener>

    <listener-class>

       org.springframework.web.context.ContextLoaderListener

    </listener-class>

</listener>
Ⅲ. WebApplicationContextUtils工具类获取ApplicationContext实现类对象传入servletContext
ApplicationContext applicationContext = WebApplicationContextUtils.getWebApplicationContext(servletContext);

Object obj = applicationContext.getBean("id");
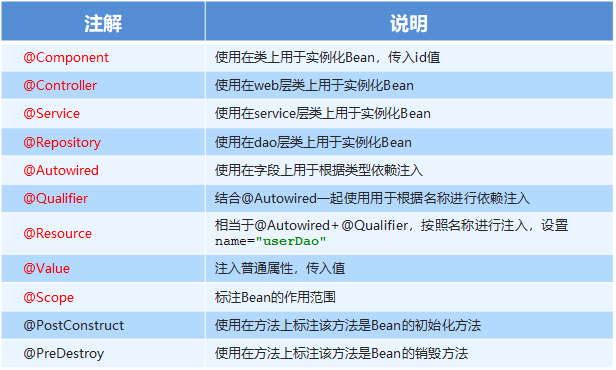
七、注解开发
需要在配置文件中开启组建扫描
<context:component-scan base-package=“包全限定名"/>
原始注解
新注解
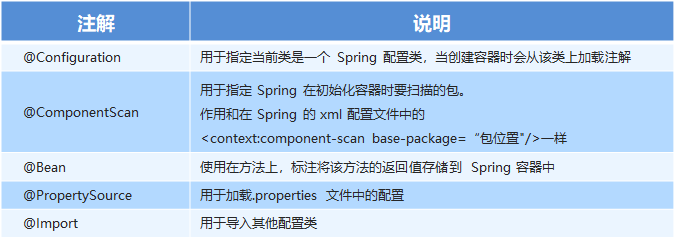
/*

@Configuration

@ComponentScan

@Import

*/

@Configuration

@ComponentScan("需要被扫描类所在包名")

@Import({DataSourceConfiguration.class})

public class SpringConfiguration {

}

---------------------------------------------------

/*

@PropertySource

@value

*/

@PropertySource("classpath:jdbc.properties")

public class DataSourceConfiguration {

    @Value("${jdbc.driver}")

    private String driver;

    @Value("${jdbc.url}")

    private String url;

    @Value("${jdbc.username}")

    private String username;

    @Value("${jdbc.password}")

    private String password;

}

---------------------------------------------------

@Bean(name="dataSource")

public DataSource getDataSource() throws PropertyVetoException {

    ComboPooledDataSource dataSource = new ComboPooledDataSource();

    dataSource.setDriverClass(driver);

    dataSource.setJdbcUrl(url);

    dataSource.setUser(username);

    dataSource.setPassword(password);

    return dataSource;

}

---------------------------------------------------

@Test
public void testAnnoConfiguration() throws Exception {
    ApplicationContext applicationContext = new AnnotationConfigApplicationContext(SpringConfiguration.class);
    UserService userService = (UserService)applicationContext.getBean("userService");
    userService.save();
    DataSource dataSource = (DataSource)applicationContext.getBean("dataSource");
    Connection connection = dataSource.getConnection();
    System.out.println(connection);
}
Spring集成Junit步骤
- 导入spring集成Junit的坐标:spring-test&junit,此处spring5及以上版本要求junit必须为4.12及以上版本
- 使用 @Runwith(SpringJUnit4ClassRunner.class) 注解替换原来的运行期,指定测试运行环境
- 使用 @ContextConfiguration指定配置文件或配置类
//加载spring核心配置文件

//@ContextConfiguration(value = {"classpath:applicationContext.xml"})

//加载spring核心配置类

@ContextConfiguration(classes = {SpringConfiguration.class}) - 使用 @Autowired注入需要测试的对象创建测试方法进行测试
@RunWith(SpringJUnit4ClassRunner.class)

@ContextConfiguration(value = {"classpath:applicationContext.xml"})

public class ProductTest {

    @Autowired

    private ProductService productService;

    @Test

    public void testFindAll() {

        List<Product> products = productService.findAll();

        for (Product product : products) {

            System.out.println(product);

        }

    }

}
Spring入门配置(一) - IOC的更多相关文章
- Spring(一):Spring入门程序和IoC初步理解
本文是按照狂神说的教学视频学习的笔记,强力推荐,教学深入浅出一遍就懂!b站搜索狂神说或点击下面链接 https://space.bilibili.com/95256449?spm_id_from=33 ...
- Spring入门一:IOC、DI、AOP基本思想
Spring框架是一个集众多涉及模式于一身的开源的.轻量级的项目管理框架,致力于javaee轻量级解决方案.相对于原来学过的框架而言,spring框架和之前学习的struts2.mybatis框架有了 ...
- [原创]java WEB学习笔记101:Spring学习---Spring Bean配置:IOC容器中bean的声明周期,Bean 后置处理器
本博客的目的:①总结自己的学习过程,相当于学习笔记 ②将自己的经验分享给大家,相互学习,互相交流,不可商用 内容难免出现问题,欢迎指正,交流,探讨,可以留言,也可以通过以下方式联系. 本人互联网技术爱 ...
- Spring课程 Spring入门篇 2-1 IOC和bean容器
课程链接: 本节讲了5部分内容,6为项目demo: 1 接口及面向接口编程 2 什么是IOC 3 Spring的bean配置 4 Bean的初始化 5 Demo 自己理解: 1 高层模块和底层模块都依 ...
- Spring入门--控制反转(IOC)与依赖注入(DI)
1.控制反转(Inversion of Control)与依赖注入(Dependency Injection) 控制反转即IoC (Inversion of Control).它把传统上由程序 ...
- Spring入门导读——IoC和AOP
和MyBatis系列不同的是,在正式开始Spring入门时,我们先来了解两个关于Spring核心的概念,IoC(Inverse of Control)控制反转和AOP()面向切面编程. 1.IoC(I ...
- Spring入门(二)— IOC注解、Spring测试、AOP入门
一.Spring整合Servlet背后的细节 1. 为什么要在web.xml中配置listener <listener> <listener-class>org.springf ...
- Spring入门(一)— IOC、DI
一.Spring介绍 Spring 是一个开源框架,是为了解决企业应用程序开发复杂性而创建的.框架的主要优势之一就是其分层架构,分层架构允许您选择使用哪一个组件,同时为 J2EE 应用程序开发提供集成 ...
- Spring入门2. IoC中装配Bean
Spring入门2. IoC中装配Bean 20131125 前言: 上一节学习了Spring在JavaProject中的配置,通过配置文件利用BeanFactory和ApplicationConte ...
随机推荐
- VoIP应用在Ubuntu 14.04下编译FFmpeg libX264及PJSIP
PJSIP是一个开源的SIP协议栈.它支持多种SIP的扩展功能,可说算是最目前流行的SIP协议栈之一了. 它实现了SIP.SDP.RTP.STUN.TURN和ICE.PJSIP作为基于SIP的一个多 ...
- Android 百度地图 SDK v3.0.0 (四) 离线地图功能介绍
转载请注明出处:http://blog.csdn.net/lmj623565791/article/details/37758097 一直认为地图应用支持离线地图非常重要啊.我等移动2G屌丝,流量不易 ...
- WPF ListView控件设置奇偶行背景色交替变换以及ListViewItem鼠标悬停动画
原文:WPF ListView控件设置奇偶行背景色交替变换以及ListViewItem鼠标悬停动画 利用WPF的ListView控件实现类似于Winform中DataGrid行背景色交替变换的效果,同 ...
- 数据绑定(五)使用集合对象作为列表控件的ItemsSource
原文:数据绑定(五)使用集合对象作为列表控件的ItemsSource ItemsSource属性可以接收一个IEnumerable接口派生类的实例作为自己的值,ItemsSource里存放的是一条一条 ...
- WPF,通过修改dataGrid的cell的style,改变选中行失去焦点时的颜色 4.0可用
<Style TargetType="{x:Type DataGridCell}"> <Style.Triggers> <Trigger Proper ...
- QuickReport根据每行的内容长度动态调整DetailBand1的行高
procedure TPosPubFactureRep.DetailBand1BeforePrint(Sender: TQRCustomBand; var PrintBand: Boolean); v ...
- [解决方案]sql server复制需要有实际的服务器名称才能连接到服务器
原文:[解决方案]sql server复制需要有实际的服务器名称才能连接到服务器 在配置数据同步的时候,要求相互同步的两台机器的数据库必须通过默认实例名称进行连接.如果你的默认实例已经删掉了,在当前实 ...
- 两种加载dll的方式
通过链接lib文件加载dll的话,使用过程中没法动态切换 通过loadlibrary函数动态加载的话,可以动态切换
- ef 查询总结
1.Linq 查询两张表:a表和b表,要得到的数据是a表数据b表没有 例如:a表有5条数据1,2,3,4,5:b表有2条数据1,3:那么就用dataGridView1输出2,4,5:link语句要怎么 ...
- jQuery实时聊天jquery-chat
jquery-chat是基于jQuery UI + Node.js + Socket.IO 实现100%纯JavaScript实时聊天(客户端和服务器都是JS),实现了facebook / Gmail ...