SpringBoot系列教程之Redis集群环境配置
之前介绍的几篇redis的博文都是基于单机的redis基础上进行演示说明的,然而在实际的生产环境中,使用redis集群的可能性应该是大于单机版的redis的,那么集群的redis如何操作呢?它的配置和单机的有什么区别,又有什么需要注意的呢?
本篇将主要介绍SpringBoot项目整合redis集群,并针对这个过程中出现的问题进行说明,并给出相应的解决方案
I. 环境相关
首先需要安装redis集群环境,可以参考博文:redis-集群搭建手册
然后初始化springboot项目,对应的pom结构如下
<parent>

    <groupId>org.springframework.boot</groupId>

    <artifactId>spring-boot-starter-parent</artifactId>

    <version>2.1.7</version>

    <relativePath/> <!-- lookup parent from update -->

</parent>

<properties>

    <project.build.sourceEncoding>UTF-8</project.build.sourceEncoding>

    <project.reporting.outputEncoding>UTF-8</project.reporting.outputEncoding>

    <spring-cloud.version>Finchley.RELEASE</spring-cloud.version>

    <java.version>1.8</java.version>

</properties>

<dependencies>

    <dependency>

        <groupId>org.springframework.boot</groupId>

        <artifactId>spring-boot-starter-data-redis</artifactId>

    </dependency>

    <dependency>

        <groupId>org.apache.commons</groupId>

        <artifactId>commons-pool2</artifactId>

    </dependency>

</dependencies>

<build>

    <pluginManagement>

        <plugins>

            <plugin>

                <groupId>org.springframework.boot</groupId>

                <artifactId>spring-boot-maven-plugin</artifactId>

            </plugin>

        </plugins>

    </pluginManagement>

</build>

<repositories>

    <repository>

        <id>spring-milestones</id>

        <name>Spring Milestones</name>

        <url>https://repo.spring.io/milestone</url>

        <snapshots>

            <enabled>false</enabled>

        </snapshots>

    </repository>

</repositories
需要注意的是,我们引入了两个包,一个是必要的 spring-boot-starter-data-redis,官方封装的一个操作redis的start工具,借助它我们可以很方便的直接使用RedisTemplate来操作redis
另外一个是commonos-pool2这个包,主要是当我们配置了redis的连接池的时候,需要用到它,否则会抛一个Class Not Found 的异常
II. 环境整合及采坑
这里我将redis集群搭建在局域网内的一台centos机器上,从后面的配置文件也可以看出(为什么这么处理?主要是为了引出后面一个问题)
1. application.yml
首我们先按照默认的配置方式,来获取我们的 RedisTemplate, 以实现最快的接入redis集群
spring:

  redis:

    password:

    cluster:

      nodes: 192.168.0.203:7000,192.168.0.203:7001,192.168.0.203:7002

      max-redirects: 3

    lettuce:

      pool:

        max-idle: 16

        max-active: 32

        min-idle: 8
我们搭建的redis集群,没有做主备(否则需要6个实例),为了省事,也没有设置密码(生产环境下,这是严格禁止的)
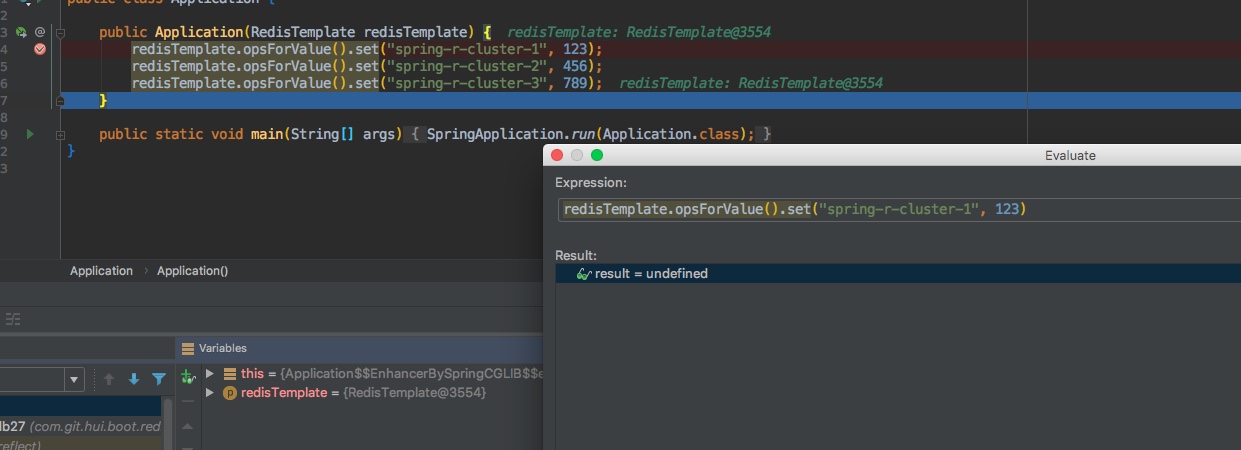
2. 使用测试
因为我们采用默认的配置,因此可以直接获取RedisTemplate的bean对象,来操作redis集群
@SpringBootApplication

public class Application {

    public Application(RedisTemplate redisTemplate) {

        redisTemplate.opsForValue().set("spring-r-cluster-1", 123);

        redisTemplate.opsForValue().set("spring-r-cluster-2", 456);

        redisTemplate.opsForValue().set("spring-r-cluster-3", 789);

    }

    public static void main(String[] args) {

        SpringApplication.run(Application.class);

    }

}
a. 拒绝连接
上面执行之后,报的第一个错误是连接拒绝,而我在redis集群所在的机器(203)上是可以连接成功的,但是本机连接报错

出现上面的问题,一般有两个原因,一个是防火墙导致端口不能外部访问,一个是redis的配置
防火墙的确认方式
- 判断防火墙是否开启:
firewall-cmd --state如果提示not running 表示未开启 - 查看防火墙规则:
firewall-cmd --list-all
然后可以根据实际场景,添加端口
# 永久开启7000端口的公共访问权限

sudo firewall-cmd --zone=public --add-port=7000/tcp --permanent

sudo firewall-cmd --reload
当然在内网的测试环境下,可以直接关闭防火墙
//Disable firewall

systemctl disable firewalld

systemctl stop firewalld

systemctl status firewalld

//Enable firewall

systemctl enable firewalld

systemctl start firewalld

systemctl status firewalld
redis配置
如果确认不是防火墙问题,那么多半是redis的配置需要修改一下了,在redis.conf中,有一行bind 127.0.0.1配置默认开启,表示只允许本机访问,其他机器无权访问
解决办法就是修改一下这个配置,并重启
bind 0.0.0.0
b. Unable to connect to 127.0.0.1:7001
执行前面的测试用例时,发现会抛一个奇怪的异常如下
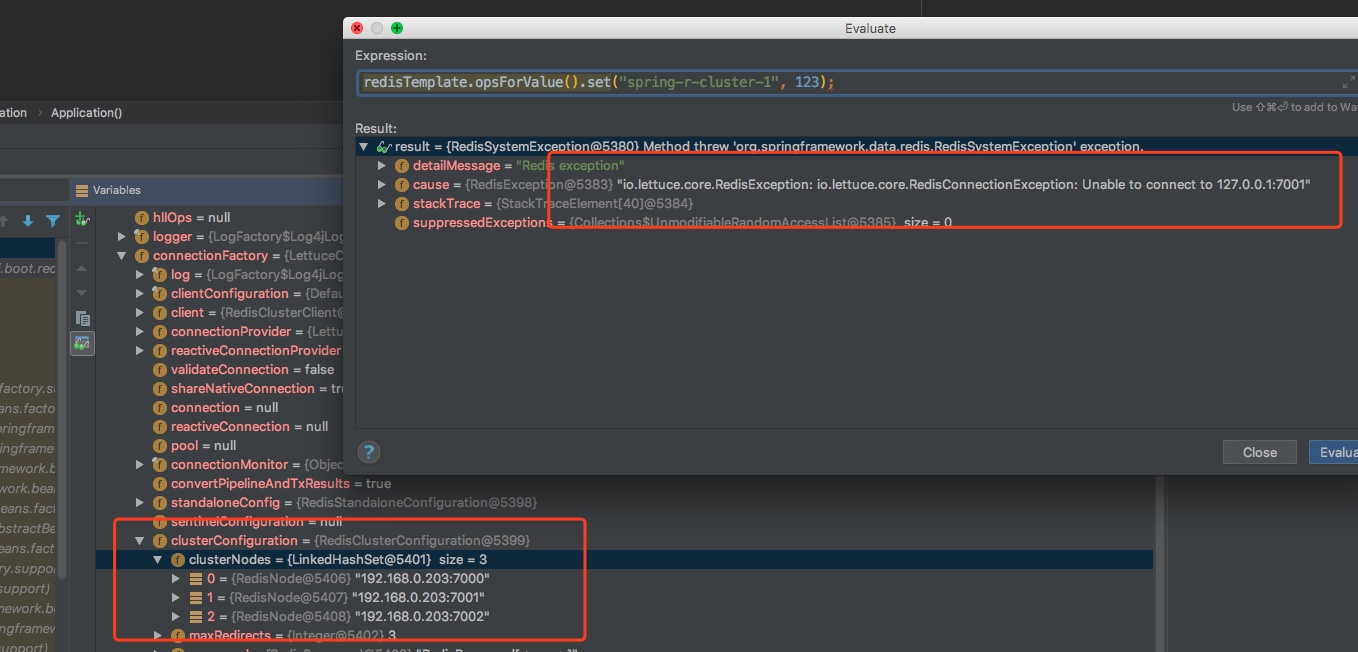
关键堆栈信息如下
Caused by: org.springframework.data.redis.RedisSystemException: Redis exception; nested exception is io.lettuce.core.RedisException: io.lettuce.core.RedisConnectionException: Unable to connect to 127.0.0.1:7001

	at org.springframework.data.redis.connection.lettuce.LettuceExceptionConverter.convert(LettuceExceptionConverter.java:74) ~[spring-data-redis-2.0.9.RELEASE.jar:2.0.9.RELEASE]

	at org.springframework.data.redis.connection.lettuce.LettuceExceptionConverter.convert(LettuceExceptionConverter.java:41) ~[spring-data-redis-2.0.9.RELEASE.jar:2.0.9.RELEASE]

	at org.springframework.data.redis.PassThroughExceptionTranslationStrategy.translate(PassThroughExceptionTranslationStrategy.java:44) ~[spring-data-redis-2.0.9.RELEASE.jar:2.0.9.RELEASE]

	at org.springframework.data.redis.FallbackExceptionTranslationStrategy.translate(FallbackExceptionTranslationStrategy.java:42) ~[spring-data-redis-2.0.9.RELEASE.jar:2.0.9.RELEASE]

	at org.springframework.data.redis.connection.lettuce.LettuceConnection.convertLettuceAccessException(LettuceConnection.java:257) ~[spring-data-redis-2.0.9.RELEASE.jar:2.0.9.RELEASE]

	at org.springframework.data.redis.connection.lettuce.LettuceStringCommands.convertLettuceAccessException(LettuceStringCommands.java:718) ~[spring-data-redis-2.0.9.RELEASE.jar:2.0.9.RELEASE]

	at org.springframework.data.redis.connection.lettuce.LettuceStringCommands.set(LettuceStringCommands.java:143) ~[spring-data-redis-2.0.9.RELEASE.jar:2.0.9.RELEASE]

	at org.springframework.data.redis.connection.DefaultedRedisConnection.set(DefaultedRedisConnection.java:231) ~[spring-data-redis-2.0.9.RELEASE.jar:2.0.9.RELEASE]

	at org.springframework.data.redis.core.DefaultValueOperations$3.inRedis(DefaultValueOperations.java:202) ~[spring-data-redis-2.0.9.RELEASE.jar:2.0.9.RELEASE]

	at org.springframework.data.redis.core.AbstractOperations$ValueDeserializingRedisCallback.doInRedis(AbstractOperations.java:59) ~[spring-data-redis-2.0.9.RELEASE.jar:2.0.9.RELEASE]

	at org.springframework.data.redis.core.RedisTemplate.execute(RedisTemplate.java:224) ~[spring-data-redis-2.0.9.RELEASE.jar:2.0.9.RELEASE]

	at org.springframework.data.redis.core.RedisTemplate.execute(RedisTemplate.java:184) ~[spring-data-redis-2.0.9.RELEASE.jar:2.0.9.RELEASE]

	at org.springframework.data.redis.core.AbstractOperations.execute(AbstractOperations.java:95) ~[spring-data-redis-2.0.9.RELEASE.jar:2.0.9.RELEASE]

	at org.springframework.data.redis.core.DefaultValueOperations.set(DefaultValueOperations.java:198) ~[spring-data-redis-2.0.9.RELEASE.jar:2.0.9.RELEASE]

	at com.git.hui.boot.redis.cluster.Application.<init>(Application.java:14) [classes/:na]

	at com.git.hui.boot.redis.cluster.Application$$EnhancerBySpringCGLIB$$ac0c03ba.<init>(<generated>) ~[classes/:na]

	at sun.reflect.NativeConstructorAccessorImpl.newInstance0(Native Method) ~[na:1.8.0_171]

	at sun.reflect.NativeConstructorAccessorImpl.newInstance(NativeConstructorAccessorImpl.java:62) ~[na:1.8.0_171]

	at sun.reflect.DelegatingConstructorAccessorImpl.newInstance(DelegatingConstructorAccessorImpl.java:45) ~[na:1.8.0_171]

	at java.lang.reflect.Constructor.newInstance(Constructor.java:423) ~[na:1.8.0_171]

	at org.springframework.beans.BeanUtils.instantiateClass(BeanUtils.java:170) ~[spring-beans-5.0.8.RELEASE.jar:5.0.8.RELEASE]

	... 19 common frames omitted

Caused by: io.lettuce.core.RedisException: io.lettuce.core.RedisConnectionException: Unable to connect to 127.0.0.1:7001

	at io.lettuce.core.LettuceFutures.awaitOrCancel(LettuceFutures.java:125) ~[lettuce-core-5.0.4.RELEASE.jar:na]

	at io.lettuce.core.cluster.ClusterFutureSyncInvocationHandler.handleInvocation(ClusterFutureSyncInvocationHandler.java:118) ~[lettuce-core-5.0.4.RELEASE.jar:na]

	at io.lettuce.core.internal.AbstractInvocationHandler.invoke(AbstractInvocationHandler.java:80) ~[lettuce-core-5.0.4.RELEASE.jar:na]

	at com.sun.proxy.$Proxy44.set(Unknown Source) ~[na:na]

	at org.springframework.data.red
通过断点可以看到,集群中的节点ip/端口是准确的,但是异常提示出来个无法连接127.0.0.1:7001,出现这个问题的原因,主要是我们在创建redis集群的时候,设置集群节点使用如下面的命令
redis/src/redis-cli --cluster create 127.0.0.1:7000 127.0.0.1:7001 127.0.0.1:7002
通过上面这种方式创建的redis集群,并没有什么问题,但是在springbot的整合中,通过redis集群获取到的节点信息就是127.0.0.1:7000... 然后导致上面的问题,因此一个解决办法是在创建集群的时候,指定下ip
首先数据和配置,然后重新建立集群关系
# 删除数据配置

rm xxx/data/*

redis/src/redis-cli  --cluster create 192.168.0.203:7000 192.168.0.203:7001 192.168.0.203:7002
然后再次测试ok
3. jedis配置
前面的配置默认会使用letttuce作为redis的桥接工具,如果我们底层想使用jedis,可以怎么操作?
首先在pom依赖中添加jedis依赖
<dependency>

    <groupId>redis.clients</groupId>

    <artifactId>jedis</artifactId>

</dependency>
yml文件中的配置基本上不改都ok,在实际的项目中,对连接池稍微改了一下,不影响阅读,这里不贴出
接下来是定义RedisConnectionFactoy来替换默认的
下面的配置和以前的一篇博文 181101-SpringBoot高级篇Redis之Jedis配置 基本差不多,需要注意的是我们使用
RedisClusterConfiguration替换了RedisStandaloneConfiguration
@Configuration

public class RedisAutoConfig {

    @Bean

    public RedisConnectionFactory redisConnectionFactory(JedisPoolConfig jedisPool,

            RedisClusterConfiguration jedisConfig) {

        JedisConnectionFactory factory = new JedisConnectionFactory(jedisConfig, jedisPool);

        factory.afterPropertiesSet();

        return factory;

    }

    @Configuration

    public static class JedisConf {

        @Value("${spring.redis.cluster.nodes:127.0.0.1:7000,127.0.0.1:7001,127.0.0.1:7002}")

        private String nodes;

        @Value("${spring.redis.cluster.max-redirects:3}")

        private Integer maxRedirects;

        @Value("${spring.redis.password:}")

        private String password;

        @Value("${spring.redis.database:0}")

        private Integer database;

        @Value("${spring.redis.jedis.pool.max-active:8}")

        private Integer maxActive;

        @Value("${spring.redis.jedis.pool.max-idle:8}")

        private Integer maxIdle;

        @Value("${spring.redis.jedis.pool.max-wait:-1}")

        private Long maxWait;

        @Value("${spring.redis.jedis.pool.min-idle:0}")

        private Integer minIdle;

        @Bean

        public JedisPoolConfig jedisPool() {

            JedisPoolConfig jedisPoolConfig = new JedisPoolConfig();

            jedisPoolConfig.setMaxIdle(maxIdle);

            jedisPoolConfig.setMaxWaitMillis(maxWait);

            jedisPoolConfig.setMaxTotal(maxActive);

            jedisPoolConfig.setMinIdle(minIdle);

            return jedisPoolConfig;

        }

        @Bean

        public RedisClusterConfiguration jedisConfig() {

            RedisClusterConfiguration config = new RedisClusterConfiguration();

            String[] sub = nodes.split(",");

            List<RedisNode> nodeList = new ArrayList<>(sub.length);

            String[] tmp;

            for (String s : sub) {

                tmp = s.split(":");

                // fixme 先不考虑异常配置的case

                nodeList.add(new RedisNode(tmp[0], Integer.valueOf(tmp[1])));

            }

            config.setClusterNodes(nodeList);

            config.setMaxRedirects(maxRedirects);

            config.setPassword(RedisPassword.of(password));

            return config;

        }

    }

}
然后其他的依旧,此时RedisTemplate的底层连接就变成了Jedis

III. 其他
0. 项目&相关博文
- 工程:https://github.com/liuyueyi/spring-boot-demo
- moduel : https://github.com/liuyueyi/spring-boot-demo/tree/master/spring-boot/124-redis-cluster
关联博文
1. 一灰灰Blog
尽信书则不如,以上内容,纯属一家之言,因个人能力有限,难免有疏漏和错误之处,如发现bug或者有更好的建议,欢迎批评指正,不吝感激
下面一灰灰的个人博客,记录所有学习和工作中的博文,欢迎大家前去逛逛
- 一灰灰Blog个人博客 https://blog.hhui.top
- 一灰灰Blog-Spring专题博客 http://spring.hhui.top

SpringBoot系列教程之Redis集群环境配置的更多相关文章
- redis集群环境配置
为什么需要集群 redis是一个开源的 key->value 高速存储系统,但是由于redis单线程运行,在系统中,只能利用单核的性能 当redis的调用越来越频繁时,可能会出现redis过于繁 ...
- SpringBoot初始教程之Redis集中式Session管理
1.介绍 有关Session的管理方式这里就不再进行讨论,目前无非就是三种单机Session(基于单机内存,无法部署多台机器).基于Cookie(安全性差).基于全局的统一Session管理(redi ...
- SpringBoot系列教程之Bean加载顺序之错误使用姿势辟谣
在网上查询 Bean 的加载顺序时,看到了大量的文章中使用@Order注解的方式来控制 bean 的加载顺序,不知道写这些的博文的同学自己有没有实际的验证过,本文希望通过指出这些错误的使用姿势,让观文 ...
- SpringBoot系列教程之Bean之指定初始化顺序的若干姿势
上一篇博文介绍了@Order注解的常见错误理解,它并不能指定 bean 的加载顺序,那么问题来了,如果我需要指定 bean 的加载顺序,那应该怎么办呢? 本文将介绍几种可行的方式来控制 bean 之间 ...
- Redis 集群环境添加节点失败问题
最近在给公司网管系统Redis集群环境添加节点时候遇到一个问题,提示新增的Node不为空: [root@node00 src]# ./redis-trib.rb add-node --slave -- ...
- redis集群环境的搭建和错误分析
redis集群环境的搭建和错误分析 redis集群时,出现的几个异常问题 09 redis集群的搭建 以及遇到的问题
- 带你自行搭建虚拟机和Redis集群环境,值得收藏!
前言: 我们看到分析 Redis 使用或原理的文章不少,但是完整搭建一套独立的 redis 集群环境的介绍,并不是很多或者说还不够详细. 那么,本文会手把手带着大家搭建一套 Redis 集群环境,Re ...
- Redis集群环境之linux搭建多机版---已完结,跟着一步一步来你就可以集群成功
上一篇踩着各种坑写了Redis集群环境之linux搭建单机版,这一篇准备就多机版集群进行搭建,主要目的一来是在上一篇的基础上进行精华提粹总结,二来是把单机版与多机版的区别进行记录. 首先软硬件环境: ...
- Redis集群环境搭建实践
0 Redis集群简介 Redis集群(Redis Cluster)是Redis提供的分布式数据库方案,通过分片(sharding)来进行数据共享,并提供复制和故障转移功能.相比于主从复制.哨兵模式, ...
随机推荐
- test20190926 孙耀峰
70+100+0=170.结论题自己还是要多试几组小数据.这套题还不错. ZYB建围墙 ZYB之国是特殊的六边形构造. 已知王国一共有
- select2实现多选 并且回显
html代码:<select name="ruleId" id="ruleId" class="required" onchange= ...
- springboot使用jpa案例
1 创建entity实体类并生成数据库表 @Entity @Table(name="student") public class Student { @Id @GeneratedV ...
- ESP8266 tcp透传AP+STA
AP 建立WIFI,接受STA连接,串口数据和TCP互传 #include <ESP8266WiFi.h> const char *ssid = "esp8266_666&quo ...
- 基于Centos7+Flask+Nginx+uWSGI+Python3的服务器网页搭建教程
之前完成了贴吧签到系统的搭建,笔者想将这个功能分享给更多人使用,所以尝试搭建了一个网页,一路遇到了很多问题,最终解决了,记录下过程分享给大家 首先安装 uWSGI ,和 Nginx 配套使用,具体用途 ...
- lxml 和 pyquery 示例 爬 卡牌
import requests from pyquery import PyQuery as pq import json import jsonpath from lxml import etree ...
- c++ sprintf() 用法
1. char boxData[100]; fi.mWidth = 1.0, fi.mCenter_x= 2.1, fi.mCenter_y=1.1; sprintf(boxData, " ...
- [Gradle] 发布 library 到本地 maven 仓库
Java Library // publish_local_java.gradle apply plugin: 'maven-publish' publishing { publications { ...
- 46、Spark SQL工作原理剖析以及性能优化
一.工作原理剖析 1.图解 二.性能优化 1.设置Shuffle过程中的并行度:spark.sql.shuffle.partitions(SQLContext.setConf()) 2.在Hive数据 ...
- 03-树2 List Leaves (25 分)
Given a tree, you are supposed to list all the leaves in the order of top down, and left to right. I ...