nginx之旅(第一篇):nginx下载安装、nginx启动与关闭、nginx配置文件详解、nginx默认网站
一、nginx下载安装
版本nginx 1.15.5
系统环境centos7.5(本机ip192.168.199.228)
关闭selinux 和防火墙firewall
1、下载
wget http://nginx.org/download/nginx-1.15.5.tar.gz -P /usr/src
2、安装
安装大概过程
配置---编译---安装
配置 1)检查环境 是否 满足安装条件 依赖解决 2)指定安装方式 配置文件 命令文件 各种文件放哪里 开启模块功能【内 置模块 三方模块】 3)指定软件安装在那里
a、切换到usr/src目录,解压文件
- [root@localhost src]# cd /usr/src
- [root@localhost src]# ls
- debug kernels nginx-1.15.5.tar.gz
- [root@localhost src]# tar xf nginx-1.15.5.tar.gz
- [root@localhost src]# ls
- debug kernels nginx-1.15.5 nginx-1.15.5.tar.gz
- [root@localhost src]#
-
查看配置方法
- [root@localhost src]# pwd
- /usr/src
- [root@localhost src]# cd nginx-1.15.5
- [root@localhost nginx-1.15.5]# ls
- auto CHANGES.ru configure html man src
- CHANGES conf contrib LICENSE README
- [root@localhost nginx-1.15.5]# ./configure --help #查看配置参数帮助
-
b、安装各种依赖环境
- [root@localhost src]# cd nginx-1.15.5
- [root@localhost nginx-1.15.5]# yum -y install gcc pcre-devel zlib zlib-devel
- Loaded plugins: fastestmirror
- Loading mirror speeds from cached hostfile
- * base: mirror.vpshosting.com.hk
- * extras: centos.01link.hk
- * updates: hk.mirrors.thegigabit.com
- Resolving Dependencies
- --> Running transaction check
- ---> Package gcc.x86_64 0:4.8.5-39.el7 will be installed
- ...
gcc 编译工具
pcre-devel 在nginx中url 需要用到这个包
zlib zlib-devel 解压缩工具
对于 gcc,因为安装nginx需要先将官网下载的源码进行编译,编译依赖gcc环境,如果没有gcc环境的话,需要安装gcc。
对于 pcre,prce(Perl Compatible Regular Expressions)是一个Perl库,包括 perl 兼容的正则表达式库。nginx的http模块使用pcre来解析正则表达式,所以需要在linux上安装pcre库。
对于 zlib,zlib库提供了很多种压缩和解压缩的方式,nginx使用zlib对http包的内容进行gzip,所以需要在linux上安装zlib库。
c、指定目录进行编译
- [root@localhost nginx-1.15.5]# ./configure --prefix=/usr/local/nginx
- checking for OS
- + Linux 3.10.0-862.el7.x86_64 x86_64
- checking for C compiler ... found
- + using GNU C compiler
- + gcc version: 4.8.5 20150623 (Red Hat 4.8.5-39) (GCC)
- ...
d、编译make
make就是将源码进行编译生成可执行程序的过程
- [root@localhost nginx-1.15.5]# pwd
- /usr/src/nginx-1.15.5
- [root@localhost nginx-1.15.5]# ls
- auto CHANGES.ru configure html Makefile objs src
- CHANGES conf contrib LICENSE man README
- [root@localhost nginx-1.15.5]# make
- make -f objs/Makefile
- make[1]: Entering directory `/usr/src/nginx-1.15.5'
- cc -c -pipe -O -W -Wall -Wpointer-arith -Wno-unused-parameter -Werror -g -I src/core -I src/event -I src/event/modules -I src/os/unix -I objs \
- ...
没有error的话进行
e、make install完成安装
- [root@localhost nginx-1.15.5]# make install
- make -f objs/Makefile install
- make[1]: Entering directory `/usr/src/nginx-1.15.5'
- test -d '/usr/local/nginx' || mkdir -p '/usr/local/nginx'
- test -d '/usr/local/nginx/sbin' \
- ...
完成安装
二、nginx的相关目录
- nginx path prefix: "/usr/local/nginx" #nginx的安装目录
- nginx binary file: "/usr/local/nginx/sbin/nginx" #nginx的启动文件
- nginx modules path: "/usr/local/nginx/modules" # nginx的模块目录
- nginx configuration prefix: "/usr/local/nginx/conf" #nginx的配置文件位置
- nginx configuration file: "/usr/local/nginx/conf/nginx.conf" #nginx的配置文件全路径
- nginx pid file: "/usr/local/nginx/logs/nginx.pid" #nginx的进程号
- nginx error log file: "/usr/local/nginx/logs/error.log" #nginx的错误日志目录
- nginx http access log file: "/usr/local/nginx/logs/access.log" #nginx的访问日志目录
三、nginx的启动与关闭、检查配置文件
查看端口是否占用
方法一
安装netstat 用netstat进行查看
- [root@localhost nginx]# yum -y install net-tools
- Loaded plugins: fastestmirror
- Loading mirror speeds from cached hostfile
- ...
-
-
- [root@localhost nginx]# netstat -ntpl
- Active Internet connections (only servers)
- Proto Recv-Q Send-Q Local Address Foreign Address State PID/Program name
- tcp 0 0 0.0.0.0:22 0.0.0.0:* LISTEN 881/sshd
- tcp 0 0 127.0.0.1:25 0.0.0.0:* LISTEN 1128/master
- tcp6 0 0 :::22 :::* LISTEN 881/sshd
- tcp6 0 0 ::1:25 :::* LISTEN 1128/master
-
-
方法二
安装lsof 用lsof 查看
- [root@localhost nginx]# yum -y install lsof
- Loaded plugins: fastestmirror
- Loading mirror speeds from cached hostfile
- ...
-
- [root@localhost nginx]# lsof -i :80
- [root@localhost nginx]#
- #没有显示结果表示端口没有被占用
启动nginx方式
- [root@localhost nginx]# lsof -i :80
- [root@localhost nginx]# /usr/local/nginx/sbin/nginx #启动nginx
- [root@localhost nginx]# lsof -i :80
- COMMAND PID USER FD TYPE DEVICE SIZE/OFF NODE NAME
- nginx 11728 root 6u IPv4 38674 0t0 TCP *:http (LISTEN)
- nginx 11729 nobody 6u IPv4 38674 0t0 TCP *:http (LISTEN)
- [root@localhost nginx]# #nginx把80端口占用了
查看是否安装成功
方法一:
用google浏览器地址栏输入http://192.168.199.228(nginx安装服务器的ip地址)
如果出现Welcome to nginx!页面则安装成功
方法二
用elinks 查看安装是否成功,elinks不会有缓存,一般的google浏览器会有缓存
- [root@localhost nginx]# yum -y install elinks
- Loaded plugins: fastestmirror
- Loading mirror speeds from cached hostfile
- * base: mirror.vpshosting.com.hk
- * extras: centos.01link.hk
- * updates: hk.mirrors.thegigabit.com
- ...
-
- [root@localhost nginx]# elinks http://192.168.199.228 --dump
- Welcome to nginx!
-
- If you see this page, the nginx web server is successfully installed and
- working. Further configuration is required.
-
- For online documentation and support please refer to [1]nginx.org.
- Commercial support is available at [2]nginx.com.
-
- Thank you for using nginx.
-
- References
-
- Visible links
- 1. http://nginx.org/
- 2. http://nginx.com/
- [root@localhost nginx]#
-
关闭 nginx
有3种方式:
方式1:快速停止
- cd /usr/local/nginx/sbin
- ./nginx -s stop
此方式相当于先查出nginx进程id再使用kill命令强制杀掉进程。不太友好。
方式2:平缓停止
- cd /usr/local/nginx/sbin
- ./nginx -s quit
此方式是指允许 nginx 服务将当前正在处理的网络请求处理完成,但不在接收新的请求,之后关闭连接,停止工作。
方法3:killall
- killall nginx
相当于直接杀死所有的关于nginx的进程
重启 nginx
方式1:先停止再启动
- ./nginx -s quit
- ./nginx
相当于先执行停止命令再执行启动命令。
方式2:重新加载配置文件
- ./nginx -s reload
通常我们使用nginx修改最多的便是其配置文件 nginx.conf。修改之后想要让配置文件生效而不用重启 nginx,便可以使用此命令。
方法3:
- killall -s HUP nginx
检测配置文件语法是否正确
方式1:通过如下命令,指定需要检查的配置文件
- nginx -t -c /usr/local/nginx/conf/nginx.conf
方式2:通过如下命令,不加 -c 参数,默认检测nginx.conf 配置文件。
- nginx -t
四、Nginx配置文件详解
nginx文件结构
- ... #全局块
-
- events { #events块
- ...
- }
-
- http #http块
- {
- ... #http全局块
- server #server块
- {
- ... #server全局块
- location [PATTERN] #location块
- {
- ...
- }
- location [PATTERN]
- {
- ...
- }
- }
- server
- {
- ...
- }
- ... #http全局块
- }
1、全局块:配置影响nginx全局的指令。一般有运行nginx服务器的用户组,nginx进程pid存放路径,日志存放路径,配置文件引入,允许生成worker process数等。
2、events块:配置影响nginx服务器或与用户的网络连接。有每个进程的最大连接数,选取哪种事件驱动模型处理连接请求,是否允许同时接受多个网路连接,开启多个网络连接序列化等。
3、http块:可以嵌套多个server,配置代理,缓存,日志定义等绝大多数功能和第三方模块的配置。如文件引入,mime-type定义,日志自定义,是否使用sendfile传输文件,连接超时时间,单连接请求数等。
4、server块:配置虚拟主机的相关参数,一个http中可以有多个server。
5、location块:配置请求的路由,以及各种页面的处理情况
该指令用于匹配 URL。
语法如下:
- location [ = | ~ | ~* | ^~] uri {
- }
(1)= :用于不含正则表达式的 uri 前,要求请求字符串与 uri 严格匹配,如果匹配成功,就停止继续向下搜索并立即处理该请求。
(2)~:用于表示 uri 包含正则表达式,并且区分大小写。
(3)~*:用于表示 uri 包含正则表达式,并且不区分大小写。
(4)^~:用于不含正则表达式的 uri 前,要求 Nginx 服务器找到标识 uri 和请求字符串匹配度最高的 location 后,立即使用此 location 处理请求,而不再使用 location 块中的正则 uri 和请求字符串做匹配。
注意:如果 uri 包含正则表达式,则必须要有 ~ 或者 ~* 标识。
location匹配规则补充
- 语法规则: 【= | ^~ | ~ | ~* | / | /uri 】
- location = /uri = 表示精确匹配,只有完全匹配上才能生效,若找到,停止搜索;
- location ^~ /uri ^~开头表示对URL路径进行前缀匹配,并且在正则匹配之前,若找到,停止搜索;
- location ~ pattern ~开头表示区分大小写的正则匹配,按配置文件顺序匹配;
- location ~* pattern ~*开头表示不区分大小写的正则匹配,按配置文件顺序匹配;
- location /uri 不带任何修饰符,表示前缀匹配,在正则匹配之后;
- location / 通用匹配,任何未匹配到其他location的请求都会匹配到,相当于default;
- 多个location配置的情况匹配顺序为
- 首先精确匹配 = ;
- 其次前缀匹配 ^~;
- 其次是按照配置文件中的正则匹配;
- 然后匹配不带任何修饰符的前缀匹配;
- 最后交给/通用匹配;
示例
- location支持的语法优先级:
- location匹配顺序
- # www.abc.com/
- 1.location = / {
- 我是代码1
- } 精确匹配
- # www.abc.com/images/
- 2.location ^~ /images/ {
- 我是代码2
- } 匹配常规串,不做正则检查
- # www.abc.com/xxx.gif
- #www.abc.com/xxx.jpg
- #www.abc.com/xxx.gif
- #www.abc.com/xxx.jpeg
- 3.location ~* \.(gif|jpg|jpeg) {
- 我是代码3
- } 正则匹配
- #优先级为4, www.abc.com/doc/xx资源
- 4. location /doc/ {
- 我是代码4
- } 匹配常规字符,有正则优先正则
- #如果你谁都没匹配到的话,默认走/,走网页根目录,优先级最低
- 5.location / {
- 我是代码5
- } 所有的location都不匹配后,默认匹配
Nginx配置文件位置/usr/local/nginx/conf/nginx.conf
- 详解一
- [root@localhost conf]# vi nginx.conf
-
- #启动该程序的默认用户
- #user nobody;
- #一个主进程和多个工作进程。工作进程是单进程的,且不需要特殊授权即可运行;这里定义的是工作进程数量
- worker_processes 4;
-
- #全局错误日志的位置及日志格式
- #error_log logs/error.log;
- #error_log logs/error.log notice;
- #error_log logs/error.log info;
-
- #pid logs/nginx.pid;
-
-
- events {
- #每个工作进程最大的并发数,设置的工作进程数*每个进程允许的最多线程数就是最大并发数
- worker_connections 1024;
-
- #http服务器设置
- http {
- #设定mime类型,类型由mime.type文件定义
- include mime.types;
- default_type application/octet-stream;
- #日志格式
- #log_format main '$remote_addr - $remote_user [$time_local] "$request" '
- # '$status $body_bytes_sent "$http_referer" '
- # '"$http_user_agent" "$http_x_forwarded_for"';
- #$remote_addr与$http_x_forwarded_for用以记录客户端的ip地址;
- #$remote_user:用来记录客户端用户名称;
- #$time_local: 用来记录访问时间与时区;
- #$request: 用来记录请求的url与http协议;
- #$status: 用来记录请求状态;成功是200,
- #$body_bytes_sent :记录发送给客户端文件主体内容大小;
- #$http_referer:用来记录从那个页面链接访问过来的;
- #$http_user_agent:记录客户浏览器的相关信息;
-
- #全局访问日志路径
- #access_log logs/access.log main;
- #sendfile指令指定 nginx 是否调用sendfile 函数(zero copy 方式)来输出文件,对于普通应用,必须设为on。如果用来进行下载等应用磁盘IO重负载应用,可设置为off,以平衡磁盘与网络IO处理速度,降低系统uptime。
- sendfile on;
- #此选项允许或禁止使用socke的TCP_CORK的选项,此选项仅在使用sendfile的时候使用
- #tcp_nopush on;
- #长连接超时时间
- #keepalive_timeout 0;
- keepalive_timeout 65;
- #开启压缩
- #gzip on;
- #配置虚拟主机
- server {
- #虚拟主机使用的端口
- listen 80;
- #虚拟主机域名
- server_name localhost;
-
- #虚拟主机支持的字符集
- #charset koi8-r;
-
- #虚拟主机的访问日志路径
- #access_log logs/host.access.log main;
-
- #定义web根路径
- location / {
- #根目录路径
- root html;
- #索引页
- index index.html index.htm;
- }
- #404页面配置
- #error_page 404 /404.html;
-
- # redirect server error pages to the static page /50x.html
- #
- #根据错误码 返回对应的页面
- error_page 500 502 503 504 /50x.html;
- #定义页面路径
- location = /50x.html {
- root html;
- }
- #定义反向代理服务器 数据服务器是lamp模型
- # proxy the PHP scripts to Apache listening on 127.0.0.1:80
- #
- #location ~ \.php$ {
- # proxy_pass http://127.0.0.1;
- #}
- #定义PHP为本机服务的模型
- # pass the PHP scripts to FastCGI server listening on 127.0.0.1:9000
- #
- #location ~ \.php$ {
- # root html;
- # fastcgi_pass 127.0.0.1:9000;
- # fastcgi_index index.php;
- # fastcgi_param SCRIPT_FILENAME /scripts$fastcgi_script_name;
- # include fastcgi_params;
- #}
- # concurs with nginx's one
- #
- #location ~ /\.ht {
- # deny all;
- #}
- }
-
-
- #
- #server {
- # listen 8000;
- # listen somename:8080;
- # server_name somename alias another.alias;
-
- # location / {
- # root html;
- # index index.html index.htm;
- # }
- #}
-
- #https的配置方案
- # HTTPS server
- #
- #server {
- # listen 443 ssl;
- # server_name localhost;
-
- # ssl_certificate cert.pem;
- # ssl_certificate_key cert.key;
-
- # ssl_session_cache shared:SSL:1m;
- # ssl_session_timeout 5m;
-
- # ssl_ciphers HIGH:!aNULL:!MD5;
- # ssl_prefer_server_ciphers on;
-
- # location / {
- # root html;
- # index index.html index.htm;
- # }
- #}
-
- }
-
详解二
- ########### 每个指令必须有分号结束。#################
- #user administrator administrators; #配置用户或者组,默认为nobody nobody。
- #worker_processes 2; #允许生成的进程数,默认为1
- #pid /nginx/pid/nginx.pid; #指定nginx进程运行文件存放地址
- error_log log/error.log debug; #制定日志路径,级别。这个设置可以放入全局块,http块,server块,级别以此为:debug|info|notice|warn|error|crit|alert|emerg
- events {
- accept_mutex on; #设置网路连接序列化,防止惊群现象发生,默认为on
- multi_accept on; #设置一个进程是否同时接受多个网络连接,默认为off
- #use epoll; #事件驱动模型,select|poll|kqueue|epoll|resig|/dev/poll|eventport
- worker_connections 1024; #最大连接数,默认为512
- }
- http {
- include mime.types; #文件扩展名与文件类型映射表
- default_type application/octet-stream; #默认文件类型,默认为text/plain
- #access_log off; #取消服务日志
- log_format myFormat '$remote_addr–$remote_user [$time_local] $request $status $body_bytes_sent $http_referer $http_user_agent $http_x_forwarded_for'; #自定义格式
- access_log log/access.log myFormat; #combined为日志格式的默认值
- sendfile on; #允许sendfile方式传输文件,默认为off,可以在http块,server块,location块。
- sendfile_max_chunk 100k; #每个进程每次调用传输数量不能大于设定的值,默认为0,即不设上限。
- keepalive_timeout 65; #连接超时时间,默认为75s,可以在http,server,location块。
-
- upstream mysvr {
- server 127.0.0.1:7878;
- server 192.168.10.121:3333 backup; #热备
- }
- error_page 404 https://www.baidu.com; #错误页
- server {
- keepalive_requests 120; #单连接请求上限次数。
- listen 4545; #监听端口
- server_name 127.0.0.1; #监听地址
- location ~*^.+$ { #请求的url过滤,正则匹配,~为区分大小写,~*为不区分大小写。
- #root path; #根目录
- #index vv.txt; #设置默认页
- proxy_pass http://mysvr; #请求转向mysvr 定义的服务器列表
- deny 127.0.0.1; #拒绝的ip
- allow 172.18.5.54; #允许的ip
- }
- }
- }
上面是nginx的基本配置,需要注意的有以下几点:
1、1.$remote_addr 与$http_x_forwarded_for 用以记录客户端的ip地址; 2.$remote_user :用来记录客户端用户名称; 3.$time_local : 用来记录访问时间与时区;4.$request : 用来记录请求的url与http协议;
5.$status : 用来记录请求状态;成功是200, 6.$body_bytes_s ent :记录发送给客户端文件主体内容大小;7.$http_referer :用来记录从那个页面链接访问过来的; 8.$http_user_agent :记录客户端浏览器的相关信息;
2、惊群现象:一个网路连接到来,多个睡眠的进程被同事叫醒,但只有一个进程能获得链接,这样会影响系统性能。
3、每个指令必须有分号结束。
4、修改user 时要用useradd 添加用户,创建一个不能从终端登录的名字为webuser的系统用户
- [root@localhost conf]# useradd -s /sbin/nologin -r webuser
五、nginx的默认网站
当Nginx配置文件中有且只有一个Server的时候,该Server就被Nginx认为是默认网站,所有发给Nginx服务器器80端口的数据都会默认给该Server.
默认网站设置
-
- server {
- listen 80;
- server_name localhost;
-
- #charset koi8-r;
-
- #access_log logs/host.access.log main;
-
- location / {
- root html;
- index index.html index.htm;
- }
-
- #error_page 404 /404.html;
-
- # redirect server error pages to the static page /50x.html
- #
- error_page 500 502 503 504 /50x.html;
- location = /50x.html {
- root html;
- }
-
- # proxy the PHP scripts to Apache listening on 127.0.0.1:80
- #
- #location ~ \.php$ {
- # proxy_pass http://127.0.0.1;
- #}
-
- # pass the PHP scripts to FastCGI server listening on 127.0.0.1:9000
- #
- #location ~ \.php$ {
- # root html;
- # fastcgi_pass 127.0.0.1:9000;
- # include fastcgi_params;
- #}
-
- # deny access to .htaccess files, if Apache's document root
- # concurs with nginx's one
- #
- #location ~ /\.ht {
- # deny all;
- #}
- }
-
-
nginx默认网站的访问控制
创建环境,在html文件夹里创建abc三个文件分别写入index.html
- [root@localhost html]# ls
- 50x.html index.html
- [root@localhost html]# pwd
- /usr/local/nginx/html
- [root@localhost html]# mkdir a b c
- [root@localhost html]# ls
- 50x.html a b c index.html
- [root@localhost html]# echo aaa >a/index.html
- [root@localhost html]# echo bbb >b/index.html
- [root@localhost html]# echo ccc >c/index.html
- [root@localhost html]# ls a/
- index.html
- [root@localhost html]# cat a/index.html
- aaa
- [root@localhost html]# ls
- 50x.html a b c index.html
- [root@localhost html]# elinks http://192.168.199.228/a --dump #本机访问测试
- aaa
-
-
用例1 :ip控制
针对a文件夹只允许本机访问,拒绝其他所有人访问
设置修改nginx配置文件,本机ip192.168.199.228
- [root@localhost html]# pwd
- /usr/local/nginx/html
- [root@localhost html]# vi ../conf/nginx.conf
- ...
- http{
- ...
-
- server{
- listen 80;
- server_name localhost;
-
- #charset koi8-r;
- charset utf-8;
-
- #access_log logs/host.access.log main;
-
- location / {
- root html;
- index index.html index.htm;
- };
- #location / 这里的/代表网站的根目录
- #针对a文件夹进行设置;
- location /a {
- allow 127.0.0.1;
- allow 192.168.199.228;
- deny all;
- #return 404;
- #return http://www.jd.com;
- #可以返回指定错误页,也可以进行url跳转,注意这里的返回是访问成功和不成功的都返回
- }
- }
allow和deny会按照顺序, 从上往下, 找到第一个匹配规则, 判断是否允许访问, 所以一般把all放最后。
其他例子
- deny 192.168.1.1;
allow 192.168.1.0/24;
allow 10.1.1.0/16;
allow 2001:0db8::/32;
deny all;
测试修改后的配置文件是否有误
- [root@localhost html]# pwd
- /usr/local/nginx/html
- [root@localhost html]# ../sbin/nginx -g ../conf/nginx.conf
- nginx: [emerg] unexpected end of parameter, expecting ";" in command line
- [root@localhost html]#
-
修改完后方法一:修改完配置一定要检测Nginx配置是否正确,正确后再重新软加载配置文件
- [root@localhost html]# ../sbin/nginx -t
- nginx: the configuration file /usr/local/nginx/conf/nginx.conf syntax is ok
- nginx: configuration file /usr/local/nginx/conf/nginx.conf test is successful
- [root@localhost html]# ../sbin/nginx -s reload
-
修改完后方法二:不再直接kill后再重启,直接重新加载nginx的配置文件
- [root@localhost html]# killall -s HUP nginx
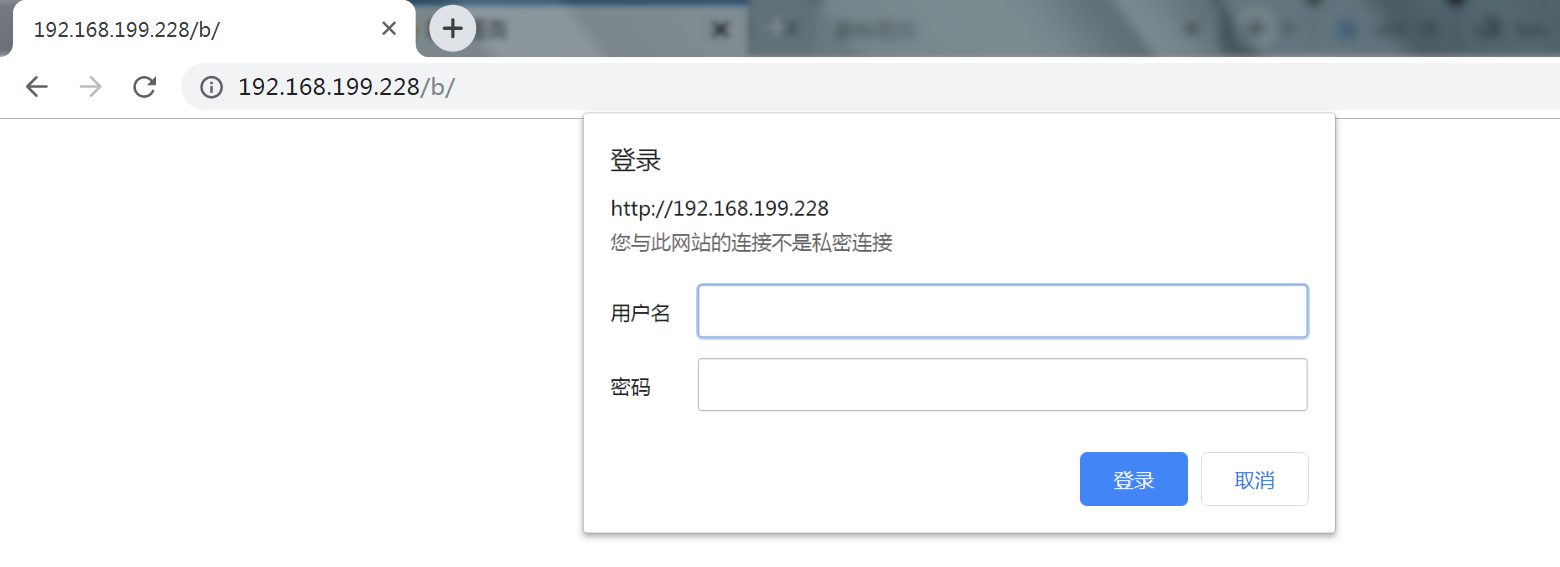
- [root@localhost html]# elinks http://192.168.199.228/a --dump
- aaa
-
用例2:登录验证
针对b文件夹,任何人都可以访问,但是需要凭用户密码进行验证
设置修改nginx配置文件,本机ip192.168.199.228
- [root@localhost html]# pwd
- /usr/local/nginx/html
- [root@localhost html]# vi ../conf/nginx.conf
- ...
- http{
- ...
-
- server{
- listen 80;
- server_name localhost;
-
- #charset koi8-r;
- charset utf-8;
-
- #access_log logs/host.access.log main;
-
- location / {
- root html;
- index index.html index.htm;
- };
- #location / 这里的/代表网站的根目录
- #针对a文件夹进行设置;
- location /a {
- allow 127.0.0.1;
- allow 192.168.199.228;
- deny all;
- #return 404;
- #return http://www.jd.com;
- #可以返回指定错误页,也可以进行url跳转,注意这里的返回是访问成功和不成功的都返回
- }
- #针对b文件夹进行设置;
- location /b {
- auth_basic ”登陆验证test";
- auth_basic_user_file /etc/nginx/htpasswd;
- #auth_basic_user_file 用来存储用户认证信息的文件;
- }
- }
语法讲解: auth_basic 默认关闭,开启的话输入一段字符串即可。 auth_basic_user_file 该文件存储用户账号密码。
安装httpd-tools使用htpasswd工具生成认证信息文件放置在上面设置的位置
- [root@localhost html]# yum -y install httpd-tools
- Loaded plugins: fastestmirror
- Loading mirror speeds from cached hostfile
- * base: hk.mirrors.thegigabit.com
- * extras: hk.mirrors.thegigabit.com
- * updates: hk.mirrors.thegigabit.com
- ...
-
-
- [root@localhost html]# mkdir /etc/nginx
- [root@localhost html]# htpasswd -c /etc/nginx/htpasswd user1
- #创建文件htpasswd并将新用户user1和加密的密码写入文件到/etc/nginx/目录下
- New password:
- Re-type new password:
- Adding password for user user1
- [root@localhost html]# htpasswd -m /etc/nginx/htpasswd user2
- #如果htpasswd文件已经存在则使用-m参数添加新用户账户密码
- New password:
- Re-type new password:
- Adding password for user user2
- [root@localhost html]# cat /etc/nginx/htpasswd
- user1:$apr1$C8hzuJ.t$z8ZI/y4HgrbrhnmC1QkTp/
- user2:$apr1$5LB3P1Wj$HxyEELRZ3vDogTGM3xR2E.
- [root@localhost html]#
-
重新加载配置文件验证效果
- [root@localhost html]# killall -s HUP nginx
- [root@localhost html]#
-

参考链接
[1]https://www.cnblogs.com/knowledgesea/p/5175711.html
nginx之旅(第一篇):nginx下载安装、nginx启动与关闭、nginx配置文件详解、nginx默认网站的更多相关文章
- 从零开始使用git第一篇:下载安装配置
从零开始使用git 第一篇:下载安装配置 第一篇:从零开始使用git第一篇:下载安装配置 第二篇:从零开始使用git第二篇:git实践操作 第三篇:从零开始使用git第三篇:git撤销操作.分支操作和 ...
- zabbix安装配置agent程序之agent配置文件详解
安装zabbix-agent http://repo.zabbix.com/zabbix/3.2/rhel/6/x86_64/ 下载:zabbix-agent-3.2.0-1.el6.x86_64.r ...
- 【转】nginx服务器安装及配置文件详解
原文:http://seanlook.com/2015/05/17/nginx-install-and-config/ nginx服务器安装及配置文件详解 nginx在工作中已经有好几个环境在使用了, ...
- nginx高性能WEB服务器系列之四配置文件详解
nginx系列友情链接:nginx高性能WEB服务器系列之一简介及安装https://www.cnblogs.com/maxtgood/p/9597596.htmlnginx高性能WEB服务器系列之二 ...
- Nginx配置配置文件详解
文章目录 配置文件 nginx.conf配置文件详解 用于调试.定位问题的配置参数 正常运行必备的配置参数 优化性能的配置参数 事件相关配置 Fastcgi相关配置参数 常需要调整的参数 nginx作 ...
- 一、Nginx配置文件详解
配置文件介绍 主要有两部分:分别是 main:主体部分 http{}:虚拟主机配置部分 配置指令主要以分号结尾:配置语法:directive value1 [value2 ....] 支持使用的变量 ...
- ubuntu nginx 安装以及配置文件详解
1.到nginx官网下载源码包.最好下载稳定版本,nginx官网http://www.nginx.org/ 2.安装nginx依赖包运行命令: sudo apt-get install libssl- ...
- nginx安装及配置文件详解
一)nginx安装及模块讲解 1.1.nginx安装步骤 mkdir /soft wget http://nginx.org/download/nginx-1.12.0.tar.gz tar zxf ...
- 第一篇博客 安装open live writer
第一篇博客安装open live writer http://openlivewriter.org/ 有的人可能会打不开,所以我准备了一个百度云的链接地址 链接:https://pan.baidu.c ...
随机推荐
- Socket是什么(一)
网络编程就是编写程序使两台联网的计算机相互交换数据. 那么,这两台计算机之间用什么传输数据呢?首先需要物理连接.如今大部分计算机都已经连接到互联网,因此不用担心这一点. 在此基础上,只需要考虑如何编写 ...
- ASP.NET CoreMVC 中的视图
ASP.NET Core MVC 中的视图 MVC 中的视图 用于显示Controller提供给它的 Model 的业务数据. 视图是带有嵌入 Razor 标记的 HTML 模板. 如果编程语言是 C ...
- mysql出生日期转成年龄
可以直接用数据库函数进行转换,省去java代码转换的麻烦 SELECT TIMESTAMPDIFF(YEAR, '1988/01/10', CURDATE()) 且此函数容错很好,就算是null,‘ ...
- Ubuntu 14.04 apt-get update失效解决(转)
现象如下: VirtualBox:~$ sudo apt-get update Err http://mirrors.aliyun.com trusty InRelease Err http://mi ...
- jar解压后重新打包
因为一些原因修改了jar中的配置文件,但用WinRAR压缩成zip文件后该后缀名为jar,发现重新压缩的文件不可用,所有这些情况下我们必须用jar重新打包. 配置Java环境,让jar命令可用: ja ...
- sql server 2019 & spark
https://cloudblogs.microsoft.com/sqlserver/2019/04/01/how-to-develop-and-submit-spark-jobs-to-sql-se ...
- python数据分析开发中的常用整理
Pandas操作 python使用pandas读取csv import pandas as pd #数据筛选 usetTable = pd.read_csv(filename,header = 0) ...
- 用Java编程能给物联网(IoT)带来什么优势与不同?
用Java编程能给物联网(IoT)带来什么优势与不同? 这是一个不太容易回答的问题,也是一个适合拿出来与大家讨论的一个话题~首先需要聊聊物联网硬件与嵌入式设备有什么不同.嵌入式设备通常是一个软件一体的 ...
- 小记:iterator && auto
小记:iterator && auto iterator 众所周知,我们有一种强大的东西,它叫做STL,比如queue.vector.set.map.multimap .deque等. ...
- 集合类源码(七)Map(ConcurrentHashMap, ConcurrentSkipListMap, TreeMap)
ConcurrentHashMap 内部结构 在JDK1.8之前的实现结构是:ReentrantLock+Segment+HashEntry+链表 JDK1.8之后的实现结构是:synchronize ...