Android 优秀UI控件 ---- FlowingDrawer
1,前天在git上看到了一个不错的控件 ,最近两天项目也没有那么赶了,就抽时间来写写代码,锻炼一下手感,先看一下效果吧。
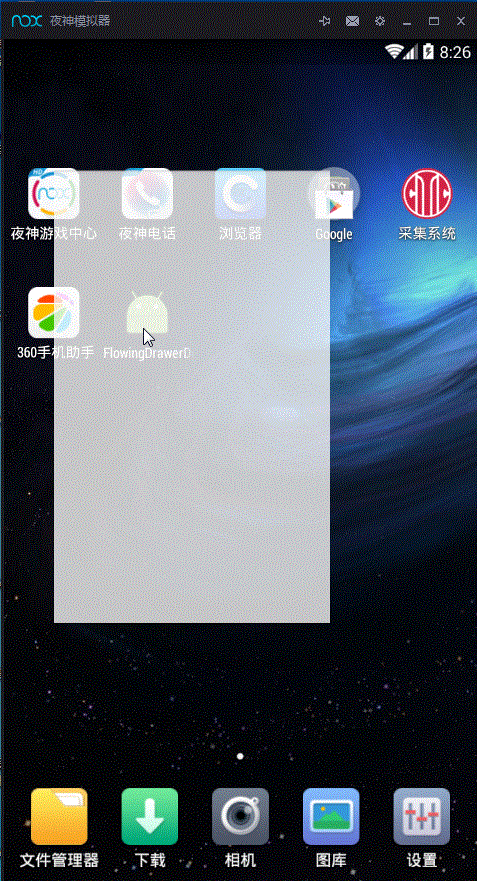
2 整体来看 ,主要是有两块来实现的,①主界面的RecyclerView ,②菜单栏的LeftDrawerLayout ,
先来将这个控件引到项目中 ,在build.gradle加入以下代码
compile 'com.mxn.soul:flowingdrawer-core:1.2.2'

compile 'com.nineoldandroids:library:2.4.0'
主界面的布局activity.xml
<?xml version="1.0" encoding="utf-8"?>

<com.mxn.soul.flowingdrawer_core.LeftDrawerLayout

    android:id="@+id/lf_drawerlayout"

    xmlns:android="http://schemas.android.com/apk/res/android"

    xmlns:app="http://schemas.android.com/apk/res-auto"

    android:layout_width="match_parent"

    android:layout_height="match_parent"

    android:clipChildren="false"

    >

    <!-- android:clipChildren="false" 这个属性是不限制子控件在其范围内-->

    <android.support.design.widget.CoordinatorLayout

        android:id="@+id/coordinatorLayout"

        android:layout_width="match_parent"

        android:layout_height="match_parent"

        android:orientation="vertical">

        <android.support.v7.widget.RecyclerView

            android:id="@+id/recyclerView"

            android:layout_width="match_parent"

            android:layout_height="match_parent"

            android:scrollbars="none"

            app:layout_behavior="@string/appbar_scrolling_view_behavior"/>

        <android.support.design.widget.AppBarLayout

            android:id="@+id/appBarLayout"

            android:layout_width="match_parent"

            android:layout_height="wrap_content">

            <include

                android:id="@+id/toolbar"

                layout="@layout/toolbar"/>

        </android.support.design.widget.AppBarLayout>

    </android.support.design.widget.CoordinatorLayout>

    <!--menu-->

    <RelativeLayout

        android:layout_width="280dp"

        android:layout_height="match_parent"

        android:layout_gravity="start"

        android:clipChildren="false"

        >

        <com.mxn.soul.flowingdrawer_core.FlowingView

            android:id="@+id/flowingView"

            android:layout_width="match_parent"

            android:layout_height="match_parent"/>

       <!--FlowingView 是弹出的那多余的那一块-->

        <FrameLayout

            android:id="@+id/frame_container_menu"

            android:layout_width="match_parent"

            android:layout_height="match_parent"

            android:layout_alignParentLeft="true"

            android:layout_marginRight="25dp"

            android:paddingRight="10dp"

            />

    </RelativeLayout>

</com.mxn.soul.flowingdrawer_core.LeftDrawerLayout>
toolbar.xml 代码
<?xml version="1.0" encoding="utf-8"?>

<android.support.v7.widget.Toolbar android:id="@+id/toolbar"

                                   xmlns:android="http://schemas.android.com/apk/res/android"

                                   xmlns:app="http://schemas.android.com/apk/res-auto"

                                   android:layout_width="match_parent"

                                   android:layout_height="?attr/actionBarSize"

                                   android:background="?attr/colorPrimary"

                                   app:elevation="@dimen/default_elevation"

                                   app:layout_scrollFlags="scroll|enterAlways"

                                   app:theme="@style/ThemeOverlay.AppCompat.Dark.ActionBar">

</android.support.v7.widget.Toolbar>
MainActivity.java
package wangjitao.com.flowingdrawerdemo;

import android.content.Context;

import android.support.v4.app.FragmentManager;

import android.support.v7.app.AppCompatActivity;

import android.os.Bundle;

import android.support.v7.widget.LinearLayoutManager;

import android.support.v7.widget.RecyclerView;

import android.support.v7.widget.Toolbar;

import android.view.View;

import com.mxn.soul.flowingdrawer_core.FlowingView;

import com.mxn.soul.flowingdrawer_core.LeftDrawerLayout;

public class MainActivity extends AppCompatActivity {

    private Context mContext = MainActivity.this ;

    private RecyclerView mRecyclerView ;

    private LeftDrawerLayout mLeftDrawerLayout ;

    private FlowingView mFlowingView ;

    private MyFeedAdapter mMyFeedAdapter ;

    @Override

    protected void onCreate(Bundle savedInstanceState) {

        super.onCreate(savedInstanceState);

        setContentView(R.layout.activity_main);

        setupToolbar();

        initView();

    }

    private void initView() {

        mLeftDrawerLayout = (LeftDrawerLayout) findViewById(R.id.lf_drawerlayout);

        //用于设置左边的drawlayout

        FragmentManager mFragmentManager = getSupportFragmentManager() ;

        MyMenuFragment mMenuFragment = (MyMenuFragment) mFragmentManager.findFragmentById(R.id.frame_container_menu);

        mFlowingView = (FlowingView) findViewById(R.id.flowingView);

        if (mMenuFragment == null) {

            mFragmentManager.beginTransaction().add(R.id.frame_container_menu, mMenuFragment = new MyMenuFragment()).commit();

        }

        mLeftDrawerLayout.setFluidView(mFlowingView);

        mLeftDrawerLayout.setMenuFragment(mMenuFragment);

        mRecyclerView = (RecyclerView) findViewById(R.id.recyclerView);

        mRecyclerView.setLayoutManager(new LinearLayoutManager(this) {

            @Override

            protected int getExtraLayoutSpace(RecyclerView.State state) {

                return 300;

            }

        });

        mMyFeedAdapter = new MyFeedAdapter(mContext);

        mRecyclerView.setAdapter(mMyFeedAdapter);

    }

    private void setupToolbar() {

        Toolbar toolbar = (Toolbar) findViewById(R.id.toolbar);

        setSupportActionBar(toolbar);

        toolbar.setNavigationIcon(R.mipmap.ic_menu_white);

        toolbar.setNavigationOnClickListener(new View.OnClickListener() {

            @Override

            public void onClick(View v) {

                mLeftDrawerLayout.toggle();

            }

        });

    }

    @Override

    public void onBackPressed() {

        if (mLeftDrawerLayout.isShownMenu()){

            mLeftDrawerLayout.closeDrawer();

        }else {

            super.onBackPressed();

        }

    }

}
再看看我们关键的自定义的FragmentLayout
package wangjitao.com.flowingdrawerdemo;

import android.os.Bundle;

import android.support.annotation.Nullable;

import android.support.design.widget.NavigationView;

import android.util.Log;

import android.view.LayoutInflater;

import android.view.View;

import android.view.ViewGroup;

import android.widget.ImageView;

import android.widget.Toast;

import com.mxn.soul.flowingdrawer_core.MenuFragment;

import com.squareup.picasso.Picasso;

public class MyMenuFragment extends MenuFragment {

    private ImageView ivMenuUserProfilePhoto;

    @Override

    public void onCreate(@Nullable Bundle savedInstanceState) {

        super.onCreate(savedInstanceState);

    }

    @Override

    public View onCreateView(LayoutInflater inflater, ViewGroup container, Bundle savedInstanceState) {

        View view = inflater.inflate(R.layout.fragment_menu, container,

                false);

        NavigationView mNavigationView = (NavigationView) view.findViewById(R.id.vNavigation) ;

        ivMenuUserProfilePhoto = (ImageView) mNavigationView.getHeaderView(0).findViewById(R.id

                .ivMenuUserProfilePhoto);

        setupHeader();

        return  setupReveal(view) ;

    }

    private void setupHeader() {

        int avatarSize = getResources().getDimensionPixelSize(R.dimen.global_menu_avatar_size);

        String profilePhoto = getResources().getString(R.string.user_profile_photo);

        Picasso.with(getActivity())

                .load(profilePhoto)

                .placeholder(R.drawable.img_circle_placeholder)

                .resize(avatarSize, avatarSize)

                .centerCrop()

                .transform(new CircleTransformation())

                .into(ivMenuUserProfilePhoto);

    }

    public void onOpenMenu(){

    }

    public void onCloseMenu(){

    }

}
菜单栏中的布局文件fragment_menu.xml
    <RelativeLayout

        xmlns:android="http://schemas.android.com/apk/res/android"

        xmlns:app="http://schemas.android.com/apk/res-auto"

        android:layout_width="match_parent"

        android:layout_height="match_parent">

        <android.support.design.widget.NavigationView

            android:id="@+id/vNavigation"

            android:layout_width="wrap_content"

            android:layout_height="match_parent"

            android:layout_gravity="start"

            android:background="@android:color/transparent"

            app:headerLayout="@layout/menu_header"

            app:itemIconTint="#8b8b8b"

            app:itemTextColor="#666666"

            app:menu="@menu/drawer_menu"/>

    </RelativeLayout>
menu_head.xml
<?xml version="1.0" encoding="utf-8"?>

<FrameLayout xmlns:android="http://schemas.android.com/apk/res/android"

    android:layout_width="match_parent"

    android:layout_height="wrap_content"

    android:background="@android:color/transparent"

    android:clickable="true">

    <LinearLayout

        android:id="@+id/vGlobalMenuHeader"

        android:layout_width="match_parent"

        android:layout_height="wrap_content">

        <ImageView

            android:id="@+id/ivMenuUserProfilePhoto"

            android:layout_width="@dimen/global_menu_avatar_size"

            android:layout_height="@dimen/global_menu_avatar_size"

            android:layout_margin="12dp" />

        <TextView

            android:layout_width="wrap_content"

            android:layout_height="wrap_content"

            android:layout_gravity="center"

            android:layout_weight="1"

            android:text="阿呆哥哥"

            android:textColor="#2d5d82"

            android:textSize="16sp"

            android:textStyle="bold" />

        <ImageButton

            android:layout_width="wrap_content"

            android:layout_height="wrap_content"

            android:layout_gravity="center_vertical"

            android:layout_margin="16dp"

            android:background="@android:color/transparent"

            android:src="@mipmap/ic_global_menu_search" />

    </LinearLayout>

    <View

        android:layout_width="match_parent"

        android:layout_height="1dp"

        android:layout_gravity="bottom"

        android:background="#dddddd" />

</FrameLayout>
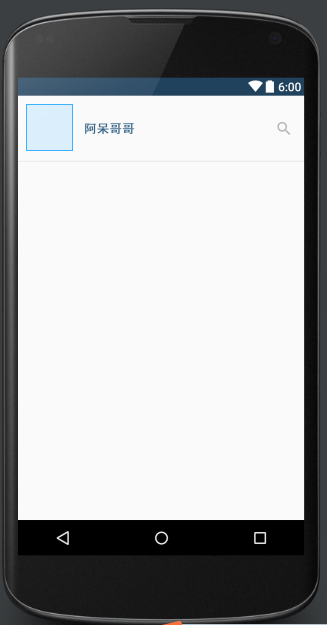
看一下menu_head的截图
drawer_menu.xml
<menu xmlns:android="http://schemas.android.com/apk/res/android">

    <group android:id="@+id/menu_group_1">

        <item

            android:id="@+id/menu_feed"

            android:icon="@mipmap/ic_global_menu_feed"

            android:title="My Feed" />

        <item

            android:id="@+id/menu_direct"

            android:icon="@mipmap/ic_global_menu_direct"

            android:title="Instagram Direct" />

        <item

            android:id="@+id/menu_news"

            android:icon="@mipmap/ic_global_menu_news"

            android:title="News" />

        <item

            android:id="@+id/menu_popular"

            android:icon="@mipmap/ic_global_menu_popular"

            android:title="Popular" />

        <item

            android:id="@+id/menu_photos_nearby"

            android:icon="@mipmap/ic_global_menu_nearby"

            android:title="Photos Nearby" />

        <item

            android:id="@+id/menu_photo_you_liked"

            android:icon="@mipmap/ic_global_menu_likes"

            android:title="Photos You've Liked" />

    </group>

    <group android:id="@+id/menu_group_2">

        <item

            android:id="@+id/menu_settings"

            android:title="Settings" />

        <item

            android:id="@+id/menu_about"

            android:title="About" />

    </group>

</menu>
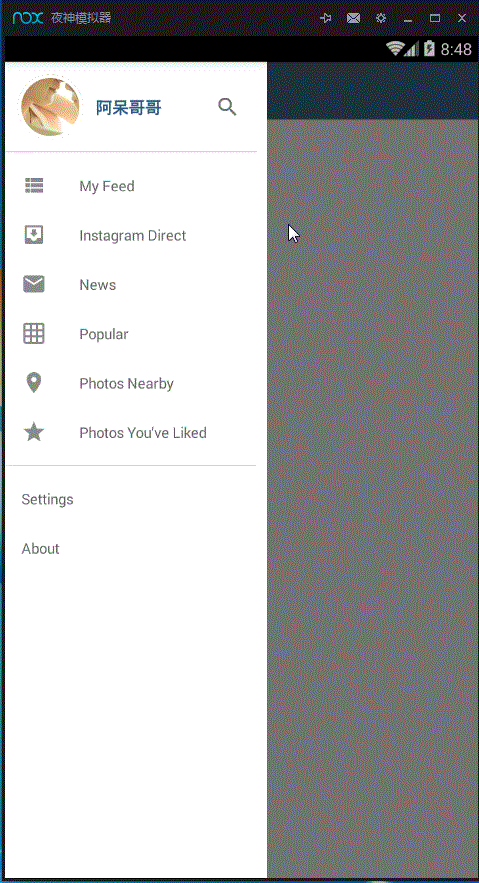
到这里基本上的模型就出来了,看效果 :
加上制作用户头像的圆形制作的CircleTransformation.class
package wangjitao.com.flowingdrawerdemo;

import android.graphics.Bitmap;

import android.graphics.BitmapShader;

import android.graphics.Canvas;

import android.graphics.Color;

import android.graphics.Paint;

import com.squareup.picasso.Transformation;

public class CircleTransformation implements Transformation {

    private static final int STROKE_WIDTH = 6;

    @Override

    public Bitmap transform(Bitmap source) {

        int size = Math.min(source.getWidth(), source.getHeight());

        int x = (source.getWidth() - size) / 2;

        int y = (source.getHeight() - size) / 2;

        Bitmap squaredBitmap = Bitmap.createBitmap(source, x, y, size, size);

        if (squaredBitmap != source) {

            source.recycle();

        }

        Bitmap bitmap = Bitmap.createBitmap(size, size, source.getConfig());

        Canvas canvas = new Canvas(bitmap);

        Paint avatarPaint = new Paint();

        BitmapShader shader = new BitmapShader(squaredBitmap, BitmapShader.TileMode.CLAMP, BitmapShader.TileMode.CLAMP);

        avatarPaint.setShader(shader);

        Paint outlinePaint = new Paint();

        outlinePaint.setColor(Color.WHITE);

        outlinePaint.setStyle(Paint.Style.STROKE);

        outlinePaint.setStrokeWidth(STROKE_WIDTH);

        outlinePaint.setAntiAlias(true);

        float r = size / 2f;

        canvas.drawCircle(r, r, r, avatarPaint);

        canvas.drawCircle(r, r, r - STROKE_WIDTH / 2, outlinePaint);

        squaredBitmap.recycle();

        return bitmap;

    }

    @Override

    public String key() {

        return "circleTransformation()";

    }

}
再加上RecyclerView的Adapter,基本上就成功了
package wangjitao.com.flowingdrawerdemo;

import android.content.Context;

import android.support.v7.widget.RecyclerView;

import android.view.LayoutInflater;

import android.view.View;

import android.view.ViewGroup;

import android.widget.FrameLayout;

import android.widget.ImageButton;

import android.widget.ImageView;

import android.widget.TextSwitcher;

import android.widget.TextView;

/**

 * Created by wangjitao on 2016/4/14.

 */

public class MyFeedAdapter extends RecyclerView.Adapter<MyFeedAdapter.MyFeedViewHolder> {

    private Context context;

    private int likeCount = 123 ;

    public MyFeedAdapter(Context context) {

        this.context = context;

    }

    @Override

    public MyFeedViewHolder onCreateViewHolder(ViewGroup parent, int viewType) {

        View view = LayoutInflater.from(context).inflate(R.layout.item_recyclerview, parent, false);

        return new MyFeedViewHolder(view);

    }

    @Override

    public void onBindViewHolder(final MyFeedViewHolder holder, int position) {

        if (position % 2 == 0) {

            holder.ivFeedCenter.setImageResource(R.mipmap.img_feed_sakura);

            holder.ivFeedBottom.setImageResource(R.mipmap.img_feed_bottom_1);

        } else {

            holder.ivFeedCenter.setImageResource(R.mipmap.img_feed_water);

            holder.ivFeedBottom.setImageResource(R.mipmap.img_feed_bottom_2);

        }

        holder.btnComments.setTag(position);

        holder.btnMore.setTag(position);

        holder.ivFeedCenter.setTag(holder);

        holder.btnLike.setTag(holder);

        holder.iv_likes.setOnClickListener(new View.OnClickListener() {

            @Override

            public void onClick(View v) {

                holder.tv_likes_count.setText((++likeCount)+" likes");

            }

        });

    }

    @Override

    public int getItemCount() {

        return 10;

    }

    class MyFeedViewHolder extends RecyclerView.ViewHolder {

        ImageView ivFeedCenter;

        ImageView ivFeedBottom;

        ImageButton btnComments;

        ImageButton btnLike;

        ImageButton btnMore;

        TextSwitcher tsLikesCounter;

        ImageView ivUserProfile;

        FrameLayout vImageRoot;

        ImageView iv_likes;

        TextView tv_likes_count ;

        public MyFeedViewHolder(View view) {

            super(view);

            ivFeedCenter = (ImageView) view.findViewById(R.id.ivFeedCenter);

            ivFeedBottom = (ImageView) view.findViewById(R.id.ivFeedBottom);

            btnComments = (ImageButton) view.findViewById(R.id.btnComments);

            btnLike = (ImageButton) view.findViewById(R.id.btnLike);

            btnMore = (ImageButton) view.findViewById(R.id.btnMore);

            tsLikesCounter = (TextSwitcher) view.findViewById(R.id.tsLikesCounter);

            ivUserProfile = (ImageView) view.findViewById(R.id.ivUserProfile);

            vImageRoot = (FrameLayout) view.findViewById(R.id.vImageRoot);

            iv_likes = (ImageView) view.findViewById(R.id.iv_likes);

            tv_likes_count = (TextView) view.findViewById(R.id.tv_likes_count);

        }

    }

}
项目下载地址:点击下载(嘿嘿嘿)
Android 优秀UI控件 ---- FlowingDrawer的更多相关文章
- [Android] Android 让UI控件固定于底部的几种方法
Android 让UI控件固定于底部的几种方法1.采用linearlayout布局:android:layout_height="0dp" <!-- 这里不能设置fill_p ...
- Android之UI控件
本文主要包括以下内容 Spinner的使用 Gallery的使用 Spinner的使用 Spinner的实现过程是 1. 在xml文件中定义Spinner的控件 2. 在activity中获取Spin ...
- Android 常用UI控件之TabHost(5)Tab栏在底部且在最上层也不盖tab页
tab栏在底部 <TabHost android:id="@android:id/tabhost" android:layout_width="match_pare ...
- Android 常用UI控件之TabHost(4)实现当Tab栏有多个tab时,可以左右滑动
<!-- <HorizontalScrollView android:id="@+id/horizontalScrollView1" android:layout_wi ...
- Android 常用UI控件之TabHost(2)简单示例
1,布局 <FrameLayout xmlns:android="http://schemas.android.com/apk/res/android" xmlns:tool ...
- Android 常用UI控件之TabHost(1)TabHost的两种布局方式
TabHost是Android中的tab组件. TabHost布局文件的基本结构 TabHost下有个layout,这个layout中有TabWidget与FrameLayout.TabWidget是 ...
- Android 常用UI控件之TabHost(3)在4.0不显示图标的解决方案
1,自定义 TabWidget 上每个tab的view 2,用多个图片
- Android 常用UI控件之Tab控件的实现方案
实现Tab的方式有多种 1,ActionBar有两种模式可以实现,但是已经过期 tab模式tab在顶部,分裂模式tab在底部(同时所有action item都在底部). 2,PagerTitleStr ...
- ANDROID L——Material Design详解(UI控件)
转载请注明本文出自大苞米的博客(http://blog.csdn.net/a396901990),谢谢支持! Android L: Google已经确认Android L就是Android Lolli ...
随机推荐
- VS2013编译Qt5.6.0静态库(乌合之众)
获取qt5.6.0源码包 直接去www.qt.io下载就好了,这里就不详细说了. 这里是我已经编译好的** 链接:http://pan.baidu.com/s/1pLb6wVT 密码: ak7y ** ...
- Truncate table
Truncate是一个能够快速清空资料表内所有资料的SQL语法.并且能针对具有自动递增值的字段,做计数重置归零重新计算的作用.
- SQL Server 2008 R2[ALTER]列属性修改
1:向表中添加字段 Alter table [表名] add [列名] 类型 2: 删除字段 Alter table [表名] drop column [列名] 3: 修改表中字段类型 (可以修 ...
- SqlServer2008R2 修改表中列为自增列
选定列,修改列属性标识规范中(是标识)为是,标识增量为1,标识种子为1 SQL语句:alter table 表名 add 列名 int IDENTITY(1,1) NOT NULL
- AD834+表面声波滤波器调试小结
AD834:带宽较宽,300M无压力,但是输出幅度小,当输入2VPPX2VPP的时候最大输出400mVPP.一个特别要注意的地方是输入走线尽量短,敷铜间距至少满足3倍线宽,不然隔直之后还会耦合信号进去 ...
- box_shadow
.tip{width:485px; height:260px; position:absolute;top:10%; left:30%;background:#fcfdfd; box-shadow:1 ...
- eclipse中tomcat能正常启动,但是浏览器访问不了tomcat首页
在eclipse中新建tomcat7,完成后tomcat能够正常启动,但是浏览器问题localhost:8080访问不了. 解决方法如下: 双击eclipse中服务器中的tomcat 出现tomcat ...
- install 命令用法详解
install 命令用法详解 http://man.linuxde.net/install install命令的作用是安装或升级软件或备份数据,它的使用权限是所有用户.install命令和cp命令类似 ...
- 话说 依赖注入(DI) or 控制反转(IoC)
科普:首先依赖注入和控制反转说的是同一个东西,是一种设计模式,这种设计模式用来减少程序间的耦合,鄙人学习了一下,看TP官网还没有相关的文章,就写下这篇拙作介绍一下这种设计模式,希望能为TP社区贡献一些 ...
- Ionic学习笔记四 一些问题处理
版权声明:本文为博主原创文章,转载请留链接,非常感谢. 目录(?)[+] IONIC actionsheet 的cancel menu在android下不显示的bug 在 _action-sh ...