WPF学习11:基于MVVM Light 制作图形编辑工具(2)
本文是WPF学习10:基于MVVM Light 制作图形编辑工具(1)的后续
这一次的目标是完成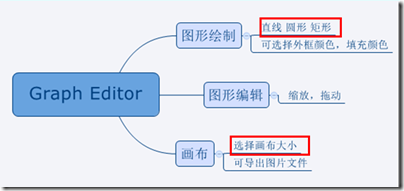
两个任务。
画布
效果:
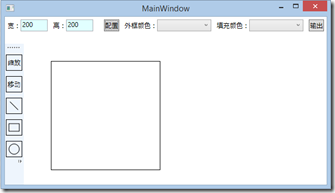

画布上,选择的方案是:直接以Image作为画布,使用RenderTargetBitmap绑定为Image的图片源,这样可以为后续的导出图片功能提供很大的便利。
对拖动栏XAML进行如下修改:
<ScrollViewer  HorizontalScrollBarVisibility="Auto" VerticalScrollBarVisibility="Auto" Grid.Column="1" Grid.Row="1">

    <Canvas  VerticalAlignment="Top" HorizontalAlignment="Left"  Width="{Binding ActualWidth,ElementName=ImageBorder}"  SnapsToDevicePixels="False" Height="{Binding Path=ActualHeight,ElementName=ImageBorder}" Margin="50 50 0 0 " ClipToBounds="True">

        <Border Name="ImageBorder" BorderBrush="Black" BorderThickness="1">

            <Image Source="{Binding DrawingBitmap}">

            </Image>

        </Border>

    </Canvas>

</ScrollViewer>
相应的,ViewModel中也要添加代码。
private RenderTargetBitmap _drawingBitmap;

public RenderTargetBitmap DrawingBitmap

{

    get { return _drawingBitmap; }

    set

    {

        _drawingBitmap = value;

        RaisePropertyChanged("DrawingBitmap");

    }

}
到这里,画布的绑定就完成了。
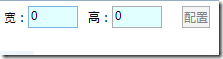
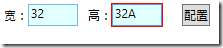
现在要完成调节画布大小的相关代码,首先,在XAML增加两个输入框使得长宽由界面配置:
<TextBlock VerticalAlignment="Center"><Run Text="宽:"/></TextBlock>

<TextBox Width="50" Margin="0 0 10 0" Text="{Binding DrawingAreaWidth, ValidatesOnDataErrors=True, UpdateSourceTrigger=PropertyChanged}"/>

<TextBlock VerticalAlignment="Center"><Run Text="高:"/></TextBlock>

<TextBox Width="50" Margin="0 0 10 0" Text="{Binding DrawingAreaHeight, ValidatesOnDataErrors=True, UpdateSourceTrigger=PropertyChanged}"/>

<Button  Margin="10 0 10 0" Content="配置" Command="{Binding SetDrawingAreaSize}"/>
ViewModel部分:
private Int32 _drawingAreaWidth;

public Int32 DrawingAreaWidth

{

    get { return _drawingAreaWidth; }

    set

    {

        _drawingAreaWidth = value;

        RaisePropertyChanged("DrawingAreaWidth");

    }

}

private Int32 _drawingAreaHeight;

public Int32 DrawingAreaHeight

{

    get { return _drawingAreaHeight; }

    set

    {

        _drawingAreaHeight = value;

        RaisePropertyChanged("DrawingAreaHeight");

    }

}

最后是Command SetDrawingAreaSize 的实现:
private ICommand _setDrawingAreaSize;

public ICommand SetDrawingAreaSize

{

    get

    {

        return _setDrawingAreaSize ?? (_setDrawingAreaSize = new RelayCommand(() =>

            {

                DrawingBitmap = new RenderTargetBitmap(DrawingAreaWidth, DrawingAreaHeight,

                    96, 96, PixelFormats.Pbgra32);

                var drawingVisual = new DrawingVisual();

                using (var context = drawingVisual.RenderOpen())

                {

                    context.DrawRectangle(Brushes.White, null,

                        new Rect(0, 0, DrawingAreaWidth, DrawingAreaHeight));

                }

                DrawingBitmap.Render(drawingVisual);

            }

            , () => (DrawingAreaWidth != 0 && DrawingAreaHeight != 0)));

    }

}
至此,本节最开始的效果就完成啦。
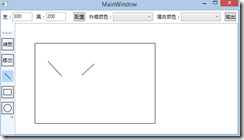
直线
效果如下:

XAML中需要引入两个命名空间:
xmlns:i="clr-namespace:System.Windows.Interactivity;assembly=System.Windows.Interactivity"

xmlns:command=http://www.galasoft.ch/mvvmlight
引入后我们就可以为Image添加三个响应鼠标的命令。
<Image Source="{Binding DrawingBitmap}">

    <i:Interaction.Triggers>

        <i:EventTrigger EventName="MouseMove">

            <command:EventToCommand Command="{Binding MouseMoveCommand}" PassEventArgsToCommand="True" />

        </i:EventTrigger>

        <i:EventTrigger EventName="MouseDown" >

            <command:EventToCommand Command="{Binding MouseDownCommand}" PassEventArgsToCommand="True"/>

        </i:EventTrigger>

        <i:EventTrigger EventName="MouseUp" >

            <command:EventToCommand Command="{Binding MouseUpCommand}" PassEventArgsToCommand="True"/>

        </i:EventTrigger>

    </i:Interaction.Triggers>

</Image>
在界面上绘制Line控件,用于动态操作时的显示,操作完毕,隐藏控件,在Image上绘图。
<Line Stroke="Black" StrokeThickness="1" Visibility="{Binding LineVisibility}"

X1="{Binding PositionX1}" X2="{Binding PositionX2}"

Y1="{Binding PositionY1}" Y2="{Binding PositionY2}"/>
ViewModel添加以下属性,X2,Y1,Y2略。
private Visibility _lineVisibility = Visibility.Hidden;

public Visibility LineVisibility

{

    get { return _lineVisibility; }

    set

    {

        _lineVisibility = value;

        RaisePropertyChanged("LineVisibility");

    }

}

private Double _positionX1;

public Double PositionX1

{

    get { return _positionX1; }

    set

    {

        _positionX1 = value;

        RaisePropertyChanged("PositionX1");

    }

}
为了让ViewModel能知道当前的绘图状态(直线,圆,矩形)在加一些数据绑定:
<RadioButton Style="{StaticResource StatusBarButton}" IsChecked="{Binding LineModeEnable}">

    <Line X1="0" Y1="0" X2="15" Y2="15" Stroke="Black" StrokeThickness="1"></Line>

</RadioButton>

<RadioButton Style="{StaticResource StatusBarButton}" IsChecked="{Binding RectangleModeEnable}">

    <Rectangle Width="20" Height="15" Stroke="Black" StrokeThickness="1"></Rectangle>

</RadioButton>

<RadioButton Style="{StaticResource StatusBarButton}" IsChecked="{Binding EllipseModeEnable}">

    <Ellipse Width="20" Height="20" Stroke="Black" StrokeThickness="1"></Ellipse>

</RadioButton>
最后,我们编写三个鼠标相应的指令:
public ICommand SetDrawingAreaSize

{

    get

    {

        return _setDrawingAreaSize ?? (_setDrawingAreaSize = new RelayCommand(() =>

            {

                DrawingBitmap = new RenderTargetBitmap(DrawingAreaWidth, DrawingAreaHeight,

                    96, 96, PixelFormats.Pbgra32);

                var drawingVisual = new DrawingVisual();

                using (var context = drawingVisual.RenderOpen())

                {

                    context.DrawRectangle(Brushes.White, null,

                        new Rect(0, 0, DrawingAreaWidth, DrawingAreaHeight));

                }

                DrawingBitmap.Render(drawingVisual);

            }

            , () => (DrawingAreaWidth != 0 && DrawingAreaHeight != 0)));

    }

}

private ICommand _mouseMoveCommand;

public ICommand MouseMoveCommand

{

    get

    {

        return _mouseMoveCommand ?? (_mouseMoveCommand = new RelayCommand<MouseEventArgs>((e) =>

        {

            PositionX2 = e.GetPosition((IInputElement)e.Source).X;

            PositionY2 = e.GetPosition((IInputElement)e.Source).Y;

        }

            , (e) => true));

    }

}

private ICommand _mouseDownCommand;

public ICommand MouseDownCommand

{

    get

    {

        return _mouseDownCommand ?? (_mouseDownCommand = new RelayCommand<MouseEventArgs>((e) =>

        {

            if(LineModeEnable)

                LineVisibility = Visibility.Visible;

            PositionX1 = e.GetPosition((IInputElement)e.Source).X;

            PositionY1 = e.GetPosition((IInputElement)e.Source).Y;

        }

            , (e) => true));

    }

}

private ICommand _mouseUpCommand;

public ICommand MouseUpCommand

{

    get

    {

        return _mouseUpCommand ?? (_mouseUpCommand = new RelayCommand<MouseEventArgs>((e) =>

        {

            var drawingVisual = new DrawingVisual();

            using (var context = drawingVisual.RenderOpen())

            {

                //此处的-1用于消除画布边界带来的偏差,因为目前都是固定的,所以没有使用数据绑定。

                if(LineModeEnable)

                context.DrawLine(new Pen(Brushes.Black, 1), new Point(PositionX1 - 1, PositionY1 - 1), new Point(PositionX2 - 1, PositionY2 - 1 ));

            }

            DrawingBitmap.Render(drawingVisual);

            LineVisibility = Visibility.Hidden;

        }

            , (e) => true));

    }

}
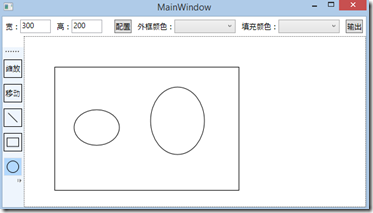
圆形
效果:
XAML代码:
<Ellipse Stroke="Black" StrokeThickness="1" Visibility="{Binding EllipseVisibility}"

        Canvas.Left="{Binding PositionX1}" Canvas.Top="{Binding PositionY1}"

        Width="{Binding ShapeWidth}" Height="{Binding ShapeHeight}"></Ellipse>
MouseDown增加:
if (EllipseModeEnable)

{

    ShapeWidth = ShapeHeight = 0;

    EllipseVisibility = Visibility.Visible;

}
Move增加:
ShapeWidth = Math.Abs(PositionX2 - PositionX1);

ShapeHeight = Math.Abs(PositionY2 - PositionY1);
Up增加:
if(EllipseModeEnable)

    context.DrawEllipse(new SolidColorBrush(Colors.White), new Pen(Brushes.Black, 1),

        new Point(PositionX1 + ShapeWidth / 2 - 1, PositionY1 + ShapeHeight / 2 - 1), ShapeWidth / 2, ShapeHeight / 2);
矩形

效果如上,代码与圆形相似,故省略。
下一节将会完成图形的放大、缩小、移动,颜色的填充。
开发环境VS2013, .NET4.5
WPF学习11:基于MVVM Light 制作图形编辑工具(2)的更多相关文章
- WPF学习12:基于MVVM Light 制作图形编辑工具(3)
本文是WPF学习11:基于MVVM Light 制作图形编辑工具(2)的后续 这一次的目标是完成 两个任务. 本节完成后的效果: 本文分为三个部分: 1.对之前代码不合理的地方重新设计. 2.图形可选 ...
- WPF学习10:基于MVVM Light 制作图形编辑工具(1)
图形编辑器的功能如下图所示: 除了MVVM Light 框架是一个新东西之外,本文所涉及内容之前的WPF学习0-9基本都有相关介绍. 本节中,将搭建编辑器的界面,搭建MVVM Light 框架的使用环 ...
- WPF学习笔记-用Expression Design制作矢量图然后导出为XAML
WPF学习笔记-用Expression Design制作矢量图然后导出为XAML 第一次用Windows live writer写东西,感觉不错,哈哈~~ 1.在白纸上完全凭感觉,想象来画图难度很大, ...
- WPF学习08:MVVM 预备知识之COMMAND
WPF内建的COMMAND是GOF 提出的23种设计模式中,命令模式的实现. 本文是WPF学习07:MVVM 预备知识之数据绑定的后续,将说明实现COMMAND的三个重点:ICommand Comm ...
- 【Telerik控件学习】-建立自己的图形编辑工具(Diagram)
Telerik提供了RadDiagram控件,用于图形元素的旋转,拖拽和缩放.更重要的是,它还拓展了许多绑定的命令(复制,剪切,粘贴,回退等等). 我们可以用来组织自己的图形编辑工具. Step1.定 ...
- MAPZONE GIS SDK接入Openlayers3之五——图形编辑工具
图形编辑工具提供对要素图形进行增.删.改的功能,具体包括以下几种工具类型: 浏览工具 选择工具 创建要素工具 删除命令 分割工具 合并命令 节点编辑工具 修边工具 撤销命令 重做命令 工具的实现基本上 ...
- WPF学习07:MVVM 预备知识之数据绑定
MVVM是一种模式,而WPF的数据绑定机制是一种WPF内建的功能集,两者是不相关的. 但是,借助WPF各种内建功能集,如数据绑定.命令.数据模板,我们可以高效的在WPF上实现MVVM.因此,我们需要对 ...
- WPF学习笔记-用Expression Blend制作自定义按钮
1.从Blend工具箱中添加一个Button,按住shift,将尺寸调整为125*125; 2.右键点击此按钮,选择Edit control parts(template)>Edit a cop ...
- WPF学习笔记:MVVM模式下,ViewModel如何关闭View?
原文:http://blog.csdn.net/leftfist/article/details/32349731 矫枉过正,从一个极端走向另一个极端.MVVM模式,View只负责呈现,虽然也有后台代 ...
随机推荐
- JMeter 系列之—-01使用
用Jmeter 做压测,总体与LoadRunner 类似: 一.线程组 1. 线程数 2. 循环次数 单个线程循环次数 3. Ramp-up Period(in seconds) [1]决定多长时间启 ...
- Linux Grub系统加密、破密、修复
一.在重新启动系统时候按任意键进入 grub界面 Grub加密 一.title前的密码 修改grub.conf 这种加密只是在用户要进入grub界面的时候提示要输入密码,但是可以正常进入系统,有没有 ...
- Node 即学即用 笔记 思维导图
Node即学即用 REPL(Read-Evaluate-Print-Loop) console.log .clear .help .exit require('http') ...
- 我的第一个开源控件-DragGridView
我的第一个开源控件出炉了,希望各个小伙伴给个star,支持下.项目地址 1. 前言 因为项目须要,要做一个相似腾讯视频.频道管理.拖拽排序的效果.这个控件是在原地址 之上改造出来的.先看下效果图. 1 ...
- Oracle 模糊查询方法
在这个信息量剧增的时代,怎样帮助用户从海量数据中检索到想要的数据.模糊查询是不可缺少的. 那么在Oracle中模糊查询是怎样实现的呢? 一.我们能够在where子句中使用likeke ...
- graph driver-device mapper-03thin pool基本操作
// 在thin pool中创建一个新thin device // 调用路径:driver.Create() 1.1 func (devices *DeviceSet) AddDevice(hash, ...
- 2016/3/24 ①数据库与php连接 三种输出fetch_row()、fetch_all()、fetch_assoc() ②增删改时判断(布尔型) ③表与表之间的联动 ④下拉菜单 ⑤登陆 三个页面
①数据库与php连接 图表 header("content-type:text/html;charset=utf-8"); //第一种方式: //1,生成连接,连接到数据库上的 ...
- HTML表单常用标签
名称 用例 备注 文本输入框 <input type="text" name="uname" value="" ...
- Linux设备驱动--块设备(四)之“自造请求”
前面, 我们已经讨论了内核所作的在队列中优化请求顺序的工作; 这个工作包括排列请求和, 或许, 甚至延迟队列来允许一个预期的请求到达. 这些技术在处理一个真正的旋转的磁盘驱动器时有助于系统的性能. 但 ...
- linux 下RTL8723/RTL8188调试记录(命令行)【转】
本文转载自:http://blog.h5min.cn/wuhongxin123/article/details/41820877 本文是在正确安装好wifi驱动后对系统进行的配置. 1. 配置wp ...