Zookeeper + Kafka 集群搭建
第一步:准备
1. 操作系统
CentOS-7-x86_64-Everything-1511
2. 安装包
kafka_2.12-0.10.2.0.tgz
zookeeper-3.4.9.tar.gz
3. Java 环境
Zookeeper 和 Kafka 的运行都需要 Java 环境,Kafka 默认使用 G1 垃圾回收器。如果不更改垃圾回收期,官方推荐使用 7u51 以上版本的 JRE 。如果使用老版本的 JRE,需要更改 Kafka 的启动脚本,指定 G1 以外的垃圾回收器。
本文使用系统自带的 Java 环境。

第二步:Zookeeper 集群搭建
1. 简介
Kafka 依赖 Zookeeper 管理自身集群(Broker、Offset、Producer、Consumer等),所以先要安装 Zookeeper。
为了达到高可用的目的,Zookeeper 自身也不能是单点,接下来就介绍如何搭建一个最小的 Zookeeper 集群(3个 zk 节点)。
2. 安装
# tar zxvf zookeeper-3.4..tar.gz

# mv zookeeper-3.4. zookeeper
3. 配置
1)配置文件位置
路径:zookeeper/conf

2)生成配置文件
将 zoo_sample.cfg 复制一份,命名为 zoo.cfg,此即为Zookeeper的配置文件。
# cd zookeeper

# cd conf

# cp zoo_sample.cfg zoo.cfg
3)编辑配置文件
默认配置:

配置完成:
# The number of milliseconds of each tick

tickTime=

# The number of ticks that the initial

# synchronization phase can take

initLimit=

# The number of ticks that can pass between

# sending a request and getting an acknowledgement

syncLimit=

# the directory where the snapshot is stored.

# do not use /tmp for storage, /tmp here is just

# example sakes.

dataDir=/root/zookeeper/data
dataLogDir=/root/zookeeper/logs

# the port at which the clients will connect

clientPort=

# the maximum number of client connections.

# increase this if you need to handle more clients

#maxClientCnxns=

#

# Be sure to read the maintenance section of the

# administrator guide before turning on autopurge.

#

# http://zookeeper.apache.org/doc/current/zookeeperAdmin.html#sc_maintenance

#

# The number of snapshots to retain in dataDir

#autopurge.snapRetainCount=

# Purge task interval in hours

# Set to "" to disable auto purge feature

#autopurge.purgeInterval=

server.=192.168.6.128::

server.=192.168.6.129::

server.=192.168.6.130::
说明:
- dataDir 和 dataLogDir 需要在启动前创建完成
- clientPort 为 zookeeper的服务端口
- server.0、server.1、server.2 为 zk 集群中三个 node 的信息,定义格式为 hostname:port1:port2,其中 port1 是 node 间通信使用的端口,port2 是node 选举使用的端口,需确保三台主机的这两个端口都是互通的。
4. 更改日志配置
Zookeeper 默认会将控制台信息输出到启动路径下的 zookeeper.out 中,通过如下方法,可以让 Zookeeper 输出按尺寸切分的日志文件:
1)修改conf/log4j.properties文件,将
zookeeper.root.logger=INFO, CONSOLE
改为
zookeeper.root.logger=INFO, ROLLINGFILE
2)修改bin/zkEnv.sh文件,将
ZOO_LOG4J_PROP="INFO,CONSOLE"
改为
ZOO_LOG4J_PROP="INFO,ROLLINGFILE"
5. 按照上述操作,在另外两台主机上安装并配置 zookeeper
6. 创建 myid 文件
分别在三台主机的 dataDir 路径下创建一个文件名为 myid 的文件,文件内容为该 zk 节点的编号。
例如,在第一台主机上建立的 myid 文件内容是 0,第二台是 1。
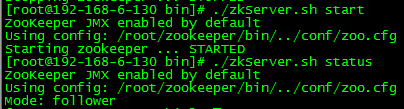
7. 启动
启动三台主机上的 zookeeper 服务
# cd bin

# ./zkServer.sh start
返回信息:

8. 查看集群状态
3个节点启动完成后,可依次执行如下命令查看集群状态:
./zkServer.sh status
192.168.6.128 返回:

192.168.6.129 返回:

192.168.6.130 返回:

如上所示,3个节点中,有1个 leader 和两个 follower。
9. 测试集群高可用性
1)停掉集群中的为 leader 的 zookeeper 服务,本文中的leader为 server2。
# ./zkServer.sh stop
返回信息:

2)查看集群中 server0 和 server1 的的状态
server0:

server1:

此时,server1 成为了集群中的 leader,server0依然为 follower。
3)启动 server2 的 zookeeper 服务,并查看状态
此时,server2 成为了集群中的 follower。
此时,Zookeeper 集群的安装及高可用性验证已完成!
第三步:Kafka 集群搭建
1. 简介
本文会安装配置一个具有两个 Broker 组成的 Kafka 集群,并在其上创建一个具有两个分区的Topic。
2. 安装
# tar zxvf kafka_2.-0.10.2.0.tgz

# mv kafka_2.-0.10.2.0 kafka
3. 配置
1)配置文件位置
路径:kafka/config/server.properties

2)默认配置
# Licensed to the Apache Software Foundation (ASF) under one or more

# contributor license agreements.  See the NOTICE file distributed with

# this work for additional information regarding copyright ownership.

# The ASF licenses this file to You under the Apache License, Version 2.0

# (the "License"); you may not use this file except in compliance with

# the License.  You may obtain a copy of the License at

#

#    http://www.apache.org/licenses/LICENSE-2.0

#

# Unless required by applicable law or agreed to in writing, software

# distributed under the License is distributed on an "AS IS" BASIS,

# WITHOUT WARRANTIES OR CONDITIONS OF ANY KIND, either express or implied.

# See the License for the specific language governing permissions and

# limitations under the License.

# see kafka.server.KafkaConfig for additional details and defaults

############################# Server Basics #############################

# The id of the broker. This must be set to a unique integer for each broker.

broker.id=

# Switch to enable topic deletion or not, default value is false

#delete.topic.enable=true

############################# Socket Server Settings #############################

# The address the socket server listens on. It will get the value returned from

# java.net.InetAddress.getCanonicalHostName() if not configured.

#   FORMAT:

#     listeners = listener_name://host_name:port

#   EXAMPLE:

#     listeners = PLAINTEXT://your.host.name:9092

#listeners=PLAINTEXT://:9092

# Hostname and port the broker will advertise to producers and consumers. If not set,

# it uses the value for "listeners" if configured.  Otherwise, it will use the value

# returned from java.net.InetAddress.getCanonicalHostName().

#advertised.listeners=PLAINTEXT://your.host.name:9092

# Maps listener names to security protocols, the default is for them to be the same. See the config documentation for more details

#listener.security.protocol.map=PLAINTEXT:PLAINTEXT,SSL:SSL,SASL_PLAINTEXT:SASL_PLAINTEXT,SASL_SSL:SASL_SSL

# The number of threads handling network requests

num.network.threads=

# The number of threads doing disk I/O

num.io.threads=

# The send buffer (SO_SNDBUF) used by the socket server

socket.send.buffer.bytes=

# The receive buffer (SO_RCVBUF) used by the socket server

socket.receive.buffer.bytes=

# The maximum size of a request that the socket server will accept (protection against OOM)

socket.request.max.bytes=

############################# Log Basics #############################

# A comma seperated list of directories under which to store log files

log.dirs=/tmp/kafka-logs

# The default number of log partitions per topic. More partitions allow greater

# parallelism for consumption, but this will also result in more files across

# the brokers.

num.partitions=

# The number of threads per data directory to be used for log recovery at startup and flushing at shutdown.

# This value is recommended to be increased for installations with data dirs located in RAID array.

num.recovery.threads.per.data.dir=

############################# Log Flush Policy #############################

# Messages are immediately written to the filesystem but by default we only fsync() to sync

# the OS cache lazily. The following configurations control the flush of data to disk.

# There are a few important trade-offs here:

#    . Durability: Unflushed data may be lost if you are not using replication.

#    . Latency: Very large flush intervals may lead to latency spikes when the flush does occur as there will be a lot of data to flush.

#    . Throughput: The flush is generally the most expensive operation, and a small flush interval may lead to exceessive seeks.

# The settings below allow one to configure the flush policy to flush data after a period of time or

# every N messages (or both). This can be done globally and overridden on a per-topic basis.

# The number of messages to accept before forcing a flush of data to disk

#log.flush.interval.messages=

# The maximum amount of time a message can sit in a log before we force a flush

#log.flush.interval.ms=

############################# Log Retention Policy #############################

# The following configurations control the disposal of log segments. The policy can

# be set to delete segments after a period of time, or after a given size has accumulated.

# A segment will be deleted whenever *either* of these criteria are met. Deletion always happens

# from the end of the log.

# The minimum age of a log file to be eligible for deletion due to age

log.retention.hours=

# A size-based retention policy for logs. Segments are pruned from the log as long as the remaining

# segments don't drop below log.retention.bytes. Functions independently of log.retention.hours.

#log.retention.bytes=

# The maximum size of a log segment file. When this size is reached a new log segment will be created.

log.segment.bytes=

# The interval at which log segments are checked to see if they can be deleted according

# to the retention policies

log.retention.check.interval.ms=

############################# Zookeeper #############################

# Zookeeper connection string (see zookeeper docs for details).

# This is a comma separated host:port pairs, each corresponding to a zk

# server. e.g. "127.0.0.1:3000,127.0.0.1:3001,127.0.0.1:3002".

# You can also append an optional chroot string to the urls to specify the

# root directory for all kafka znodes.

zookeeper.connect=localhost:

# Timeout in ms for connecting to zookeeper

zookeeper.connection.timeout.ms=
3)更改配置
############################# Server Basics #############################

# The id of the broker. This must be set to a unique integer for each broker.

broker.id=

# Switch to enable topic deletion or not, default value is false

#delete.topic.enable=true

############################# Socket Server Settings #############################

# The address the socket server listens on. It will get the value returned from

# java.net.InetAddress.getCanonicalHostName() if not configured.

#   FORMAT:

#     listeners = listener_name://host_name:port

#   EXAMPLE:

#     listeners = PLAINTEXT://your.host.name:9092

listeners=PLAINTEXT://:9092

port=

host.name=192.168.6.128

advertised.host.name=192.168.6.128

advertised.port=

# Hostname and port the broker will advertise to producers and consumers. If not set,

# it uses the value for "listeners" if configured.  Otherwise, it will use the value

# returned from java.net.InetAddress.getCanonicalHostName().

#advertised.listeners=PLAINTEXT://your.host.name:9092

# Maps listener names to security protocols, the default is for them to be the same. See the config docume

ntation for more details

#listener.security.protocol.map=PLAINTEXT:PLAINTEXT,SSL:SSL,SASL_PLAINTEXT:SASL_PLAINTEXT,SASL_SSL:SASL_SS

L

# The number of threads handling network requests

num.network.threads=

# The number of threads doing disk I/O

num.io.threads=

# The send buffer (SO_SNDBUF) used by the socket server

socket.send.buffer.bytes=

# The receive buffer (SO_RCVBUF) used by the socket server

socket.receive.buffer.bytes=

# The maximum size of a request that the socket server will accept (protection against OOM)

socket.request.max.bytes=

############################# Log Basics #############################

# A comma seperated list of directories under which to store log files

log.dirs=/root/kafka/logs

# The default number of log partitions per topic. More partitions allow greater

# parallelism for consumption, but this will also result in more files across

# the brokers.

num.partitions=

# The number of threads per data directory to be used for log recovery at startup and flushing at shutdown

.

# This value is recommended to be increased for installations with data dirs located in RAID array.

num.recovery.threads.per.data.dir=

############################# Log Flush Policy #############################

# Messages are immediately written to the filesystem but by default we only fsync() to sync

# the OS cache lazily. The following configurations control the flush of data to disk.

# There are a few important trade-offs here:

#    . Durability: Unflushed data may be lost if you are not using replication.

#    . Latency: Very large flush intervals may lead to latency spikes when the flush does occur as there

will be a lot of data to flush.

#    . Throughput: The flush is generally the most expensive operation, and a small flush interval may le

ad to exceessive seeks.

# The settings below allow one to configure the flush policy to flush data after a period of time or

# every N messages (or both). This can be done globally and overridden on a per-topic basis.

# The number of messages to accept before forcing a flush of data to disk

#log.flush.interval.messages=

# The maximum amount of time a message can sit in a log before we force a flush

#log.flush.interval.ms=

############################# Log Retention Policy #############################

# The following configurations control the disposal of log segments. The policy can

# be set to delete segments after a period of time, or after a given size has accumulated.

# A segment will be deleted whenever *either* of these criteria are met. Deletion always happens

# from the end of the log.

# The minimum age of a log file to be eligible for deletion due to age

log.retention.hours=

# A size-based retention policy for logs. Segments are pruned from the log as long as the remaining

# segments don't drop below log.retention.bytes. Functions independently of log.retention.hours.

#log.retention.bytes=

# The maximum size of a log segment file. When this size is reached a new log segment will be created.

log.segment.bytes=

# The interval at which log segments are checked to see if they can be deleted according

# to the retention policies

log.retention.check.interval.ms=

############################# Zookeeper #############################

# Zookeeper connection string (see zookeeper docs for details).

# This is a comma separated host:port pairs, each corresponding to a zk

# server. e.g. "127.0.0.1:3000,127.0.0.1:3001,127.0.0.1:3002".

# You can also append an optional chroot string to the urls to specify the

# root directory for all kafka znodes.

zookeeper.connect=192.168.6.128:,192.168.6.129:,192.168.6.130:

# Timeout in ms for connecting to zookeeper

zookeeper.connection.timeout.ms=
配置的详细说明请参考官方文档:http://kafka.apache.org/documentation.html#brokerconfigs
注意:按照官方文档的说法,advertised.host.name 和 advertised.port 这两个参数用于定义集群向 Producer 和 Consumer 广播的节点 host 和 port,如果不定义,会默认使用 host.name 和 port 的定义。但在实际应用中,发现如果不定义 advertised.host.name 参数,使用 Java 客户端从远端连接集群时,会发生连接超时,抛出异常:org.apache.kafka.common.errors.TimeoutException: Batch Expired
经过过 debug 发现,连接到集群是成功的,但连接到集群后更新回来的集群 meta 信息却是错误的。metadata 中的 Cluster 信息中节点的 hostname 是一串字符,而不是实际的ip地址。这串其实是远端主机的 hostname,这说明在没有配置 advertised.host.name 的情况下,Kafka 并没有像官方文档宣称的那样改为广播我们配置的 host.name,而是广播了主机配置的 hostname 。远端的客户端并没有配置 hosts,所以自然是连接不上这个 hostname 的。要解决这一问题,把 host.name 和 advertised.host.name 都配置成绝对的 ip 地址就可以了。
4. 在另一台主机上安装 kafka,并做配置
5. 在两台主机上分别启动 Kafka 服务
# bin/kafka-server-start.sh -daemon config/server.properties
官方给出的启动方法是:bin/kafka-server-start.sh config/server.properties &
6. 创建分区和 topic
1)创建一个名为 ruready,拥有两个分区,两个副本的Topic
# bin/kafka-topics.sh --create --zookeeper 192.168.6.128:,192.168.6.129:,192.168.6.130: --replication-factor --partitions --topic ruready
返回信息:

2)查看 Topic 状态
# bin/kafka-topics.sh --describe --zookeeper 192.168.6.128:,192.168.6.129:,192.168.6.130: --topic ruready
返回信息:

此时,Kafka 集群的搭建已成功完成!
Zookeeper + Kafka 集群搭建的更多相关文章
- zookeeper+kafka集群搭建
一.ZK集群安装. 解压安装包后进入conf目录,conf/zoo_sample.cfg拷贝一份命名为zoo.cfg,同时也放在conf下面. zookeeper配置文件: # The number ...
- 搭建zookeeper+kafka集群
搭建zookeeper+kafka集群 一.环境及准备 集群环境: 软件版本: 部署前操作: 关闭防火墙,关闭selinux(生产环境按需关闭或打开) 同步服务器时间,选择公网ntpd服务器或 ...
- zookeeper及kafka集群搭建
zookeeper及kafka集群搭建 1.有关zookeeper的介绍可参考:http://www.cnblogs.com/wuxl360/p/5817471.html 2.zookeeper安装 ...
- zookeeper与Kafka集群搭建及python代码测试
Kafka初识 1.Kafka使用背景 在我们大量使用分布式数据库.分布式计算集群的时候,是否会遇到这样的一些问题: 我们想分析下用户行为(pageviews),以便我们设计出更好的广告位 我想对用户 ...
- Docker搭建Zookeeper&Kafka集群
最近在学习Kafka,准备测试集群状态的时候感觉无论是开三台虚拟机或者在一台虚拟机开辟三个不同的端口号都太麻烦了(嗯..主要是懒). 环境准备 一台可以上网且有CentOS7虚拟机的电脑 为什么使用虚 ...
- CentOS 7 Zookeeper 和 Kafka 集群搭建
环境 CentOS 7.4 Zookeeper-3.6.1 Kafka_2.13-2.4.1 Kafka-manager-2.0.0.2 本次安装的软件全部在 /home/javateam 目录下. ...
- zookeeper集群及kafka集群搭建
1.zookeeper集群搭建 1.1 上传安装包 官网推荐至少3个节点,我们这里也用三个节点192.169.2.18 192.169.1.82 192.169.1.95 准备好安装包,zooke ...
- kafka集群搭建和使用Java写kafka生产者消费者
1 kafka集群搭建 1.zookeeper集群 搭建在110, 111,112 2.kafka使用3个节点110, 111,112 修改配置文件config/server.properties ...
- Kafka【第一篇】Kafka集群搭建
Kafka初识 1.Kafka使用背景 在我们大量使用分布式数据库.分布式计算集群的时候,是否会遇到这样的一些问题: 我们想分析下用户行为(pageviews),以便我们设计出更好的广告位 我想对用户 ...
随机推荐
- JS 响应式编程
<!DOCTYPE html> <html> <head> <meta charset="utf-8" /> <script ...
- 神经网络NN
神经网络基本模型: 1.前向神经网络:无圈的有向图N=(V,E,W),其中,V为神经元集合,E为连结权值集合,W为每一连结赋予一实值的权重. 神经元集V可以被分成无接受域的输入结点集V1,无投射域的输 ...
- catalan卡特兰数
卡塔兰数是组合数学中一个常在各种计数问题中出现的数列.以比利时的数学家欧仁·查理·卡塔兰(1814–1894)命名.历史上,清代数学家明安图(1692年-1763年)在其<割圜密率捷法>最 ...
- Java线程:线程中断
interrupt方法可以用来请求终止线程. 当对一个线程调用interrupt方法时,线程的中断状态被置位.这时每个线程都有boolean标志.每个线程都应该不时的检查这个标志,以判断线程是否被中断 ...
- JS前端的分享功能
给网页加上分享代码,借助网友的力量推广网站,目前已经很流行了 以下是网页代码 QQ空间分享代码如下: <a href="javascript:void(0);" onclic ...
- VoiceEngine获取硬件信息
#include "webrtc\voice_engine\include\voe_base.h" #include "webrtc\voice_engine\inclu ...
- 使用 Passenger +Apache扩展 Puppet,代替其Webrick的web框架
使用 Passenger +Apache扩展 Puppet,代替其Webrick的web框架 1安装 yum install ruby-devel ruby-libs rubygems libcurl ...
- php之 有点复杂的 流程管理
1.流程管理的用法是什么样的? 2.怎么发起想要的流程? 3.审批的人要是怎么审批通过? 4.流程审核是不是要挨个走过? 一.还是要有数据库的内容的 肯定会有表的,首先就是用户表了,然后就是流程表,用 ...
- python练习_购物车(简版)
python练习_购物车(简版) 需求: 写一个python购物车可以输入用户初始化金额 可以打印商品,且用户输入编号,即可购买商品 购物时计算用户余额,是否可以购买物品 退出结算时打印购物小票 以下 ...
- Neutron Router 工作原理 - 每天5分钟玩转 OpenStack(142)
上一节我们创建了 router 连通了 vlan100 和 vlan101, 今天分析router是如何工作的.首先查看控制节点的网络结构发生了什么变化: br-int 上多了两个 port: 1. ...