.NET 云原生架构师训练营(KestrelServer源码分析)--学习笔记
目录
- 目标
- 源码
目标
理解 KestrelServer 如何接收网络请求,网络请求如何转换成 http request context(C# 可识别)
源码
https://github.com/dotnet/aspnetcore/
在目录 aspnetcore\src\Servers\Kestrel\Core\src\Internal 下有一个 KestrelServerImpl
internal class KestrelServerImpl : IServer
在 host 启动的时候调用了 server 的 startup 方法,可以从这个入口开始
public async Task StartAsync<TContext>(IHttpApplication<TContext> application, CancellationToken cancellationToken) where TContext : notnull
StartAsync 方法主要分为以下三步
async Task OnBind(ListenOptions options, CancellationToken onBindCancellationToken)

{

    ...

}

AddressBindContext = new AddressBindContext(_serverAddresses, Options, Trace, OnBind);

await BindAsync(cancellationToken).ConfigureAwait(false);
BindAsync 方法中使用 AddressBindContext 进行绑定
await AddressBinder.BindAsync(Options.ListenOptions, AddressBindContext!, cancellationToken).ConfigureAwait(false);
在 AddressBinder 的 BindAsync 方法中创建了多种策略进行绑定
var strategy = CreateStrategy(

    listenOptions.ToArray(),

    context.Addresses.ToArray(),

    context.ServerAddressesFeature.PreferHostingUrls);

...

await strategy.BindAsync(context, cancellationToken).ConfigureAwait(false);
例如 AddressesStrategy,它有自己的一个绑定方法
private class AddressesStrategy : IStrategy

{

    protected readonly IReadOnlyCollection<string> _addresses;

    public AddressesStrategy(IReadOnlyCollection<string> addresses)

    {

        _addresses = addresses;

    }

    public virtual async Task BindAsync(AddressBindContext context, CancellationToken cancellationToken)

    {

        foreach (var address in _addresses)

        {

            var options = ParseAddress(address, out var https);

            context.ServerOptions.ApplyEndpointDefaults(options);

            if (https && !options.IsTls)

            {

                options.UseHttps();

            }

            await options.BindAsync(context, cancellationToken).ConfigureAwait(false);

        }

    }

}
options 来自 IConnectionBuilder 的 ListenOptions 的绑定
public class ListenOptions : IConnectionBuilder, IMultiplexedConnectionBuilder
这一路走下来发现找不到重点,所以需要换一个方向从 OnBind 方法入手,它是一个委托,需要找到调用的地方
async Task OnBind(ListenOptions options, CancellationToken onBindCancellationToken)
可以看到 OnBind 方法传入到 AddressBindContext 中
AddressBindContext = new AddressBindContext(_serverAddresses, Options, Trace, OnBind);
在 AddressBindContext 中它是一个 CreateBinding
public Func<ListenOptions, CancellationToken, Task> CreateBinding { get; }
全局搜索 CreateBinding

可以找到在 AddressBinder 的 BindEndpointAsync 方法中被调用
internal static async Task BindEndpointAsync(ListenOptions endpoint, AddressBindContext context, CancellationToken cancellationToken)

{

    try

    {

        await context.CreateBinding(endpoint, cancellationToken).ConfigureAwait(false);

    }

    catch (AddressInUseException ex)

    {

        throw new IOException(CoreStrings.FormatEndpointAlreadyInUse(endpoint), ex);

    }

    context.ServerOptions.OptionsInUse.Add(endpoint);

}
而 BindEndpointAsync 方法被 ListenOptions 的 BindAsync 方法调用,也就是上面提到的 StartAsync 的第三步 BindAsync 走到的 ListenOptions
internal virtual async Task BindAsync(AddressBindContext context, CancellationToken cancellationToken)

{

    await AddressBinder.BindEndpointAsync(this, context, cancellationToken).ConfigureAwait(false);

    context.Addresses.Add(GetDisplayName());

}
在第三步 BindAsync 方法中加载配置,加载之后才调用真正的绑定方法
Options.ConfigurationLoader?.Load();

await AddressBinder.BindAsync(Options.ListenOptions, AddressBindContext!, cancellationToken).ConfigureAwait(false);
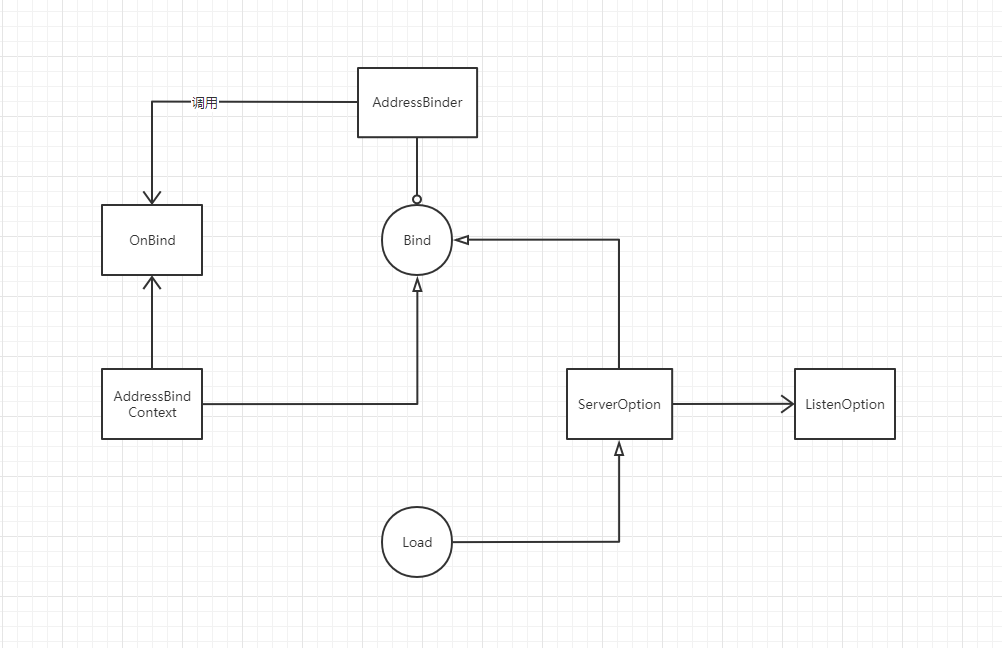
所以整个过程的重点在第一步的 OnBind,而 OnBind 的重点在于 TransportManager 的 BindAsync 方法
options.EndPoint = await _transportManager.BindAsync(options.EndPoint, multiplexedConnectionDelegate, options, onBindCancellationToken).ConfigureAwait(false);
进入 TransportManager 中可以看到在 BindAsync 方法中开始接收
StartAcceptLoop(new GenericConnectionListener(transport), c => connectionDelegate(c), endpointConfig);
在 StartAcceptLoop 方法中调用了 StartAcceptingConnections 方法
var acceptLoopTask = connectionDispatcher.StartAcceptingConnections(connectionListener);
在 StartAcceptingConnections 方法中将需要被执行的方法添加到队列中
ThreadPool.UnsafeQueueUserWorkItem(StartAcceptingConnectionsCore, listener, preferLocal: false);
在 StartAcceptingConnectionsCore 里面开始监听接收,这就是关键,这里执行了 kestrelConnection,而 kestrelConnection 又包含 _connectionDelegate
var connection = await listener.AcceptAsync();

var kestrelConnection = new KestrelConnection<T>(

    id, _serviceContext, _transportConnectionManager, _connectionDelegate, connection, Log);

_transportConnectionManager.AddConnection(id, kestrelConnection);

ThreadPool.UnsafeQueueUserWorkItem(kestrelConnection, preferLocal: false);
在 kestrelConnection 中可以看到整个 ExecuteAsync 方法里面只执行了 _connectionDelegate
await _connectionDelegate(connectionContext);
意识到 _connectionDelegate 的重要性之后再往回找是怎么传进来的,可以找到是在 KestrelServerImpl 中通过 ListenOptions 构建出来的
var connectionDelegate = options.Build();
在 Build 方法里面可以看到它是一个管道
ConnectionDelegate app = context =>

{

    return Task.CompletedTask;

};

for (var i = _middleware.Count - 1; i >= 0; i--)

{

    var component = _middleware[i];

    app = component(app);

}

return app;
通过 _middleware 的 Use 方法的引用找不到有价值的信息
public IConnectionBuilder Use(Func<ConnectionDelegate, ConnectionDelegate> middleware)

{

    _middleware.Add(middleware);

    return this;

}
于是回到 KestrelServerImpl 中,查看 UseHttpServer 方法
options.UseHttpServer(ServiceContext, application, options.Protocols, addAltSvcHeader);
可以看到这个方法构建了一个 HttpConnectionMiddleware
var middleware = new HttpConnectionMiddleware<TContext>(serviceContext, application, protocols, addAltSvcHeader);

return builder.Use(next =>

{

    return middleware.OnConnectionAsync;

});
进入 HttpConnectionMiddleware 可以看到一个核心方法 OnConnectionAsync,创建了一个 HttpConnection,然后调用 ProcessRequestsAsync
var connection = new HttpConnection(httpConnectionContext);

return connection.ProcessRequestsAsync(_application);
在 ProcessRequestsAsync 方法中可以看到 KestrelServer 的核心逻辑,根据不同的协议,执行不同的逻辑;同时可以看到它是如何处理请求的,通过 requestProcessor 处理请求
switch (SelectProtocol())

{

    case HttpProtocols.Http1:

        requestProcessor = _http1Connection = new Http1Connection<TContext>((HttpConnectionContext)_context);

        _protocolSelectionState = ProtocolSelectionState.Selected;

        break;

    case HttpProtocols.Http2:

        requestProcessor = new Http2Connection((HttpConnectionContext)_context);

        _protocolSelectionState = ProtocolSelectionState.Selected;

        break;

    case HttpProtocols.Http3:

        requestProcessor = new Http3Connection((HttpMultiplexedConnectionContext)_context);

        _protocolSelectionState = ProtocolSelectionState.Selected;

        break;

}

await requestProcessor.ProcessRequestsAsync(httpApplication);
requestProcessor 是一个 IRequestProcessor 接口,它有多个实现,以 Http2Connection 为例
internal partial class Http2Connection : IHttp2StreamLifetimeHandler, IHttpStreamHeadersHandler, IRequestProcessor
在 Http2Connection 的 ProcessRequestsAsync 方法中读取流,解析转换,处理
await _frameWriter.WriteWindowUpdateAsync(0, diff);

var result = await Input.ReadAsync();

await ProcessFrameAsync(application, framePayload);
当 HttpConnectionMiddleware 的 OnConnectionAsync 处理完之后,如何与应用层代码拼接,这里只是 Kestrel 的处理
可以通过 IRequestProcessor 接口的 ProcessRequestsAsync 方法的实现找到 HttpProtocol 的 ProcessRequestsAsync 方法,可以看到它执行了一个 ProcessRequests 方法
await ProcessRequests(application);
在 ProcessRequests 方法中将从 Body 里面获取的内容封装到一个 context,这个才是真正的 HttpContext,然后再运行应用层代码,之前都是 Kestrel 的解析逻辑,这里才是串联到我们构建的管道 application
InitializeBodyControl(messageBody);

var context = application.CreateContext(this);

// Run the application code for this request

await application.ProcessRequestAsync(context);
接下来看一下 application 是如何传过来的,一直找到 HttpConnection,HttpConnectionMiddleware,HttpConnectionBuilderExtensions,KestrelServerImpl
public async Task StartAsync<TContext>(IHttpApplication<TContext> application, CancellationToken cancellationToken) where TContext : notnull
可以看到是 Host 调用 Server 的 StartAsync 传进来的,这里体现了职责分离的原则,对于应用层的管道,定义了一个 IHttpApplication application,这就是 requestDelegate
从 Host 传到 Server,Server 完成了网络端口的绑定,网络的监听接收,网络二进制转换成具体的 c# 可识别的 HTTPContext 之后,调用了 Host 那边封装好的一个 application 应用层的管道,这是 Host 在 Startup 里面定义的,这就是一个完整的过程

课程链接
https://appsqsyiqlk5791.h5.xiaoeknow.com/v1/course/video/v_5f39bdb8e4b01187873136cf?type=2

本作品采用知识共享署名-非商业性使用-相同方式共享 4.0 国际许可协议进行许可。
欢迎转载、使用、重新发布,但务必保留文章署名 郑子铭 (包含链接: http://www.cnblogs.com/MingsonZheng/ ),不得用于商业目的,基于本文修改后的作品务必以相同的许可发布。
如有任何疑问,请与我联系 (MingsonZheng@outlook.com) 。
.NET 云原生架构师训练营(KestrelServer源码分析)--学习笔记的更多相关文章
- .NET 云原生架构师训练营(组合模式)--学习笔记
目录 引入 组合模式 源码 引入 在上一篇执行 _connectionDelegate 之后,HttpConnectionMiddleware 处理请求 return connection.Proce ...
- .NET 云原生架构师训练营(模板方法 && 建造者)--学习笔记
目录 模板方法 源码 建造者 模板方法 定义一个操作中的算法的骨架,而将一些步骤延迟到子类中,使得子类可以不改变一个算法的结构即可重定义该算法的某些特定步骤 源码 https://github.com ...
- .NET 云原生架构师训练营(Identity Server)--学习笔记
目录 OAuth 2.0 OpenID Connect QuickStart OAuth 2.0 概念 过程 通信 组件 示例代码 概念 OAuth 2.0 是一个授权协议,它允许软件应用代表(而不是 ...
- .NET 云原生架构师训练营(模块一 架构师与云原生)--学习笔记
目录 什么是软件架构 软件架构的基本思路 单体向分布式演进.云原生.技术中台 1.1 什么是软件架构 1.1.1 什么是架构? Software architecture = {Elements, F ...
- .NET 云原生架构师训练营(建立系统观)--学习笔记
目录 目标 ASP .NET Core 什么是系统 什么是系统思维 系统分解 什么是复杂系统 作业 目标 通过整体定义去认识系统 通过分解去简化对系统的认识 ASP .NET Core ASP .NE ...
- .NET 云原生架构师训练营(权限系统 RGCA 架构设计)--学习笔记
目录 项目核心内容 实战目标 RGCA 四步架构法 项目核心内容 无代码埋点实现对所有 API Action 访问控制管理 对 EF Core 实体新增.删除.字段级读写控制管理 与 Identity ...
- .NET 云原生架构师训练营(模块二 基础巩固 EF Core 更新和迁移)--学习笔记
2.4.6 EF Core -- 更新 状态 自动变更检测 不查询删除和更新 并发 状态 Entity State Property State Entity State Added 添加 Uncha ...
- .NET 云原生架构师训练营(模块二 基础巩固 MongoDB 问答系统)--学习笔记
2.5.6 MongoDB -- 问答系统 MongoDB 数据库设计 API 实现概述 MongoDB 数据库设计 设计优化 内嵌(mongo)还是引用(mysql) 数据一致性 范式:将数据分散到 ...
- .NET 云原生架构师训练营(模块二 基础巩固 MongoDB API实现)--学习笔记
2.5.7 MongoDB -- API实现 问题查询单个实现 问题查询列表实现 问题跨集合查询实现 问题创建实现 问题更新实现 问题回答实现 问题评论实现 问题投票实现 回答实现 QuestionC ...
随机推荐
- 替DateDif哭诉一把(Excel函数集团)
Excel中有个工作表函数DateDif,专门用来计算两日期之间的日差.月差.年差,传说十分好用. 具体用法在此就省略了,好奇的童鞋请自行*度~ 可是,在Excel里,他却是个"没户口&qu ...
- MemoryCache 如何清除全部缓存?
最近有个需求需要定时清理服务器上所有的缓存.本来以为很简单的调用一下 MemoryCache.Clear 方法就完事了.谁知道 MemoryCache 类以及 IMemoryCache 扩展方法都没有 ...
- CF94A Restoring Password 题解
Content 有一个 \(80\) 位的 \(01\) 字符串,由 \(8\) 个长度为 \(10\) 的 \(01\) 字符串组成,每个小字符串分别对应一个数字.现在,给出这个字符串和 \(0\) ...
- CF1036D Vasya and Arrays 题解
Content 给定两个长度分别为 \(n\) 和 \(m\) 的数列 \(A,B\).你需要将两个数列都恰好分成 \(k\) 份,使得两个数列中第 \(i(i\in[1,k])\) 份的元素和对应相 ...
- js Date()获取时间,格式化输出,时间比较大小
1.获取时间并且格式化输出 new Date().toLocaleString('cn',{hour12:false}) //2018/12/6 17:57:15 new Date().toLocal ...
- 使用.NET 6开发TodoList应用(6)——使用MediatR实现POST请求
需求 需求很简单:如何创建新的TodoList和TodoItem并持久化. 初学者按照教程去实现的话,应该分成以下几步:创建Controller并实现POST方法:实用传入的请求参数new一个数据库实 ...
- mysql报错:You do not have the SUPER privilege and binary logging is enabled
MySQL出现 You do not have the SUPER privilege and binary logging is enabled报错 解决方案: 1.用root用户登录:mysql ...
- 【LeetCode】558. Quad Tree Intersection 解题报告(Python)
作者: 负雪明烛 id: fuxuemingzhu 个人博客: http://fuxuemingzhu.cn/ 目录 题目描述 题目大意 解题方法 日期 题目地址:https://leetcode.c ...
- 【LeetCode】392. Is Subsequence 解题报告(Python)
[LeetCode]392. Is Subsequence 解题报告(Python) 标签: LeetCode 题目地址:https://leetcode.com/problems/is-subseq ...
- idea使用教程-常用设置
[1]进入设置: [2]设置主题: [3]编辑区的字体变大或者变小: [4]鼠标悬浮在代码上有提示: [5]自动导包和优化多余的包: 手动导包:快捷键:alt+enter 自动导包和优化多余的包: [ ...