python使用gitlab-api
一.简介
公司使用gitlab 来托管代码,日常代码merge request以及其他管理是交给测试,鉴于操作需经常打开网页,重复且繁琐,所以交给Python管理。
安装:
pip install python-gitlab
二.示例
1.获取gitlab某个项目中,某分支的最新commit信息,提交人、提交时间、commit-id等等,主要用于搭配jenkins做这些信息的展示。当项目构建后,在钉钉显示提交人和commit的id号与jenkins的信息。
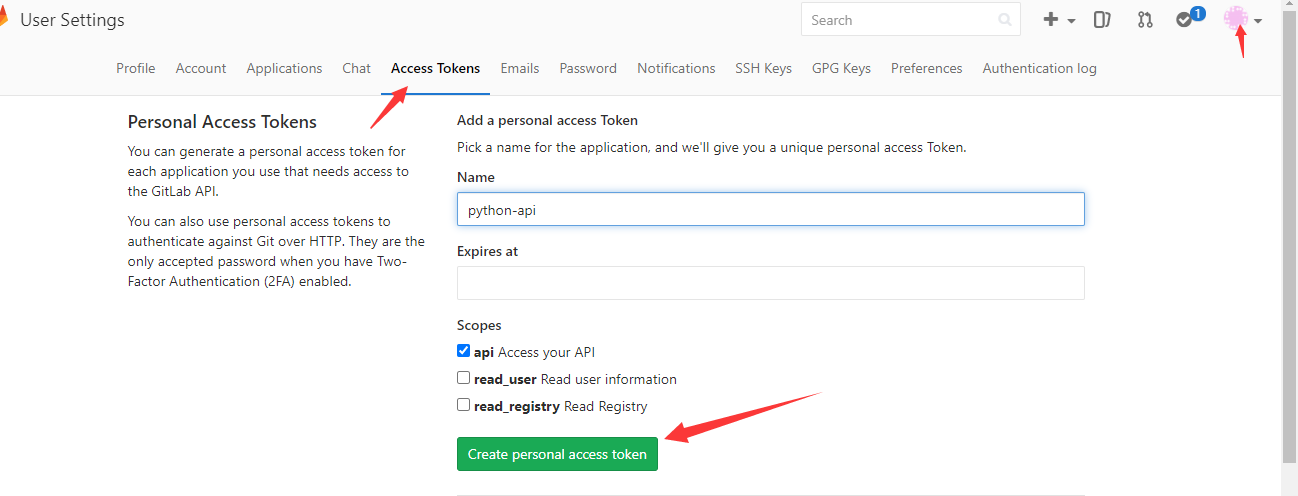
2.生成自己的token

3.代码
#!/usr/bin/python3import gitlab, json, sys#[项目组名、项目名、分支]group_name = sys.argv[1]job_name = sys.argv[2]job_branch = sys.argv[3]job_url = group_name + '/' + job_namegl = gitlab.Gitlab('http://10.0.23.14/', private_token='Fsdfxs7sdjssd')projects = gl.projects.list(search=job_name)for project in projects:if project.path_with_namespace == job_url:breakcommits = project.commits.list(all=True, query_parameters={'ref_name': job_branch, 'since': '2020-11-11T00:00:00Z'})print(commits[0].author_name)print(commits[0].id)
讲解
projects返回一个数组,是前面search名字相似的项目,每个数组的内容都是一个对象。
每个对象返回如下:
<class 'gitlab.v4.objects.Project'> => {'id': 440, 'description': '', 'default_branch': 'master', 'tag_list': [], 'ssh_url_to_repo': 'git@47.94.250.239:jenkins/pipeline-fuction.git', 'http_url_to_repo': 'http://47.94.250.239/jenkins/pipeline-fuction.git', 'web_url': 'http://47.94.250.239/jenkins/pipeline-fuction', 'name': 'pipeline-fuction', 'name_with_namespace': 'jenkins / pipeline-fuction', 'path': 'pipeline-fuction', 'path_with_namespace': 'jenkins/pipeline-fuction', 'star_count': 0, 'forks_count': 0, 'created_at': '2020-10-15T01:24:02.322Z', 'last_activity_at': '2020-11-12T05:45:36.106Z', '_links': {'self': 'http://47.94.250.239/api/v4/projects/440', 'issues': 'http://47.94.250.239/api/v4/projects/440/issues', 'merge_requests': 'http://47.94.250.239/api/v4/projects/440/merge_requests', 'repo_branches': 'http://47.94.250.239/api/v4/projects/440/repository/branches', 'labels': 'http://47.94.250.239/api/v4/projects/440/labels', 'events': 'http://47.94.250.239/api/v4/projects/440/events', 'members': 'http://47.94.250.239/api/v4/projects/440/members'}, 'archived': False, 'visibility': 'private', 'owner': {'name': 'jenkins', 'username': 'jenkins', 'id': 5, 'state': 'active', 'avatar_url': 'http://www.gravatar.com/avatar/1656b1f22c7d92fca3ed5ab37fb442a2?s=80&d=identicon', 'web_url': 'http://47.94.250.239/jenkins'}, 'container_registry_enabled': True, 'issues_enabled': True, 'merge_requests_enabled': True, 'wiki_enabled': True, 'jobs_enabled': True, 'snippets_enabled': True, 'shared_runners_enabled': True, 'lfs_enabled': True, 'creator_id': 5, 'namespace': {'id': 8, 'name': 'jenkins', 'path': 'jenkins', 'kind': 'user', 'full_path': 'jenkins', 'parent_id': None}, 'import_status': 'none', 'import_error': None, 'avatar_url': None, 'open_issues_count': 0, 'runners_token': 'mqoNuw7tCrjaz8hP2Do7', 'public_jobs': True, 'ci_config_path': None, 'shared_with_groups': [], 'only_allow_merge_if_pipeline_succeeds': False, 'request_access_enabled': False, 'only_allow_merge_if_all_discussions_are_resolved': False, 'printing_merge_request_link_enabled': True, 'permissions': {'project_access': {'access_level': 40, 'notification_level': 3}, 'group_access': None}}
所以为了获得精确的项目,要用循环拆解开,然后project.path_with_namespace去匹配组名+项目名才行。
path_with_namespace就是这个对象的属性,找到了就break跳出即可。
commits中获取的也是一个数组,里面也是存的commit对象,每个信息如下
<class 'gitlab.v4.objects.ProjectCommit'> => {'id': '29184d28eb302c6ff82f62d943f94e6df32f21f3', 'short_id': '29184d28', 'title': 'Update CgdPortalFuction.groovy', 'created_at': '2020-11-10T16:21:43.000+08:00', 'parent_ids': ['64a9c0dbcd3b348f20c6f268672ab8aab60977cf'], 'message': 'Update CgdPortalFuction.groovy', 'author_name': '朱浩然', 'author_email': '18410168540@163.com', 'authored_date': '2020-11-10T16:21:43.000+08:00', 'committer_name': '朱浩然', 'committer_email': '18410168540@163.com', 'committed_date': '2020-11-10T16:21:43.000+08:00'}
query_parameters是过滤条件,不过只有分支起作用,since我就算写2029年也是没效果,但加上的话就会少取很多历史数据。
比如不加len(commits)是10万条,那加了since条件随意写就是最近的几百条,没仔细研究为啥,能用就行。
根据commit的返回可以输出各种属性,比如提交人、提交id等等
print(commits[0].author_name)
配置文件方式存储token
1.为了保护API 用到的 private_token,一般会将其写到系统的配置文件中去
/etc/python-gitlab.cfg 或者 ~/.python-gitlab.cfg
[global]default = gitssh_verify = Falsetimeout = 10[git]url = http://10.0.0.1private_token = xxxxxxxxapi_version = 3
2.使用
## logingl = gitlab.Gitlab.from_config('git', ['~/.python-gitlab.cfg'])## 得到第一页project列表projects = gl.projects.list()## 得到所有projectprojects = gl.projects.list(all=True)projects = gl.projects.all()
其它返回
1.根据commit的id,返回详细信息
project.commits.get(commit.id)
<class 'gitlab.v4.objects.ProjectCommit'> => {'id': '293b079158c01c002afdcd84a88476e4fd8125c4', 'short_id': '293b0791', 'title': "Merge branch 'dev_new_lzj_neep5498' into business_portal_new", 'created_at': '2020-10-27T10:25:22.000+08:00', 'parent_ids': ['80f73d35650a211202940fbf9af115bd546f7c65', 'c688cda729aec3584e119ea35751930aca57a2a9'], 'message': "Merge branch 'dev_new_lzj_neep5498' into business_portal_new\n", 'author_name': 'liuzeju', 'author_email': 'liuzj@tydic.com', 'authored_date': '2020-10-27T10:25:22.000+08:00', 'committer_name': 'liuzeju', 'committer_email': 'liuzj@tydic.com', 'committed_date': '2020-10-27T10:25:22.000+08:00', 'stats': {'additions': 6, 'deletions': 4, 'total': 10}, 'status': None}
三.其它操作
"""gitlab 经常使用到的apiDOC_URL: http://python-gitlab.readthedocs.io/en/stable/LOCAL_PATH: C:\Python36\Lib\site-packages\gitlab"""import gitlaburl = 'http://xxxxxxx'token = 'xxxxxxxxxxxxxx'# 登录gl = gitlab.Gitlab(url, token)# ---------------------------------------------------------------- ## 获取第一页projectprojects = gl.projects.list()# 获取所有的projectprojects = gl.projects.list(all=True)# ---------------------------------------------------------------- ## ---------------------------------------------------------------- ## 获取所有project的name,idfor p in gl.projects.list(all=True, as_list=False):print(p.name, p.id)# ---------------------------------------------------------------- ## ---------------------------------------------------------------- ## 获取第一页project的name,idfor p in gl.projects.list(page=1):print(p.name, p.id)# ---------------------------------------------------------------- ## ---------------------------------------------------------------- ## 通过指定id 获取 project 对象project = gl.projects.get(501)# ---------------------------------------------------------------- ## ---------------------------------------------------------------- ## 查找项目projects = gl.projects.list(search='keyword')# ---------------------------------------------------------------- ## ---------------------------------------------------------------- ## 创建一个项目project = gl.projects.create({'name':'project1'})# ---------------------------------------------------------------- ## ---------------------------------------------------------------- ## 获取公开的项目projects = gl.projects.list(visibility='public') # public, internal or private# ---------------------------------------------------------------- ## 获取 project 对象是以下操作的基础# ---------------------------------------------------------------- ## 通过指定project对象获取该项目的所有分支branches = project.branches.list()print(branches)# ---------------------------------------------------------------- ## ---------------------------------------------------------------- ## 获取指定分支的属性branch = project.branches.get('master')print(branch)# ---------------------------------------------------------------- ## ---------------------------------------------------------------- ## 创建分支branch = project.branches.create({'branch_name': 'feature1','ref': 'master'})# ---------------------------------------------------------------- ## ---------------------------------------------------------------- ## 删除分支project.branches.delete('feature1')# ---------------------------------------------------------------- ## ---------------------------------------------------------------- ## 分支保护/取消保护branch.protect()branch.unprotect()# ---------------------------------------------------------------- ## ---------------------------------------------------------------- ## 获取指定项目的所有tagstags = project.tags.list()# 获取某个指定tag 的信息tags = project.tags.list('1.0')# 创建一个tagtag = project.tags.create({'tag_name':'1.0', 'ref':'master'})# 设置tags 说明:tag.set_release_description('awesome v1.0 release')# 删除tagsproject.tags.delete('1.0')# ortag.delete()# ---------------------------------------------------------------- ## 获取所有commit infocommits = project.commits.list()for c in commits:print(c.author_name, c.message, c.title)# ---------------------------------------------------------------- ## ---------------------------------------------------------------- ## 获取指定commit的infocommit = project.commits.get('e3d5a71b')# ---------------------------------------------------------------- ## ---------------------------------------------------------------- ## 获取指定项目的所有merge requestmrs = project.mergerequests.list()print(mrs)# ---------------------------------------------------------------- ## ---------------------------------------------------------------- ## 获取 指定mr infomr = project.mergerequests.get(mr_id)# ---------------------------------------------------------------- ## ---------------------------------------------------------------- ## 创建一个merge requestmr = project.mergerequests.create({'source_branch':'cool_feature','target_branch':'master','title':'merge cool feature', })# ---------------------------------------------------------------- ## ---------------------------------------------------------------- ## 更新一个merge request 的描述mr.description = 'New description'mr.save()# ---------------------------------------------------------------- ## ---------------------------------------------------------------- ## 开关一个merge request (close or reopen):mr.state_event = 'close' # or 'reopen'mr.save()# ---------------------------------------------------------------- ## ---------------------------------------------------------------- ## Delete a MR:project.mergerequests.delete(mr_id)# ormr.delete()# ---------------------------------------------------------------- ## ---------------------------------------------------------------- ## Accept a MR:mr.merge()# ---------------------------------------------------------------- ## ---------------------------------------------------------------- ## 指定条件过滤 所有的merge request# state: state of the MR. It can be one of all, merged, opened or closed# order_by: sort by created_at or updated_at# sort: sort order (asc or desc)mrs = project.mergerequests.list(state='merged', sort='asc') # all, merged, opened or closed# ---------------------------------------------------------------- ## ---------------------------------------------------------------- ## 创建一个commitdata = {'branch_name': 'master', # v3'commit_message': 'blah blah blah','actions': [{'action': 'create','file_path': 'blah','content': 'blah'}]}commit = project.commits.create(data)# ---------------------------------------------------------------- ## ---------------------------------------------------------------- ## Compare two branches, tags or commits:result = project.repository_compare('develop', 'feature-20180104')print(result)# get the commitsfor commit in result['commits']:print(commit)## get the diffsfor file_diff in result['diffs']:print(file_diff)# ---------------------------------------------------------------- ## ---------------------------------------------------------------- ## get the commitsfor commit in result['commits']:print(commit)## get the diffsfor file_diff in result['diffs']:print(file_diff)# ---------------------------------------------------------------- #
python使用gitlab-api的更多相关文章
- 教你怎么调用Gitlab API
1.生成Personal Access Tokens 选择右上角用户信息setting—>Access Tokens 2.常用Gitlab API #获取所有的项目信息 #private_tok ...
- 【转】教你怎么调用Gitlab API
官方文档: https://docs.gitlab.com/ce/api/ https://docs.gitlab.com/ee/api/branches.html#list-repository-b ...
- 使用Python结合Face++ API识别人脸
Face++是北京旷视科技旗下的视觉服务平台,可以进行人脸识别.检测等功能.其人脸识别技术据悉在目前准确率较高,其API非常友好,免费使用,功能众多,而且调用几乎没有限制.这里我使用了Python调用 ...
- 使用Python调用Flickr API抓取图片数据
Flickr是雅虎旗下的图片分享网站,上面有全世界网友分享的大量精彩图片,被认为是专业的图片网站.其API也很友好,可以实现多种功能.这里我使用了Python调用其API获得了大量的照片数据.需要注意 ...
- 使用python+pychram进行API测试(接口测试)初级STEP 1
花了一天时间安装了解了下最基本的python+pychram进行API测试,下面这个可以指导自己以后入门:基本的开发级别还需要学习 1.python下载地址:https://www.python.or ...
- WEB自动化(Python+selenium)的API
在做Web自动化过程中,汇总了Python+selenium的API相关方法,给公司里的同事做了第二次培训,分享给大家 ...
- 使用sphinx快速为你python注释生成API文档
sphinx简介sphinx是一种基于Python的文档工具,它可以令人轻松的撰写出清晰且优美的文档,由Georg Brandl在BSD许可证下开发.新版的Python3文档就是由sphinx生成的, ...
- 基于python调用libvirt API
基于python调用libvirt API 1.程序代码 #!/usr/bin/python import libvirt import sys def createConnection(): con ...
- python安装包API文档
在python开发过程中,经常会使用第三方包,或者内置的包. 那么这些包,具体有哪些选项,有哪些方法,你知道吗?下面介绍一种万能方法. 使用命令:<注意,命令里python显示的API版本是根据 ...
- python入门-使用API
python入门-使用API import requests #执行API调用并存储响应 url = 'https://api.github.com/search/repositories?q=lan ...
随机推荐
- 系统调用篇——SSDT
写在前面 此系列是本人一个字一个字码出来的,包括示例和实验截图.由于系统内核的复杂性,故可能有错误或者不全面的地方,如有错误,欢迎批评指正,本教程将会长期更新. 如有好的建议,欢迎反馈.码字不易, ...
- 面试官:咱们来聊一聊mysql主从延迟
背景 前段时间遇到一个线上问题,后来排查好久发现是因为主从同步延迟导致的,所以今天写一篇文章总结一下这个问题希望对你有用.如果觉得还不错,记得加个关注点个赞哦 思维导图 思维导图 常见的主从架构 随着 ...
- Dapr-Actor构建块
前言: 前篇-绑定 文章对Dapr的绑定构建块进行了解,本篇继续对 Actor 构建块进行了解学习. 一.Actor简介: Actors 为最低级别的"计算单元". 换句话说,您将 ...
- [spojQTREE5]Query on a tree V
合理的正解大概是动态点分治,这里给出其实现 1 #include<bits/stdc++.h> 2 using namespace std; 3 #define N 100005 4 st ...
- [noi32]sort
先解释一下checker.cpp,它的判定标准是2e7,即答案超过2e7就认为代价过大了. 首先,很容易想到的办法是直接对其快排,从外到内交换区间即可,然而这样会被邪恶的出题人给卡掉(当然其实随便一组 ...
- 小程序嵌套H5的方式和技巧(二)
文章接上文,小程序嵌套H5的方式和技巧(一) 四.刷新wev-view嵌套的H5页面 1)我们为什么要刷新wev-view嵌套的H5页面? 很多的业务场景都需要开发者每次打开页面都更新一下页面的数据. ...
- page_fault_in_nonpaged_area异常解决方案(已解决)
电脑在运行虚拟机的时候异常重启,多次打开结果一样,问了客服告诉我导致蓝屏的原因很多,可能是驱动不兼容,系统,或其他.{没点有用的} 百度到这个方案: 打开->此电脑->右键属性->高 ...
- java的String参数格式化
String类的format()方法用于创建格式化的字符串以及连接多个字符串对象.熟悉C语言的同学应该记得C语言的sprintf()方法,两者有类似之处.format()方法有两种重载形式. form ...
- 一类巧妙利用利用失配树的序列DP
I.导入 求长度为\(\text{len}\)的包含给定连续子串\(\text{T}\)的 0/1 串的个数.(\(|T|<=15\)) 通常来说这种题目应该立刻联想到状压 DP 与取反集--这 ...
- 1.TwoSum-Leetcode
#include<iostream> #include<algorithm> #include<map> using namespace std; class So ...
