Spring全家桶之spring boot(三)
spring boot集成mybatis
众所周知,spring与springmvc可以无缝集成,而mybatis不是spring旗下的框架,因此需要进行配置,当然,这里的配置也是非常简单的。
1、首先我们需要创建一个数据库表:
   CREATE TABLE `learnmybatis`.`t_student` (

  `id` INT NOT NULL AUTO_INCREMENT,

  `name` VARCHAR(20) NULL,

  `age` INT NULL,

  `score` DOUBLE NULL,

  PRIMARY KEY (`id`));
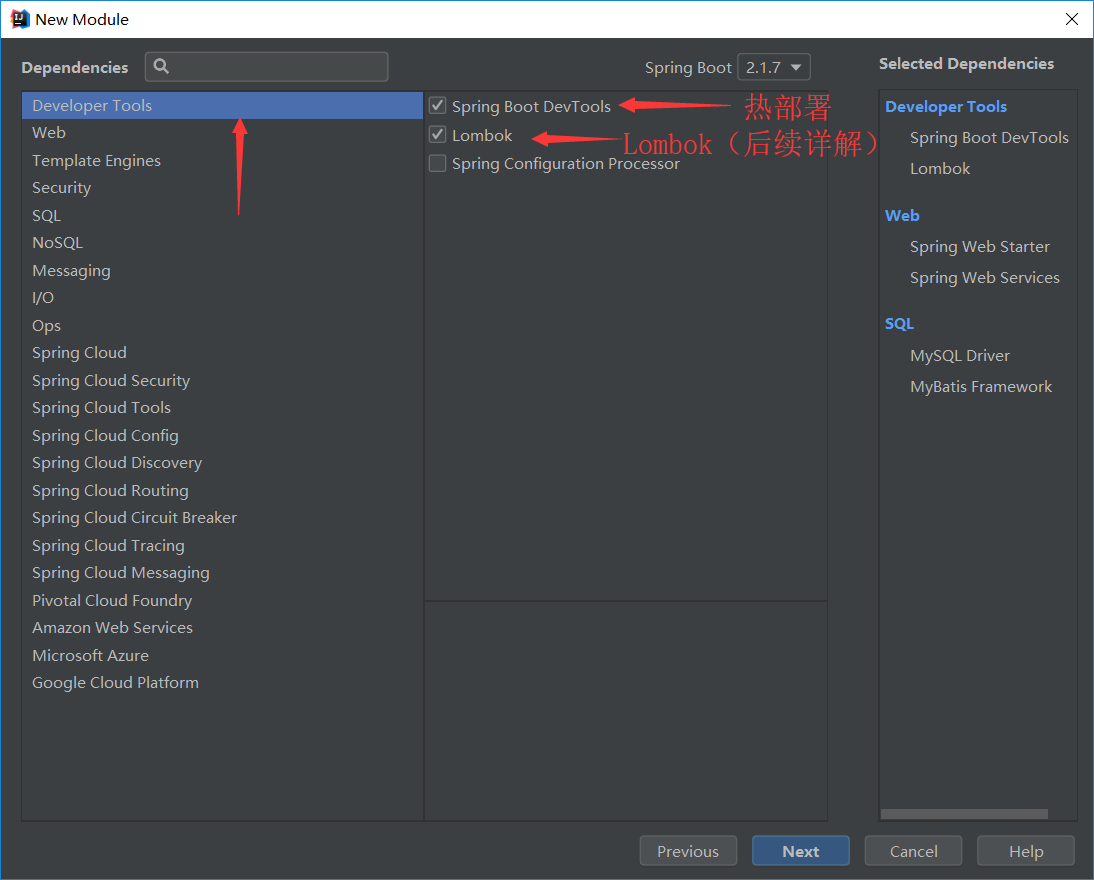
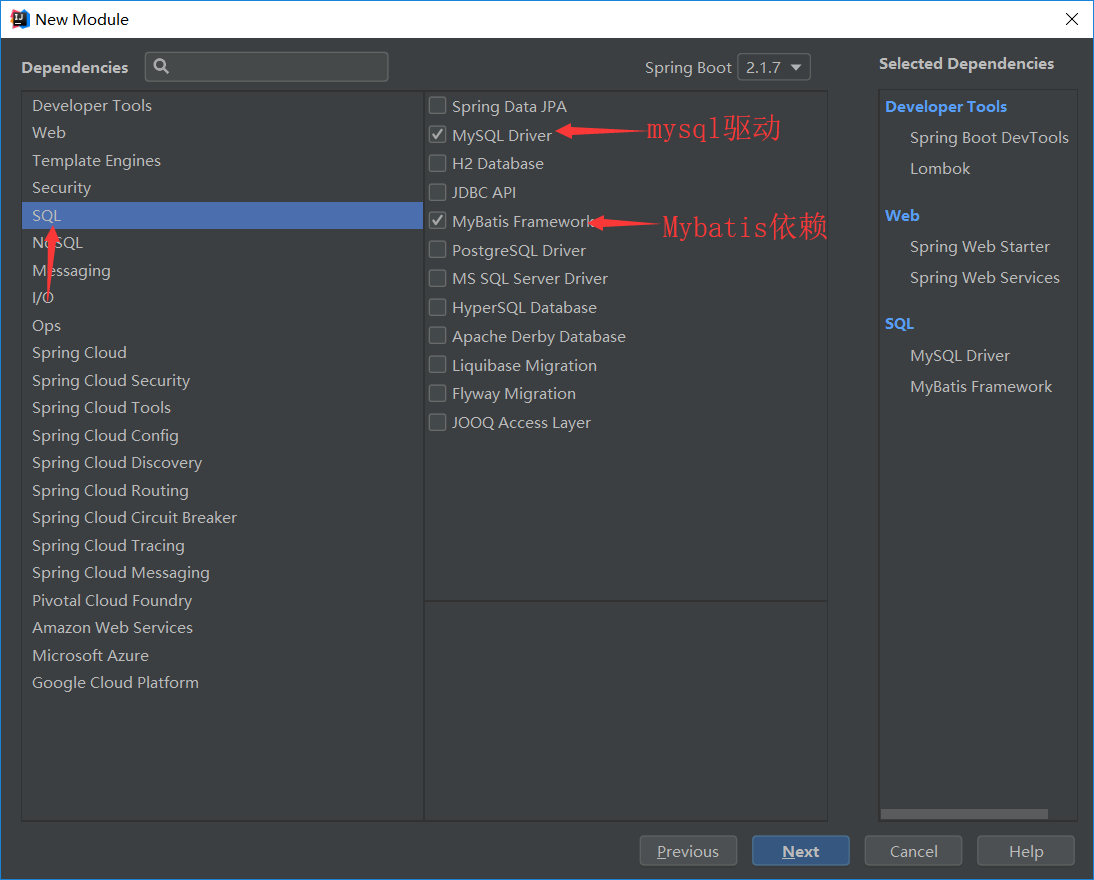
2、这里我们在Project中创建一个新的Model,创建模块时与之前不同的是我们需要勾选一些新的依赖,这样就不需要手动去添加了。


勾选完之后pom.xml文件中会自动添加spring boot起步依赖、mybatis起步依赖、mysql驱动依赖、spring boot热部署依赖、lombok依赖,之后我们仍需手动添加alibaba的druid数据库连接池依赖
    <!-- 加载mybatis整合springboot -->

    <dependency>

        <groupId>org.mybatis.spring.boot</groupId>

        <artifactId>mybatis-spring-boot-starter</artifactId>

        <version>1.3.2</version>

    </dependency>

    <!-- MySQL的jdbc驱动包 -->

    <dependency>

        <groupId>mysql</groupId>

        <artifactId>mysql-connector-java</artifactId>

    </dependency>

    <!-- springboot 开发自动热部署 -->

    <dependency>

        <groupId>org.springframework.boot</groupId>

        <artifactId>spring-boot-devtools</artifactId>

        <optional>true</optional>

    </dependency>

    <!-- alibaba的druid数据库连接池 该依赖需要手动添加-->

    <dependency>

        <groupId>com.alibaba</groupId>

        <artifactId>druid-spring-boot-starter</artifactId>

        <version>1.1.10</version>

    </dependency>
3、在pom.xml文件build标签下添加如下代码(目的是将mybatis配置文件添加到target目录下,否则在运行mybatis的时候会报找不到xml文件的错误):
<resources>

        <resource>

            <directory>src/main/java</directory>

            <includes>

                <include>**/*.xml</include>

            </includes>

        </resource>
</resources>
pom.xml中我们加了让maven将xml文件也编译放到target目录下的代码,除了将mapper放到dao包下这种方式之外,还可以直接将mapper文件放到resources下。在resources下创建mappers目录,然后将mapper.xml文件放到这个目录下。(两种方法选其一即可,如果放在resources目录下要记得重新编译)
修改application.properties配置文件,指定mapper文件路径,如果采用这种方法,则在pom.xml中删除上述resource中的配置:
#指定mapper文件的位置

mybatis.mapper-locations=classpath:mappers/*.xml
4、添加数据源相关配置,在application.properties配置文件中添加如下代码:
#指定mapper文件的位置
mybatis.mapper-locations=classpath:com/scm/mybatis/mapper/*.xml
#指定bean的位置
mybatis.type-aliases-package=com.scm.mybatis.bean

#数据源
spring.datasource.username=root
spring.datasource.password=
spring.datasource.driver-class-name=com.mysql.cj.jdbc.Driver
spring.datasource.url=jdbc:mysql://localhost:3306/student?useUnicode=true&characterEncoding=utf8&useSSL=false&serverTimezone=Asia/Shanghai
spring.datasource.type=com.alibaba.druid.pool.DruidDataSource

#查看sql语句日志
logging.level.com.monkey1024.mapper=debug
注意:注意上面的serverTimezone=Asia/Shanghai,这里如果写成serverTimezone=UTC或者GMT的话,在插入或更新数据的时候,日期可能会有问题,因为我们中国所在的时区是东八区。
5、 在创建bean目录,并在该目录下创建Student类
package com.scm.mybatis.bean;

public class Student {

        private Integer id;

        private String name;

        private Integer age;

        private Double score;

    public Integer getId() {

        return id;

    }

    public void setId(Integer id) {

        this.id = id;

    }

    public String getName() {

        return name;

    }

    public void setName(String name) {

        this.name = name;

    }

    public Integer getAge() {

        return age;

    }

    public void setAge(Integer age) {

        this.age = age;

    }

    public Double getScore() {

        return score;

    }

    public void setScore(Double score) {

        this.score = score;

    }

}
6、创建mapper目录,并在该目录下创建Mapper和dao接口
分别创建StudentMapper.xml和StudentMapper类
<?xml version="1.0" encoding="UTF-8" ?>

<!DOCTYPE mapper

        PUBLIC "-//mybatis.org//DTD Mapper 3.0//EN"

        "http://mybatis.org/dtd/mybatis-3-mapper.dtd">

<mapper namespace="com.scm.mybatis.mapper.StudentMapper">

    <!--查询多条数据-->

    <select id="selectAllStudent" resultType="student">

        SELECT id,name,age,score FROM t_student

    </select>

</mapper>
package com.scm.mybatis.mapper;

import com.scm.mybatis.bean.Student;

import org.apache.ibatis.annotations.Mapper;

import java.util.List;

@Mapper//在dao接口上加入Mapper注解,这样springboot就可以扫描到

public interface StudentMapper {

    List<Student> selectAllStudent();

}
我们在dao层的接口上添加了一个@Mapper注解,这样spring boot就可以扫描到该接口从而使用mybatis动态代理。除了这种方式之外还可以在spring boot的启动类上添加@MapperScan注解,这样就无需在dao层接口上添加@Mapper注解了。另一种方法如下(两种方法选其一即可):
@SpringBootApplication

@MapperScan("com.scm.mybatis.mapper")//扫描mapper文件

public class Application {

    public static void main(String[] args) {

        SpringApplication.run(Application.class, args);

    }

}
7、创建service目录,并在该目录下分别创建StudentService接口和StudentServiceImpl实现类
package com.scm.mybatis.service;

import com.scm.mybatis.bean.Student;

import java.util.List;

public interface StudentService {

    List<Student> selectAllStudent();

}
package com.scm.mybatis.service;

import com.scm.mybatis.bean.Student;

import com.scm.mybatis.mapper.StudentMapper;

import org.springframework.beans.factory.annotation.Autowired;

import org.springframework.stereotype.Service;

import java.util.List;

@Service

public class StudentServiceImpl implements StudentService{

    @Autowired

    private StudentMapper studentMapper;

    @Override

    public List<Student> selectAllStudent() {

        return studentMapper.selectAllStudent();

    }

}
8、创建controller目录,并在该目录下创建MybatisController类
package com.scm.mybatis.controller;

import com.scm.mybatis.service.StudentService;

import org.springframework.beans.factory.annotation.Autowired;

import org.springframework.stereotype.Controller;

import org.springframework.web.bind.annotation.RequestMapping;

import org.springframework.web.bind.annotation.ResponseBody;

@Controller

public class MybatisController {

    @Autowired

    private StudentService studentService;

    @RequestMapping("/find")

    @ResponseBody

    public Object findAllStudent() {

        return studentService.selectAllStudent();

    }

}
之后运行spring boot启动类,在浏览器中发送请求即可。
spring boot中开启事务
在spring boot中开启事务也非常简单通过下面两步即可:
1、在入口类中使用注解 @EnableTransactionManagement 开启事务支持
@SpringBootApplication

@EnableTransactionManagement //开启事务支持

public class Application {

    public static void main(String[] args) {

        SpringApplication.run(Application.class, args);

    }

}
2、在访问数据库的Service方法上添加注解 @Transactional 即可
@Service

@Transactional//开启事务

public class StudentServiceImpl implements StudentService{

    @Autowired

    private StudentMapper studentMapper;

    @Override

    public List<Student> selectAllStudent() {

        return studentMapper.selectAllStudent();

    }

}
Lombok使用方法
在创建项目的时候我们添加了lombok依赖,那么lombok到底有什么用呢?
在之前所编写的代码中,我们写了很多bean,这里面加了很多set、get方法,这些方法冗余,但却也不可缺少。这里我们可以使用lombok包,通过该工具,就不用在bean源码中手动添加set、get方法了,除此之外equals,hashcode,toString方法也无需手动在源码中添加了。lombok会在生成的bean的class字节码中添加这些方法,在使用lombok之后,代码就清爽多了。
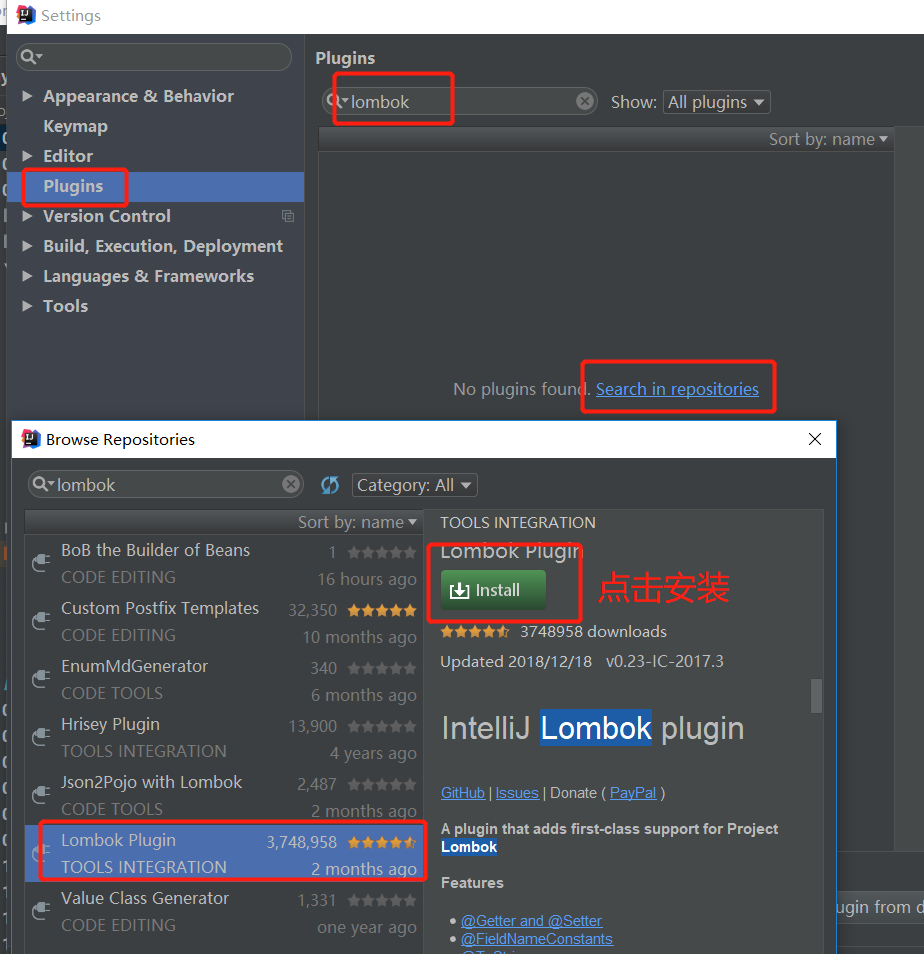
1、检查pom.xml中是否存在lombok依赖,若存在则在idea中添加lombok插件,ctrl+alt+s打开设置,在Plugins中搜索lombok

2、插件安装完成之后,在Student类上面加上@Data注解,然后set、get等方法就可以去掉了:
package com.scm.mybatis.bean;

import lombok.Data;

@Data

public class Student {

        private Integer id;

        private String name;

        private Integer age;

        private Double score;

}
这样我们的代码是不是看起来就简洁了许多呢,重新编译之后打开target目录进入bean包查看Student类会发现set、get、equals、toString、canEqual方法都已经自动写好了。
Spring全家桶之spring boot(三)的更多相关文章
- Spring全家桶之spring boot(二)
spring boot的两种配置文件: 虽然spring boot可以帮助我们进行一些配置项,但是有些内容还是需要开发者自己进行配置,因此spring boot提供了配置文件以供开发者配置.sprin ...
- Spring全家桶之spring boot(一)
spring boot框架抛弃了繁琐的xml配置过程,采用大量的默认配置简化我们的开发过程.使用spring boot之后就不用像以前使用ssm的时候添加那么多配置文件了,spring boot除了支 ...
- Spring全家桶之spring boot(五)
Thymeleaf简介 Thymeleaf是一个流行的模板引擎,该模板引擎采用Java语言开发,模板引擎是一个技术名词,是跨领域跨平台的概念,在Java语言体系下有模板引擎,在C#.PHP语言体系下也 ...
- Spring全家桶之SpringMVC(三)
Spring MVC单个接收表单提交的数据 单个接收表单提交的参数 在实际开发中通过会在spring MVC的Controller里面接收表单提交过来的参数,这块代码该怎么去编写呢? 示例: 编写 ...
- Spring全家桶之spring boot(四)
spring boot拦截器.过滤器.servlet和健康检查机制 spring boot拦截器 spring boot配置拦截器与原来大致相同,只是需要在拦截器的配置类上添加@Configurat ...
- 10分钟详解Spring全家桶7大知识点
Spring框架自2002年诞生以来一直备受开发者青睐,它包括SpringMVC.SpringBoot.Spring Cloud.Spring Cloud Dataflow等解决方案.有人亲切的称之为 ...
- Java秋招面试复习大纲(二):Spring全家桶+MyBatis+MongDB+微服务
前言 对于那些想面试高级 Java 岗位的同学来说,除了算法属于比较「天方夜谭」的题目外,剩下针对实际工作的题目就属于真正的本事了,热门技术的细节和难点成为了面试时主要考察的内容. 这里说「天方夜谭」 ...
- 一文解读Spring全家桶 (转)
Spring框架自2002年诞生以来一直备受开发者青睐,它包括SpringMVC.SpringBoot.Spring Cloud.Spring Cloud Dataflow等解决方案.有人亲切的称之为 ...
- 【转】Spring全家桶
Spring框架自诞生以来一直备受开发者青睐,有人亲切的称之为:Spring 全家桶.它包括SpringMVC.SpringBoot.Spring Cloud.Spring Cloud Dataflo ...
随机推荐
- pytorch seq2seq模型中加入teacher_forcing机制
在循环内加的teacher forcing机制,这种为目标确定的时候,可以这样加. 目标不确定,需要在循环外加. decoder.py 中的修改 """ 实现解码器 &q ...
- 深入分析Redis的主从复制机制
一.前言 最近由于疫情影响,时间比较多,所以开始学习之前一直想学,但是却没时间学的Redis.这两天研究了一下Redis的持久化以及主从复制机制,现在已经很晚了,就不多废话了.这篇博客就来谈一谈R ...
- .NetCore对接各大财务软件凭证API——金蝶系列(1)
哈喽,又和大家见面了,虽然看文章的小伙伴不多,但是我相信总有一天,自己写的这些文章或多或少会对其他人有些帮助,让他们在相关的业务开发下能少走些弯路,那我的目的就达到了,好了,今天就正式开始我们的系列了 ...
- 使用openmp进行并行编程
预处理指令pragma 在系统中加入预处理器指令一般是用来允许不是基本c语言规范部分的行为.不支持pragma的编译器会忽略pragma指令提示的那些语句,这样就允许使用pragma的程序在不支持它们 ...
- LeetCode 面试题56 - I. 数组中数字出现的次数 | Python
面试题56 - I. 数组中数字出现的次数 题目 一个整型数组 nums 里除两个数字之外,其他数字都出现了两次.请写程序找出这两个只出现一次的数字.要求时间复杂度是O(n),空间复杂度是O(1). ...
- thinkphp5.0 url跳转
<a href="{:url('member/index/index',['id'=>5])}">跳转</a> define()自定义常量在thiin ...
- docker 搭建一个wordpress 博客系统(4)
安装lnmp ()下载镜像 [root@server ~]# docker pull mysql:latest #下载mysql镜像 [root@server ~]# docker pull rich ...
- java并发中ExecutorService的使用
文章目录 创建ExecutorService 为ExecutorService分配Tasks 关闭ExecutorService Future ScheduledExecutorService Exe ...
- 徐州I
#include<bits/stdc++.h> using namespace std; #define rep(i,a,b) for(int i=a;i<=b;++i) #defi ...
- 阿里巴巴年薪800k大数据全栈工程师成长记
大数据全栈工程师一词,最早出现于Facebook工程师Calos Bueno的一篇文章 - Full Stack (需fanqiang).他把全栈工程师定义为对性能影响有着深入理解的技术通才.自那以后 ...
