一步步动手实现高并发的Reactor模型 —— Kafka底层如何充分利用多线程优势去处理网络I/O与业务分发
一、从《Apeche Kafka源码剖析》上搬来的概念和图
Kafka网络采用的是Reactor模式,是一种基于事件驱动的模式。熟悉Java编程的读者应该了解Java NIO提供了Reactor模式的API。常见的单线程Java NIO编程模式如图所示。
熟悉NIO编程都应该知道这个Selector,我们可以通过轮询它来获取监听事件,然后通过事件来进行不同的处理,比如OP_ACCEPT连接,OP_READ读取数据等等。
这样简单的处理对于客户端是没什么问题,但对于服务端来说就有些缺点了。在服务端,我们要求读取请求、处理请求以及发送响应各个环节必须能迅速完成,并且要尽可能做到互不影响。所以我们就需要对上述简单的模型进行修改。
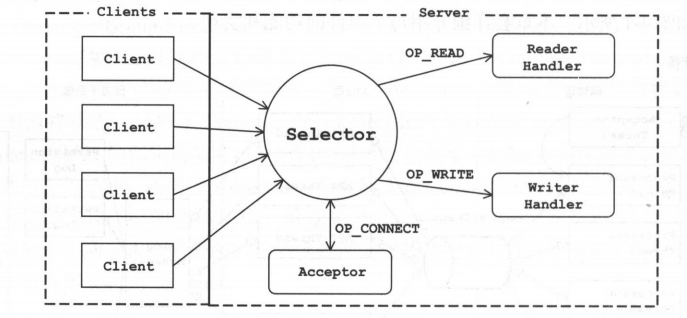
为了满足高并发的需求,也为了充分利用服务器的资源,我们对上述的架构稍作调整,将网络读写的逻辑与业务处理的逻辑进行拆分,让其由不同的线程池来处理,如图所示。

二、套餐一:直接撸Kafka源码
如果不想看本文下面这个很挫的Reactor模型,可以直接看Kafka的源码 ~ 如果需要稍微借助一点中文注释,我已经标注了十分多的注释~
可以直接看这个版本,基于Kafka0.10.0.1的源码解读
,当然也可以直接去看官方版本。
SocketServer就是它的入口。
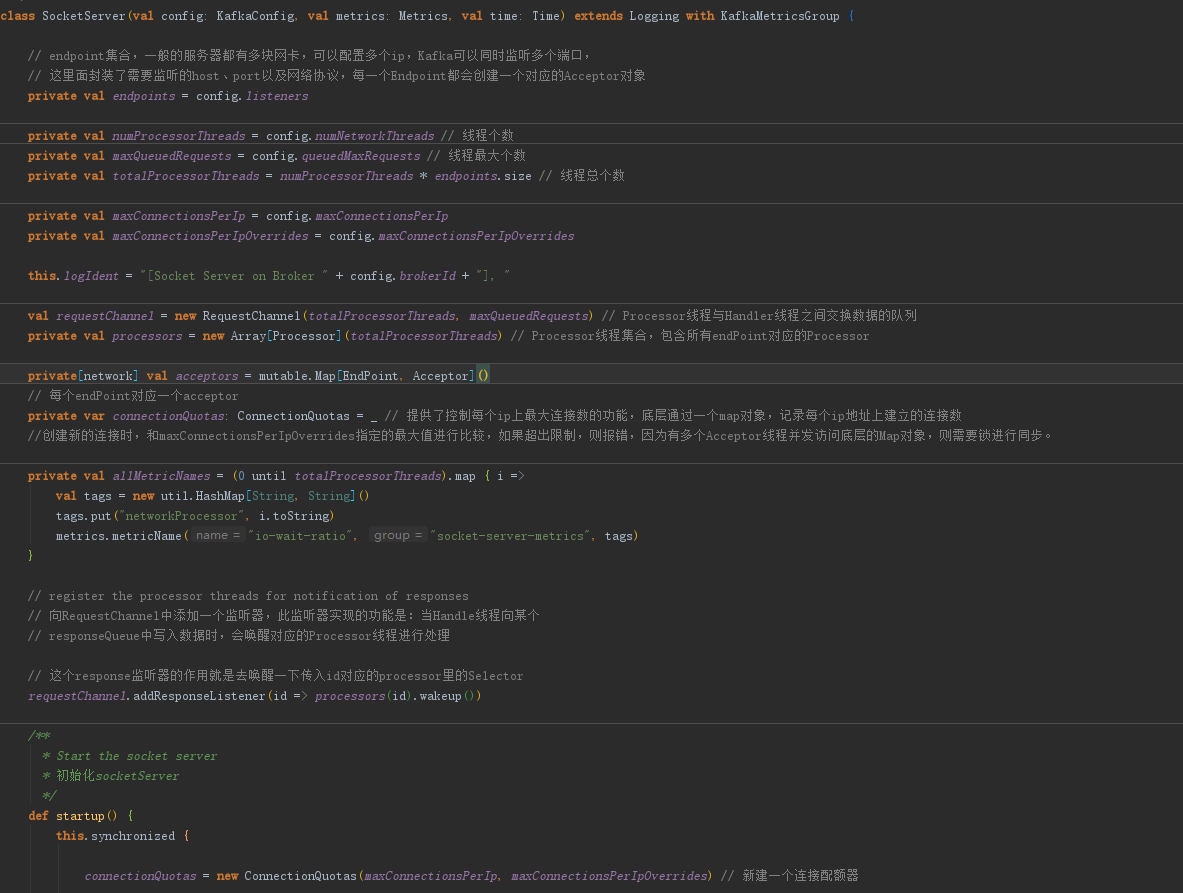
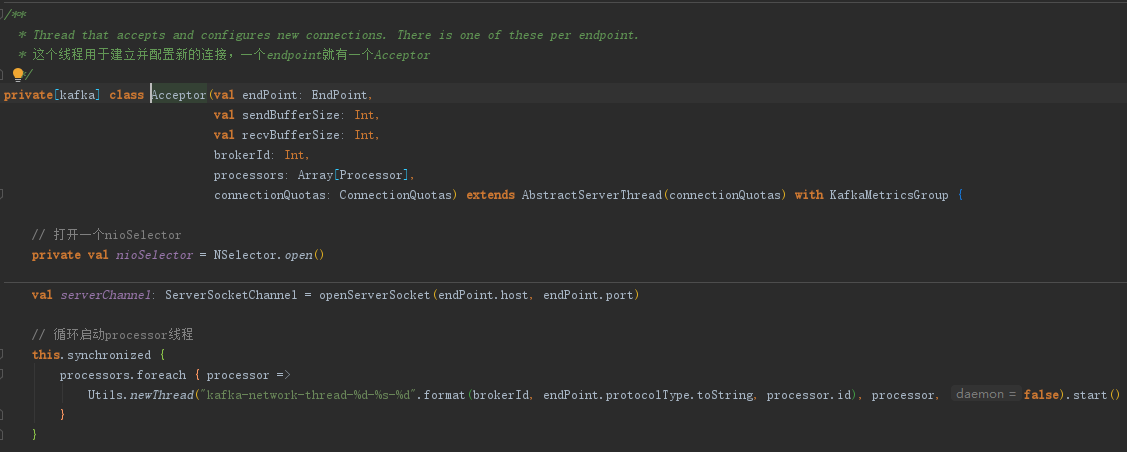
其中,内部类 Acceptor 负责建立并配置新连接
内部类 Processor 负责处理IO事件。

KafkaRequestHandler 这个类负责业务的处理。

而业务处理和IO之间的桥则是 RequestChannel。
三、套餐二:动手一步步实现Reactor模型
事先声明,以下这个很挫(但也简单)的Reactor模型只是保证它能用,而且思路和Kafka大致一致,并没有去做很多的异常处理!!很多细节地方也做得不是很到位。
3.1 回忆一下selector是怎么用的
//1. 获取服务端通道ServerSocketChannel ssChannel = ServerSocketChannel.open();ssChannel.bind(new InetSocketAddress(9898));//2. 设置为非阻塞模式ssChannel.configureBlocking(false);//3. 打开一个监听器Selector selector = Selector.open();//4. 向监听器注册接收事件ssChannel.register(selector, SelectionKey.OP_ACCEPT);while (selector.select() > 0) {//5. 获取监听器上所有的监听事件值Iterator<SelectionKey> it = selector.selectedKeys().iterator();//6. 如果有值while (it.hasNext()) {//7. 取到SelectionKeySelectionKey key = it.next();//8. 根据key值判断对应的事件if (key.isAcceptable()) {//9. 接入处理SocketChannel socketChannel = ssChannel.accept();socketChannel.configureBlocking(false);socketChannel.register(selector, SelectionKey.OP_READ);} else if (key.isReadable()) {//10. 可读事件处理SocketChannel channel = (SocketChannel) key.channel();readMsg(channel);}//11. 移除当前keyit.remove();}}
这就是我们上面提到的第一张图的模型,我们发现它的IO操作和业务处理是杂糅在一起的。当然我们简单的做可以使用一个业务处理的线程池负责处理业务。
但是我们这里是要去实现第二个图的模型~
3.2 实现负责建立连接的Acceptor
- 在 Acceptor 中监听端口
public Acceptor(InetSocketAddress inetSocketAddress, Processor[] processors) throws IOException {ServerSocketChannel serverSocketChannel = ServerSocketChannel.open();serverSocketChannel.configureBlocking(false);serverSocketChannel.socket().bind(inetSocketAddress);this.serverSocketChannel = serverSocketChannel;this.selector = Selector.open();this.processors = processors;// 先忽略这个东西 = =}
- 注册 OP_ACCEPT 事件,并且不断轮询进行连接的建立,kafka在初始化中大量使用了CountdownLaunch来确保初始化的成功,这里偷懒省去这一步骤。
@Overridepublic void run() {if (init) {System.out.println("已可以开始建立连接");init = false;}try {serverSocketChannel.register(selector, SelectionKey.OP_ACCEPT);} catch (ClosedChannelException e) {e.printStackTrace();}int currentProcessors = 0;while (true) {try {int ready = selector.select(500); // 半秒轮询一次if (ready > 0) {Iterator<SelectionKey> selectionKeys = selector.selectedKeys().iterator();while (selectionKeys.hasNext()) {SelectionKey selectionKey = selectionKeys.next();selectionKeys.remove();if (selectionKey.isAcceptable()) {this.accept(selectionKey, processors[currentProcessors]);currentProcessors = (currentProcessors + 1) % processors.length;} else {throw new RuntimeException("不应该出现的情况,因为只订阅了OP_ACCEPT");}}}} catch (IOException e) {e.printStackTrace();}}}// 建立连接,并且使用RoundRobin分配给一个Processor,也就是负责IO的角色public void accept(SelectionKey selectionKey, Processor processor) throws IOException {SelectableChannel channel = selectionKey.channel();SocketChannel socketChannel = ((ServerSocketChannel) channel).accept();socketChannel.configureBlocking(false);socketChannel.socket().setTcpNoDelay(true);socketChannel.socket().setKeepAlive(true);// 将需要连接的socketChannel转交给processor去处理processor.accept(socketChannel);}
3.3 实现负责处理IO的Processor
- 新连接进来后的处理:这里只是简单将新建立的连接放在了newConnection中。
public Processor(String name, RequestChannel requestChannel, ConcurrentHashMap<SelectionKey, ArrayBlockingQueue<ByteBuffer>> inFlightResponse) throws IOException {this.name = name;this.newConnection = new ConcurrentLinkedQueue<>();this.selector = Selector.open();this.inFlightResponse = inFlightResponse;this.requestChannel = requestChannel;}protected void accept(SocketChannel socketChannel) {try {System.out.println(name + "正在与" + socketChannel.getLocalAddress() + "建立连接");} catch (IOException e) {e.printStackTrace();}newConnection.add(socketChannel);// 还需要wakeUp,如果轮询阻塞了,告诉它可以不阻塞了selector.wakeup();}
- 处理newConnection,并注册OP_READ,等待客户端传输数据
@Overridepublic void run() {while (true) {/** 处理新链接*/while (!newConnection.isEmpty()) {SocketChannel socketChannel = newConnection.poll();try {socketChannel.register(selector, SelectionKey.OP_READ);} catch (ClosedChannelException e) {e.printStackTrace();}}
新接收到的数据,我们会将其丢进 RequestChannel,并取消关注OP_READ,保证不会让多个请求同时进来。
requestChannel.sendRequest(new Request(selectionKey, byteBuffer));// 接受完数据后,把数据丢进队列
而最新处理完的数据,我们则会将其缓存在 inFlightRequest ,并关注OP_WIRTE。这是仿照 Kafka 的 inFlightRequest 做的,当然做得很粗糙。
Kafka 的 inFlightRequest 是将对应每个节点请求/应答的请求和响应放在了队列中,确保在同一时间段内,一个节点只会有一个请求和应答。这也巧妙的避开了拆包粘包问题,首先 Kafka 保证了不会同时对一个节点发送请求,其次,Kafka 使用了自定的协议(其实就是包头上标明了整个包的长度再加上CRC校验)来保证一次请求的完整性。
我们的Selector轮询中,会将刚才在上一步中关注了OP_WRITE的SelectionKey连同要返回的数据一同拿出,并进行处理,处理完成后,取消关注OP_WRITE,并重新关注OP_READ。
- 处理新请求与新应答,我们将READ事件和WRITE事件放在了Processor来进行。
/** 将新应答放入缓冲队列*/Response response = requestChannel.receiveResponse();while (response != null) {SelectionKey key = response.getSelectionKey();key.interestOps(key.interestOps() | SelectionKey.OP_WRITE);ArrayBlockingQueue<ByteBuffer> inFlight = inFlightResponse.getOrDefault(response.getSelectionKey(), new ArrayBlockingQueue<>(100));inFlightResponse.put(response.getSelectionKey(), inFlight);try {inFlight.put(response.getByteBuffer());} catch (InterruptedException e) {e.printStackTrace();}response = requestChannel.receiveResponse();}int ready = selector.select(500);// 半秒轮询一次if (ready > 0) {Iterator<SelectionKey> selectionKeys = selector.selectedKeys().iterator();while (selectionKeys.hasNext()) {SelectionKey selectionKey = selectionKeys.next();selectionKeys.remove();/** 处理新请求*/if (selectionKey.isReadable()) {System.out.println(name + "正在处理新请求");SocketChannel socketChannel = (SocketChannel) selectionKey.channel();ByteBuffer byteBuffer = ByteBuffer.allocate(1024);// 懒得定协议,就默认取这么多吧 = =socketChannel.read(byteBuffer);// TODO 划重点byteBuffer.flip();requestChannel.sendRequest(new Request(selectionKey, byteBuffer));// 接受完数据后,把数据丢进队列selectionKey.interestOps(selectionKey.interestOps() & ~SelectionKey.OP_READ);// 不再关注read}/** 处理新应答*/if (selectionKey.isWritable()) {System.out.println(name + "正在处理新应答");ByteBuffer send = inFlightResponse.get(selectionKey)// // TODO 划重点.poll();SocketChannel socketChannel = (SocketChannel) selectionKey.channel();socketChannel.write(send);selectionKey.interestOps(selectionKey.interestOps() & ~SelectionKey.OP_WRITE);selectionKey.interestOps(selectionKey.interestOps() | SelectionKey.OP_READ);}}}
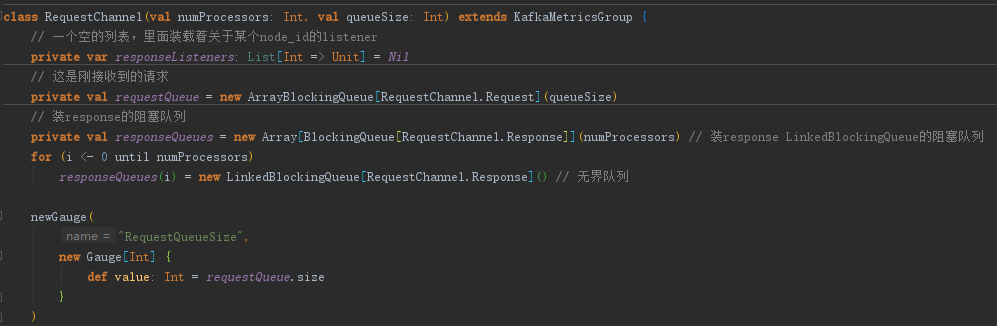
- RequestChannel的实现实际上十分简单..就是两个队列
/*** Created by Anur IjuoKaruKas on 2018/12/13*/public class RequestChannel {private ArrayBlockingQueue<Request> requestQueue;private ArrayBlockingQueue<Response> responseQueue;public RequestChannel() {requestQueue = new ArrayBlockingQueue<>(100);responseQueue = new ArrayBlockingQueue<>(100);}..........}
3.4 实现负责处理业务的Handler
很容易想到,Handler 实际上就是负责从 RequestChannel 的 requestQueue 中拉取需要处理的数据,并塞回 RequestChannel 的 responseQueue 中。
我们可以根据接收数据的不同,来进行不同的业务处理。甚至如果需要拓展,这里可以像 netty 一样,仅仅把 Handler 当成Boss,具体业务的执行可以创建相应的线程池去进行处理,比如说 Fetch 业务比较耗时,我可以创建一个较大的线程池,去执行Fetch业务,而 Hello 业务,我们只需要 Executors.newSingleThreadExecutor() 即可。
@Overridepublic void run() {while (true) {Request request = requestChannel.receiveRequest();if (request != null) {System.out.println("接收的请求将由" + name + "进行处理");handler(request.getSelectionKey(), request.getByteBuffer());}}}public void handler(SelectionKey selectionKey, ByteBuffer byteBuffer) {byte[] bytes = byteBuffer.array();String msg = new String(bytes);try {Thread.sleep(500); // 模拟业务处理} catch (InterruptedException e) {e.printStackTrace();}ByteBuffer response;if (msg.startsWith("Fetch")) {response = ByteBuffer.allocate(2048);response.put("Fetch ~~~~~~~~~~".getBytes());response.put(bytes);response.flip();} else if (msg.startsWith("Hello")) {response = ByteBuffer.allocate(2048);response.put("Hi ~~~~~~~~~~".getBytes());response.put(bytes);response.flip();} else {response = ByteBuffer.allocate(2048);response.put("Woww ~~~~~~~~~~".getBytes());response.put(bytes);response.flip();}System.out.println(name + "处理完毕,正将处理结果返回给Processor");requestChannel.sendResponse(new Response(selectionKey, response));}
3.5 运行我们很挫的模型
我们会发现现在这个很挫的 Reactor 模型的拓展性却很好,大头的两个 Processor 和 Handler 都是可以随意拓展数量的。Kafka 也是这么做的,不过 Kafka 是根据服务器核心的数量来创建 processor 和 handler 的:
// processors的创建val protocol = endpoint.protocolType// 网络协议val processorEndIndex = processorBeginIndex + numProcessorThreadsfor (i <- processorBeginIndex until processorEndIndex)processors(i) = newProcessor(i, connectionQuotas, protocol) // 创建Processor// 在这里面会 // 循环启动processor线程val acceptor = new Acceptor(endpoint, sendBufferSize, recvBufferSize, brokerId,processors.slice(processorBeginIndex, processorEndIndex), connectionQuotas) // 创建Acceptor// handlers的创建// 保存KafkaRequestHandler的执行线程val threads = new Array[Thread](numThreads)// KafkaRequestHandler集合val runnables = new Array[KafkaRequestHandler](numThreads)for (i <- 0 until numThreads) {runnables(i) = new KafkaRequestHandler(i, brokerId, aggregateIdleMeter, numThreads, requestChannel, apis)threads(i) = Utils.daemonThread("kafka-request-handler-" + i, runnables(i))threads(i).start()}
这里进行简单处理,我将所有的东西统统扔进一个线程池。
运行一下我们的整个模型,然后我们使用 Hercules 模拟客户端对我们的服务器进行请求。
/*** Created by Anur IjuoKaruKas on 2018/12/12*/public class Reactor {public static final int PORT = 9999;public static void main(String[] args) throws IOException {RequestChannel requestChannel = new RequestChannel();ConcurrentHashMap<SelectionKey, ArrayBlockingQueue<ByteBuffer>> inFlightResponse = new ConcurrentHashMap<>();Processor processor1 = new Processor("p1", requestChannel, inFlightResponse);Processor processor2 = new Processor("p2", requestChannel, inFlightResponse);Acceptor acceptor = new Acceptor(new InetSocketAddress(PORT), new Processor[] {processor1,processor2});ExecutorService executorService = Executors.newFixedThreadPool(10);executorService.execute(acceptor);executorService.execute(processor1);executorService.execute(processor2);Handler handler1 = new Handler("h1", requestChannel);Handler handler2 = new Handler("h2", requestChannel);executorService.execute(handler1);executorService.execute(handler2);}}
建立连接后,我们模拟两个客户端,依次发送 ‘hello baby’,‘Fetch msg’ 和 ‘感谢gaojingyu_gw发现问题’。
得到如下响应:
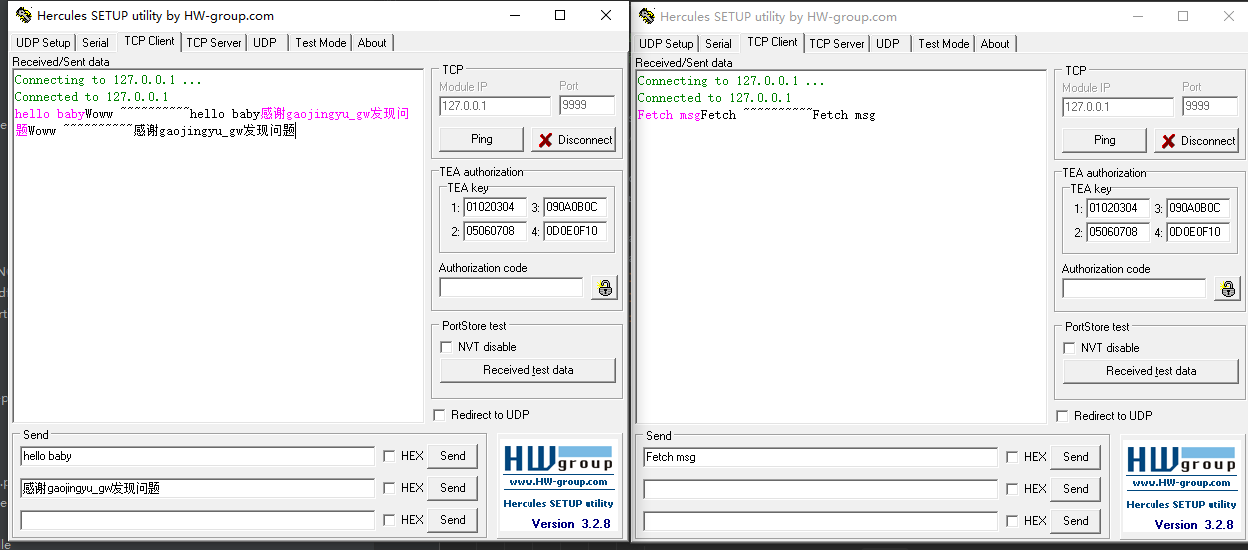
并且服务器日志如下:
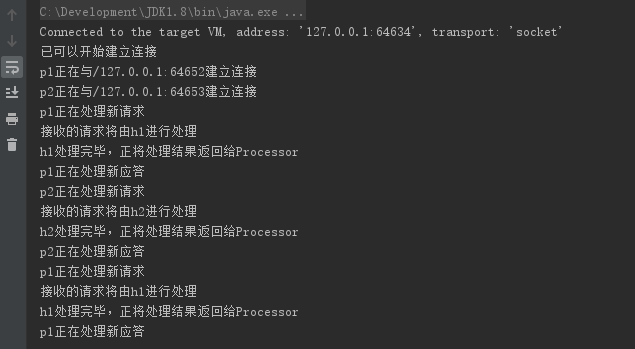
我们发现,p1和p2会交替从Acceptor中获取新的连接。h1和h2也交替会从RequestChannel中获取任务来进行执行~
另外额外感谢gaojingyu_gw发现问题,反馈无法建立更多连接。博主来来回回看了很多个地方,终于发现原版的代码确实无法建立更多的连接,Acceptor、Processor中的轮询代码有误,错误代码如下:
Set<SelectionKey> selectionKeys = selector.selectedKeys();for (SelectionKey selectionKey : selectionKeys) {if (selectionKey.isAcceptable()) {this.accept(selectionKey, processors[currentProcessors]);currentProcessors = (currentProcessors + 1) % processors.length;} else {throw new RuntimeException("不应该出现的情况,因为只订阅了OP_ACCEPT");}}
我们在循环selectionKeys的时候,不能直接循环。我们需要获得其迭代器,并在每次获得迭代器的下一个元素时,将这个元素移除。为什么不能直接循环:
Keys are added to the selected-key set by selection operations. A key may be removed directly from the selected-key set by invoking the set's remove method or by invoking the remove method of an iterator obtained from the set. Keys are never removed from the selected-key set in any other way; they are not, in particular, removed as a side effect of selection operations. Keys may not be added directly to the selected-key set.
正确代码如下:
Iterator<SelectionKey> selectionKeys = selector.selectedKeys().iterator();while (selectionKeys.hasNext()) {SelectionKey selectionKey = selectionKeys.next();selectionKeys.remove();if (selectionKey.isAcceptable()) {this.accept(selectionKey, processors[currentProcessors]);currentProcessors = (currentProcessors + 1) % processors.length;} else {throw new RuntimeException("不应该出现的情况,因为只订阅了OP_ACCEPT");}}
具体的代码请点击这里,直接拉取下来即可运行,运行的主类是 src/reactor/Reactor
觉得好的话可以顺手为文章点个赞哟~谢谢各位看官老爷!
参考文献:
《Apeche Kafka源码剖析》—— 徐郡明著
Kafka 源码 0.10.0.1
一步步动手实现高并发的Reactor模型 —— Kafka底层如何充分利用多线程优势去处理网络I/O与业务分发的更多相关文章
- [golang]Golang实现高并发的调度模型---MPG模式
Golang实现高并发的调度模型---MPG模式 传统的并发形式:多线程共享内存,这也是Java.C#或者C++等语言中的多线程开发的常规方法,其实golang语言也支持这种传统模式,另外一种是Go语 ...
- Java高并发程序设计学习笔记(二):多线程基础
转自:https://blog.csdn.net/dataiyangu/article/details/86226835# 什么是线程?线程的基本操作线程的基本操作新建线程调用run的一种方式调用ru ...
- Linux高并发机制——epoll模型
epoll是一个特别重要的概念,常常用于处理服务端的并发问题.当服务端的在线人数越来越多,会导致系统资源吃紧,I/O效率越来越慢,这时候就应该考虑epoll了.epoll是Linux内核为处理大批句柄 ...
- Java高并发-Java内存模型和线程安全
一.原子性 原子性是指一个操作是不可中断的.即使在多个线程一起执行的时候,一个操作一旦开始,就不会被其它线程干扰. i++是原子操作吗? 不是,包含3个操作:读i,i=i+1,写i 32位的机子上读取 ...
- 尼恩 Java高并发三部曲 [官方]
高并发 发烧友社群:疯狂创客圈(总入口) 奉上以下珍贵的学习资源: 疯狂创客圈 经典图书 : 极致经典 + 社群大片好评 < Java 高并发 三部曲 > 面试必备 + 大厂必备 + 涨薪 ...
- 用Netty开发中间件:高并发性能优化
用Netty开发中间件:高并发性能优化 最近在写一个后台中间件的原型,主要是做消息的分发和透传.因为要用Java实现,所以网络通信框架的第一选择当然就是Netty了,使用的是Netty 4版本.Net ...
- Web大规模高并发请求和抢购的解决方案
电商的秒杀和抢购,对我们来说,都不是一个陌生的东西.然而,从技术的角度来说,这对于Web系统是一个巨大的考验.当一个Web系统,在一秒钟内收到数以万计甚至更多请求时,系统的优化和稳定至关重要.这次我们 ...
- php解决高并发问题
我们通常衡量一个Web系统的吞吐率的指标是QPS(Query Per Second,每秒处理请求数),解决每秒数万次的高并发场景,这个指标非常关键.举个例子,我们假设处理一个业务请求平均响应时间为10 ...
- java多线程高并发
旭日Follow_24 的CSDN 博客 ,全文地址请点击: https://blog.csdn.net/xuri24/article/details/81293321 “高并发和多线程”总是被一起提 ...
随机推荐
- Codeforces Round #598 (Div. 3) C. Platforms Jumping
There is a river of width nn. The left bank of the river is cell 00 and the right bank is cell n+1n+ ...
- 吴裕雄 python 机器学习——集成学习随机森林RandomForestRegressor回归模型
import numpy as np import matplotlib.pyplot as plt from sklearn import datasets,ensemble from sklear ...
- P2023 [AHOI2009]维护序列 区间加乘模板
题意: 有长为N的数列,不妨设为a1,a2,…,aN .有如下三种操作形式:N<=1e5(1)把数列中的一段数全部乘一个值;(2)把数列中的一段数全部加一个值;(3)询问数列中的一段数的和,由于 ...
- IDEA 自定义注释模板 支持设置多个param参数
在使用IDEA过程中,很多人可能感觉自带注释太简约了,想增加一些属性,比如作者.创建时间.版本号等等,这个时候我们可以使用自定义的注释模板来实现我们需求,话不多说直接进入如何自定义模板设置: 打开设置 ...
- Flume基础学习
Flume是一款非常优秀的日志采集工具.支持多种形式的日志采集,作为apache的顶级开源项目,Flume再大数据方面具有广泛的应用 首先需要在Flume的解压目录中conf文件夹中将flume-en ...
- quernation,euler,rotationmatrix之间的相互转换
转自:https://blog.csdn.net/zhuoyueljl/article/details/70789472
- Springmvc-crud-03(静态资源错误)
错误描述:静态资源加载失败 原因:spring会拦截静态资源 解决办法: <!-- 配置spring支持静态资源请求 --> <mvc:default-servlet-handler ...
- [转]Ethereum-智能合约最佳实践
主要章节如下: Solidity安全贴士 已知的攻击手段 竞态 可重入 交易顺序依赖 针对Gas的攻击 上溢/下溢 工程技术 参考文献 这篇文档旨在为Solidity开发人员提供一些智能合约的secu ...
- [C++_QT] Error: Not a signal or slot declaration
问题: 在Qt工程中添加了一个新的窗口之后 一直报错 如下 单单从错误描述上看 是缺少信号或者槽 但是我确定没有缺少啊 然后第二个错误显示了一个mox_xxxx文件 然后我就去那个目录下去找那个文件 ...
- Smart License
思科启动了通过构建思科智能软件管理器门户来简化客户许可管理的计划. 它可以帮助客户了解他们购买的许可证以及他们使用的许可证. 其他各种思科产品已经启用Smart Enabled,随着此版本(我这里学习 ...