吴恩达DeepLearning.ai的Sequence model作业Dinosaurus Island
- 如何存储文本数据以使用RNN进行处理
- 如何通过在每个时间步采样预测并将其传递给下一个RNN单元来合成数据
- 如何构建字符级文本生成循环神经网络
- 为什么剪裁渐变很重要
from utils import *
import random
import pprint
- 读取恐龙名称的数据集
- 创建唯一字符列表(例如a-z)
- 计算数据集和词汇量。
data = open('dinos.txt', 'r').read() # 加载数据集
data= data.lower() # 将所有数据变小写
chars = list(set(data)) # 创建唯一字符列表,data中用了什么字符
data_size, vocab_size = len(data), len(chars) # 数据集的大小和词汇量
print('There are %d total characters and %d unique characters in your data.' % (data_size, vocab_size))
['\n', 'a', 'b', 'c', 'd', 'e', 'f', 'g', 'h', 'i', 'j', 'k', 'l', 'm', 'n', 'o', 'p', 'q', 'r', 's', 't', 'u', 'v', 'w', 'x', 'y', 'z']
{ 0: '\n', 1: 'a', 2: 'b', 3: 'c', 4: 'd', 5: 'e', 6: 'f', 7: 'g', 8: 'h', 9: 'i', 10: 'j', 11: 'k', 12: 'l', 13: 'm', 14: 'n', 15: 'o', 16: 'p', 17: 'q', 18: 'r', 19: 's', 20: 't', 21: 'u', 22: 'v', 23: 'w', 24: 'x', 25: 'y', 26: 'z'}
- 初始化参数
- 运行优化循环
- 前向传播以计算损失函数
- 向后传播根据损失函数计算梯度
- 梯度裁剪以避免梯度爆炸
- 使用梯度下降规则更新你的参数
- 返回学习到的参数
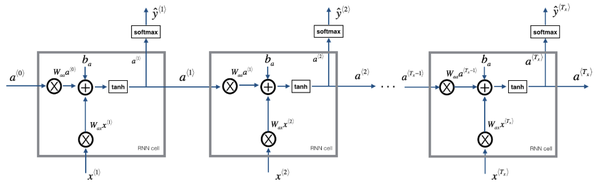
- 每一个时间步长, RNN都会根据之前的字符来预测下一个字符是什么。
- 数据集
\mathbf{X} = (x^{\langle 1 \rangle}, x^{\langle 2 \rangle}, ..., x^{\langle T_x \rangle}) 是训练集中的字符列表。
\mathbf{Y} = (y^{\langle 1 \rangle}, y^{\langle 2 \rangle}, ..., y^{\langle T_x \rangle}) 是相同的字符列表,但是向前移动了一个字符。
- 每个时间步长
t,
y^{\langle t \rangle} = x^{\langle t+1 \rangle}. 在时间
t + 1 处的输入值相同.
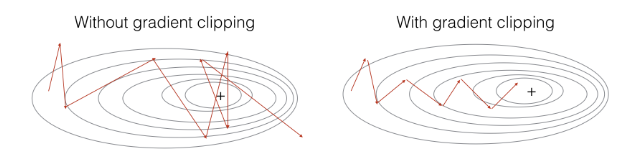
- 梯度裁剪:避免梯度爆炸
- 采样:一种用于生成字符的技术
- 当梯度值非常大时,称为“梯度爆炸”。
- 梯度爆炸使训练过程更加困难,因为更新可能太大,以至于在反向传播过程中“overshoot”了最佳值。
- 向前传播
- 计算成本函数
- 向后传播
- 参数更新
- 剪切渐变有多种方法。
- 我们将使用简单的按元素裁剪程序,其中将梯度向量的每个元素裁剪为位于某个范围[-N,N]之间。
- 例如,如果N = 10
- 元素的取值范围是[-10,10]
- 如果任何在梯度向量中大于10的元素,则将其设置为10。
- 如果任何在梯度向量中小于-10的元素,则将其设置为-10。
- 如果任何在-10到10之间的元素,则它们保持原始值。
def clip(gradients, maxValue):
'''
Clips the gradients' values between minimum and maximum.
Arguments:
gradients -- a dictionary containing the gradients "dWaa", "dWax", "dWya", "db", "dby"
maxValue -- everything above this number is set to this number, and everything less than -maxValue is set to -maxValue
Returns:
gradients -- a dictionary with the clipped gradients.
'''
dWaa, dWax, dWya, db, dby = gradients['dWaa'], gradients['dWax'], gradients['dWya'], gradients['db'], gradients['dby']
### START CODE HERE ###
# clip to mitigate exploding gradients, loop over [dWax, dWaa, dWya, db, dby]. (≈2 lines)
for gradient in [dWax, dWaa, dWya, db, dby]:
np.clip(gradient, -maxValue, maxValue, out=gradient)
### END CODE HERE ###
# gradients = {"dWaa": dWaa, "dWax": dWax, "dWya": dWya, "db": db, "dby": dby}
return gradients
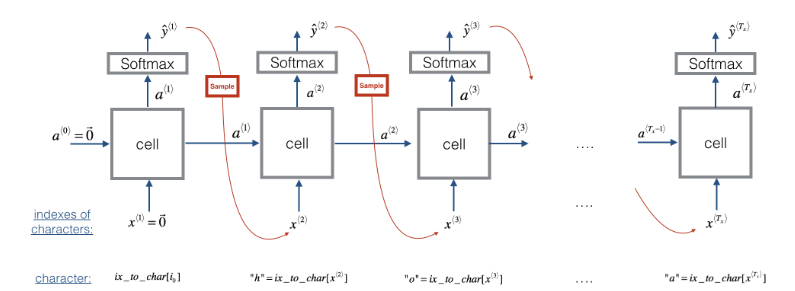
- Step 1: 输入0的 "dummy" 向量
x^{\langle 1 \rangle} = \vec{0}.
- 这是我们生成任何字符之前的默认输入。 我们还设置了
a^{\langle 0 \rangle} = \vec{0}
- Step 2: 执行一次向前传播即可获得
a^{\langle 1 \rangle} 和
\hat{y}^{\langle 1 \rangle}. 这里是公式:
- 关于
的一些细节:
- 注意
表示由“ i”索引的字符是下一个字符的概率。
- 我们提供了 softmax() 函数供你使用.
x^{\langle 1 \rangle} 在代码中是 x.当创建one-hot向量时,请创建一个由零的组成numpy数组,其中行数等于唯一字符数,列数等于1。 它是2D而不是1D数组。
a^{\langle 0 \rangle} 在代码中是a_prev. 它是一个由零组成的numpy数组,其中行数为
n_ {a} ,列数为1。它也是2D数组。 通过获取
W_ {aa} 中的列数来得到
W_{aa}a^{\langle t \rangle}起作用 。
a ^ {\ langle 0 \ rangle} 在代码中为a_prev。
- 你可能想知道为什么我们强调
- 对于numpy中的矩阵乘法,如果将2D矩阵与1D向量相乘,则最终得到1D数组。
- 当我们将两个数组相加时,期望它们具有相同形状,这将成为一个问题。
- 当两个具有不同维数的数组加在一起时,Python将会执行“广播broadcasts”。
- 这是一些示例代码,显示了使用1D和2D数组之间的区别。
import numpy as np
matrix1 = np.array([[1,1],[2,2],[3,3]]) # (3,2)
matrix2 = np.array([[0],[0],[0]]) # (3,1)
vector1D = np.array([1,1]) # (2,)
vector2D = np.array([[1],[1]]) # (2,1)
np.dot(matrix1,vector1D) # 2D 和 1D 数组相乘: 结果是1D数组 [2 4 6]
np.dot(matrix1,vector2D) # 2D 和 2D 数组相乘: 结果是2D数组 [[2], [4], [6]]
np.dot(matrix1,vector2D) + matrix2 # (3 x 1) 向量和(3 x 1)向量相加是(3 x 1) 向量,这个是我们想要的。 [[2] [4] [6]]
np.dot(matrix1,vector1D) + matrix2 # (3,) 向量和(3 x 1)向量相加,这会在第二维上广播1D的数组,这不是我们想要的!
- Step 3: 抽样:
- 注意我们已经有了
y^{\langle t+1 \rangle}, 我们想选择恐龙名称中的下一个字母。如果我们选择最有可能的情况,那么在给定起始字母的情况下,模型将始终产生相同的结果。
- 为了使结果更有趣,我们将使用np.random.choice选择可能但并非总是相同的下一个字母。
- 采样是从一组值中选择一个值,其中每个值都有一定概率被选择。
- 采样使我们能够生成随机的序列值。
- 根据
- 这就意味着如果
\hat{y}^{\langle t+1 \rangle }_i = 0.16, 你将以16%的概率选择索引“ i”。
- 你可以查看np.random.choice.
np.random.seed(0)
probs = np.array([0.1, 0.0, 0.7, 0.2])
idx = np.random.choice([0, 1, 2, 3] p = probs)
- 这就意味着你会根据分布来选择索引:
- 注意p的值是1D向量。
- 注意
\hat{y}^{\langle t+1 \rangle}在代码中用 y 表示, 它是2维数组。
- Step 4: 更新
x^{\langle t \rangle }
- sample()函数的最后一步就是更新变量x, 它当前存储的是
x^{\langle t + 1 \rangle }.
- 你将选择作为预测字符相对应的one-hot矢量来代表
- 你将接着在步骤1中向前传播
# GRADED FUNCTION: sample

def sample(parameters, char_to_ix, seed):

    """

    Sample a sequence of characters according to a sequence of probability distributions output of the RNN

    Arguments:

    parameters -- python dictionary containing the parameters Waa, Wax, Wya, by, and b.

    char_to_ix -- python dictionary mapping each character to an index.

    seed -- used for grading purposes. Do not worry about it.

    Returns:

    indices -- a list of length n containing the indices of the sampled characters.

    """

    # Retrieve parameters and relevant shapes from "parameters" dictionary

    Waa, Wax, Wya, by, b = parameters['Waa'], parameters['Wax'], parameters['Wya'], parameters['by'], parameters['b']

    vocab_size = by.shape[0]

    n_a = Waa.shape[1]

    ### START CODE HERE ###

    # Step 1: Create the a zero vector x that can be used as the one-hot vector

    # representing the first character (initializing the sequence generation). (≈1 line)

    x = np.zeros((vocab_size, 1)) # 可以看看上面为什么这里是二维

    # Step 1': Initialize a_prev as zeros (≈1 line)

    a_prev = np.zeros((n_a, 1))

    # Create an empty list of indices, this is the list which will contain the list of indices of the characters to generate (≈1 line)

    indices = []

    # idx is the index of the one-hot vector x that is set to 1

    # All other positions in x are zero.

    # We will initialize idx to -1

    idx = -1

    # Loop over time-steps t. At each time-step:

    # sample a character from a probability distribution

    # and append its index (`idx`) to the list "indices".

    # We'll stop if we reach 50 characters

    # (which should be very unlikely with a well trained model).

    # Setting the maximum number of characters helps with debugging and prevents infinite loops.

    counter = 0

    newline_character = char_to_ix['\n']

    while (idx != newline_character and counter != 50):

        # Step 2: Forward propagate x using the equations (1), (2) and (3)

        a = np.tanh(np.dot(Wax, x) + np.dot(Waa, a_prev) + b)

        z = np.dot(Wya, a) + by

        y = softmax(z)

        # for grading purposes

        np.random.seed(counter+seed)

        # Step 3: Sample the index of a character within the vocabulary from the probability distribution y

        # (see additional hints above)

        idx = np.random.choice(list(range(vocab_size)), p=y.ravel())

        # Append the index to "indices"

        indices.append(idx)

        # Step 4: Overwrite the input x with one that corresponds to the sampled index `idx`.

        # (see additional hints above)

        x = np.zeros((vocab_size, 1))

        x[idx] = 1

        # Update "a_prev" to be "a"

        a_prev = a

        # for grading purposes

        seed += 1

        counter +=1

    ### END CODE HERE ###

    if (counter == 50):

        indices.append(char_to_ix['\n'])

    return indices
- 在本节中,你将实现一个函数,该函数执行一步随机梯度下降(带有修剪的梯度)。
- 你将一次查看一个训练示例,因此优化算法将是随机梯度下降。
- 通过RNN向前传播以计算损耗
- 随时间向后传播以计算相对于参数的损耗梯度
- 梯度裁剪
- 使用梯度下降更新参数
def rnn_forward(X, Y, a_prev, parameters):

    """ Performs the forward propagation through the RNN and computes the cross-entropy loss.

    It returns the loss' value as well as a "cache" storing values to be used in backpropagation."""

    ....

    return loss, cache

def rnn_backward(X, Y, parameters, cache):

    """ Performs the backward propagation through time to compute the gradients of the loss with respect

    to the parameters. It returns also all the hidden states."""

    ...

    return gradients, a

def update_parameters(parameters, gradients, learning_rate):

    """ Updates parameters using the Gradient Descent Update Rule."""

    ...

    return parameters

Recall that you previously implemented the clip function:

def clip(gradients, maxValue)

    """Clips the gradients' values between minimum and maximum."""

    ...

    return gradients
- 请注意,即使parameters不是optimize函数的返回值之一,parameters字典中的权重和偏差也会通过优化进行更新。参数字典通过引用传递到函数中,因此即使在函数外部访问该字典,对字典的更改也会对参数字典做出更改。
- Python字典和列表是“按引用传递”,这意味着,如果将字典传递给函数并在函数内修改字典,则这将更改同一字典。
def optimize(X, Y, a_prev, parameters, learning_rate = 0.01):

    """

    Execute one step of the optimization to train the model.

    Arguments:

    X -- list of integers, where each integer is a number that maps to a character in the vocabulary.

    Y -- list of integers, exactly the same as X but shifted one index to the left.

    a_prev -- previous hidden state.

    parameters -- python dictionary containing:

                        Wax -- Weight matrix multiplying the input, numpy array of shape (n_a, n_x)

                        Waa -- Weight matrix multiplying the hidden state, numpy array of shape (n_a, n_a)

                        Wya -- Weight matrix relating the hidden-state to the output, numpy array of shape (n_y, n_a)

                        b --  Bias, numpy array of shape (n_a, 1)

                        by -- Bias relating the hidden-state to the output, numpy array of shape (n_y, 1)

    learning_rate -- learning rate for the model.

    Returns:

    loss -- value of the loss function (cross-entropy)

    gradients -- python dictionary containing:

                        dWax -- Gradients of input-to-hidden weights, of shape (n_a, n_x)

                        dWaa -- Gradients of hidden-to-hidden weights, of shape (n_a, n_a)

                        dWya -- Gradients of hidden-to-output weights, of shape (n_y, n_a)

                        db -- Gradients of bias vector, of shape (n_a, 1)

                        dby -- Gradients of output bias vector, of shape (n_y, 1)

    a[len(X)-1] -- the last hidden state, of shape (n_a, 1)

    """

    ### START CODE HERE ###

    # Forward propagate through time (≈1 line)

    loss, cache = rnn_forward(X, Y, a_prev, parameters)

    # Backpropagate through time (≈1 line)

    gradients, a = rnn_backward(X, Y, parameters, cache)

    # Clip your gradients between -5 (min) and 5 (max) (≈1 line)

    gradients = clip(gradients, 5)

    # Update parameters (≈1 line)

    parameters = update_parameters(parameters, gradients, learning_rate)

    ### END CODE HERE ###

    return loss, gradients, a[len(X)-1]
- 给定恐龙名称数据集,我们将数据集的每一行(一个名称)用作一个训练样本。
- 每100步随机梯度下降,你将抽样10个随机选择的名称,以查看算法的运行情况。
- 请记住要对数据集进行混洗,以便随机梯度下降以随机顺序访问样本。
- 使用for循环,在“示例”列表中浏览经过排序的恐龙名称列表。
- 如果有100个示例,并且for循环将索引从100开始递增,请考虑如何使索引循环回到0,以便我们可以在j为100、101,等等
- 提示:101除以100为零,余数为1。
- %是python中的模运算符。
def model(data, ix_to_char, char_to_ix, num_iterations = 35000, n_a = 50, dino_names = 7, vocab_size = 27):

    """

    Trains the model and generates dinosaur names.

    Arguments:

    data -- text corpus

    ix_to_char -- dictionary that maps the index to a character

    char_to_ix -- dictionary that maps a character to an index

    num_iterations -- number of iterations to train the model for

    n_a -- number of units of the RNN cell

    dino_names -- number of dinosaur names you want to sample at each iteration.

    vocab_size -- number of unique characters found in the text (size of the vocabulary)

    Returns:

    parameters -- learned parameters

    """

    # Retrieve n_x and n_y from vocab_size

    n_x, n_y = vocab_size, vocab_size

    # Initialize parameters

    parameters = initialize_parameters(n_a, n_x, n_y)

    # Initialize loss (this is required because we want to smooth our loss)

    loss = get_initial_loss(vocab_size, dino_names)

    # Build list of all dinosaur names (training examples).

    with open("dinos.txt") as f:

        examples = f.readlines()

    examples = [x.lower().strip() for x in examples]

    # Shuffle list of all dinosaur names

    np.random.seed(0)

    np.random.shuffle(examples)

    # Initialize the hidden state of your LSTM

    a_prev = np.zeros((n_a, 1))

    # Optimization loop

    for j in range(num_iterations):

        ### START CODE HERE ###

        # Set the index `idx` (see instructions above)

        index = j % len(examples)

        # Set the input X (see instructions above)

        single_example = examples[index]

        single_example_chars = [ch for ch in single_example]

        single_example_ix = [char_to_ix[ch] for ch in single_example_chars]

        X = [None] + single_example_ix

        # Set the labels Y (see instructions above)

        ix_newline = char_to_ix["\n"]

        Y = X[1:] + [ix_newline]

        # Perform one optimization step: Forward-prop -> Backward-prop -> Clip -> Update parameters

        # Choose a learning rate of 0.01

        curr_loss, gradients, a_prev = optimize(X, Y, a_prev, parameters)

        ### END CODE HERE ###

        # Use a latency trick to keep the loss smooth. It happens here to accelerate the training.

        loss = smooth(loss, curr_loss)

        # Every 2000 Iteration, generate "n" characters thanks to sample() to check if the model is learning properly

        if j % 2000 == 0:

            print('Iteration: %d, Loss: %f' % (j, loss) + '\n')

            # The number of dinosaur names to print

            seed = 0

            for name in range(dino_names):

                # Sample indices and print them

                sampled_indices = sample(parameters, char_to_ix, seed)

                print_sample(sampled_indices, ix_to_char)

                seed += 1  # To get the same result (for grading purposes), increment the seed by one.

            print('\n')

    return parameters

吴恩达DeepLearning.ai的Sequence model作业Dinosaurus Island的更多相关文章
- 吴恩达deepLearning.ai循环神经网络RNN学习笔记_看图就懂了!!!(理论篇)
前言 目录: RNN提出的背景 - 一个问题 - 为什么不用标准神经网络 - RNN模型怎么解决这个问题 - RNN模型适用的数据特征 - RNN几种类型 RNN模型结构 - RNN block - ...
- 吴恩达deepLearning.ai循环神经网络RNN学习笔记_没有复杂数学公式,看图就懂了!!!(理论篇)
本篇文章被Google中国社区组织人转发,评价: 条理清晰,写的很详细! 被阿里算法工程师点在看! 所以很值得一看! 前言 目录: RNN提出的背景 - 一个问题 - 为什么不用标准神经网络 - RN ...
- 用纯Python实现循环神经网络RNN向前传播过程(吴恩达DeepLearning.ai作业)
Google TensorFlow程序员点赞的文章! 前言 目录: - 向量表示以及它的维度 - rnn cell - rnn 向前传播 重点关注: - 如何把数据向量化的,它们的维度是怎么来的 ...
- 一文看懂神经网络初始化!吴恩达Deeplearning.ai最新干货
[导读]神经网络的初始化是训练流程的重要基础环节,会对模型的性能.收敛性.收敛速度等产生重要的影响.本文是deeplearning.ai的一篇技术博客,文章指出,对初始化值的大小选取不当, 可能造成 ...
- 吴恩达《AI For Everyone》_练习英语翻译_待更新
AI For Everyone https://www.coursera.org/learn/ai-for-everyone 讲师: Andrew Ng (吴恩达) CEO/Founder Landi ...
- 吴恩达DeepLearning 第一课第四周随笔
第四周 4.1深度神经网络符号约定 L=4______(神经网络层数) 4.2 校正矩阵的维数 校正要点:,, dZ,dA,dW,db都与它们被导数(Z,A,W,b)的维数相同 4.3 为什么使用 ...
- 吴恩达deeplearning之CNN—卷积神经网络
https://blog.csdn.net/ice_actor/article/details/78648780 个人理解: 卷积计算的过程其实是将原始的全连接换成了卷积全连接,每个kernel为对应 ...
- Coursera-AndrewNg(吴恩达)机器学习笔记——第二周编程作业
一.准备工作 从网站上将编程作业要求下载解压后,在Octave中使用cd命令将搜索目录移动到编程作业所在目录,然后使用ls命令检查是否移动正确.如: 提交作业:提交时候需要使用自己的登录邮箱和提交令牌 ...
- Coursera-AndrewNg(吴恩达)机器学习笔记——第四周编程作业(多分类与神经网络)
多分类问题——识别手写体数字0-9 一.逻辑回归解决多分类问题 1.图片像素为20*20,X的属性数目为400,输出层神经元个数为10,分别代表1-10(把0映射为10). 通过以下代码先形式化展示数 ...
随机推荐
- 三年前端,面试思考(头条蚂蚁美团offer)
小鱼儿本人985本科,软件工程专业,前端.工作三年半,第一家创业公司,半年.第二家前端技术不错的公司,两年半.第三家,个人创业半年.可以看出,我是个很喜欢折腾的人,大学期间也做过很多项目,非常愿意参与 ...
- PHPRAP v1.0.6 发布,修复因php7.1版本遗弃mcrypt扩展造成安装失败的BUG
PHPRAP,是一个PHP轻量级开源API接口文档管理系统,致力于减少前后端沟通成本,提高团队协作开发效率,打造PHP版的RAP. 更新记录 [修复]修复因php7.1版本遗弃mcrypt扩展造成安装 ...
- Vue 项目分环境打包
我们开发项目的时候,用vue-cli 2.x版本新建的项目,只有dev, pro两种开发环境, 有时需要个test环境来给测试使用,所以找了很多方法,总结了个最简单的方法来给大家使用 packa ...
- 【译文连载】 理解Istio服务网格(第六章 可观测性)
全书目录 第一章 概述 第二章 安装 第三章 流控 第四章 服务弹性 第五章 混沌测试 本文目录 第6章 可观测性 6.1 分布式调用链跟踪(tracing) 6.1.1 基本概念 6.1.2 Ja ...
- javascript中的中介者模式——迪米特法则
”迪米特法则“——最少知识原则,不和陌生人说话,就是说,一个对象应当对其他对象有尽可能少的了解.talk only to your immediate friends.初衷是:降低对象之间的耦合度. ...
- vue的子组件不能进行router的切换
在用vue开发过程中,偶然一次使用在子组件中进行router的切换,发现不起作用,后来才反应过来,子组件只是一个组件,vue的路由的切换只能是在父组件(也就是真正的页面)里面进行跳转!
- Ajax上传数据和上传文件(三种方式)
Ajax向后端发送数据可以有三种方式:原生Ajax方式,jQuery Ajax方式,iframe+form 方式(伪造Ajax方式) <!DOCTYPE html> <html la ...
- 关于OSS不再维护的一些讨论
FUSE for macOS 将不再维护 Fuse 是一款针对Mac OS的文件系统所开发的一款开源软件. 用于MacOS的FUSE软件包提供了多个API,用于为OS X 10.9至macOS 10. ...
- Intel优化Gen7驱动代码 Geekbench 5性能猛增
Linux下缺少大量开发.支持是会导致各种奇葩的错误的,Intel日前就提交了一个代码修复,22nm Ivybridge及Haswell处理器的GeekBench 5的性能就提升了330%. 3.3倍 ...
- 轻装上阵Flink--在IDEA上开发基于Flink的实时数据流程序
前言 本文介绍如何在IDEA上快速开发基于Flink框架的DataStream程序.先直接上手! 环境清单 案例是在win7运行.安装VirtualBox,在VirtualBox上安装Centos操作 ...