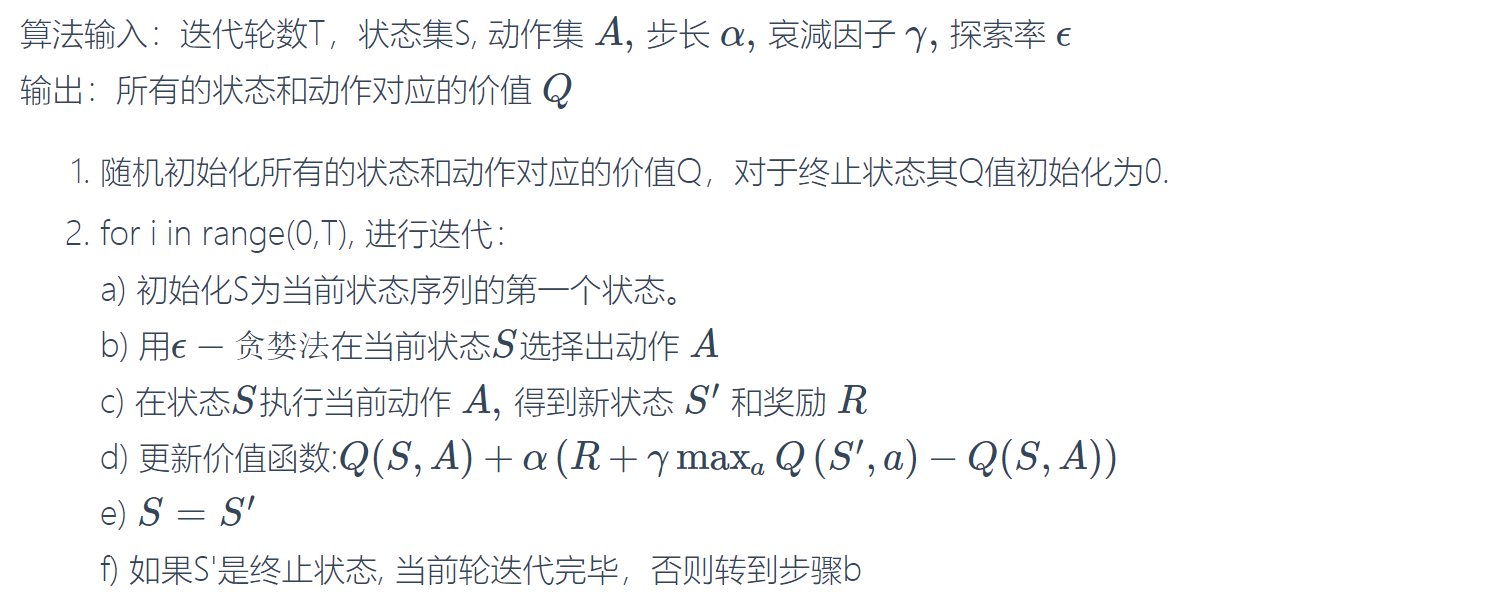
DQN(Deep Q-learning)入门教程(四)之Q-learning Play Flappy Bird
在上一篇博客中,我们详细的对Q-learning的算法流程进行了介绍。同时我们使用了\(\epsilon-贪婪法\)防止陷入局部最优。

那么我们可以想一下,最后我们得到的结果是什么样的呢?因为我们考虑到了所有的(\(\epsilon-贪婪法\)导致的)情况,因此最终我们将会得到一张如下的Q-Table表。
| Q-Table | \(a_1\) | \(a_2\) |
|---|---|---|
| \(s_1\) | \(q(s_1,a_1)\) | \(q(s_1,a_2)\) |
| \(s_2\) | \(q(s_2,a_1)\) | \(q(s_2,a_2)\) |
| \(s_3\) | \(q(s_3,a_1)\) | \(q(s_3,a_2)\) |
当agent运行到某一个场景\(s\)时,会去查询已经训练好的Q-Table,然后从中选择一个最大的\(q\)对应的action。
训练内容
这一次,我们将对Flappy-bird游戏进行训练。这个游戏的介绍我就不多说了,可以看一下维基百科的介绍。

游戏就是控制一只穿越管道,然后可以获得分数,对于小鸟来说,他只有两个动作,跳or不跳,而我们的目标就是使小鸟穿越管道获得更多的分数。
前置准备
因为我们的目标是来学习“强化学习”的,所以我们不可能说自己去弄一个Flappy-bird(当然自己弄也可以),这里我们直接使用一个已经写好的Flappy-bird。
PyGame-Learning-Environment,是一个Python的强化学习环境,简称PLE,下面时他Github上面的介绍:
PyGame Learning Environment (PLE) is a learning environment, mimicking the Arcade Learning Environment interface, allowing a quick start to Reinforcement Learning in Python. The goal of PLE is allow practitioners to focus design of models and experiments instead of environment design.
PLE hopes to eventually build an expansive library of games.
然后关于FlappyBird的文档介绍在这里,文档的介绍还是蛮清楚的。安装步骤如下所示,推荐在Pipenv的环境下安装,不过你也可以直接clone我的代码然后然后根据reademe的步骤进行使用。
git clone https://github.com/ntasfi/PyGame-Learning-Environment.gitcd PyGame-Learning-Environment/pip install -e .
需要的库如下:
- pygame
- numpy
- pillow
函数说明
在官方文档有几个的函数在这里说下,因为等下我们需要用到。
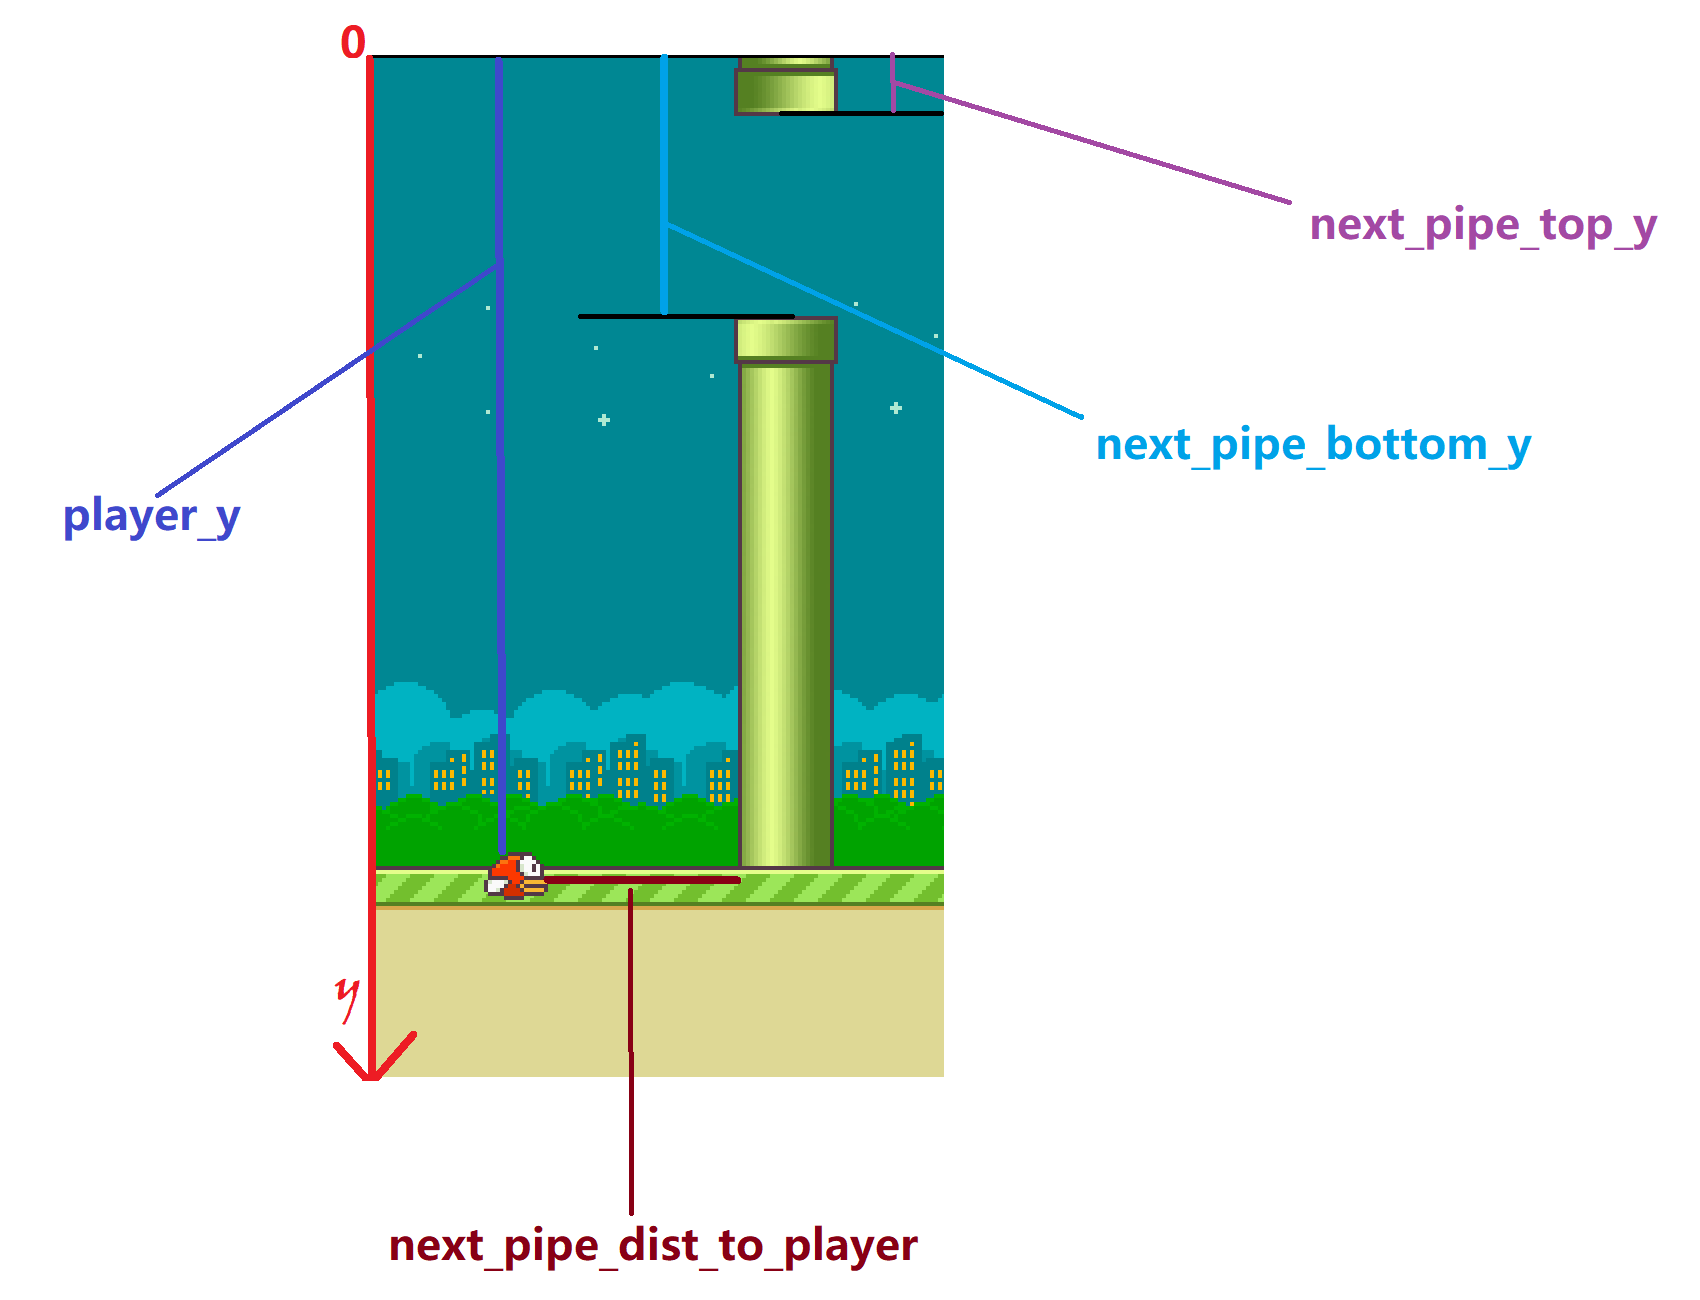
getGameState():获得游戏当前的状态,返回值为一个字典:- player y position.
- players velocity.
- next pipe distance to player
- next pipe top y position
- next pipe bottom y position
- next next pipe distance to player
- next next pipe top y position
- next next pipe bottom y position
部分数据表示如下:

reset_game():重新开始游戏act(action):在游戏中执行一个动作,参数为动作,返回执行后的分数。game_over():假如游戏结束,则返回True,否者返回False。getActionSet():获得游戏的动作集合。
我们的窗体大小默认是288*512,其中鸟的速度在-20到10之间(最小速度我并不知道,但是经过观察,并没有小于-20的情况,而最大的速度在源代码里面已经说明好了为10)
Coding Time
在前面我们说,通过getGameState()函数,我们可以获得几个关于环境的数据,在这里我们选择如下的数据:
- next_pipe_dist_to_player:
- player_y与next_pipe_top_y的差值
- 的速度
但是我们可以想一想,next_pipe_dist_to_player一共会有多少种的取值:因为窗体大小为288*512,则取值的范围大约是0~288,也就是说它大约有288个取值,而关于player_y与next_pipe_top_y的差值,则大概有1024个取值。这样很难让模型收敛,因此我们将数值进行简化。其中简化的思路来自:GitHub
首先我们创建一个Agent类,然后逐渐向里面添加功能。
class Agent():def __init__(self, action_space):# 获得游戏支持的动作集合self.action_set = action_space# 创建q-tableself.q_table = np.zeros((6, 6, 6, 2))# 学习率self.alpha = 0.7# 励衰减因子self.gamma = 0.8# 贪婪率self.greedy = 0.8
至于为什么q-table的大小是(6,6,6,2),其中的3个6分别代表next_pipe_dist_to_player,player_y与next_pipe_top_y的差值,的速度,其中的2代表动作的个数。也就是说,表格中的state一共有$6 \times6 \times 6 $种,表格的大小为\(6 \times6 \times 6 \times 2\)。
缩小状态值的范围
我们定义一个函数get_state(s),这个函数专门提取游戏中的状态,然后返回进行简化的状态数据:
def get_state(self, state):"""提取游戏state中我们需要的数据:param state: 游戏state:return: 返回提取好的数据"""return_state = np.zeros((3,), dtype=int)dist_to_pipe_horz = state["next_pipe_dist_to_player"]dist_to_pipe_bottom = state["player_y"] - state["next_pipe_top_y"]velocity = state['player_vel']if velocity < -15:velocity_category = 0elif velocity < -10:velocity_category = 1elif velocity < -5:velocity_category = 2elif velocity < 0:velocity_category = 3elif velocity < 5:velocity_category = 4else:velocity_category = 5if dist_to_pipe_bottom < 8: # very close or less than 0height_category = 0elif dist_to_pipe_bottom < 20: # closeheight_category = 1elif dist_to_pipe_bottom < 50: # not closeheight_category = 2elif dist_to_pipe_bottom < 125: # midheight_category = 3elif dist_to_pipe_bottom < 250: # farheight_category = 4else:height_category = 5# make a distance categoryif dist_to_pipe_horz < 8: # very closedist_category = 0elif dist_to_pipe_horz < 20: # closedist_category = 1elif dist_to_pipe_horz < 50: # not closedist_category = 2elif dist_to_pipe_horz < 125: # middist_category = 3elif dist_to_pipe_horz < 250: # fardist_category = 4else:dist_category = 5return_state[0] = height_categoryreturn_state[1] = dist_categoryreturn_state[2] = velocity_categoryreturn return_state
更新Q-table
更新的数学公式如下:
\]
下面是更新Q-table的函数代码:
def update_q_table(self, old_state, current_action, next_state, r):""":param old_state: 执行动作前的状态:param current_action: 执行的动作:param next_state: 执行动作后的状态:param r: 奖励:return:"""next_max_value = np.max(self.q_table[next_state[0], next_state[1], next_state[2]])self.q_table[old_state[0], old_state[1], old_state[2], current_action] = (1 - self.alpha) * self.q_table[old_state[0], old_state[1], old_state[2], current_action] + self.alpha * (r + next_max_value)
选择最佳的动作
然后我们就是根据q-table对应的Q值选择最大的那一个,其中第一个代表(也就是0)跳跃,第2个代表不执行任何操作。
选择的示意图如下:

代码如下所示:
def get_best_action(self, state, greedy=False):"""获得最佳的动作:param state: 状态:是否使用ϵ-贪婪法:return: 最佳动作"""# 获得q值jump = self.q_table[state[0], state[1], state[2], 0]no_jump = self.q_table[state[0], state[1], state[2], 1]# 是否执行策略if greedy:if np.random.rand(1) < self.greedy:return np.random.choice([0, 1])else:if jump > no_jump:return 0else:return 1else:if jump > no_jump:return 0else:return 1
更新\(\epsilon\)值
这个比较简单,从前面的博客中,我们知道\(\epsilon\)是随着训练次数的增加而减少的,有很多种策略可以选择,这里乘以\(0.95\)吧。
def update_greedy(self):self.greedy *= 0.95
执行动作
在官方文档中,如果小鸟没有死亡奖励为0,越过一个管道,奖励为1,死亡奖励为-1,我们稍微的对其进行改变:
def act(self, p, action):"""执行动作:param p: 通过p来向游戏发出动作命令:param action: 动作:return: 奖励"""# action_set表示游戏动作集(119,None),其中119代表跳跃r = p.act(self.action_set[action])if r == 0:r = 1if r == 1:r = 10else:r = -1000return r
main函数
最后我们就可以执行main函数了。
if __name__ == "__main__":# 训练次数episodes = 2000_000000# 实例化游戏对象game = FlappyBird()# 类似游戏的一个接口,可以为我们提供一些功能p = PLE(game, fps=30, display_screen=False)# 初始化p.init()# 实例化Agent,将动作集传进去agent = Agent(p.getActionSet())max_score = 0for episode in range(episodes):# 重置游戏p.reset_game()# 获得状态state = agent.get_state(game.getGameState())agent.update_greedy()while True:# 获得最佳动作action = agent.get_best_action(state)# 然后执行动作获得奖励reward = agent.act(p, action)# 获得执行动作之后的状态next_state = agent.get_state(game.getGameState())# 更新q-tableagent.update_q_table(state, action, next_state, reward)# 获得当前分数current_score = p.score()state = next_stateif p.game_over():max_score = max(current_score, max_score)print('Episodes: %s, Current score: %s, Max score: %s' % (episode, current_score, max_score))# 保存q-tableif current_score > 300:np.save("{}_{}.npy".format(current_score, episode), agent.q_table)break
部分的训练的结果如下:

总结
emm,说实话,我也不知道结果会怎么样,因为训练的时间比较长,我不想放在我的电脑上面跑,然后我就放在树莓派上面跑,但是树莓派性能比较低,导致训练的速度比较慢。但是,我还是觉得我的方法有点问题,get_state()函数中简化的方法,我感觉不是特别的合理,如果各位有好的看法,可以在评论区留言哦,然后共同学习。
项目地址:https://github.com/xiaohuiduan/flappy-bird-q-learning
参考
- Use reinforcement learning to train a flappy bird NEVER to die
- PyGame-Learning-Environment
- https://github.com/BujuNB/Flappy-Brid-RL
DQN(Deep Q-learning)入门教程(四)之Q-learning Play Flappy Bird的更多相关文章
- DQN(Deep Q-learning)入门教程(三)之蒙特卡罗法算法与Q-learning算法
蒙特卡罗法 在介绍Q-learing算法之前,我们还是对蒙特卡罗法(MC)进行一些介绍.MC方法是一种无模型(model-free)的强化学习方法,目标是得到最优的行为价值函数\(q_*\).在前面一 ...
- DQN(Deep Q-learning)入门教程(五)之DQN介绍
简介 DQN--Deep Q-learning.在上一篇博客DQN(Deep Q-learning)入门教程(四)之Q-learning Play Flappy Bird 中,我们使用Q-Table来 ...
- DQN(Deep Q-learning)入门教程(六)之DQN Play Flappy-bird ,MountainCar
在DQN(Deep Q-learning)入门教程(四)之Q-learning Play Flappy Bird中,我们使用q-learning算法去对Flappy Bird进行强化学习,而在这篇博客 ...
- DQN(Deep Q-learning)入门教程(二)之最优选择
在上一篇博客:DQN(Deep Q-learning)入门教程(一)之强化学习介绍中有三个很重要的函数: 策略:\(\pi(a|s) = P(A_t=a | S_t=s)\) 状态价值函数:\(v_\ ...
- 无废话ExtJs 入门教程四[表单:FormPanel]
无废话ExtJs 入门教程四[表单:FormPanel] extjs技术交流,欢迎加群(201926085) 继上一节内容,我们在窗体里加了个表单.如下所示代码区的第28行位置,items:form. ...
- PySide——Python图形化界面入门教程(四)
PySide——Python图形化界面入门教程(四) ——创建自己的信号槽 ——Creating Your Own Signals and Slots 翻译自:http://pythoncentral ...
- Elasticsearch入门教程(四):Elasticsearch文档CURD
原文:Elasticsearch入门教程(四):Elasticsearch文档CURD 版权声明:本文为博主原创文章,遵循CC 4.0 BY-SA版权协议,转载请附上原文出处链接和本声明. 本文链接: ...
- RabbitMQ入门教程(四):工作队列(Work Queues)
原文:RabbitMQ入门教程(四):工作队列(Work Queues) 版权声明:本文为博主原创文章,遵循CC 4.0 BY-SA版权协议,转载请附上原文出处链接和本声明. 本文链接:https:/ ...
- JasperReports入门教程(四):多数据源
JasperReports入门教程(四):多数据源 背景 在报表使用中,一个页面需要打印多个表格,每个表格分别使用不同的数据源是很常见的一个需求.假如我们现在有一个需求如下:需要在一个报表同时打印所有 ...
随机推荐
- 9) drf JWT 认证 签发与校验token 多方式登陆 自定义认证规则反爬 admin密文显示
一 .认证方法比较 1.认证规则图 django 前后端不分离 csrf认证 drf 前后端分离 禁用csrf 2. 认证规则演变图 数据库session认证:低效 缓存认证:高效 jwt认证:高效 ...
- [NOI 2020 Online] 入门组T1 文具采购(洛谷 P6188)题解
原题传送门 题目部分:(来自于考试题面,经整理) [题目描述] 小明的班上共有 n 元班费,同学们准备使用班费集体购买 3 种物品: 1.圆规,每个 7 元. 2.笔,每支 4 元. 3.笔记本,每本 ...
- turtle库应用实例2-六芒星的绘制
六芒星的绘制 ...
- js递归实现方式
定义: 递归函数就是在函数体内调用本函数: 递归函数的使用要注意函数终止条件避免死循环: 递归实现形式: 1.声明一个具名函数,通过函数名调用 function f(a){ if(a<=1){ ...
- 2018 USP-ICMC
简单题 B D F L 中等难度题 E I 更难一点得题 A C G 难题 H K J B. Ugly Number 这个题目很简单,不过我的方法有点点小问题,不过可以改进一下就应该没什么问题了. 这 ...
- Listener:监听器
目录 Listener概述 ServletContextListener Listener概述 web的三大组件之一 Servlet.Filter.Listener 事件监听机制 事件:一件事情 事件 ...
- Spring官网阅读 | 总结篇
接近用了4个多月的时间,完成了整个<Spring官网阅读>系列的文章,本文主要对本系列所有的文章做一个总结,同时也将所有的目录汇总成一篇文章方便各位读者来阅读. 下面这张图是我整个的写作大 ...
- 仿站-获取网站的所有iconfont图标
在仿站过程中,网站的iconfont查找非常浪费时间,这里教大家一次性获取网站iconfont的方法 1.打开 开发者工具 在element中搜索font-face,结果如下,复制font-face所 ...
- python学习之 %s %d 以及%变量名的含义
%age是对前面age变量的引用,%d是将这个变量名为age的值加到其中,但是如果变量值为字符串类型,则这里应该写成%s 也就是说当变量值为数值类型,而且必须是整型类型 应该使用%d 当变量值为字符串 ...
- IDC预测2020云服务逆势增长!云服务器已成上云首选
IDC预测2020云服务逆势增长!云服务器已成上云首选 据IDC最新预测指出,2020年IT基础设施支出今年将增长约4%,达到2370亿美元,驱动力主要来源于云服务. 受疫情的影响,不少企业开源节流, ...
