集合之LinkedList(含JDK1.8源码分析)
一、前言
LinkedList是基于链表实现的,所以先讲解一下什么是链表。链表原先是C/C++的概念,是一种线性的存储结构,意思是将要存储的数据存在一个存储单元里面,这个存储单元里面除了存放有待存储的数据以外,还存储有其下一个存储单元的地址(下一个存储单元的地址是必要的,有些存储结构还存放有其前一个存储单元的地址),每次查找数据的时候,通过某个存储单元中的下一个存储单元的地址寻找其后面的那个存储单元。
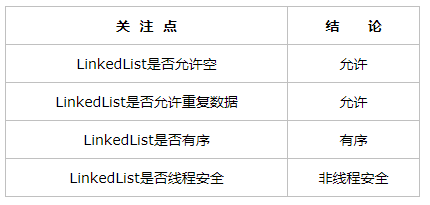
四个关注点在LinkedList上的答案

二、LinkedList的数据结构
linkedList的数据结构如下:

说明:如上图所示,LinkedList底层使用的双向链表结构,有一个头结点和一个尾结点,双向链表意味着我们可以从头开始正向遍历,或者是从尾开始逆向遍历,并且可以针对头部和尾部进行相应的操作。
三、LinkedList的源码分析-属性及其构造函数
3.1 类的继承关系
public class LinkedList<E>

    extends AbstractSequentialList<E>

    implements List<E>, Deque<E>, Cloneable, java.io.Serializable
说明:LinkedList的类继承结构很有意思,我们着重要看是Deque接口,Deque接口表示是一个双端队列,那么也意味着LinkedList是双端队列的一种实现,所以,基于双端队列的操作在LinkedList中全部有效。
3.2 类的内部类
private static class Node<E> {

        E item;//实际存储元素的地方

        Node<E> next;//指向下一个节点

        Node<E> prev;//指向上一个节点

        Node(Node<E> prev, E element, Node<E> next) {

            this.item = element;

            this.next = next;

            this.prev = prev;

        }

    }
说明:内部类Node就是实际的结点,用于存放实际元素的地方。
3.3 类的属性
transient int size = 0;

    /**

     * Pointer to first node.

     * Invariant: (first == null && last == null) ||

     *            (first.prev == null && first.item != null)

     */

    transient Node<E> first;

    /**

     * Pointer to last node.

     * Invariant: (first == null && last == null) ||

     *            (last.next == null && last.item != null)

     */

    transient Node<E> last;
说明:LinkedList的属性非常简单,一个头结点、一个尾结点、一个表示链表中实际元素个数的变量。注意,头结点、尾结点都有transient关键字修饰,这也意味着在序列化时该域是不会序列化的。
3.4 类的构造函数
1 LinkedList()型构造函数
/**

     * Constructs an empty list.

     */

    public LinkedList() {

    }
2 LinkedList(Collection<? extends E>)型构造函数
/**

     * Constructs a list containing the elements of the specified

     * collection, in the order they are returned by the collection's

     * iterator.

     *

     * @param  c the collection whose elements are to be placed into this list

     * @throws NullPointerException if the specified collection is null

     */

    public LinkedList(Collection<? extends E> c) {

        this();

        addAll(c);

    }
说明:会调用无参构造函数,并且会把集合中所有的元素添加到LinkedList中。addAll函数后续分析。
四、LinkedList的源码分析-核心函数
4.1 核心函数分析
1、增:add
说明:add函数用于向LinkedList中添加一个元素,并且添加到链表尾部。具体添加到尾部的逻辑是由linkLast函数完成的。
举例:
public class Test {

    public static void main(String[] args) {

        List<String> list = new LinkedList<>();

        list.add("zhangsan");

        list.add("lisi");

        list.add("wangwu");
     list.add("zhangsan");
     System.out.println(list);
  }
}
结果:
[zhangsan, lisi, wangwu, zhangsan]
add源码分析:
/**

     * Appends the specified element to the end of this list.

     *

     * <p>This method is equivalent to {@link #addLast}.

     *

     * @param e element to be appended to this list

     * @return {@code true} (as specified by {@link Collection#add})

     */

    public boolean add(E e) {

        linkLast(e);

        return true;

    }
LinkLast方法如下:
/**

     * Links e as last element.

     */

    void linkLast(E e) {

        //将last节点保存

        final Node<E> l = last;

        //构造新节点

        final Node<E> newNode = new Node<>(l, e, null);

        //将新构造的节点赋值给last节点,便于下次添加元素时使用

        last = newNode;

        //判断保存的last节点是否为null

        if (l == null)

            //为null,首次添加,first节点与last节点一样,都是新节点

            first = newNode;

        else

            //不为null,说明list中已有元素,将newNode赋值给未添加元素e之前,list中已经存在的last节点的next属性

            l.next = newNode;

        //size加1

        size++;

        //结构性修改加1

        modCount++;

    }
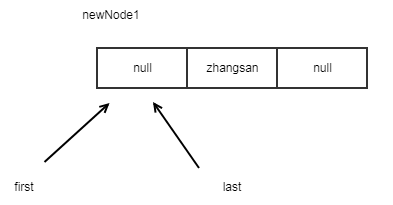
图示说明添加元素后链表状态的改变:
list.add("zhangsan");


list.add("lisi");

list.add("wangwu");

由此可见,双向链表的含义即:由上一个节点的next属性可以得到下一个节点,由下一个节点的prev属性可以得到上一个节点。上下两个节点之间互相指向关联。
2、addAll函数
说明:addAll有两个重载函数,addAll(Collection<? extends E> c)型和addAll(int index, Collection<? extends E> c)型,而前一种实际上的操作是调用后一种来完成,所以着重分析后一种函数。
/**

     * Appends all of the elements in the specified collection to the end of

     * this list, in the order that they are returned by the specified

     * collection's iterator.  The behavior of this operation is undefined if

     * the specified collection is modified while the operation is in

     * progress.  (Note that this will occur if the specified collection is

     * this list, and it's nonempty.)

     *

     * @param c collection containing elements to be added to this list

     * @return {@code true} if this list changed as a result of the call

     * @throws NullPointerException if the specified collection is null

     */

    public boolean addAll(Collection<? extends E> c) {

        return addAll(size, c);

    }
addAll(int index, Collection<? extends E> c)源码分析如下:
/**

     * Inserts all of the elements in the specified collection into this

     * list, starting at the specified position.  Shifts the element

     * currently at that position (if any) and any subsequent elements to

     * the right (increases their indices).  The new elements will appear

     * in the list in the order that they are returned by the

     * specified collection's iterator.

     *

     * @param index index at which to insert the first element

     *              from the specified collection

     * @param c collection containing elements to be added to this list

     * @return {@code true} if this list changed as a result of the call

     * @throws IndexOutOfBoundsException {@inheritDoc}

     * @throws NullPointerException if the specified collection is null

     */

    public boolean addAll(int index, Collection<? extends E> c) {

        //检出插入的位置是否位于0-size之内

        checkPositionIndex(index);

        //将collection中的元素转成数组

        Object[] a = c.toArray();

        //获取数组元素大小

        int numNew = a.length;

        //数组为空,直接返回

        if (numNew == 0)

            return false;

        //定义Node节点中的前节点和后节点

        LinkedList.Node<E> pred, succ;

        if (index == size) {

            //index == size,说明是在list的末尾添加元素,那么list属性中的last节点会变化

            succ = null;//后节点置为null

            pred = last;//将list属性last节点赋值给前节点

        } else {

            //index != size,说明是在list的开始及中间添加元素,

            succ = node(index);//获取索引处的节点值

            pred = succ.prev;//索引处的节点值的prev赋值给pred,以便构造新节点

        }

        for (Object o : a) {

            //向下转型

            @SuppressWarnings("unchecked") E e = (E) o;

            //根据前节点和collection中的元素生成新的节点,新节点已指向原list的last节点

            LinkedList.Node<E> newNode = new LinkedList.Node<>(pred, e, null);

            if (pred == null)

                first = newNode;//表明在第一个元素之前(索引为0的节点)添加新元素或是list中无元素

            else

                pred.next = newNode;//将节点的next置为新节点

            pred = newNode;//将新节点赋值给pred

        }

        if (succ == null) {

            //succ == null,说明是在list的尾部添加的元素,此时list的last属性值为新生成的节点

            last = pred;

        } else {

            //succ != null,说明是在list的开始及中间添加元素,将最后一个新生成的节点和原索引处的节点关联起来

            pred.next = succ;

            succ.prev = pred;

        }

        //修改元素的个数

        size += numNew;

        //结构性修改加1

        modCount++;

        return true;

    }
上述addAll函数还使用了node(int index)函数,根据索引值获取节点。
/**

     * Returns the (non-null) Node at the specified element index.

     */

    Node<E> node(int index) {

        // assert isElementIndex(index);

        //判断索引是位于链表的前半段还是位于链表的后半段

        if (index < (size >> 1)) {//位于链表的前半段

            Node<E> x = first;//从头节点开始正向遍历

            for (int i = 0; i < index; i++)

                x = x.next;

            return x;

        } else {//位于链表的后半段

            Node<E> x = last;//从尾节点开始反向遍历

            for (int i = size - 1; i > index; i--)

                x = x.prev;

            return x;

        }

    }
说明:
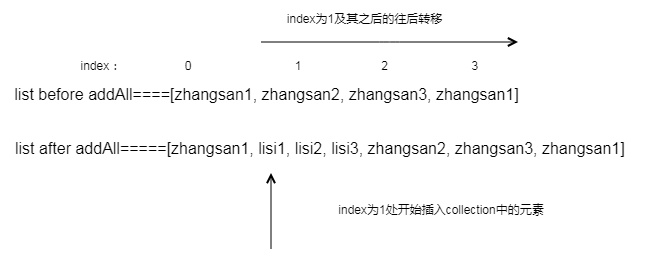
====Inserts all of the elements in the specified collection into this list, starting at the specified position. Shifts the element currently at that position (if any) and any subsequent elements to the right (increases their indices).====
注意注释中的这句话:
====将collection中的元素插入到list中,开始插入的位置是index的位置(index从0开始)。并将当前位于该位置的元素(index处如果有)和任何后续元素右移(增加其索引)。====
举例:
public class Test {

    public static void main(String[] args) {

        List<String> list = new LinkedList<>();

        list.add("zhangsan1");

        list.add("zhangsan2");

        list.add("zhangsan3");

        list.add("zhangsan1");

        System.out.println("list before addAll====" + list);

        List<String> dataList = new ArrayList<>();

        dataList.add("lisi1");

        dataList.add("lisi2");

        dataList.add("lisi3");

        list.addAll(1,dataList);

        System.out.println("list after addAll=====" + list);

    }

}
结果:
list before addAll====[zhangsan1, zhangsan2, zhangsan3, zhangsan1]

list after addAll=====[zhangsan1, lisi1, lisi2, lisi3, zhangsan2, zhangsan3, zhangsan1]
图示说明:

3、删 remove函数
说明:主要是通过unLink函数来完成。一是将被移除节点的上一个节点的next属性指向被移除节点的下一个节点,将被移除节点的下一个节点的prev属性指向被移除节点的上一个节点。二是将被移除的节点的next、prev、element属性都置为null,以便回收。
举例:
public class Test {

    public static void main(String[] args) {

        List<String> list = new LinkedList<>();

        list.add("zhangsan1");

        list.add("zhangsan2");

        list.add("zhangsan3");

        list.add("zhangsan1");

        System.out.println("list before remove====" + list);

        list.remove(1);

        System.out.println("list after remove=====" + list);

    }

}
结果:
list before remove====[zhangsan1, zhangsan2, zhangsan3, zhangsan1]

list after remove=====[zhangsan1, zhangsan3, zhangsan1]
源码分析:
以remove(int index)函数为例:
/**

     * Removes the element at the specified position in this list.  Shifts any

     * subsequent elements to the left (subtracts one from their indices).

     * Returns the element that was removed from the list.

     *

     * @param index the index of the element to be removed

     * @return the element previously at the specified position

     * @throws IndexOutOfBoundsException {@inheritDoc}

     */

    public E remove(int index) {

        checkElementIndex(index);

        return unlink(node(index));

    }
unLink函数:
/**

     * Unlinks non-null node x.

     */

    E unlink(LinkedList.Node<E> x) {

        // assert x != null;

        final E element = x.item;//获取返回值

        final LinkedList.Node<E> next = x.next;//获取待移除节点的后置节点

        final LinkedList.Node<E> prev = x.prev;//获取待移除节点的前置节点

        if (prev == null) {//说明移除的是第一个元素

            first = next;//first节点就是待移除节点的后置节点

        } else {//移除的不是第一个元素

            prev.next = next;//将待移除节点的前一个和后一个节点关联起来

            x.prev = null;//将待移除节点的prev属性置为null,以便回收

        }

        if (next == null) {//说明移除的是最后一个元素

            last = prev;//last节点就是待移除节点的前置节点

        } else {//移除的不是最后一个元素

            next.prev = prev;//将待移除节点的前一个和后一个节点关联起来

            x.next = null;//将待移除节点的next属性置为null,以便回收

        }

        x.item = null;//将待移除节点的item属性置为null,以便回收

        size--;//list的大小减1

        modCount++;//结构性修改加1

        return element;//返回移除的元素

    }
图示说明:
remove之前:

remove之后:

4、改 set函数
说明:set函数很简单,就是根据索引值替换其节点的element,不改变前置和后置和后置节点。
源码分析:
/**

     * Replaces the element at the specified position in this list with the

     * specified element.

     *

     * @param index index of the element to replace

     * @param element element to be stored at the specified position

     * @return the element previously at the specified position

     * @throws IndexOutOfBoundsException {@inheritDoc}

     */

    public E set(int index, E element) {

        checkElementIndex(index);//检查索引下表

        Node<E> x = node(index);//根据索引获取对应的节点

        E oldVal = x.item;//获取返回值

        x.item = element;//替换节点的element

        return oldVal;//返回被替换的值

    }
举例:
public class Test {

    public static void main(String[] args) {

        List<String> list = new LinkedList<>();

        list.add("zhangsan1");

        list.add("zhangsan2");

        list.add("zhangsan3");

        list.add("zhangsan1");

        System.out.println("list before set====" + list);

        list.set(3,"zhangsan4");

        System.out.println("list after set=====" + list);

    }

}
结果:
list before set====[zhangsan1, zhangsan2, zhangsan3, zhangsan1]

list after set=====[zhangsan1, zhangsan2, zhangsan3, zhangsan4]
5、查 get函数
说明:get函数也很简单,根据索引值获取对应节点,然后获取节点中的element。
源码分析:
/**

     * Returns the element at the specified position in this list.

     *

     * @param index index of the element to return

     * @return the element at the specified position in this list

     * @throws IndexOutOfBoundsException {@inheritDoc}

     */

    public E get(int index) {

        checkElementIndex(index);

        return node(index).item;

    }
五、总结
1、LinkedList和ArrayList的对比
老生常谈的问题了,这里我尝试以自己的理解尽量说清楚这个问题,顺便在这里就把LinkedList的优缺点也给讲了。
1、顺序插入速度ArrayList会比较快,因为ArrayList是基于数组实现的,数组是事先new好的,只要往指定位置塞一个数据就好了;LinkedList则不同,每次顺序插入的时候LinkedList将new一个对象出来,如果对象比较大,那么new的时间势必会长一点,再加上一些引用赋值的操作,所以顺序插入LinkedList必然慢于ArrayList
2、基于上一点,因为LinkedList里面不仅维护了待插入的元素,还维护了Entry的前置Entry和后继Entry,如果一个LinkedList中的Entry非常多,那么LinkedList将比ArrayList更耗费一些内存
3、数据遍历的速度,看最后一部分,这里就不细讲了,结论是:使用各自遍历效率最高的方式,ArrayList的遍历效率会比LinkedList的遍历效率高一些
4、有些说法认为LinkedList做插入和删除更快,这种说法其实是不准确的:
(1)LinkedList做插入、删除的时候,慢在寻址,快在只需要改变前后Entry的引用地址
(2)ArrayList做插入、删除的时候,慢在数组元素的批量copy,快在寻址
所以,如果待插入、删除的元素是在数据结构的前半段尤其是非常靠前的位置的时候,LinkedList的效率将大大快过ArrayList,因为ArrayList将批量copy大量的元素;越往后,对于LinkedList来说,因为它是双向链表,所以在第2个元素后面插入一个数据和在倒数第2个元素后面插入一个元素在效率上基本没有差别,但是ArrayList由于要批量copy的元素越来越少,操作速度必然追上乃至超过LinkedList。
从这个分析看出,如果你十分确定你插入、删除的元素是在前半段,那么就使用LinkedList;如果你十分确定你删除、删除的元素在比较靠后的位置,那么可以考虑使用ArrayList。如果你不能确定你要做的插入、删除是在哪儿呢?那还是建议你使用LinkedList吧,因为一来LinkedList整体插入、删除的执行效率比较稳定,没有ArrayList这种越往后越快的情况;二来插入元素的时候,弄得不好ArrayList就要进行一次扩容,记住,ArrayList底层数组扩容是一个既消耗时间又消耗空间的操作,在我的文章Java代码优化中,第9点有详细的解读。
最后一点,一切都是纸上谈兵,在选择了List后,有条件的最好可以做一些性能测试,比如在你的代码上下文记录List操作的时间消耗。
2、对LinkedList以及ArrayList的迭代
ArrayList使用最普通的for循环遍历比较快,LinkedList使用foreach循环比较快,具体可参见foreach循环原理。看一下两个List的定义:
public class ArrayList<E> extends AbstractList<E>

        implements List<E>, RandomAccess, Cloneable, java.io.Serializable
public class LinkedList<E>

    extends AbstractSequentialList<E>

    implements List<E>, Deque<E>, Cloneable, java.io.Serializable
注意ArrayList实现了RandomAccess这个接口,而LinkedList并没有实现这个接口。关于此接口的作用,看一下JDK API上的说法:

注意,虽然上面的例子用的Iterator,但是做foreach循环的时候,编译器默认会使用这个集合的Iterator。
举例:
public class Test {

    private static int Size = 200000;

    public static void loopTest(List<Integer> list){

        long startTime1 = System.currentTimeMillis();

        for(int i = 0; i < list.size(); i++) {

            list.get(i);

        }

        long endTime1 = System.currentTimeMillis();

        System.out.println(list.getClass().getSimpleName() + "使用for循环遍历的时间为:" + (endTime1 - startTime1) + "ms");

        long startTime2 = System.currentTimeMillis();

        for(Integer integer : list) {

        }

        long endTime2 = System.currentTimeMillis();

        System.out.println(list.getClass().getSimpleName() + "使用foreach循环遍历的时间为:" + (endTime2 - startTime2) + "ms");

    }

    public static void main(String[] args) {

        List<Integer> list = new ArrayList<>(Size);

        List<Integer> list1 = new LinkedList<>();

        for(int i = 0; i < Size; i++) {

            list.add(i);

            list1.add(i);

        }

        loopTest(list);

        loopTest(list1);

    }

}
三次运行结果如下:
ArrayList使用for循环遍历的时间为:6ms

ArrayList使用foreach循环遍历的时间为:7ms

LinkedList使用for循环遍历的时间为:38527ms

LinkedList使用foreach循环遍历的时间为:20ms
ArrayList使用for循环遍历的时间为:6ms

ArrayList使用foreach循环遍历的时间为:8ms

LinkedList使用for循环遍历的时间为:35023ms

LinkedList使用foreach循环遍历的时间为:22ms
ArrayList使用for循环遍历的时间为:6ms

ArrayList使用foreach循环遍历的时间为:8ms

LinkedList使用for循环遍历的时间为:34493ms

LinkedList使用foreach循环遍历的时间为:20ms
结果也验证了上述结论:ArrayList使用for循环遍历比foreach循环遍历快。LinkedList使用foreach循环遍历比for循环遍历快。
最最想要提出的一点是:如果使用普通for循环遍历LinkedList,在大数据量的情况下,其遍历速度将慢得令人发指,可参见这篇文章To Java程序员:切勿用普通for循环遍历LinkedList。
参考资料:
时间复杂度参考:https://blog.csdn.net/booirror/article/details/7707551/
https://www.cnblogs.com/leesf456/p/5308843.html
https://www.cnblogs.com/xrq730/p/5005347.html
集合之LinkedList(含JDK1.8源码分析)的更多相关文章
- 集合之HashSet(含JDK1.8源码分析)
一.前言 我们已经分析了List接口下的ArrayList和LinkedList,以及Map接口下的HashMap.LinkedHashMap.TreeMap,接下来看的是Set接口下HashSet和 ...
- 集合之TreeSet(含JDK1.8源码分析)
一.前言 前面分析了Set接口下的hashSet和linkedHashSet,下面接着来看treeSet,treeSet的底层实现是基于treeMap的. 四个关注点在treeSet上的答案 二.tr ...
- 集合之LinkedHashSet(含JDK1.8源码分析)
一.前言 上篇已经分析了Set接口下HashSet,我们发现其操作都是基于hashMap的,接下来看LinkedHashSet,其底层实现都是基于linkedHashMap的. 二.linkedHas ...
- 集合之HashMap(含JDK1.8源码分析)
一.前言 之前的List,讲了ArrayList.LinkedList,反映的是两种思想: (1)ArrayList以数组形式实现,顺序插入.查找快,插入.删除较慢 (2)LinkedList以链表形 ...
- 集合之LinkedHashMap(含JDK1.8源码分析)
一.前言 大多数的情况下,只要不涉及线程安全问题,map都可以使用hashMap,不过hashMap有一个问题,hashMap的迭代顺序不是hashMap的存储顺序,即hashMap中的元素是无序的. ...
- 集合之ArrayList(含JDK1.8源码分析)
一.ArrayList的数据结构 ArrayList底层的数据结构就是数组,数组元素类型为Object类型,即可以存放所有类型数据.我们对ArrayList类的实例的所有的操作(增删改查等),其底层都 ...
- 集合之TreeMap(含JDK1.8源码分析)
一.前言 前面所说的hashMap和linkedHashMap都不具备统计的功能,或者说它们的统计性能的时间复杂度都不是很好,要想对两者进行统计,需要遍历所有的entry,时间复杂度比较高,此时,我们 ...
- Java集合:LinkedList (JDK1.8 源码解读)
LinkedList介绍 还是和ArrayList同样的套路,顾名思义,linked,那必然是基于链表实现的,链表是一种线性的储存结构,将储存的数据存放在一个存储单元里面,并且这个存储单元里面还维护了 ...
- 【集合框架】JDK1.8源码分析之HashMap(一) 转载
[集合框架]JDK1.8源码分析之HashMap(一) 一.前言 在分析jdk1.8后的HashMap源码时,发现网上好多分析都是基于之前的jdk,而Java8的HashMap对之前做了较大的优化 ...
随机推荐
- Spark中的Join类型
常规连接: 左半连接: 左半连接结果集:仅仅保留左边表中的行,这些行的joinkey出现在右边表中!!!(类似于leftTable.joinKey in (rightTable.joinKeys)). ...
- D. Zero Quantity Maximization(hash+map)
题意:就是让c=a*x+b,给你一个a[],b[],让你尽可能多的让c[]=0,输出有多少. 思路:直接令c=0,则x=-b/a, 也就是一条直线,通过这样就用hash值使相同的k值映射到一起,使用了 ...
- 【vue】vue +element 搭建项目,在使用InputNumber 计数器时遇到的问题
自己遇到的坑: InputNumber 计数器的change事件定义时如果不传入参数value,会产生this.num不同步的问题 <template> <el-input-numb ...
- Ubuntu 14.04 安装配置备忘录
完全在 Linux 下工作,大概有3年时间了. 之前都是用 Windows, 而把 Linux 装在虚拟机里,现在反过来,把 Windows 装在了虚拟机里,只是因为偶尔还要用网银的缘故. 以我这几年 ...
- CF980E The Number Games
CF980E The Number Games 给定一棵大小为 \(n\) 的树,第 \(i\) 个点的点权为 \(2^i\) ,删掉 \(k\) 个点及其连边,使得剩下的点组成一个连通块,且权值和最 ...
- Java 中常见的数据结构
1.数据结构有什么作用? 当使用 Java 里面的容器类时,你有没有想过,怎么 ArrayList 就像一个无限扩充的数组,也好像链表之类的.很好使用,这就是数据结构的用处,只不过你在不知不觉中使用了 ...
- Mac环境 安装brew
一.brew官网主页上的方法: /usr/bin/ruby -e "$(curl -fsSL https://raw.githubusercontent.com/Homebrew/insta ...
- Java虚拟机垃圾收集器
一.判断对象存活的算法 1.引用计数(Reference Counting)算法 给对象添加一个引用计数器,每当有一个地方引用时,计数器加1.当引用失效时,计数器减1.当计数器的值为0的时候说该对象不 ...
- face recognition[variations of softmax][L-Softmax]
本文来自<Large-Margin Softmax Loss for Convolutional Neural Networks>,时间线为2016年12月,是北大和CMU的作品. 0 引 ...
- Feature Extractor[ResNet]
0. 背景 众所周知,深度学习,要的就是深度,VGG主要的工作贡献就是基于小卷积核的基础上,去探寻网络深度对结果的影响.而何恺明大神等人发现,不是随着网络深度增加,效果就好的,他们发现了一个违背直觉的 ...
