Linux死锁检测-Lockdep
关键词:LockDep、spinlock、mutex。
lockdep是内核提供协助发现死锁问题的功能。
本文首先介绍何为lockdep,然后如何在内核使能lockdep,并简单分析内核lockdep相关代码。
最后构造不同死锁用例,并分析如何根据lockdep输出发现问题根源。
1. Lockdep介绍
死锁是指两个或多个进程因争夺资源而造成的互相等待的现象。
常见的死锁有如下两种:
递归死锁:中断等延迟操作中使用了锁,和外面的锁构成了递归死锁。
AB-BA死锁:多个锁因处理不当而引发死锁,多个内核路径上的所处理顺序不一致也会导致死锁。
Linux内核提供死锁调试模块Lockdep,跟踪每个锁的自身状态和各个锁之间的依赖关系,经过一系列的验证规则来确保锁之间依赖关系是正确的。
2. 内核死锁检测Lockdep
2.1 使能Lockdep
Lockdep检测的锁包括spinlock、rwlock、mutex、rwsem的死锁,锁的错误释放,原子操作中睡眠等错误行为。
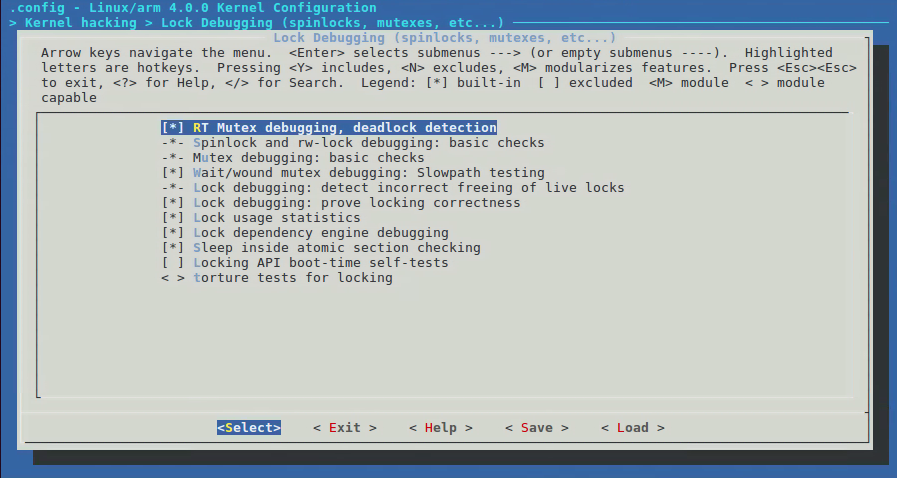
在内核中配置路径为:Kernel hacking->Lock Debugging (spinlocks, mutexes, etc...)。

下面是lockcep内核选项及其解释:
CONFIG_DEBUG_RT_MUTEXES=y
检测rt mutex的死锁,并自动报告死锁现场信息。
CONFIG_DEBUG_SPINLOCK=y
检测spinlock的未初始化使用等问题。配合NMI watchdog使用,能发现spinlock死锁。
CONFIG_DEBUG_MUTEXES=y
检测并报告mutex错误
CONFIG_DEBUG_WW_MUTEX_SLOWPATH=y
检测wait/wound类型mutex的slowpath测试。
CONFIG_DEBUG_LOCK_ALLOC=y
检测使用中的锁(spinlock/rwlock/mutex/rwsem)被释放,或者使用中的锁被重新初始化,或者在进程退出时持有锁。
CONFIG_PROVE_LOCKING=y
使内核能在死锁发生前报告死锁详细信息。参见/proc/lockdep_chains。
CONFIG_LOCKDEP=y
整个Lockdep的总开关。参见/proc/lockdep、/proc/lockdep_stats。
CONFIG_LOCK_STAT=y
记锁持有竞争区域的信息,包括等待时间、持有时间等等信息。参见/proc/lock_stat。
CONFIG_DEBUG_LOCKDEP=y
会对Lockdep的使用过程中进行更多的自我检测,会增加很多额外开销。
CONFIG_DEBUG_ATOMIC_SLEEP=y
在atomic section中睡眠可能造成很多不可预测的问题,这些atomic section包括spinlock持锁、rcu读操作、禁止内核抢占部分、中断处理中等等。
2.2 Lock相关内核节点
/proc/sys/kernel/lock_stat------------------------置位则可以查看/proc/lock_stat统计信息,清楚则关闭lockdep统计信息。
/proc/sys/kernel/max_lock_depth--------------
/proc/sys/kernel/prove_locking
/proc/locks
/proc/lock_stat-------------------------------------关于锁的使用统计信息
/proc/lockdep---------------------------------------存在依赖关系的锁
/proc/lockdep_stats------------------------------存在依赖关系锁的统计信息
/proc/lockdep_chains----------------------------依赖关系锁链表
内核还提供了了Tracepoint协助发现锁的使用问题:/sys/kernel/debug/tracing/events/lock。
2.3 lockdep代码简单分析
3. Lockdep测试
3.1 测试spin_lock死锁
构造测试用例代码如下:
void hack_spinAB(void)

{

  printk("hack_lockdep:A->B\n");

  spin_lock(&hack_spinA);

  spin_lock(&hack_spinB);

}

void hack_spinBA(void)

{

  printk("hack_lockdep:B->A\n");

  spin_lock(&hack_spinB);

}

static int __init lockdep_test_init(void)

{

  printk("al: lockdep error test init\n");

  hack_spinAB();

  hack_spinBA();

  return ;

}
执行insmod data/lock.ko 后,控制台显示如下。
首先从死锁描述大概可以知道死锁类型。
然后详细介绍了产生死锁的点,这时就可以大概知道是哪个锁,有哪些地方调用导致了死锁。
接着是详细的发生死锁的backtrace,有助于分析死锁产生时的栈回溯。
al: lockdep error test init
hack_lockdep:A->B
hack_lockdep:B->A=============================================
[ INFO: possible recursive locking detected ]---------------------------------------------------------------检测到的死锁描述:递归死锁类型
4.0.0+ #87 Tainted: G O
---------------------------------------------
insmod/658 is trying to acquire lock:---------------------------------------------------------------------------死锁细节描述:欲持锁点和已持锁点
(hack_spinB){+.+...}, at: [<bf002030>] lockdep_test_init+0x30/0x3c [lock]--------------------------lockdep_test_init中调用hack_spinBA再次持有hack_spinB锁but task is already holding lock:
(hack_spinB){+.+...}, at: [<bf000038>] hack_spinAB+0x38/0x3c [lock]--------------------------------hack_spinB已经在hack_spinAB函数中被持有other info that might help us debug this:-----------------------------------------------------------------------锁的其它补充信息
Possible unsafe locking scenario:CPU0
----
lock(hack_spinB);
lock(hack_spinB);*** DEADLOCK ***
May be due to missing lock nesting notation
2 locks held by insmod/658:----------------------------------------------------------------------------------------进程共持有两个锁
#0: (hack_spinA){+.+...}, at: [<bf000030>] hack_spinAB+0x30/0x3c [lock]
#1: (hack_spinB){+.+...}, at: [<bf000038>] hack_spinAB+0x38/0x3c [lock]stack backtrace:--------------------------------------------------------------------------------------------------------栈回溯信息:可以看出从lockdep_test_init->_raw_spin_lock->lock_acquire的调用路径。
CPU: 0 PID: 658 Comm: insmod Tainted: G O 4.0.0+ #87
Hardware name: ARM-Versatile Express
[<c00171b4>] (unwind_backtrace) from [<c0012e7c>] (show_stack+0x20/0x24)
[<c0012e7c>] (show_stack) from [<c05ade10>] (dump_stack+0x8c/0xb4)
[<c05ade10>] (dump_stack) from [<c006b988>] (__lock_acquire+0x1aa4/0x1f64)
[<c006b988>] (__lock_acquire) from [<c006c55c>] (lock_acquire+0xf4/0x190)
[<c006c55c>] (lock_acquire) from [<c05b4ec8>] (_raw_spin_lock+0x60/0x98)
[<c05b4ec8>] (_raw_spin_lock) from [<bf002030>] (lockdep_test_init+0x30/0x3c [lock])
[<bf002030>] (lockdep_test_init [lock]) from [<c0008a28>] (do_one_initcall+0x9c/0x1e8)
[<c0008a28>] (do_one_initcall) from [<c05abf30>] (do_init_module+0x70/0x1c0)
[<c05abf30>] (do_init_module) from [<c00a4ddc>] (load_module+0x18b0/0x1f90)
[<c00a4ddc>] (load_module) from [<c00a55fc>] (SyS_init_module+0x140/0x150)
[<c00a55fc>] (SyS_init_module) from [<c000ec80>] (ret_fast_syscall+0x0/0x4c)
INFO: rcu_sched self-detected stall on CPU
0: (2099 ticks this GP) idle=5ed/140000000000001/0 softirq=13024/13024 fqs=1783
(t=2100 jiffies g=-51 c=-52 q=22)
Task dump for CPU 0:
insmod R running 0 658 657 0x00000002
[<c00171b4>] (unwind_backtrace) from [<c0012e7c>] (show_stack+0x20/0x24)
[<c0012e7c>] (show_stack) from [<c0052874>] (sched_show_task+0x128/0x184)
[<c0052874>] (sched_show_task) from [<c0055dd0>] (dump_cpu_task+0x48/0x4c)
[<c0055dd0>] (dump_cpu_task) from [<c0082878>] (rcu_dump_cpu_stacks+0x9c/0xd4)
[<c0082878>] (rcu_dump_cpu_stacks) from [<c008665c>] (rcu_check_callbacks+0x640/0x968)
[<c008665c>] (rcu_check_callbacks) from [<c008b628>] (update_process_times+0x4c/0x74)
[<c008b628>] (update_process_times) from [<c009a1d4>] (tick_periodic+0x54/0xf8)
[<c009a1d4>] (tick_periodic) from [<c009a3d8>] (tick_handle_periodic+0x38/0x98)
[<c009a3d8>] (tick_handle_periodic) from [<c00164a4>] (twd_handler+0x40/0x50)
[<c00164a4>] (twd_handler) from [<c007dfc4>] (handle_percpu_devid_irq+0xd8/0x1dc)
[<c007dfc4>] (handle_percpu_devid_irq) from [<c0079a7c>] (generic_handle_irq+0x3c/0x4c)
[<c0079a7c>] (generic_handle_irq) from [<c0079dc4>] (__handle_domain_irq+0x6c/0xc4)
[<c0079dc4>] (__handle_domain_irq) from [<c0008740>] (gic_handle_irq+0x34/0x6c)
[<c0008740>] (gic_handle_irq) from [<c0013a44>] (__irq_svc+0x44/0x5c)
Exception stack(0xed5c9d18 to 0xed5c9d60)
9d00: 00000000 00010000
9d20: 0000ffff c02f3898 bf0001b0 c0b1d248 123cc000 00000000 0c99b2c5 00000000
9d40: 00000000 ed5c9d84 ed5c9d60 ed5c9d60 c0070cb4 c0070cb4 60000013 ffffffff
[<c0013a44>] (__irq_svc) from [<c0070cb4>] (do_raw_spin_lock+0xf0/0x1e0)
[<c0070cb4>] (do_raw_spin_lock) from [<c05b4eec>] (_raw_spin_lock+0x84/0x98)
[<c05b4eec>] (_raw_spin_lock) from [<bf002030>] (lockdep_test_init+0x30/0x3c [lock])
[<bf002030>] (lockdep_test_init [lock]) from [<c0008a28>] (do_one_initcall+0x9c/0x1e8)
[<c0008a28>] (do_one_initcall) from [<c05abf30>] (do_init_module+0x70/0x1c0)
[<c05abf30>] (do_init_module) from [<c00a4ddc>] (load_module+0x18b0/0x1f90)
[<c00a4ddc>] (load_module) from [<c00a55fc>] (SyS_init_module+0x140/0x150)
[<c00a55fc>] (SyS_init_module) from [<c000ec80>] (ret_fast_syscall+0x0/0x4c)
BUG: spinlock lockup suspected on CPU#0, insmod/658------------------------------------------------------------错误类型是spinlock,下面的backtrace和上面基本一致。
lock: hack_spinB+0x0/0xfffffedc [lock], .magic: dead4ead, .owner: insmod/658, .owner_cpu: 0-----------发生死锁的是hack_spinB
CPU: 0 PID: 658 Comm: insmod Tainted: G O 4.0.0+ #87
Hardware name: ARM-Versatile Express
[<c00171b4>] (unwind_backtrace) from [<c0012e7c>] (show_stack+0x20/0x24)
[<c0012e7c>] (show_stack) from [<c05ade10>] (dump_stack+0x8c/0xb4)
[<c05ade10>] (dump_stack) from [<c0070b2c>] (spin_dump+0x8c/0xd0)
[<c0070b2c>] (spin_dump) from [<c0070cd0>] (do_raw_spin_lock+0x10c/0x1e0)
[<c0070cd0>] (do_raw_spin_lock) from [<c05b4eec>] (_raw_spin_lock+0x84/0x98)
[<c05b4eec>] (_raw_spin_lock) from [<bf002030>] (lockdep_test_init+0x30/0x3c [lock])
[<bf002030>] (lockdep_test_init [lock]) from [<c0008a28>] (do_one_initcall+0x9c/0x1e8)
[<c0008a28>] (do_one_initcall) from [<c05abf30>] (do_init_module+0x70/0x1c0)
[<c05abf30>] (do_init_module) from [<c00a4ddc>] (load_module+0x18b0/0x1f90)
[<c00a4ddc>] (load_module) from [<c00a55fc>] (SyS_init_module+0x140/0x150)
[<c00a55fc>] (SyS_init_module) from [<c000ec80>] (ret_fast_syscall+0x0/0x4c)
3.2 mutex测试
执行insmod /data/mutexlock.ko,稍后结果如下。
首先是死锁类型介绍。
然后是产生死锁的两个点的调用者,再详细给出了两个点的栈回溯。
最后是死锁点的详细栈回溯。
======================================================

[ INFO: possible circular locking dependency detected ]

4.0.+ # Tainted: G           O

-------------------------------------------------------

kworker/:/ is trying to acquire lock:

 (mutex_a){+.+...}, at: [<bf000080>] lockdep_test_worker+0x24/0x58 [mutexlock]

but task is already holding lock:

 ((&(&delay_task)->work)){+.+...}, at: [<c0041078>] process_one_work+0x130/0x60c

which lock already depends on the new lock.

the existing dependency chain (in reverse order) is:

-> # ((&(&delay_task)->work)){+.+...}:

       [<c00406f4>] flush_work+0x4c/0x2bc

       [<c0041cc4>] __cancel_work_timer+0xa8/0x1d0

       [<c0041e28>] cancel_delayed_work_sync+0x1c/0x20

       [<bf000138>] lockdep_thread+0x84/0xa4 [mutexlock]

       [<c0046ee0>] kthread+0x100/0x118

       [<c000ed50>] ret_from_fork+0x14/0x24

-> # (mutex_a){+.+...}:

       [<c006c55c>] lock_acquire+0xf4/0x190

       [<c05b09e4>] mutex_lock_nested+0x90/0x480

       [<bf000080>] lockdep_test_worker+0x24/0x58 [mutexlock]

       [<c0041138>] process_one_work+0x1f0/0x60c

       [<c0041fd0>] worker_thread+0x54/0x530

       [<c0046ee0>] kthread+0x100/0x118

       [<c000ed50>] ret_from_fork+0x14/0x24

other info that might help us debug this:

 Possible unsafe locking scenario:

       CPU0                    CPU1

       ----                    ----

  lock((&(&delay_task)->work));

                               lock(mutex_a);

                               lock((&(&delay_task)->work));

  lock(mutex_a);

 *** DEADLOCK ***

 locks held by kworker/:/:

 #:  ("events"){.+.+.+}, at: [<c0041078>] process_one_work+0x130/0x60c

 #:  ((&(&delay_task)->work)){+.+...}, at: [<c0041078>] process_one_work+0x130/0x60c

stack backtrace:

CPU:  PID:  Comm: kworker/: Tainted: G           O    4.0.+ #

Hardware name: ARM-Versatile Express

Workqueue: events lockdep_test_worker [mutexlock]

[<c00171b4>] (unwind_backtrace) from [<c0012e7c>] (show_stack+0x20/0x24)

[<c0012e7c>] (show_stack) from [<c05ade10>] (dump_stack+0x8c/0xb4)

[<c05ade10>] (dump_stack) from [<c0065e80>] (print_circular_bug+0x21c/0x344)

[<c0065e80>] (print_circular_bug) from [<c006be44>] (__lock_acquire+0x1f60/0x1f64)

[<c006be44>] (__lock_acquire) from [<c006c55c>] (lock_acquire+0xf4/0x190)

[<c006c55c>] (lock_acquire) from [<c05b09e4>] (mutex_lock_nested+0x90/0x480)

[<c05b09e4>] (mutex_lock_nested) from [<bf000080>] (lockdep_test_worker+0x24/0x58 [mutexlock])

[<bf000080>] (lockdep_test_worker [mutexlock]) from [<c0041138>] (process_one_work+0x1f0/0x60c)

[<c0041138>] (process_one_work) from [<c0041fd0>] (worker_thread+0x54/0x530)

[<c0041fd0>] (worker_thread) from [<c0046ee0>] (kthread+0x100/0x118)

[<c0046ee0>] (kthread) from [<c000ed50>] (ret_from_fork+0x14/0x24)
上面的backtrace,和下面的代码流程对照,只有在打开CONFIG_PROVE_LOCKING才会打印相关信息。
lockdep_test_worker

  ->mutex_lock(&mutex_a)

    ->mutex_lock_nested

      ->__mutex_lock_common

        ->mutex_acquire_nest

          ->lock_acquire_exclusive

            ->lock_acquire

              ->__lock_acquire-----------------------------------------下面的validate_chain在打开CONFIG_PROVE_LOCKING才会进行检查。

                ->validate_chain->...->print_circular_bug
参考文档
Linux死锁检测-Lockdep的更多相关文章
- linux死锁检测的一种思路【转】
转自:http://www.cnblogs.com/mumuxinfei/p/4365697.html 前言: 上一篇博文讲述了pstack的使用和原理. 和jstack一样, pstack能获取进 ...
- linux死锁检测的一种思路
前言: 上一篇博文讲述了pstack的使用和原理. 和jstack一样, pstack能获取进程的线程堆栈快照, 方便检验和性能评估. 但jstack功能更加的强大, 它能对潜在的死锁予以提示, 而p ...
- LiteOS:SpinLock自旋锁及LockDep死锁检测
摘要:除了多核的自旋锁机制,本文会介绍下LiteOS 5.0引入的LockDep死锁检测特性. 2020年12月发布的LiteOS 5.0推出了全新的内核,支持SMP多核调度功能.想学习SMP多核调度 ...
- Linux内核死锁检测机制【转】
转自:http://www.oenhan.com/kernel-deadlock-check 死锁就是多个进程(线程)因为等待别的进程已占有的自己所需要的资源而陷入阻塞的一种状态,死锁状态一旦形成,进 ...
- 浅谈linux的死锁检测 【转】
转自:http://www.blog.chinaunix.net/uid-25942458-id-3823545.html 死锁:就是多个进程(≥2)因为争夺资源而相互等待的一种现象,若无外力推动,将 ...
- 为什么MySQL死锁检测会严重降低TPS
在大量的客户端,更新数据表的同一行时,会造成数据库的吞吐量大幅降低. 很多数据库的前辈和同行分别通过实验和源码的方法,定位到了罪魁祸首----MySQL死锁检测 实验方式:http://blog.cs ...
- 14.3.5.2 Deadlock Detection and Rollback 死锁检测和回滚:
14.3.5.2 Deadlock Detection and Rollback 死锁检测和回滚: InnoDB 自动检查四艘,回滚一个事务或者事务来打破死锁. InnoDB 试图选择小的事务来回滚, ...
- Linux - 死锁现象
一.死锁的概念: 1.死锁的现象描述: 在很多应用中,需要一个进程排他性的访问若干种资源而不是一种.例如,两个进程准备分别将扫描的文档记录到CD上.进程A请求使用扫描仪, 并被授权使用.但进程B首先请 ...
- UNIX环境高级编程——记录上锁(fcntl函数)以及死锁检测
一.记录锁 record locking 功能:当一个进程正在读或修改文件的某个部分时,它可以阻止其它进程修改同一文件区. 字节范围锁 byte-range locking 二.历史 flock函数, ...
随机推荐
- iPhone X手机投屏电脑无线连接教程
iPhone X手机是一款非常有气场的手机,独特的设计,展现手机的独特魅力,手机外观让人一眼就爱上,手感也是超级的舒适,真的是堪称完美,但是iPhone X手机投屏电脑怎么无线连接呢? 使用工具: 电 ...
- 初见jQuery EasyUI
本文通过一个简单的小例子,简述jQuery EasyUI的使用方法,仅供学习分享使用,如有不足之处,还请指正. 什么是jQuery EasyUI ? 引用官网的一句话:jQuery EasyUI fr ...
- 手动编译websocket-sharp项目使其支持.net core
以前项目中使用了websocket-sharp,挺好用.可惜,不支持.net core.好在手动编译很顺利: 从github下载源代码 创建dotnet core的类库,复制代码后并编译即可 dotn ...
- Wu反走样算法绘制圆(C++/MFC实现)
Wu反走样圆 原理:参考Bresenham算法,在主位移过程中计算出离理想圆最近的两个点,赋予不同的亮度值,绘制像素点即可! MFC 中CXXXView类中添加函数: //Wu算法画反走样圆 void ...
- [Objective-C]用Block实现链式编程
看这篇博客时最快让你上手ReactiveCocoa之基础篇看到作者介绍链式编程那一块,发现自己的钻研精神不足.想想自己使用链式编程也有段时间了,对,就是 Masonry 库.自己一直享受点语法带来的效 ...
- Linux没有最小只有更小----迷你Linux版本大集合(转)
[自从去年到现在已经收集了上百种版本的Linux和Unix,至于Unix就不想说了,没有Linux的功底是很难驾驭Unix的,我在这里只把小于360M的Linux以及一些非Linux但是很像Linux ...
- 关于Inception默认配置的一个坑
本文地址:https://www.cnblogs.com/ajiangg/p/9850902.html 约半年前上线了去哪儿的开源审核工具Inception(最近发现已经闭源了.....)以及基于In ...
- Oracle 锁机制探究
以前虽然在网上看到很多关于Oracle锁机制的描述,但总感觉哪里有缺陷不适合自己,因此花了点时间参考官网以及Tom Tyke的<Oracle 9i/10g/11g编程艺术>一书整理了一下O ...
- Gson解析泛型
1.简单对象我们传入对象Class来将JSON字符串转为对象 private static <T> T fromJson(String result, Class<T> cla ...
- 如何阅读luajit的代码——用vs调试篇
为什么要看luajit的源码 作为目前最快的脚本语言之一,luajit确实是一个杰作,但相比原生lua仅仅几万行的代码而言,luajit却可以说是巨无霸.更要命的是,luajit之所以快,是因为大量使 ...
