第二十一节,使用TensorFlow实现LSTM和GRU网络
本节主要介绍在TensorFlow中实现LSTM以及GRU网络。
一 LSTM网络
Long Short Term 网络—— 一般就叫做 LSTM ——是一种 RNN 特殊的类型,可以学习长期依赖信息。LSTM 由 Hochreiter & Schmidhuber (1997) 提出,并在近期被 Alex Graves 进行了改良和推广。在很多问题,LSTM 都取得相当巨大的成功,并得到了广泛的使用。
LSTM 通过刻意的设计来避免长期依赖问题。记住长期的信息在实践中是 LSTM 的默认行为,而非需要付出很大代价才能获得的能力!
LSTM的结构如下:

这种结构的核心思想是引入了一个叫做细胞状态的连接,这个细胞状态用来存放想要记忆的东西。同时在里面加入了三个门:
- 忘记门;顾名思义,是控制是否遗忘的,在LSTM中即以一定的概率控制是否遗忘上一层的隐藏细胞状态。
- 输入门:输入门(input gate)负责处理当前序列位置的输入.
- 输出门:决定什么时候需要把状态和输出放在一起输出。
二 LSTM 的变体
上面我们介绍了正常的 LSTM。但是不是所有的 LSTM 都长成一个样子的。实际上,几乎所有包含 LSTM 的论文都采用了微小的变体。差异非常小,但是也值得拿出来讲一下。
1.窥视孔连接(peephole )
其中一个流形的 LSTM 变体,就是由 Gers & Schmidhuber (2000) 提出的,增加了 “peephole connection”。是说,我们让每个门也会接受细胞状态的输入。

上面的图例中,我们增加了 peephole 到每个门上,但是许多论文会加入部分的 peephole 而非所有都加。
2.coupled 忘记门和输入门
另一个变体是通过使用 coupled 忘记和输入门。不同于之前是分开确定什么忘记和需要添加什么新的信息,这里是一同做出决定。我们仅仅会当我们将要输入在当前位置时忘记。我们仅仅输入新的值到那些我们已经忘记旧的信息的那些状态 。

3.GRU
另一个改动较大的变体是 Gated Recurrent Unit (GRU),这是由 Cho, et al. (2014) 提出。它将忘记门和输入门合成了一个单一的 更新门。同样还混合了细胞状态和隐藏状态,和其他一些改动。最终的模型比标准的 LSTM 模型要简单,也是非常流行的变体。由于GRU比LSTM少了一个状态输出,效果几乎一样,因此在编码使用时使用GRU可以让代码更为简单一些。

这里只是部分流行的 LSTM 变体。当然还有很多其他的,如 Yao, et al. (2015) 提出的 Depth Gated RNN。还有用一些完全不同的观点来解决长期依赖的问题,如 Koutnik, et al. (2014) 提出的 Clockwork RNN。
要问哪个变体是最好的?其中的差异性真的重要吗? Greff, et al. (2015) 给出了流行变体的比较,结论是他们基本上是一样的。 Jozefowicz, et al. (2015) 则在超过 1 万中 RNN 架构上进行了测试,发现一些架构在某些任务上也取得了比 LSTM 更好的结果。
三 Bi-RNN网络介绍
Bi-RNN又叫双向RNN,是采用了两个方向的RNN网络。
RNN网络擅长的是对于连续数据的处理,既然是连续的数据规律,我们不仅可以学习他的正向规律,还可以学习他的反向规律。这样正向和反向结合的网络,回比单向循环网络有更高的拟合度。
双向RNN的处理过程和单向RNN非常相似,就是在正向传播的基础上再进行一次反向传播,而且这两个都连接这一个输出层。
四 TensorFlow中cell库
TensorFlow中定义了5个关于cell的类,cell我们可以理解为DNN中的一个隐藏层,只不过是一个比较特殊的层。如下
1.BasicRNNCell类
最基本的RNN类实现:
def __init__(self, num_units, activation=None, reuse=None)
- num_units:LSTM网络单元的个数,也即隐藏层的节点数。
- activation: Nonlinearity to use. Default: `tanh`.
- reuse:(optional) Python boolean describing whether to reuse variables in an existing scope. If not `True`, and the existing scope already has the given variables, an error is raised.
2.BasicLSTMCell类
LSTM网络:
def __init__(self, num_units, forget_bias=1.0, state_is_tuple=True, activation=None, reuse=None):
- num_units:LSTM网络单元的个数,也即隐藏层的节点数。
- forget_bias:添加到忘记门的偏置。
- state_is_tuple:由于细胞状态ct和输出ht是分开的,当为True时放在一个tuple中,(c=array([[]]),h=array([[]])),当为False时两个值就按列连接起来,成为[batch,2n],建议使用True。
- activation: Activation function of the inner states. Default: `tanh`.
- reuse: (optional) Python boolean describing whether to reuse variables in an existing scope. If not `True`, and the existing scope already has the given variables, an error is raised. 在一个scope中是否重用。
3.LSTMCell类
LSTM实现的一个高级版本。
def __init__(self, num_units,

use_peepholes=False, cell_clip=None,

initializer=None, num_proj=None, proj_clip=None,

num_unit_shards=None, num_proj_shards=None,

forget_bias=1.0, state_is_tuple=True,

activation=None, reuse=None):
- num_units:LSTM网络单元的个数,也即隐藏层的节点数。
- use_peepholes:默认False,True表示启用Peephole连接。
- cell_clip:是否在输出前对cell状态按照给定值进行截断处理。
- initializer: (optional) The initializer to use for the weight and projection matrices.
- num_proj: (optional) int, The output dimensionality for the projection matrices. If None, no projection is performed.通过projection层进行模型压缩的输出维度。
- proj_clip: (optional) A float value. If `num_proj > 0` and `proj_clip` is provided, then the projected values are clipped elementwise to within `[-proj_clip, proj_clip]`.将num_proj按照给定的proj_clip截断。
- num_unit_shards: Deprecated, will be removed by Jan. 2017. Use a variable_scope partitioner instead.
- num_proj_shards: Deprecated, will be removed by Jan. 2017. Use a variable_scope partitioner instead.
- forget_bias: Biases of the forget gate are initialized by default to 1 in order to reduce the scale of forgetting at the beginning of the training.
- state_is_tuple: If True, accepted and returned states are 2-tuples of the `c_state` and `m_state`. If False, they are concatenated along the column axis. This latter behavior will soon be deprecated.
- activation: Activation function of the inner states. Default: `tanh`.
- reuse: (optional) Python boolean describing whether to reuse variables in an existing scope. If not `True`, and the existing scope already has the given variables, an error is raised.
4.GRU类
  def __init__(self,

               num_units,

               activation=None,

               reuse=None,

               kernel_initializer=None,

               bias_initializer=None):
- num_units:GRU网络单元的个数,也即隐藏层的节点数。
- activation: Nonlinearity to use. Default: `tanh`.
- reuse:(optional) Python boolean describing whether to reuse variables in an existing scope. If not `True`, and the existing scope already has the given variables, an error is raise
5.MultiRNNCell
多层RNN的实现:
def __init__(self, cells, state_is_tuple=True)
- cells: list of RNNCells that will be composed in this order. 一个cell列表。将列表中的cell一个个堆叠起来,如果使用cells=[cell1,cell2],就是一共有2层,数据经过cell1后还要经过cells。
- state_is_tuple: If True, accepted and returned states are n-tuples, where `n = len(cells)`. If False, the states are all concatenated along the column axis. This latter behavior will soon be deprecated.如果是True则返回的是n-tuple,即cell的输出值与cell的输出状态组成了一个元组。其中输出值和输出状态的结构均为[batch,num_units]。
五 通过cell类构建RNN
定义好cell类之后,还需要将它们连接起来构成RNN网络,TensorFlow中有几种现成的构建网络模式,是封装好的函数,直接调用即可:
1.静态RNN构建
def tf.contrib.rnn.static_rnn(cell, inputs, initial_state=None, dtype=None, sequence_length=None, scope=None):
- cell:生成好的cell类对象。
- inputs:A length T list of inputs, each a `Tensor` of shape `[batch_size, input_size]`, or a nested tuple of such elements.输入数据,由张量组成的list。list的顺序就是时间顺序。元素就是每个序列的值,形状为[batch_size,input_size]。
- initial_state: (optional) An initial state for the RNN. If `cell.state_size` is an integer, this must be a `Tensor` of appropriate type and shape `[batch_size, cell.state_size]`. If `cell.state_size` is a tuple, this should be a tuple of tensors having shapes `[batch_size, s] for s in cell.state_size`.初始化cell状态。
- dtype: (optional) The data type for the initial state and expected output. Required if initial_state is not provided or RNN state has a heterogeneous。期望输出和初始化state的类型。
- sequence_length: Specifies the length of each sequence in inputs. An int32 or int64 vector (tensor) size `[batch_size]`, values in `[0, T)`.每一个输入的序列长度。
- scope: VariableScope for the created subgraph; defaults to "rnn".命名空间
返回值有两个,一个是输出结果,一个是cell状态。我们只关注结果,结果也是一个list,输入是多少个时序,list里面就会有多少个元素。每个元素大小为[batch_size,num_units]。
注意:在输入时,一定要将我们习惯使用的张量改为由张量组成的list。另外,在得到输出时也要去最后一个时序的输出参与后面的运算。
2.动态RNN构建
def tf.nn.dynamic_rnn(cell, inputs, sequence_length=None,
     initial_state=None, dtype=None, parallel_iterations=None,
       swap_memory=False, time_major=False, scope=None):
- cell:生成好的cell类对象。
- inputs:If `time_major == False` (default), this must be a `Tensor` of shape:`[batch_size, max_time, ...]`, or a nested tuple of such elements. If `time_major == True`, this must be a `Tensor` of shape: `[max_time, batch_size, ...]`, or a nested tuple of such elements. 输入数据,是一个张量,默认是三维张量,[batch_size,max_time,...],batch_size表示一个批次数量,max_time:表示时间序列总数,后面是一个时序输入数据的长度。
- sequence_length: Specifies the length of each sequence in inputs. An int32 or int64 vector (tensor) size `[batch_size]`, values in `[0, T)`.每一个输入的序列长度。
- initial_state: (optional) An initial state for the RNN.If `cell.state_size` is an integer, this must be a `Tensor` of appropriate type and shape `[batch_size, cell.state_size]`. If `cell.state_size` is a tuple, this should be a tuple of tensors having shapes `[batch_size, s] for s in cell.state_size`.初始化cell状态。
- dtype:期望输出和初始化state的类型。
- parallel_iterations: (Default: 32). The number of iterations to run inparallel. Those operations which do not have any temporal dependency and can be run in parallel, will be. This parameter trades off time for space. Values >> 1 use more memory but take less time, while smaller values use less memory but computations take longer.
- swap_memory: Transparently swap the tensors produced in forward inference but needed for back prop from GPU to CPU. This allows training RNNs which would typically not fit on a single GPU, with very minimal (or no) performance penalty.
- time_major: The shape format of the `inputs` and `outputs` Tensors. If true, these `Tensors` must be shaped `[max_time, batch_size, depth]`. If false, these `Tensors` must be shaped `[batch_size, max_time, depth]`. Using `time_major = True` is a bit more efficient because it avoids transposes at the beginning and end of the RNN calculation. However, most TensorFlow data is batch-major, so by default this function accepts input and emits output in batch-major form.
- scope: VariableScope for the created subgraph; defaults to "rnn".命名空间。
返回值:一个是结果,一个是cell状态。
A pair (outputs, state) where:
outputs: The RNN output `Tensor`.
If time_major == False (default), this will be a `Tensor` shaped: `[batch_size, max_time, cell.output_size]`.
If time_major == True, this will be a `Tensor` shaped: `[max_time, batch_size, cell.output_size]`.
Note, if `cell.output_size` is a (possibly nested) tuple of integers or `TensorShape` objects, then `outputs` will be a tuple having the same structure as `cell.output_size`, containing Tensors having shapes
corresponding to the shape data in `cell.output_size`.
state: The final state. If `cell.state_size` is an int, this will be shaped `[batch_size, cell.state_size]`. If it is a `TensorShape`, this will be shaped `[batch_size] + cell.state_size`. If it is a (possibly nested) tuple of ints or `TensorShape`, this will be a tuple having the corresponding shapes.
由于time_major默认值是False,所以结果是以[batch_size,max_time,...]形式的张量。
注意:在输出时如果是以[batch_size,max_time,...]形式,即批次优先的矩阵,因为我们需要取最后一个时序的输出,所以需要转置成时间优先的形式。
outputs = tf.transpose(outputs,[1,0,2])
3.双向RNN构建
双向RNN作为一个可以学习正反规律的循环神经网络,在TensorFlow中有4个函数可以使用。
1.静态单层双向RNN
def tf.contrib.rnn.static_bidirectional_rnn(cell_fw,

                             cell_bw,

                             inputs,

                             initial_state_fw=None,

                             initial_state_bw=None,

                             dtype=None,

                             sequence_length=None,

                             scope=None):
cell_fw: An instance of RNNCell, to be used for forward direction.这个参数是实例化后的cell对象,代表前向。
cell_bw: An instance of RNNCell, to be used for backward direction.这个参数是实例化后的cell对象,代表后向。
inputs: A length T list of inputs, each a tensor of shape [batch_size, input_size], or a nested tuple of such elements.一个长度为t的输入列表,每一个元素都是一个张量,形状为[batch_size,input_size],t表示时序总数。
initial_state_fw: (optional) An initial state for the forward RNN. This must be a tensor of appropriate type and shape `[batch_size, cell_fw.state_size]`. If `cell_fw.state_size` is a tuple, this should be a tuple of
tensors having shapes `[batch_size, s] for s in cell_fw.state_size`.前向的细胞状态初始化,默认为0.initial_state_bw: (optional) Same as for `initial_state_fw`, but using the corresponding properties of `cell_bw`.后向的细胞状态初始化,默认为0.
dtype: (optional) The data type for the initial state. Required if either of the initial states are not provided.可以为自定义cell初始状态指定类型。
sequence_length: (optional) An int32/int64 vector, size `[batch_size]`, containing the actual lengths for each of the sequences.传入的序列长度
scope: VariableScope for the created subgraph; defaults to "bidirectional_rnn"。名称空间。
返回值是一个tuple(outputs,outputs_state_fw,output_state_bw)。outputs为一个长度为t的list,每一个元素都包含正向和反向的输出(即合并之后的,因此不需要使用tf.concat进行连接了)。
2.静态多层双向RNN
def tf.contrib.rnn.stack_bidirectional_rnn(cells_fw,

                            cells_bw,

                            inputs,

                            initial_states_fw=None,

                            initial_states_bw=None,

                            dtype=None,

                            sequence_length=None,

                            scope=None):
cells_fw: List of instances of RNNCell, one per layer, to be used for forward direction.实例化后的cell列表,代表正向。
cells_bw: List of instances of RNNCell, one per layer,to be used for backward direction.实例化后的cell列表,代表反向。
inputs: A length T list of inputs, each a tensor of shape [batch_size, input_size], or a nested tuple of such elements.一个长度为t的输入列表,每一个元素都是一个张量,形状为[batch_size,input_size],t表示时序总数。
initial_states_fw: (optional) A list of the initial states (one per layer) for the forward RNN. Each tensor must has an appropriate type and shape `[batch_size, cell_fw.state_size]`.前向细胞状态初始化,默认为0.
initial_states_bw: (optional) Same as for `initial_states_fw`, but using the corresponding properties of `cells_bw`.后向的细胞状态初始化,默认为0.
dtype: (optional) The data type for the initial state. Required if either of the initial states are not provided.可以为自定义cell初始状态指定类型。
sequence_length: (optional) An int32/int64 vector, size `[batch_size]`, containing the actual lengths for each of the sequences.传入的序列长度
scope: VariableScope for the created subgraph; defaults to None.名称空间。
返回值是一个tuple(outputs,outputs_state_fw,output_state_bw)。outputs为一个长度为t的list,每一个元素都包含正向和反向的输出(即合并之后的,因此不需要使用tf.concat进行连接了)。
3.动态单层双向RNN
def tf.nn.bidirectional_dynamic_rnn(cell_fw, cell_bw, inputs, sequence_length=None,

                              initial_state_fw=None, initial_state_bw=None,

                              dtype=None, parallel_iterations=None,

                              swap_memory=False, time_major=False, scope=None):
- cell_fw: An instance of RNNCell, to be used for forward direction. 这个参数是实例化后的cell对象,代表前向。
- cell_bw: An instance of RNNCell, to be used for backward direction.这个参数是实例化后的cell对象,代表后向。
- inputs: The RNN inputs. If time_major == False (default), this must be a tensor of shape: `[batch_size, max_time, ...]`, or a nested tuple of such elements. If time_major == True, this must be a tensor of shape:`[max_time, batch_size, ...]`, or a nested tuple of such elements.输入数据,是一个张量,默认是三维张量,[batch_size,max_time,...],batch_size表示一个批次数量,max_time:表示时间序列总数,后面是一个时序输入数据的长度。
- sequence_length: (optional) An int32/int64 vector, size `[batch_size]`, containing the actual lengths for each of the sequences in the batch. If not provided, all batch entries are assumed to be full sequences; and time reversal is applied from time `0` to `max_time` for each sequence.序列长度
- initial_state_fw: (optional) An initial state for the forward RNN. This must be a tensor of appropriate type and shape `[batch_size, cell_fw.state_size]`. If `cell_fw.state_size` is a tuple, this should be a tuple of tensors having shapes `[batch_size, s] for s in cell_fw.state_size`.前向细胞状态初始化,默认为0.
- initial_state_bw: (optional) Same as for `initial_state_fw`, but using the corresponding properties of `cell_bw`.后向细胞状态初始化,默认为0.
- dtype: (optional) The data type for the initial states and expected output. Required if initial_states are not provided or RNN states have a heterogeneous dtype.数据类型。
- parallel_iterations: (Default: 32). The number of iterations to run in parallel. Those operations which do not have any temporal dependency and can be run in parallel, will be. This parameter trades off time for space. Values >> 1 use more memory but take less time, while smaller values use less memory but computations take longer.
- swap_memory: Transparently swap the tensors produced in forward inference but needed for back prop from GPU to CPU. This allows training RNNs which would typically not fit on a single GPU, with very minimal (or no) performance penalty.
- time_major: The shape format of the `inputs` and `outputs` Tensors.If true, these `Tensors` must be shaped `[max_time, batch_size, depth]`. If false, these `Tensors` must be shaped `[batch_size, max_time, depth]`. Using `time_major = True` is a bit more efficient because it avoids transposes at the beginning and end of the RNN calculation. However, most TensorFlow data is batch-major, so by default this function accepts input and emits output in batch-major form.
- scope: VariableScope for the created subgraph; defaults to "bidirectional_rnn"。命名空间
返回是一个tuple(outputs,outputs_state),outputs也是一个元组(output_fw,output_bw),默认情况下(即time_major=False)每一个都为一个张量,形状为[batch_size,max_time,layers_output],如果需要总的结果,可以将前后项的layers_output使用tf.concat连接起来。
hiddens = tf.concat(hiddens,axis=2)
除此之外,我们一般还需要转换为时序优先的矩阵。
hiddens = tf.transpose(hiddens,[1,0,2])
4.动态多层双向RNN
def tf.contrib.rnn.stack_bidirectional_dynamic_rnn(cells_fw,

                                    cells_bw,

                                    inputs,

                                    initial_states_fw=None,

                                    initial_states_bw=None,

                                    dtype=None,

                                    sequence_length=None,

                                    parallel_iterations=None,

                                    scope=None):
cells_fw: List of instances of RNNCell, one per layer, to be used for forward direction.实例化后的cell列表,代表正向。
cells_bw: List of instances of RNNCell, one per layer,to be used for backward direction.实例化后的cell列表,代表反向。
inputs: The RNN inputs. this must be a tensor of shape:`[batch_size, max_time, ...]`, or a nested tuple of such elements.输入数据,是一个张量,默认是三维张量,[batch_size,max_time,...],batch_size表示一个批次数量,max_time:表示时间序列总数,后面是一个时序输入数据的长度。
initial_states_fw: (optional) A list of the initial states (one per layer) for the forward RNN. Each tensor must has an appropriate type and shape
`[batch_size, cell_fw.state_size]`.前向细胞状态初始化,默认为0.initial_states_bw: (optional) Same as for `initial_states_fw`, but using the corresponding properties of `cells_bw`.后向细胞状态初始化,默认为0.
dtype: (optional) The data type for the initial state. Required if either of the initial states are not provided.数据类型。
sequence_length: (optional) An int32/int64 vector, size `[batch_size]`, containing the actual lengths for each of the sequences.序列长度。
parallel_iterations: (Default: 32). The number of iterations to run in parallel. Those operations which do not have any temporal dependency and can be run in parallel, will be. This parameter trades off time for space. Values >> 1 use more memory but take less time, while smaller values use less memory but computations take longer.
scope: VariableScope for the created subgraph; defaults to None.命名空间
返回是一个tuple(outputs,output_state_fw,output_state_bw),outputs为一个张量,形状为[batch_size,max_time,layers_output],layers_output包含tf.concat之后的正向和反向的输出。
我们一般还需要转换为时序优先的矩阵。
hiddens = tf.transpose(hiddens,[1,0,2])
六 Tensoflow实现单层单向RNN
我们使用MNIST数据集作为数据源,通过构建RNN对MNIST数据集进行分类,由于单张图像大小为28x28,我们把每张图像分成28个总时序,每个时序是28个值,然后送入RNN网络。
# -*- coding: utf-8 -*-

"""

Created on Fri May 11 11:49:52 2018

@author: zy

"""

'''

使用TensorFlow库实现单层RNN  分别使用LSTM单元,GRU单元,static_rnn和dynamic_rnn函数

'''

import tensorflow as tf

import numpy as np

tf.reset_default_graph()

'''

一 使用动态RNN处理变长序列

'''

np.random.seed(0)

#创建输入数据  正态分布 2:表示一次的批次数量 4:表示时间序列总数  5:表示具体的数据

X = np.random.randn(2,4,5)

#第二个样本长度为3

X[1,1:] = 0

#每一个输入序列的长度

seq_lengths = [4,1]

print('X:\n',X)

#分别建立一个LSTM与GRU的cell,比较输出的状态  3是隐藏层节点的个数

cell = tf.contrib.rnn.BasicLSTMCell(num_units = 3,state_is_tuple = True)

gru = tf.contrib.rnn.GRUCell(3)

#如果没有initial_state,必须指定a dtype

outputs,last_states = tf.nn.dynamic_rnn(cell,X,seq_lengths,dtype =tf.float64 )

gruoutputs,grulast_states = tf.nn.dynamic_rnn(gru,X,seq_lengths,dtype =tf.float64 )

sess = tf.InteractiveSession()

sess.run(tf.global_variables_initializer())

result,sta,gruout,grusta = sess.run([outputs,last_states,gruoutputs,grulast_states])

print('全序列:\n',result[0])

print('短序列:\n',result[1])

#由于在BasicLSTMCell设置了state_is_tuple是True,所以lstm的值为 (状态ct,输出h)

print('LSTM的状态:',len(sta),'\n',sta[1])

print('GRU的全序列:\n',gruout[0])

print('GRU的短序列:\n',gruout[1])

#GRU没有状态输出,其状态就是最终输出,因为批次是两个,所以输出为2

print('GRU的状态:',len(grusta),'\n',grusta[1])

'''

二 构建单层单向RNN网络对MNIST数据集分类

'''

'''

MNIST数据集一个样本长度为28 x 28

我们可以把一个样本分成28个时间段,每段内容是28个值,然后送入LSTM或者GRU网络

我们设置隐藏层的节点数为128

'''

def single_layer_static_lstm(input_x,n_steps,n_hidden):

    '''

    返回静态单层LSTM单元的输出,以及cell状态

    args:

        input_x:输入张量 形状为[batch_size,n_steps,n_input]

        n_steps:时序总数

        n_hidden:LSTM单元输出的节点个数 即隐藏层节点数

    '''

    #把输入input_x按列拆分,并返回一个有n_steps个张量组成的list 如batch_sizex28x28的输入拆成[(batch_size,28),((batch_size,28))....]

    #如果是调用的是静态rnn函数,需要这一步处理   即相当于把序列作为第一维度

    input_x1 = tf.unstack(input_x,num=n_steps,axis=1)

    #可以看做隐藏层

    lstm_cell = tf.contrib.rnn.BasicLSTMCell(num_units=n_hidden,forget_bias=1.0)

    #静态rnn函数传入的是一个张量list  每一个元素都是一个(batch_size,n_input)大小的张量

    hiddens,states = tf.contrib.rnn.static_rnn(cell=lstm_cell, inputs=input_x1, dtype=tf.float32)

    return hiddens,states

def single_layer_static_gru(input_x,n_steps,n_hidden):

    '''

    返回静态单层GRU单元的输出,以及cell状态

    args:

        input_x:输入张量 形状为[batch_size,n_steps,n_input]

        n_steps:时序总数

        n_hidden:gru单元输出的节点个数 即隐藏层节点数

    '''

    #把输入input_x按列拆分,并返回一个有n_steps个张量组成的list 如batch_sizex28x28的输入拆成[(batch_size,28),((batch_size,28))....]

    #如果是调用的是静态rnn函数,需要这一步处理   即相当于把序列作为第一维度

    input_x1 = tf.unstack(input_x,num=n_steps,axis=1)

    #可以看做隐藏层

    gru_cell = tf.contrib.rnn.GRUCell(num_units=n_hidden)

    #静态rnn函数传入的是一个张量list  每一个元素都是一个(batch_size,n_input)大小的张量

    hiddens,states = tf.contrib.rnn.static_rnn(cell=gru_cell,inputs=input_x1,dtype=tf.float32)

    return hiddens,states

def single_layer_dynamic_lstm(input_x,n_steps,n_hidden):

    '''

    返回动态单层LSTM单元的输出,以及cell状态

    args:

        input_x:输入张量  形状为[batch_size,n_steps,n_input]

        n_steps:时序总数

        n_hidden:LSTM单元输出的节点个数 即隐藏层节点数

    '''

    #可以看做隐藏层

    lstm_cell = tf.contrib.rnn.BasicLSTMCell(num_units=n_hidden,forget_bias=1.0)

    #动态rnn函数传入的是一个三维张量,[batch_size,n_steps,n_input]  输出也是这种形状

    hiddens,states = tf.nn.dynamic_rnn(cell=lstm_cell,inputs=input_x,dtype=tf.float32)

    #注意这里输出需要转置  转换为时序优先的

    hiddens = tf.transpose(hiddens,[1,0,2])

    return hiddens,states

def single_layer_dynamic_gru(input_x,n_steps,n_hidden):

    '''

    返回动态单层GRU单元的输出,以及cell状态

    args:

        input_x:输入张量 形状为[batch_size,n_steps,n_input]

        n_steps:时序总数

        n_hidden:gru单元输出的节点个数 即隐藏层节点数

    '''

    #可以看做隐藏层

    gru_cell = tf.contrib.rnn.GRUCell(num_units=n_hidden)

    #动态rnn函数传入的是一个三维张量,[batch_size,n_steps,n_input]  输出也是这种形状

    hiddens,states = tf.nn.dynamic_rnn(cell=gru_cell,inputs=input_x,dtype=tf.float32)

    #注意这里输出需要转置  转换为时序优先的

    hiddens = tf.transpose(hiddens,[1,0,2])

    return hiddens,states

def  mnist_rnn_classfication(flag):

    '''

    对MNIST进行分类

    arg:

        flags:表示构建的RNN结构是哪种

            1:单层静态LSTM

            2: 单层静态GRU

            3:单层动态LSTM

            4: 单层动态GRU

    '''

    '''

    1. 导入数据集

    '''

    tf.reset_default_graph()

    from tensorflow.examples.tutorials.mnist import input_data

    #mnist是一个轻量级的类,它以numpy数组的形式存储着训练,校验,测试数据集  one_hot表示输出二值化后的10维

    mnist = input_data.read_data_sets('MNIST-data',one_hot=True)

    print(type(mnist)) #<class 'tensorflow.contrib.learn.python.learn.datasets.base.Datasets'>

    print('Training data shape:',mnist.train.images.shape)           #Training data shape: (55000, 784)

    print('Test data shape:',mnist.test.images.shape)                #Test data shape: (10000, 784)

    print('Validation data shape:',mnist.validation.images.shape)    #Validation data shape: (5000, 784)

    print('Training label shape:',mnist.train.labels.shape)          #Training label shape: (55000, 10)

    '''

    2 定义参数,以及网络结构

    '''

    n_input = 28             #LSTM单元输入节点的个数

    n_steps = 28             #序列长度

    n_hidden = 128           #LSTM单元输出节点个数(即隐藏层个数)

    n_classes = 10           #类别

    batch_size = 128         #小批量大小

    training_step = 5000     #迭代次数

    display_step  = 200      #显示步数

    learning_rate = 1e-4     #学习率

    #定义占位符

    #batch_size:表示一次的批次样本数量batch_size  n_steps:表示时间序列总数  n_input:表示一个时序具体的数据长度  即一共28个时序,一个时序送入28个数据进入LSTM网络

    input_x = tf.placeholder(dtype=tf.float32,shape=[None,n_steps,n_input])

    input_y = tf.placeholder(dtype=tf.float32,shape=[None,n_classes])

    #可以看做隐藏层

    if  flag == 1:

        print('单层静态LSTM网络:')

        hiddens,states = single_layer_static_lstm(input_x,n_steps,n_hidden)

    elif flag == 2:

        print('单层静态gru网络:')

        hiddens,states = single_layer_static_gru(input_x,n_steps,n_hidden)

    elif  flag == 3:

        print('单层动态LSTM网络:')

        hiddens,states = single_layer_dynamic_lstm(input_x,n_steps,n_hidden)

    elif flag == 4:

        print('单层动态gru网络:')

        hiddens,states = single_layer_dynamic_gru(input_x,n_steps,n_hidden)

    print('hidden:',hiddens[-1].shape)      #(128,128)

    #取LSTM最后一个时序的输出,然后经过全连接网络得到输出值

    output = tf.contrib.layers.fully_connected(inputs=hiddens[-1],num_outputs=n_classes,activation_fn = tf.nn.softmax)

    '''

    3 设置对数似然损失函数

    '''

    #代价函数 J =-(Σy.logaL)/n    .表示逐元素乘

    cost = tf.reduce_mean(-tf.reduce_sum(input_y*tf.log(output),axis=1))

    '''

    4 求解

    '''

    train = tf.train.AdamOptimizer(learning_rate).minimize(cost)

    #预测结果评估

    #tf.argmax(output,1)  按行统计最大值得索引

    correct = tf.equal(tf.argmax(output,1),tf.argmax(input_y,1))       #返回一个数组 表示统计预测正确或者错误

    accuracy = tf.reduce_mean(tf.cast(correct,tf.float32))             #求准确率

    #创建list 保存每一迭代的结果

    test_accuracy_list = []

    test_cost_list=[]

    with tf.Session() as sess:

        #使用会话执行图

        sess.run(tf.global_variables_initializer())   #初始化变量

        #开始迭代 使用Adam优化的随机梯度下降法

        for i in range(training_step):

            x_batch,y_batch = mnist.train.next_batch(batch_size = batch_size)

            #Reshape data to get 28 seq of 28 elements

            x_batch = x_batch.reshape([-1,n_steps,n_input])

            #开始训练

            train.run(feed_dict={input_x:x_batch,input_y:y_batch})

            if (i+1) % display_step == 0:

                 #输出训练集准确率

                training_accuracy,training_cost = sess.run([accuracy,cost],feed_dict={input_x:x_batch,input_y:y_batch})

                print('Step {0}:Training set accuracy {1},cost {2}.'.format(i+1,training_accuracy,training_cost))

        #全部训练完成做测试  分成200次,一次测试50个样本

        #输出测试机准确率   如果一次性全部做测试,内容不够用会出现OOM错误。所以测试时选取比较小的mini_batch来测试

        for i in range(200):

            x_batch,y_batch = mnist.test.next_batch(batch_size = 50)

            #Reshape data to get 28 seq of 28 elements

            x_batch = x_batch.reshape([-1,n_steps,n_input])

            test_accuracy,test_cost = sess.run([accuracy,cost],feed_dict={input_x:x_batch,input_y:y_batch})

            test_accuracy_list.append(test_accuracy)

            test_cost_list.append(test_cost)

            if (i+1)% 20 == 0:

                 print('Step {0}:Test set accuracy {1},cost {2}.'.format(i+1,test_accuracy,test_cost))

        print('Test accuracy:',np.mean(test_accuracy_list))

if __name__ == '__main__':

    mnist_rnn_classfication(1)    #1:单层静态LSTM

    mnist_rnn_classfication(2)    #2:单层静态gru

    mnist_rnn_classfication(3)    #3:单层动态LSTM

    mnist_rnn_classfication(4)    #4:单层动态gru
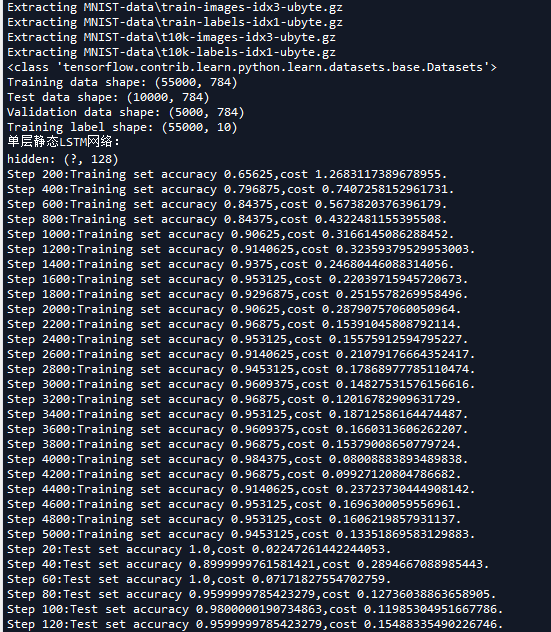
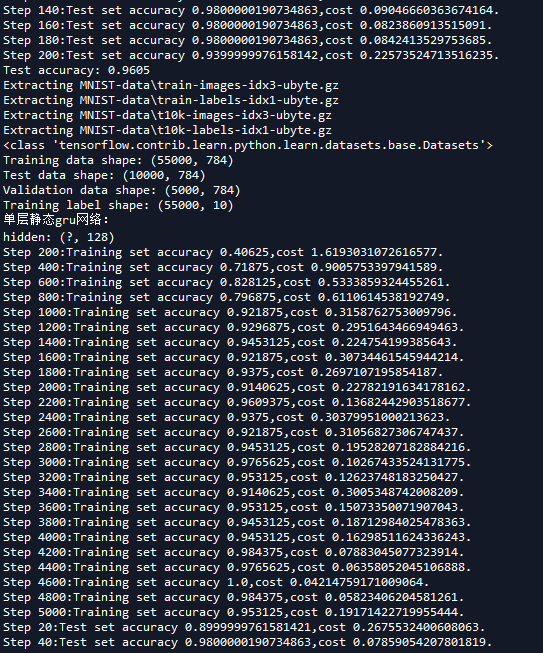
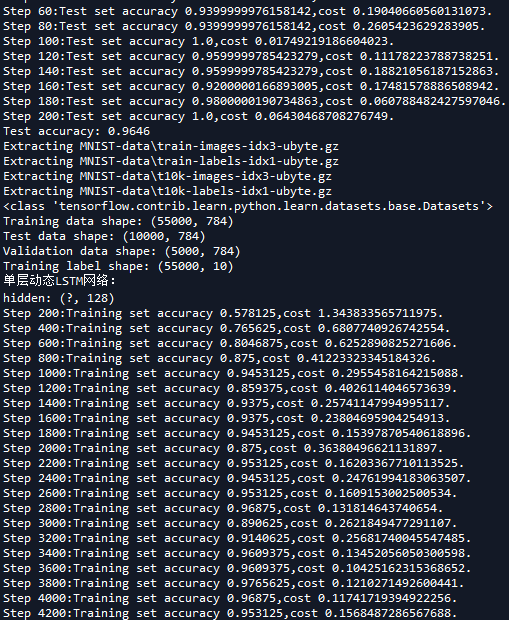
以上是部分截图....
七 Tensoflow实现多层单向RNN
# -*- coding: utf-8 -*-

"""

Created on Fri May 11 16:29:11 2018

@author: zy

"""

'''

使用TensorFlow库实现单层RNN  分别使用LSTM单元,GRU单元,static_rnn和dynamic_rnn函数

'''

import tensorflow as tf

import numpy as np

'''

构建多层单向RNN网络对MNIST数据集分类

'''

'''

MNIST数据集一个样本长度为28 x 28

我们可以把一个样本分成28个时间段,每段内容是28个值,然后送入LSTM或者GRU网络

我们设置隐藏层的节点数为128

'''

def multi_layer_static_lstm(input_x,n_steps,n_hidden):

    '''

    返回静态多层LSTM单元的输出,以及cell状态

    args:

        input_x:输入张量 形状为[batch_size,n_steps,n_input]

        n_steps:时序总数

        n_hidden:LSTM单元输出的节点个数 即隐藏层节点数

    '''

    #把输入input_x按列拆分,并返回一个有n_steps个张量组成的list 如batch_sizex28x28的输入拆成[(batch_size,28),((batch_size,28))....]

    #如果是调用的是静态rnn函数,需要这一步处理   即相当于把序列作为第一维度

    input_x1 = tf.unstack(input_x,num=n_steps,axis=1)

    #可以看做3个隐藏层

    stacked_rnn = []

    for i in range(3):

        stacked_rnn.append(tf.contrib.rnn.LSTMCell(num_units=n_hidden))

    #多层RNN的实现 例如cells=[cell1,cell2],则表示一共有两层,数据经过cell1后还要经过cells

    mcell = tf.contrib.rnn.MultiRNNCell(cells=stacked_rnn)

    #静态rnn函数传入的是一个张量list  每一个元素都是一个(batch_size,n_input)大小的张量

    hiddens,states = tf.contrib.rnn.static_rnn(cell=mcell,inputs=input_x1,dtype=tf.float32)

    return hiddens,states

def multi_layer_static_gru(input_x,n_steps,n_hidden):

    '''

    返回静态多层GRU单元的输出,以及cell状态

    args:

        input_x:输入张量 形状为[batch_size,n_steps,n_input]

        n_steps:时序总数

        n_hidden:gru单元输出的节点个数 即隐藏层节点数

    '''

    #把输入input_x按列拆分,并返回一个有n_steps个张量组成的list 如batch_sizex28x28的输入拆成[(batch_size,28),((batch_size,28))....]

    #如果是调用的是静态rnn函数,需要这一步处理   即相当于把序列作为第一维度

    input_x1 = tf.unstack(input_x,num=n_steps,axis=1)

        #可以看做3个隐藏层

    stacked_rnn = []

    for i in range(3):

        stacked_rnn.append(tf.contrib.rnn.GRUCell(num_units=n_hidden))

    #多层RNN的实现 例如cells=[cell1,cell2],则表示一共有两层,数据经过cell1后还要经过cells

    mcell = tf.contrib.rnn.MultiRNNCell(cells=stacked_rnn)

    #静态rnn函数传入的是一个张量list  每一个元素都是一个(batch_size,n_input)大小的张量

    hiddens,states = tf.contrib.rnn.static_rnn(cell=mcell,inputs=input_x1,dtype=tf.float32)

    return hiddens,states

def multi_layer_static_mix(input_x,n_steps,n_hidden):

    '''

    返回静态多层GRU和LSTM混合单元的输出,以及cell状态

    args:

        input_x:输入张量 形状为[batch_size,n_steps,n_input]

        n_steps:时序总数

        n_hidden:gru单元输出的节点个数 即隐藏层节点数

    '''

    #把输入input_x按列拆分,并返回一个有n_steps个张量组成的list 如batch_sizex28x28的输入拆成[(batch_size,28),((batch_size,28))....]

    #如果是调用的是静态rnn函数,需要这一步处理   即相当于把序列作为第一维度

    input_x1 = tf.unstack(input_x,num=n_steps,axis=1)

    #可以看做2个隐藏层

    gru_cell = tf.contrib.rnn.GRUCell(num_units=n_hidden*2)

    lstm_cell = tf.contrib.rnn.LSTMCell(num_units=n_hidden)

    #多层RNN的实现 例如cells=[cell1,cell2],则表示一共有两层,数据经过cell1后还要经过cells

    mcell = tf.contrib.rnn.MultiRNNCell(cells=[lstm_cell,gru_cell])

    #静态rnn函数传入的是一个张量list  每一个元素都是一个(batch_size,n_input)大小的张量

    hiddens,states = tf.contrib.rnn.static_rnn(cell=mcell,inputs=input_x1,dtype=tf.float32)

    return hiddens,states

def multi_layer_dynamic_lstm(input_x,n_steps,n_hidden):

    '''

    返回动态多层LSTM单元的输出,以及cell状态

    args:

        input_x:输入张量  形状为[batch_size,n_steps,n_input]

        n_steps:时序总数

        n_hidden:LSTM单元输出的节点个数 即隐藏层节点数

    '''

    #可以看做3个隐藏层

    stacked_rnn = []

    for i in range(3):

        stacked_rnn.append(tf.contrib.rnn.LSTMCell(num_units=n_hidden))

    #多层RNN的实现 例如cells=[cell1,cell2],则表示一共有两层,数据经过cell1后还要经过cells

    mcell = tf.contrib.rnn.MultiRNNCell(cells=stacked_rnn)

    #动态rnn函数传入的是一个三维张量,[batch_size,n_steps,n_input]  输出也是这种形状

    hiddens,states = tf.nn.dynamic_rnn(cell=mcell,inputs=input_x,dtype=tf.float32)

    #注意这里输出需要转置  转换为时序优先的

    hiddens = tf.transpose(hiddens,[1,0,2])

    return hiddens,states

def multi_layer_dynamic_gru(input_x,n_steps,n_hidden):

    '''

    返回动态多层GRU单元的输出,以及cell状态

    args:

        input_x:输入张量 形状为[batch_size,n_steps,n_input]

        n_steps:时序总数

        n_hidden:gru单元输出的节点个数 即隐藏层节点数

    '''

    #可以看做3个隐藏层

    stacked_rnn = []

    for i in range(3):

        stacked_rnn.append(tf.contrib.rnn.GRUCell(num_units=n_hidden))

    #多层RNN的实现 例如cells=[cell1,cell2],则表示一共有两层,数据经过cell1后还要经过cells

    mcell = tf.contrib.rnn.MultiRNNCell(cells=stacked_rnn)

    #动态rnn函数传入的是一个三维张量,[batch_size,n_steps,n_input]  输出也是这种形状

    hiddens,states = tf.nn.dynamic_rnn(cell=mcell,inputs=input_x,dtype=tf.float32)

    #注意这里输出需要转置  转换为时序优先的

    hiddens = tf.transpose(hiddens,[1,0,2])

    return hiddens,states

def multi_layer_dynamic_mix(input_x,n_steps,n_hidden):

    '''

    返回动态多层GRU和LSTM混合单元的输出,以及cell状态

    args:

        input_x:输入张量 形状为[batch_size,n_steps,n_input]

        n_steps:时序总数

        n_hidden:gru单元输出的节点个数 即隐藏层节点数

    '''

    #可以看做2个隐藏层

    gru_cell = tf.contrib.rnn.GRUCell(num_units=n_hidden*2)

    lstm_cell = tf.contrib.rnn.LSTMCell(num_units=n_hidden)

    #多层RNN的实现 例如cells=[cell1,cell2],则表示一共有两层,数据经过cell1后还要经过cells

    mcell = tf.contrib.rnn.MultiRNNCell(cells=[lstm_cell,gru_cell])

    #动态rnn函数传入的是一个三维张量,[batch_size,n_steps,n_input]  输出也是这种形状

    hiddens,states = tf.nn.dynamic_rnn(cell=mcell,inputs=input_x,dtype=tf.float32)

    #注意这里输出需要转置  转换为时序优先的

    hiddens = tf.transpose(hiddens,[1,0,2])

    return hiddens,states

def  mnist_rnn_classfication(flag):

    '''

    对MNIST进行分类

    arg:

        flags:表示构建的RNN结构是哪种

            1:多层静态LSTM

            2: 多层静态GRU

            3:多层静态LSTM和GRU混合

            4:多层动态LSTM

            5: 多层动态GRU

            6: 多层动态LSTM和GRU混合

    '''

    '''

    1. 导入数据集

    '''

    tf.reset_default_graph()

    from tensorflow.examples.tutorials.mnist import input_data

    #mnist是一个轻量级的类,它以numpy数组的形式存储着训练,校验,测试数据集  one_hot表示输出二值化后的10维

    mnist = input_data.read_data_sets('MNIST-data',one_hot=True)

    print(type(mnist)) #<class 'tensorflow.contrib.learn.python.learn.datasets.base.Datasets'>

    print('Training data shape:',mnist.train.images.shape)           #Training data shape: (55000, 784)

    print('Test data shape:',mnist.test.images.shape)                #Test data shape: (10000, 784)

    print('Validation data shape:',mnist.validation.images.shape)    #Validation data shape: (5000, 784)

    print('Training label shape:',mnist.train.labels.shape)          #Training label shape: (55000, 10)

    '''

    2 定义参数,以及网络结构

    '''

    n_input = 28             #LSTM单元输入节点的个数

    n_steps = 28             #序列长度

    n_hidden = 128           #LSTM单元输出节点个数(即隐藏层个数)

    n_classes = 10           #类别

    batch_size = 128         #小批量大小

    training_step = 1000     #迭代次数

    display_step  = 200      #显示步数

    learning_rate = 1e-4     #学习率

    #定义占位符

    #batch_size:表示一次的批次样本数量batch_size  n_steps:表示时间序列总数  n_input:表示一个时序具体的数据长度  即一共28个时序,一个时序送入28个数据进入LSTM网络

    input_x = tf.placeholder(dtype=tf.float32,shape=[None,n_steps,n_input])

    input_y = tf.placeholder(dtype=tf.float32,shape=[None,n_classes])

    #可以看做隐藏层

    if  flag == 1:

        print('多层静态LSTM网络:')

        hiddens,states = multi_layer_static_lstm(input_x,n_steps,n_hidden)

    elif flag == 2:

        print('多层静态gru网络:')

        hiddens,states = multi_layer_static_gru(input_x,n_steps,n_hidden)

    elif flag == 3:

        print('多层静态LSTM和gru混合网络:')

        hiddens,states = multi_layer_static_mix(input_x,n_steps,n_hidden)

    elif  flag == 4:

        print('多层动态LSTM网络:')

        hiddens,states = multi_layer_dynamic_lstm(input_x,n_steps,n_hidden)

    elif flag == 5:

        print('多层动态gru网络:')

        hiddens,states = multi_layer_dynamic_gru(input_x,n_steps,n_hidden)

    elif flag == 6:

        print('多层动态LSTM和gru混合网络:')

        hiddens,states = multi_layer_dynamic_mix(input_x,n_steps,n_hidden)

    print('hidden:',hiddens[-1].shape)      #(128,128)

    #取LSTM最后一个时序的输出,然后经过全连接网络得到输出值

    output = tf.contrib.layers.fully_connected(inputs=hiddens[-1],num_outputs=n_classes,activation_fn = tf.nn.softmax)

    '''

    3 设置对数似然损失函数

    '''

    #代价函数 J =-(Σy.logaL)/n    .表示逐元素乘

    cost = tf.reduce_mean(-tf.reduce_sum(input_y*tf.log(output),axis=1))

    '''

    4 求解

    '''

    train = tf.train.AdamOptimizer(learning_rate).minimize(cost)

    #预测结果评估

    #tf.argmax(output,1)  按行统计最大值得索引

    correct = tf.equal(tf.argmax(output,1),tf.argmax(input_y,1))       #返回一个数组 表示统计预测正确或者错误

    accuracy = tf.reduce_mean(tf.cast(correct,tf.float32))             #求准确率

    #创建list 保存每一迭代的结果

    test_accuracy_list = []

    test_cost_list=[]

    with tf.Session() as sess:

        #使用会话执行图

        sess.run(tf.global_variables_initializer())   #初始化变量

        #开始迭代 使用Adam优化的随机梯度下降法

        for i in range(training_step):

            x_batch,y_batch = mnist.train.next_batch(batch_size = batch_size)

            #Reshape data to get 28 seq of 28 elements

            x_batch = x_batch.reshape([-1,n_steps,n_input])

            #开始训练

            train.run(feed_dict={input_x:x_batch,input_y:y_batch})

            if (i+1) % display_step == 0:

                 #输出训练集准确率

                training_accuracy,training_cost = sess.run([accuracy,cost],feed_dict={input_x:x_batch,input_y:y_batch})

                print('Step {0}:Training set accuracy {1},cost {2}.'.format(i+1,training_accuracy,training_cost))

        #全部训练完成做测试  分成200次,一次测试50个样本

        #输出测试机准确率   如果一次性全部做测试,内容不够用会出现OOM错误。所以测试时选取比较小的mini_batch来测试

        for i in range(200):

            x_batch,y_batch = mnist.test.next_batch(batch_size = 50)

            #Reshape data to get 28 seq of 28 elements

            x_batch = x_batch.reshape([-1,n_steps,n_input])

            test_accuracy,test_cost = sess.run([accuracy,cost],feed_dict={input_x:x_batch,input_y:y_batch})

            test_accuracy_list.append(test_accuracy)

            test_cost_list.append(test_cost)

            if (i+1)% 20 == 0:

                 print('Step {0}:Test set accuracy {1},cost {2}.'.format(i+1,test_accuracy,test_cost))

        print('Test accuracy:',np.mean(test_accuracy_list))

if __name__ == '__main__':

    mnist_rnn_classfication(1)    #1:多层静态LSTM

    mnist_rnn_classfication(2)    #2:多层静态gru

    mnist_rnn_classfication(3)    #3: 多层静态LSTM和gru混合网络:

    mnist_rnn_classfication(4)    #4:多层动态LSTM

    mnist_rnn_classfication(5)    #5:多层动态gru

    mnist_rnn_classfication(6)    #3: 多层动态LSTM和gru混合网络:
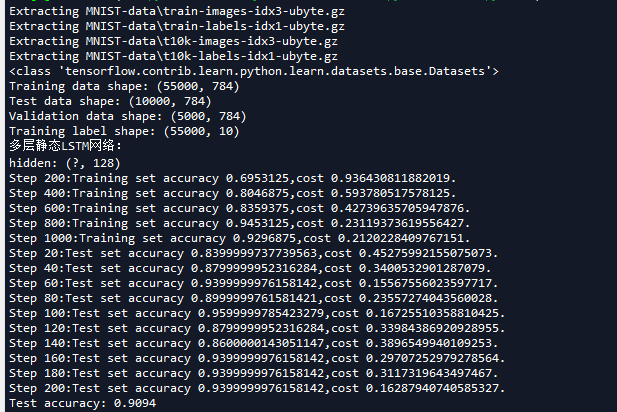
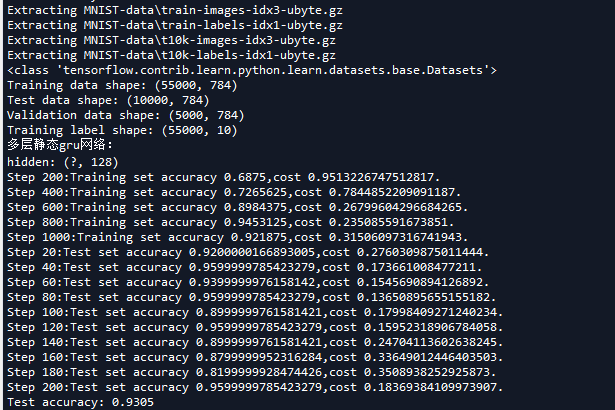
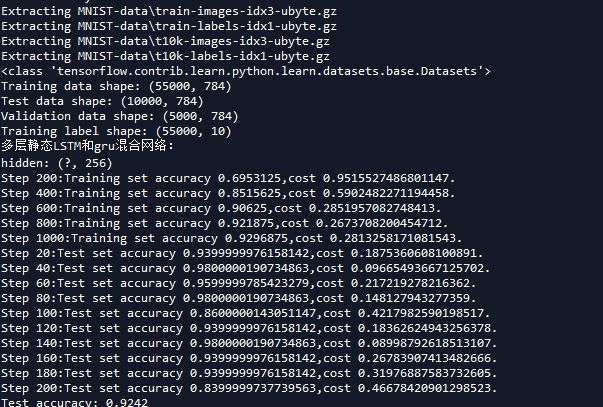
以上是部分截图...
八 Tensoflow实现双向RNN
# -*- coding: utf-8 -*-

"""

Created on Fri May 11 21:24:41 2018

@author: zy

"""

'''

使用TensorFlow库实现单层双向RNN  分别使用LSTM单元,GRU单元,static_rnn和dynamic_rnn函数

'''

import tensorflow as tf

import numpy as np

'''

构建双向RNN网络对MNIST数据集分类

'''

'''

MNIST数据集一个样本长度为28 x 28

我们可以把一个样本分成28个时间段,每段内容是28个值,然后送入LSTM或者GRU网络

我们设置隐藏层的节点数为128

'''

def single_layer_static_bi_lstm(input_x,n_steps,n_hidden):

    '''

    返回单层静态双向LSTM单元的输出,以及cell状态

    args:

        input_x:输入张量 形状为[batch_size,n_steps,n_input]

        n_steps:时序总数

        n_hidden:LSTM单元输出的节点个数 即隐藏层节点数

    '''

    #把输入input_x按列拆分,并返回一个有n_steps个张量组成的list 如batch_sizex28x28的输入拆成[(batch_size,28),((batch_size,28))....]

    #如果是调用的是静态rnn函数,需要这一步处理   即相当于把序列作为第一维度

    input_x1 = tf.unstack(input_x,num=n_steps,axis=1)

    #正向

    lstm_fw_cell = tf.contrib.rnn.BasicLSTMCell(num_units=n_hidden,forget_bias = 1.0)

    #反向

    lstm_bw_cell = tf.contrib.rnn.BasicLSTMCell(num_units=n_hidden,forget_bias = 1.0)

    #静态rnn函数传入的是一个张量list  每一个元素都是一个(batch_size,n_input)大小的张量  这里的输出hiddens是一个list 每一个元素都是前向输出,后向输出的合并

    hiddens,fw_state,bw_state = tf.contrib.rnn.static_bidirectional_rnn(cell_fw=lstm_fw_cell,cell_bw=lstm_bw_cell,inputs=input_x1,dtype=tf.float32)

    print('hiddens:\n',type(hiddens),len(hiddens),hiddens[0].shape,hiddens[1].shape)    #<class 'list'> 28 (?, 256) (?, 256)

    return hiddens,fw_state,bw_state

def single_layer_dynamic_bi_lstm(input_x,n_steps,n_hidden):

    '''

    返回单层动态双向LSTM单元的输出,以及cell状态

    args:

        input_x:输入张量 形状为[batch_size,n_steps,n_input]

        n_steps:时序总数

        n_hidden:gru单元输出的节点个数 即隐藏层节点数

    '''

     #正向

    lstm_fw_cell = tf.contrib.rnn.BasicLSTMCell(num_units=n_hidden,forget_bias = 1.0)

    #反向

    lstm_bw_cell = tf.contrib.rnn.BasicLSTMCell(num_units=n_hidden,forget_bias = 1.0)

    #动态rnn函数传入的是一个三维张量,[batch_size,n_steps,n_input]  输出是一个元组 每一个元素也是这种形状

    hiddens,state = tf.nn.bidirectional_dynamic_rnn(cell_fw=lstm_fw_cell,cell_bw=lstm_bw_cell,inputs=input_x,dtype=tf.float32)

    print('hiddens:\n',type(hiddens),len(hiddens),hiddens[0].shape,hiddens[1].shape)   #<class 'tuple'> 2 (?, 28, 128) (?, 28, 128)

    #按axis=2合并 (?,28,128) (?,28,128)按最后一维合并(?,28,256)

    hiddens = tf.concat(hiddens,axis=2)

    #注意这里输出需要转置  转换为时序优先的

    hiddens = tf.transpose(hiddens,[1,0,2])

    return hiddens,state

def multi_layer_static_bi_lstm(input_x,n_steps,n_hidden):

    '''

    返回多层静态双向LSTM单元的输出,以及cell状态

    args:

        input_x:输入张量 形状为[batch_size,n_steps,n_input]

        n_steps:时序总数

        n_hidden:LSTM单元输出的节点个数 即隐藏层节点数

    '''

    #把输入input_x按列拆分,并返回一个有n_steps个张量组成的list 如batch_sizex28x28的输入拆成[(batch_size,28),((batch_size,28))....]

    #如果是调用的是静态rnn函数,需要这一步处理   即相当于把序列作为第一维度

    input_x1 = tf.unstack(input_x,num=n_steps,axis=1)

    stacked_fw_rnn = []

    stacked_bw_rnn = []

    for i in range(3):

        #正向

        stacked_fw_rnn.append(tf.contrib.rnn.BasicLSTMCell(num_units=n_hidden,forget_bias = 1.0))

        #反向

        stacked_bw_rnn.append(tf.contrib.rnn.BasicLSTMCell(num_units=n_hidden,forget_bias = 1.0))

    #静态rnn函数传入的是一个张量list  每一个元素都是一个(batch_size,n_input)大小的张量 这里的输出hiddens是一个list 每一个元素都是前向输出,后向输出的合并

    hiddens,fw_state,bw_state = tf.contrib.rnn.stack_bidirectional_rnn(stacked_fw_rnn,stacked_bw_rnn,inputs=input_x1,dtype=tf.float32)

    print('hiddens:\n',type(hiddens),len(hiddens),hiddens[0].shape,hiddens[1].shape)    #<class 'list'> 28 (?, 256) (?, 256)

    return hiddens,fw_state,bw_state

def multi_layer_dynamic_bi_lstm(input_x,n_steps,n_hidden):

    '''

    返回多层动态双向LSTM单元的输出,以及cell状态

    args:

        input_x:输入张量 形状为[batch_size,n_steps,n_input]

        n_steps:时序总数

        n_hidden:gru单元输出的节点个数 即隐藏层节点数

    '''

    stacked_fw_rnn = []

    stacked_bw_rnn = []

    for i in range(3):

        #正向

        stacked_fw_rnn.append(tf.contrib.rnn.BasicLSTMCell(num_units=n_hidden,forget_bias = 1.0))

        #反向

        stacked_bw_rnn.append(tf.contrib.rnn.BasicLSTMCell(num_units=n_hidden,forget_bias = 1.0))

    tf.contrib.rnn.MultiRNNCell

    #动态rnn函数传入的是一个三维张量,[batch_size,n_steps,n_input]  输出也是这种形状,n_input变成了正向和反向合并之后的 即n_input*2

    hiddens,fw_state,bw_state = tf.contrib.rnn.stack_bidirectional_dynamic_rnn(stacked_fw_rnn,stacked_bw_rnn,inputs=input_x,dtype=tf.float32)

    print('hiddens:\n',type(hiddens),hiddens.shape)   # <class 'tensorflow.python.framework.ops.Tensor'> (?, 28, 256)

    #注意这里输出需要转置  转换为时序优先的

    hiddens = tf.transpose(hiddens,[1,0,2])

    return hiddens,fw_state,bw_state

def  mnist_rnn_classfication(flag):

    '''

    对MNIST进行分类

    arg:

        flags:表示构建的RNN结构是哪种

            1:单层静态双向LSTM

            2: 单层动态双向LSTM

            3:多层静态双向LSTM

            4: 多层动态双向LSTM

    '''

    '''

    1. 导入数据集

    '''

    tf.reset_default_graph()

    from tensorflow.examples.tutorials.mnist import input_data

    #mnist是一个轻量级的类,它以numpy数组的形式存储着训练,校验,测试数据集  one_hot表示输出二值化后的10维

    mnist = input_data.read_data_sets('MNIST-data',one_hot=True)

    print(type(mnist)) #<class 'tensorflow.contrib.learn.python.learn.datasets.base.Datasets'>

    print('Training data shape:',mnist.train.images.shape)           #Training data shape: (55000, 784)

    print('Test data shape:',mnist.test.images.shape)                #Test data shape: (10000, 784)

    print('Validation data shape:',mnist.validation.images.shape)    #Validation data shape: (5000, 784)

    print('Training label shape:',mnist.train.labels.shape)          #Training label shape: (55000, 10)

    '''

    2 定义参数,以及网络结构

    '''

    n_input = 28             #LSTM单元输入节点的个数

    n_steps = 28             #序列长度

    n_hidden = 128           #LSTM单元输出节点个数(即隐藏层个数)

    n_classes = 10           #类别

    batch_size = 128         #小批量大小

    training_step = 1000     #迭代次数

    display_step  = 200      #显示步数

    learning_rate = 1e-4     #学习率

    #定义占位符

    #batch_size:表示一次的批次样本数量batch_size  n_steps:表示时间序列总数  n_input:表示一个时序具体的数据长度  即一共28个时序,一个时序送入28个数据进入LSTM网络

    input_x = tf.placeholder(dtype=tf.float32,shape=[None,n_steps,n_input])

    input_y = tf.placeholder(dtype=tf.float32,shape=[None,n_classes])

    #可以看做隐藏层

    if  flag == 1:

        print('单层静态双向LSTM网络:')

        hiddens,fw_state,bw_state = single_layer_static_bi_lstm(input_x,n_steps,n_hidden)

    elif flag == 2:

        print('单层动态双向LSTM网络:')

        hiddens,bw_state = single_layer_dynamic_bi_lstm(input_x,n_steps,n_hidden)

    elif flag == 3:

        print('多层静态双向LSTM网络:')

        hiddens,fw_state,bw_state = multi_layer_static_bi_lstm(input_x,n_steps,n_hidden)

    elif  flag == 4:

        print('多层动态双向LSTM网络:')

        hiddens,fw_state,bw_state = multi_layer_dynamic_bi_lstm(input_x,n_steps,n_hidden)

    #取LSTM最后一个时序的输出,然后经过全连接网络得到输出值

    output = tf.contrib.layers.fully_connected(inputs=hiddens[-1],num_outputs=n_classes,activation_fn = tf.nn.softmax)

    '''

    3 设置对数似然损失函数

    '''

    #代价函数 J =-(Σy.logaL)/n    .表示逐元素乘

    cost = tf.reduce_mean(-tf.reduce_sum(input_y*tf.log(output),axis=1))

    '''

    4 求解

    '''

    train = tf.train.AdamOptimizer(learning_rate).minimize(cost)

    #预测结果评估

    #tf.argmax(output,1)  按行统计最大值得索引

    correct = tf.equal(tf.argmax(output,1),tf.argmax(input_y,1))       #返回一个数组 表示统计预测正确或者错误

    accuracy = tf.reduce_mean(tf.cast(correct,tf.float32))             #求准确率

    #创建list 保存每一迭代的结果

    test_accuracy_list = []

    test_cost_list=[]

    with tf.Session() as sess:

        #使用会话执行图

        sess.run(tf.global_variables_initializer())   #初始化变量

        #开始迭代 使用Adam优化的随机梯度下降法

        for i in range(training_step):

            x_batch,y_batch = mnist.train.next_batch(batch_size = batch_size)

            #Reshape data to get 28 seq of 28 elements

            x_batch = x_batch.reshape([-1,n_steps,n_input])

            #开始训练

            train.run(feed_dict={input_x:x_batch,input_y:y_batch})

            if (i+1) % display_step == 0:

                 #输出训练集准确率

                training_accuracy,training_cost = sess.run([accuracy,cost],feed_dict={input_x:x_batch,input_y:y_batch})

                print('Step {0}:Training set accuracy {1},cost {2}.'.format(i+1,training_accuracy,training_cost))

        #全部训练完成做测试  分成200次,一次测试50个样本

        #输出测试机准确率   如果一次性全部做测试,内容不够用会出现OOM错误。所以测试时选取比较小的mini_batch来测试

        for i in range(200):

            x_batch,y_batch = mnist.test.next_batch(batch_size = 50)

            #Reshape data to get 28 seq of 28 elements

            x_batch = x_batch.reshape([-1,n_steps,n_input])

            test_accuracy,test_cost = sess.run([accuracy,cost],feed_dict={input_x:x_batch,input_y:y_batch})

            test_accuracy_list.append(test_accuracy)

            test_cost_list.append(test_cost)

            if (i+1)% 20 == 0:

                 print('Step {0}:Test set accuracy {1},cost {2}.'.format(i+1,test_accuracy,test_cost))

        print('Test accuracy:',np.mean(test_accuracy_list))

if __name__ == '__main__':

    mnist_rnn_classfication(1)    #1:单层静态双向LSTM网络:

    mnist_rnn_classfication(2)    #2:单层动态双向LSTM网络:

    mnist_rnn_classfication(3)    #3: 多层静态双向LSTM网络:

    mnist_rnn_classfication(4)    #4:多层动态双向LSTM网络:
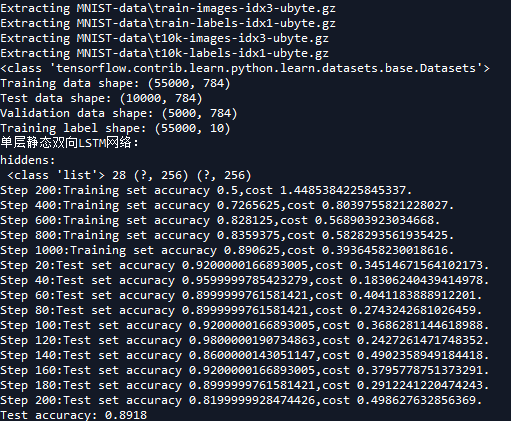
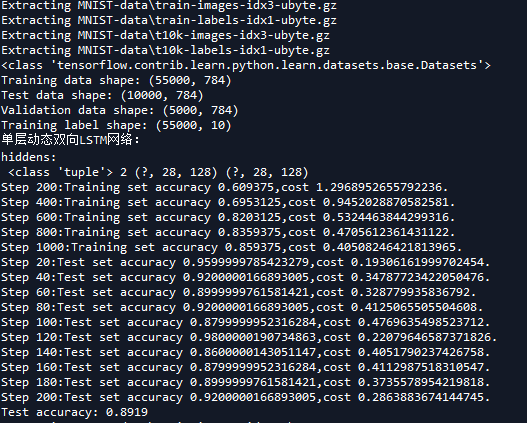
以上是部分截图....
参考文献
[1]LSTM模型与前向反向传播算法、
第二十一节,使用TensorFlow实现LSTM和GRU网络的更多相关文章
- centos LAMP第三部分php,mysql配置 php配置文件 配置php的error_log 配置php的open_basedir 安装php的扩展模块 phpize mysql配置第二十一节课
centos LAMP第三部分php,mysql配置 php配置文件 配置php的error_log 配置php的open_basedir 安装php的扩展模块 phpize mysql配 ...
- 风炫安全WEB安全学习第二十一节课 存储型XSS讲解
风炫安全WEB安全学习第二十一节课 存储型XSS讲解 存储型XSS演示 存储型XSS,持久化,代码是存储在服务器中的,如在个人信息或发表文章等地方,加入代码,如果没有过滤或过滤不严,那么这些代码将储存 ...
- 第二十一节:ADO层次上的海量数据处理方案(SqlBulkCopy类插入和更新)
一. 简介 1. 背景: 虽然前面EF的扩展插件Z.EntityFramework.Extensions,性能很快,而且也很方便,但是该插件要收费,使用免费版本的话,需要定期更新,如果不更新,将失效, ...
- [ExtJS5学习笔记]第二十一节 Extjs5中使用config配置给ext.widget或者create方法传递参数
本文地址:http://blog.csdn.net/sushengmiyan/article/details/39252805 官方例子:http://docs.sencha.com/extjs/5. ...
- 第二十一节:Java语言基础-关键字,标识符,注释,常量和变量,运算符
Java语言基础-关键字,标识符,注解,常量和变量,运算符 class Demo { public static void main(String[] args){ System.out.printl ...
- 【php增删改查实例】第二十一节 - 用户修改功能
19.1 添加用户修改的按钮 打开userManage.html,找到新增按钮的地方: 我们不难发现,编辑按钮就差不多应该在新建用户的右边. 那么,假如我现在是新人,对这个项目本身就不太熟悉,那么我得 ...
- php第二十一节课
AJAX <!DOCTYPE html PUBLIC "-//W3C//DTD XHTML 1.0 Transitional//EN" "http://www.w3 ...
- 第二十一节:Asp.Net Core MVC和WebApi路由规则的总结和对比
一. Core Mvc 1.传统路由 Core MVC中,默认会在 Startup类→Configure方法→UseMvc方法中,会有默认路由:routes.MapRoute("defaul ...
- 十 | 门控循环神经网络LSTM与GRU(附python演练)
欢迎大家关注我们的网站和系列教程:http://panchuang.net/ ,学习更多的机器学习.深度学习的知识! 目录: 门控循环神经网络简介 长短期记忆网络(LSTM) 门控制循环单元(GRU) ...
随机推荐
- 怎样利用ADO中的adoquery进行缓存更新?????(100分)
我用BDE时,用query与updatesql相结合进行缓存更新,但是在ADO中没有updatesql,只有用adoquery,在DBGRID中,用CANCELUPADTE,只能取消一条记录,烦恼不已 ...
- 数据库迁移(创建关联等操作) Target database is not up to date报错
使用Mysql-sqlalchemy执行数据库迁移 来更新数据库: 队长试探性的在网上找了几种方案 依然没有解决报错问题: 后来看了https://www.aliyun.com/jiaocheng/4 ...
- iis7.0 发生未知 FastCGI错误,错误代码 0x8007010b 的解决办法
错误提示 修改该网站所对应的应用程序池 进程模型->标识 修改为:LocalSystem
- 如何调用layer.open打开的的iframe窗口中的JS
- LODOP设置打印机不存在不打印
LODOP中打印机的选择有优先级的存在,如果程序中指定的是错误的打印机,那么会走下一个优先级,这样,就可能存在选择了打印机无效,从默认打印机打印出来了,可以在代码里加判断避免这一点. 打印机优先级简介 ...
- c++ 实现拓扑排序
要简洁大方地实现拓扑排序,首先要了解两个标准模板 std::queue 和 std::vector 1 queue 添加头文件 #include<queue> 定义一个int类型的队列 q ...
- P1308 统计单词数
P1308 题目描述 一般的文本编辑器都有查找单词的功能,该功能可以快速定位特定单词在文章中的位置,有的还能统计出特定单词在文章中出现的次数. 现在,请你编程实现这一功能,具体要求是:给定一个单词,请 ...
- CF558E-A Simple Task-线段树+计数排序
计数排序的原理,只要知道了有几个数比i小,就可以知道i的位置 这道题只有26个字母,搞26颗线段树,然后区间更新 #include <cstdio> #include <cstrin ...
- Elasticsearch 中数据类型 text 与 keyword 的区别
随着ElasticSearch 5.X 系列的到来, 同时也迎来了该版本的重大特性之一: 移除了string类型. 这个变动的根本原因是string类型会给我们带来很多困惑: 因为ElasticSea ...
- 【XSY2759】coin DP 线性插值
题目描述 有\(n\)种面值不同的硬币,每种有无限个,且任意两个\((x,y)\)要么\(x\)是\(y\)的倍数,要么\(y\)是\(x\)的倍数. 你要取\(m\)元钱,问你有多少种不同的取法. ...
