Android : App客户端与后台服务的AIDL通信以及后台服务的JNI接口实现
一、APP客户端进程与后台服务进程的AIDL通信
AIDL(Android Interface definition language-“接口定义语言”) 是 Android 提供的一种进程间通信 (IPC:Inter-Process Communication) 机制,支持的数据类型:
1. Java 的原生类型;
2. String 和CharSequence;
3. List 和 Map ,List和Map 对象的元素必须是AIDL支持的数据类型; 以上三种类型都不需要导入(import);
4. AIDL 自动生成的接口 需要导入(import);
5. 实现android.os.Parcelable 接口的类. 需要导入(import)。
Android studio工程建立如下:
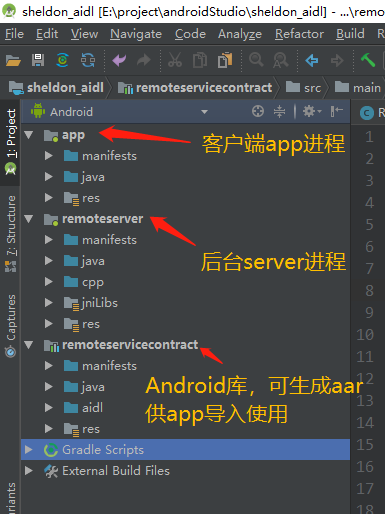
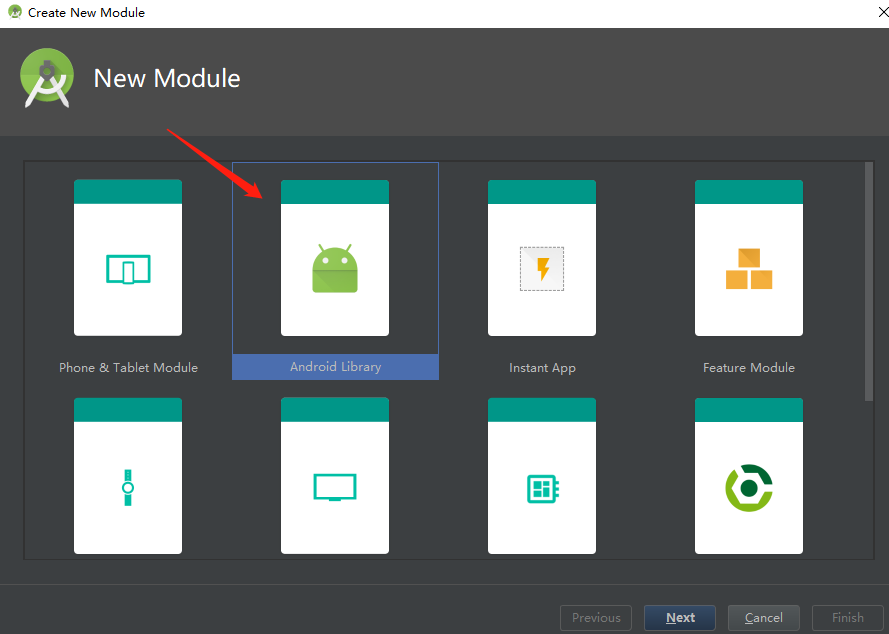
app和remoteserver按常规应用建立,remoteservicecontract通过新建Android Library生成:

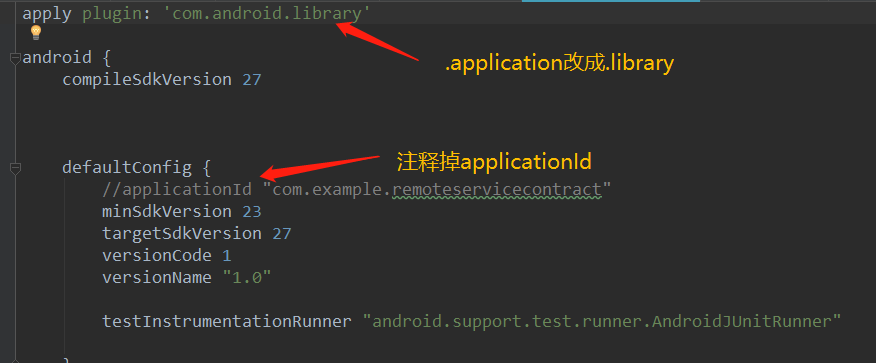
也可以将原本的应用模块改成库模块:
然后在remoteservicecontract建立aidl目录并新建AIDL文件:
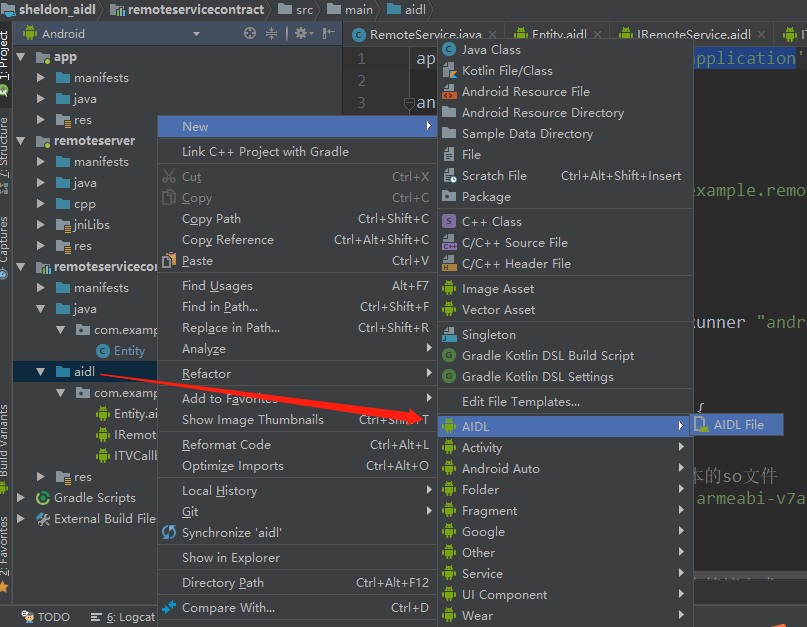
建立如下三个AIDL接口:
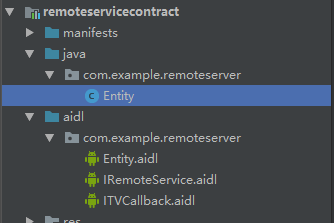
aidl文件的声明和java实现如下:
(1)Entity.aidl 是声明本地实现的 android.os.Parcelable 接口的类
// Entity.aidl

package com.example.remoteserver;

parcelable Entity;
java实现:
package com.example.remoteserver;

import android.os.Parcel;

import android.os.Parcelable;

import android.util.Log;

public class Entity implements Parcelable {

    private int age;

    private String name;

    private final String TAG = "Engity";

    public Entity() {

    }

    public Entity(int age, String name) {

        Log.i(TAG,"new age="+age+",name="+name);

        this.age = age;

        this.name = name;

    }

    protected Entity(Parcel in) {

        age = in.readInt();

        name = in.readString();

    }

    public static final Creator<Entity> CREATOR = new Creator<Entity>() {

        @Override

        public Entity createFromParcel(Parcel in) {

            return new Entity(in);

        }

        @Override

        public Entity[] newArray(int size) {

            return new Entity[size];

        }

    };

    public int getAge() {

        Log.i(TAG,"get age="+age);

        return this.age;

    }

    public void setAge(int age) {

        Log.i(TAG,"set age="+age);

        this.age = age;

    }

    public String getName() {

        Log.i(TAG,"get name="+name);

        return this.name;

    }

    public void setName(String name) {

        Log.i(TAG,"set name="+name);

        this.name = name;

    }

    @Override

    public int describeContents() {

        return 0;

    }

    @Override

    public void writeToParcel(Parcel dest, int flags) {

        dest.writeInt(age);

        dest.writeString(name);

    }

    @Override

    public String toString() {

        return String.format("age=%s, name=%s", getAge(), getName());

    }

}
(2)IRemoteService.aidl声明服务端供客户端调用的接口:
// IRemoteService.aidl

package com.example.remoteserver;

import com.example.remoteserver.Entity;

import com.example.remoteserver.ITVCallback;

// Declare any non-default types here with import statements

interface IRemoteService {

    void doSomeThing(int anInt,String aString);

    void addEntity(in Entity entity);

    void setEntity(int index,in Entity entity);

    List<Entity> getEntity();

    void asyncCallSomeone( String para, ITVCallback callback);

}
java实现:
package com.example.remoteserver;

import android.Manifest;

import android.app.Service;import android.content.Context;

import android.content.Intent;

import android.content.pm.PackageManager;

import android.location.LocationManager;

import android.os.Build;

import android.os.Handler;

import android.os.IBinder;

import android.os.Looper;

import android.os.RemoteCallbackList;

import android.os.RemoteException;

import android.provider.Settings;

import android.support.annotation.Nullable;

import android.support.v4.content.ContextCompat;

import android.util.Log;

import android.view.LayoutInflater;

import android.view.View;

import android.view.ViewGroup;

import android.widget.BaseAdapter;

import android.widget.Toast;

import java.nio.ByteBuffer;

import java.util.ArrayList;

import java.util.List;

public class RemoteService extends Service {

    public static final String TAG = "RemoteService";

    private List<Entity> data = new ArrayList<Entity>();
   int mStartMode;       // indicates how to behave if the service is killed

    final RemoteCallbackList<ITVCallback> remoteCallbackList = new RemoteCallbackList<>();

    public void onCreate() {

        // Used to load the 'native-lib' library on application startup.

        System.loadLibrary("RemoteServiceJNI"); //加载native接口的c库

        pthreadState = true;

        DataThread datathread = new DataThread();

        datathread.start();

        Nano_Printf("service onCreate");

        Nano_Printf(String.format("<%s>",stringFromJNI())); //调用JNI接口

    }

    public int onStartCommand(Intent intent, int flags, int startId) {

        Nano_Printf("service onStartCommand");

        return mStartMode;

    }

    /*返回Binder对象实例*/

    public IBinder onBind(Intent intent) {

        Nano_Printf("service on bind,intent = %s",intent.toString());

        return binder;

    }

    public void onDestroy() {

        Nano_Printf("service onDestroy");

        pthreadState = false;

        // 取消掉所有的回调

        remoteCallbackList.kill();

    }

    private void Nano_Printf(String...args) {

        String str = "";

        for(int i = 0; i < args.length; i++){

            str +=  args[i];

            if( i != args.length - 1){

                str += ", ";

            }

        }

        Log.d(TAG, str);

    }


   /*生成的 Binder 对象实例,实现接口定义的方法*/

    private final IRemoteService.Stub binder = new IRemoteService.Stub() {

        @Override

        public void doSomeThing(int anInt, String aString) throws RemoteException {

            Log.i(TAG, String.format("rcv:%s, %s", anInt, aString));

        }

        @Override

        public void addEntity(Entity entity) throws RemoteException {

            Log.i(TAG, String.format("rcv:entity = %s", entity));

            data.add(entity);

        }

        @Override

        public List<Entity> getEntity() throws RemoteException {

            Log.i(TAG, String.format("get:List<Entity> = %s", data));

            return data;

        }

        public void setEntity(int index, Entity entity) throws RemoteException {

            Log.i(TAG, String.format("set:entity[%d] = %s", index, entity));

            data.set(index, entity);

        }

        @Override
     /*客户端调用asyncCallSomeone接口并传过来callback实例,服务端注册callback并回调修改结果*/

        public void asyncCallSomeone(String para, ITVCallback callback) throws RemoteException {

            Log.i(TAG, String.format("asyncCallSomeone..."));

            remoteCallbackList.register(callback);

            final int len = remoteCallbackList.beginBroadcast();

            for (int i = 0; i < len; i++) {

                remoteCallbackList.getBroadcastItem(i).onSuccess(para + "_callbck");

            }

            remoteCallbackList.finishBroadcast();

        }

    };

    /*native interface*/

    public native String   stringFromJNI();

}
(3)ITVCallback.aidl声明客户端向服务端注册的回调接口:
// Callback.aidl

package com.example.remoteserver;

// Declare any non-default types here with import statements

interface ITVCallback {

    /**

     * Demonstrates some basic types that you can use as parameters

     * and return values in AIDL.

     */

    void onSuccess(String aString);

}
app客户端Java实现:
package com.example.administrator.sheldon_aidl;

import android.content.ComponentName;
import android.content.Context;
import android.content.Intent;
import android.content.ServiceConnection;
import android.nfc.Tag;
import android.os.IBinder;
import android.os.Looper;
import android.os.RemoteException;
import android.support.v7.app.AppCompatActivity;
import android.os.Bundle;
import android.util.Log;
import android.view.View;
import android.widget.Toast;

/*导入资源库中AIDL定义的类*/
import com.example.remoteserver.Entity;
import com.example.remoteserver.ITVCallback;
import com.example.remoteserver.IRemoteService;

import java.util.List;

public class MainActivity extends AppCompatActivity {

    private boolean mBound = false;
    private IRemoteService iRemoteService;

    @Override
    protected void onCreate(Bundle savedInstanceState) {
        super.onCreate(savedInstanceState);
        setContentView(R.layout.activity_main);
findViewById(R.id.add).setOnClickListener(new View.OnClickListener() {
    @Override
    public void onClick(View v) {
        if (!mBound) {
            alert("未连接到远程服务");
            return;
        }
        try {
            Entity entity = new Entity(100, "sheldon");
            if (iRemoteService != null){
                iRemoteService.addEntity(entity); //调用服务端的接口添加成员变量

                iRemoteService.registerCallBack(mCallback);
            }

        } catch (RemoteException e) {
            e.printStackTrace();
        }
    }
});
        findViewById(R.id.modify).setOnClickListener(new View.OnClickListener() {
            @Override
            public void onClick(View v) {
                if (!mBound) {
                    alert("未连接到远程服务");
                    return;
                }

                if (iRemoteService != null) {
                    try {
                        List<Entity> entityList = iRemoteService.getEntity();
                        int pos = 1;
                        if(entityList.size()>pos){
                            entityList.get(pos).setAge(1314);
                            entityList.get(pos).setName("li");
                            iRemoteService.setEntity(pos,entityList.get(pos)); //调用服务端的接口修改成员变量
                        }
                    } catch (RemoteException e) {
                        e.printStackTrace();
                    }
                }
            }
        });

        findViewById(R.id.callback).setOnClickListener(new View.OnClickListener() {
            @Override
            public void onClick(View v) {
                if (!mBound) {
                    alert("未连接到远程服务");
                    return;
                }

                if (iRemoteService != null) {
                    try {
                        final String para = "canshu";
                        iRemoteService.asyncCallSomeone(para, mCallback); //调用服务端的接口并传入回调
                    } catch (RemoteException e) {
                        e.printStackTrace();
                    }
                }
            }
        });
    }

    private void alert(String str) {
        //解决在子线程中调用Toast的异常情况处理(还是有异常)
        //Looper.prepare();
        Toast.makeText(this, str, 0).show();
        //Looper.loop();
    }

    @Override
    protected void onStart() {
        super.onStart();
        if (!mBound) {
            attemptToBindService();    // 尝试绑定服务
        }
    }

    @Override
    protected void onStop() {
        super.onStop();
        if (mBound) {
            unbindService(mServiceConnection); // 解绑服务
            mBound = false;
        }
    }

    /**
     * 尝试与服务端建立连接
     */
    private void attemptToBindService() {
        Intent intent = new Intent();
        intent.setAction("com.example.REMOTE.myserver"); //这里的action由..\remoteserver\src\main\AndroidManifest.xml中指定
        intent.setPackage("com.example.remoteserver");  //这里即为服务端进程包名
        bindService(intent, mServiceConnection, Context.BIND_AUTO_CREATE);
    }

  /*实现 ServiceConnection 接口,在其中拿到IRemoteService AIDL类*/
    private ServiceConnection mServiceConnection = new ServiceConnection() {
        @Override
        public void onServiceConnected(ComponentName name, IBinder service) {
            Log.i(getLocalClassName(), "service connected");
            iRemoteService = IRemoteService.Stub.asInterface(service);

            mBound = true;

            if (iRemoteService != null) {
                try {
                    iRemoteService.doSomeThing(0, "anything string");
                } catch (RemoteException e) {
                    e.printStackTrace();
                }
            }
        }

        @Override
        public void onServiceDisconnected(ComponentName name) {
            Log.i(getLocalClassName(), "service disconnected");
            mBound = false;
        }
    };

    /*实现callback接口*/
    private ITVCallback mCallback = new ITVCallback.Stub() {
        @Override
        public void onSuccess(String aString) throws RemoteException {  //回调接口被服务端调用,获得结果并用Toast显示
            Log.d("nano-client ", String.format("service arrived %s",aString));
            alert(String.format("回调: %s", aString));
        }
    };
}
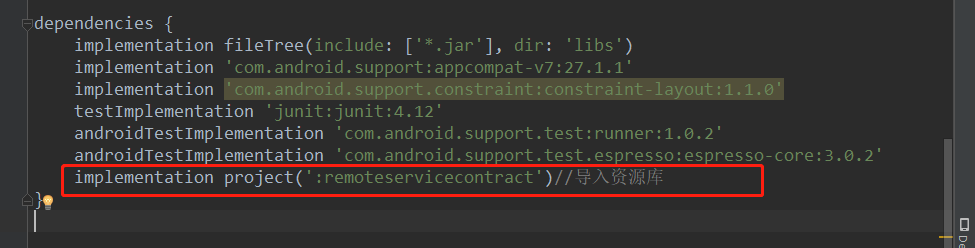
客户端和服务端的通信AIDL接口定义在remoteservicecontract库中,需要在各模块导入使用,
如果各模块在同一个Android Studio工程开发,可通过修改build.gradle直接应用:
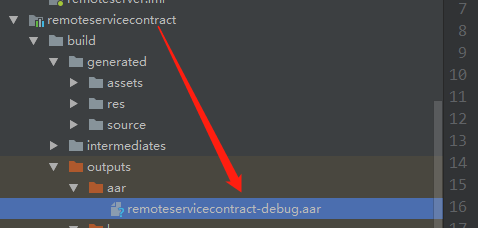
也可以将生成的aar,提供给另一个工程导入使用:

二、后台服务的JNI接口实现:
目录结构如下:
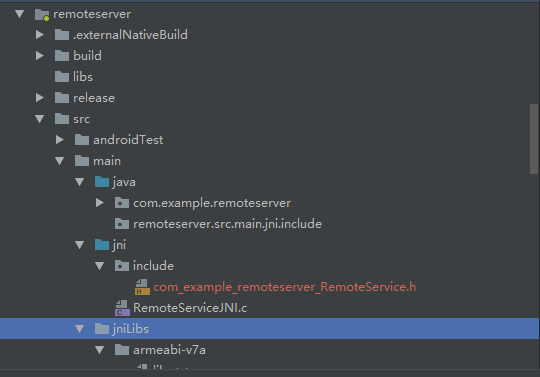
1.声明native方法,如 RemoteService.java 中声明的:
    /*native interface*/

    public native String   stringFromJNI();
2.通过javah生成native格式的头文件 com_example_remoteserver_RemoteService.h:

javah -d 【头文件生成路径】 -classpath 【java文件路径】-jni 【包名.类名】
/* DO NOT EDIT THIS FILE - it is machine generated */

#include <jni.h>

/* Header for class com_example_remoteserver_RemoteService */

#ifndef _Included_com_example_remoteserver_RemoteService

#define _Included_com_example_remoteserver_RemoteService

#ifdef __cplusplus

extern "C" {

#endif

/*

 * Class:     com_example_remoteserver_RemoteService

 * Method:    stringFromJNI

 * Signature: ()Ljava/lang/String;
*/
JNIEXPORT jstring JNICALL Java_com_example_remoteserver_RemoteService_stringFromJNI

  (JNIEnv *, jobject);

#ifdef __cplusplus

}

#endif

#endif
3.根据生成的jni头文件建立 RemoteServiceJNI.c 文件实现其接口:
#include <jni.h>

#include <string.h>

#include <android/log.h>

#define TAG "nano-jni"

#define LOGD(...) __android_log_print(ANDROID_LOG_DEBUG,TAG ,__VA_ARGS__)

#define LOGI(...) __android_log_print(ANDROID_LOG_INFO,TAG ,__VA_ARGS__)

#define LOGW(...) __android_log_print(ANDROID_LOG_WARN,TAG ,__VA_ARGS__)

#define LOGE(...) __android_log_print(ANDROID_LOG_ERROR,TAG ,__VA_ARGS__)

#define LOGF(...) __android_log_print(ANDROID_LOG_FATAL,TAG ,__VA_ARGS__)

#ifdef __cplusplus

extern "C" {

#endif

/*

 * Class:     com_example_remoteserver_RemoteService

 * Method:    stringFromJNI

 * Signature: ()Ljava/lang/String;
参数说明:
    Native的对应函数名要以“Java_”开头,后面依次跟上Java的“package名”、“class名”、“函数名”,中间以下划线“_” 分割,在package名中的“.”也要改为“_”。
关于函数的参数和返回值也有相应的规则。对于Java中的基本类型如int 、double 、char 等,
在Native端都有相对应的类型来表示,如jint 、jdouble 、jchar 等;其他的对象类型则统统由jobject 来表示,
(String 是个例外,由于其使用广泛,故在Native代码中有jstring 这个类型来表示)。
而对于Java中的数组,在Native中由jarray 对应,具体到基本类型和一般对象类型的数组则有jintArray 等
和jobjectArray 分别对应(String 数组在这里没有例外,同样用jobjectArray 表示)。
另外在JNI的Native函数中,其前两个参数JNIEnv *和jobject 是必需的,前者是一个JNIEnv 结构体的指针,这个结构体中定义了很多JNI的接口函数指针,
使开发者可以使用JNI所定义的接口功能;后者指代的是调用这个JNI函数的Java对象,有点类似于C++中的this 指针。
在上述两个参数之后,还需要根据Java端的函数声明依次对应添加参数,如下Java中声明的JNI函数没有参数,则Native的对应函数只有类型为JNIEnv *和jobject 的两个参数。
*/

JNIEXPORT jstring JNICALL Java_com_example_remoteserver_RemoteService_stringFromJNI

  (JNIEnv *env, jobject thiz){

    return (*env)->NewStringUTF(env, "Hi! Sheldon, I`m JNI ~");

  }

#ifdef __cplusplus

}

#endif
4.编译c文件生成so:
Android studio 的gradle3.0版本以下可以配置NDK编译c/cpp文件:
修改对应模块的build.gradle在defaultConfig中添加:
//gradle3.0以上已经不支持该方式

 ndk {

     moduleName "libRemoteServiceJNI"            //指定生成的so文件名

     ldLibs     "log", "z", "m"                  //添加log库

     abiFilters "armeabi", "armeabi-v7a", "x86"  //支持cpu的类型

 }
而gradle3.0以上版本需要用CMake工具编译:
首先Android studio安装CMake工具:
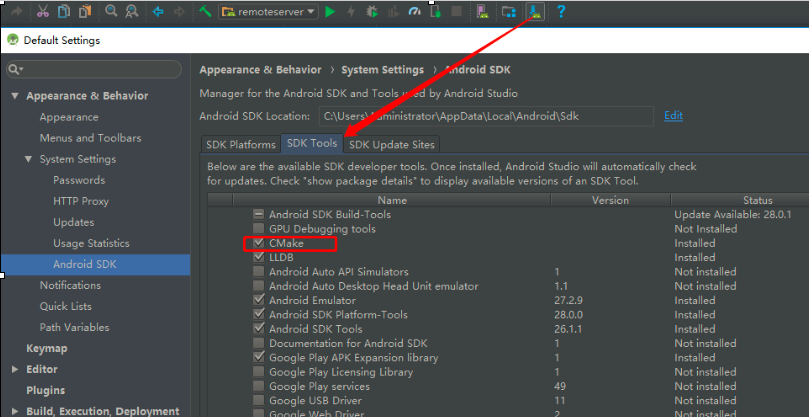
然后同样在defaultConfig{}中添加编译参数:
        // 使用Cmake工具

        externalNativeBuild {

            cmake {

                cppFlags ""

                //生成多个版本的so文件

                abiFilters 'armeabi-v7a' //,'arm64-v8a','x86','x86_64'

            }

        }
另外在defaultConfig{}的外一层即android{}中配置编译脚本的路径:
    // 配置CMakeLists.txt路径

    externalNativeBuild {

        cmake {

            path "CMakeLists.txt" //编译脚本

        }

    }
比较关键的是CMakeLists.txt编译脚本,具体内容如下:
###############################

#.cmake verson,指定cmake版本

cmake_minimum_required(VERSION 3.4.)

#.C++ 的编译选项是 CMAKE_CXX_FLAGS

# 指定编译参数,可选

#SET(CMAKE_C_FLAGS "-Wno-error=format-security -Wno-error=pointer-sign")

#.设置cmake生成so输出的路径

set(CMAKE_LIBRARY_OUTPUT_DIRECTORY ${CMAKE_SOURCE_DIR}/src/main/jniLibs/${ANDROID_ABI})

#.包含头文件,导入第三方动态库

include_directories(

${CMAKE_SOURCE_DIR}/src/main/jni/include

)

#.指定源文件和编译生成so名及类型

# 生成在intermediates/cmake/和以上指定的目录下(指定的话build.gradle设置pickFirst避免冲突)

add_library(RemoteServiceJNI SHARED

${CMAKE_SOURCE_DIR}/src/main/jni/RemoteServiceJNI.c)

#.设置需要生成so的第三方链接库

target_link_libraries(

RemoteServiceJNI

log

android

)

#添加子目录,将会调用子目录中的CMakeLists.txt

#ADD_SUBDIRECTORY(one)

#ADD_SUBDIRECTORY(two)

###############################
配置好编译环境后,点击make project生成so在remoteserver\build\intermediates\cmake\debug\obj\armeabi-v7a\libRemoteServiceJNI.so
在java中加载调用即可:

如果遇到: More than one file was found with OS independent path 'lib/armeabi-v7a/xxx.so' 的报错,则在build.gradle中的android {}里添加:
    packagingOptions { //For Error: More than one file was found with OS independent path

        pickFirst 'lib/armeabi-v7a/libnano_socket.so'

        pickFirst 'lib/armeabi-v7a/libRemoteServiceJNI.so'

    }
完整工程已上传到GitHub: https://github.com/dragonforgithub/sheldon_aidl.git
Android : App客户端与后台服务的AIDL通信以及后台服务的JNI接口实现的更多相关文章
- Android App加固原理与技术历程
App为什么会被破解入侵 随着黑客技术的普及化平民化,App,这个承载我们移动数字工作和生活的重要工具,不仅是黑客眼中的肥肉,也获得更多网友的关注.百度一下"App破解"就有529 ...
- eShopOnContainers 看微服务⑤:消息通信
1.消息通信 传统的单体应用,组件间的调用都是使用代码级的方法函数.比如用户登录自动签到,增加积分.我们可以在登录函数调用积分模块的某个函数,为了解耦我们使用以来注入并放弃new Class()这种方 ...
- “快的打车”创始人陈伟星的新项目招人啦,高薪急招Java服务端/Android/Ios 客户端研发工程师/ mysql DBA/ app市场推广专家,欢迎大家加入我们的团队! - V2EX
"快的打车"创始人陈伟星的新项目招人啦,高薪急招Java服务端/Android/Ios 客户端研发工程师/ mysql DBA/ app市场推广专家,欢迎大家加入我们的团队! - ...
- Android服务之AIDL
在android开发过程中,为了让其他的应用程序,也可以访问本应用程序的服务,android系统采用远程过程调用来实现.android通过接口来公开定义的服务.我们将能够夸进程访问的服务成为AIDL服 ...
- Android -- service的开启方式, start开启和绑定开启服务,调用服务的的方法, aidl调用远程服务
1. 概述 bindService() 绑定服务 可以得到服务的代理人对象,间接调用服务里面的方法. 绑定服务: 间接调用服务里面的方法. 如果调用者activity被销毁了, ...
- 玩转OneNET物联网平台之MQTT服务④ —— 远程控制LED(设备自注册)+ Android App控制
授人以鱼不如授人以渔,目的不是为了教会你具体项目开发,而是学会学习的能力.希望大家分享给你周边需要的朋友或者同学,说不定大神成长之路有博哥的奠基石... QQ技术互动交流群:ESP8266&3 ...
- 玩转OneNET物联网平台之MQTT服务⑦ —— 远程控制LED(数量无限制)+ Android App控制 优化第一版
授人以鱼不如授人以渔,目的不是为了教会你具体项目开发,而是学会学习的能力.希望大家分享给你周边需要的朋友或者同学,说不定大神成长之路有博哥的奠基石... QQ技术互动交流群:ESP8266&3 ...
- 鉴权应用服务器 app客户端 web服务端 安全令牌(SecurityToken)、临时访问密钥(AccessKeyId, AccessKeySecret)
设置EndPoint和凭证 移动终端是一个不受信任的环境,把AccessKeyId和AccessKeySecret直接保存在终端用来加签请求,存在极高的风险.建议只在测试时使用明文设置模式,业务应用推 ...
- Android中AIDL通信机制分析
一.背景 ·1.AIDL出现的原因 在android系统中,每一个程序都是运行在自己的进程中,进程之间无法进行通讯,为了在Android平台,一个进程通常不能访问另一个进程的内存空间,所以要想对话,需 ...
随机推荐
- 虚拟机VM三种网络连接方式说明
- 零基础快速入门web学习路线(含视频教程)
下面小编专门为广大web学习爱好者汇总了一条完整的自学线路:零基础快速入门web学习路线(含视频教程)(绝对纯干货)适合初学者的最新WEB前端学习路线汇总! 在当下来说web前端开发工程师可谓是高福利 ...
- 2019/3/28 wen 继承
- c#查找窗口的两种办法
原文最早发表于百度空间2009-06-17 1.process.MainWindowTitle(这个只能获取一部分窗口)2.EnumWindows(用windows API)
- Python Redis string
String操作,redis中的String在在内存中按照一个name对应一个value来存储.如图: set(name, value, ex=None, px=None, nx=False, xx= ...
- 剑指offer(23)二叉搜索树的后序遍历序列
题目描述 输入一个整数数组,判断该数组是不是某二叉搜索树的后序遍历的结果.如果是则输出Yes,否则输出No.假设输入的数组的任意两个数字都互不相同. 题目分析 1.后续遍历我们可以知道,最右边的是根节 ...
- web前端除了关注代码功能实现,还应具备web性能优化以及SEO优化的常识
web前端除了关注代码功能实现,还应具备web性能优化以及SEO优化的常识 ——不会WPO.SEO的前端工程师不是好码农 作为一名web前端工程师,除了要实现上级的要求,满足其所需要的功能,还要在平时 ...
- 【BZOJ】 4813: [Cqoi2017]小Q的棋盘
题目链接:http://www.lydsy.com/JudgeOnline/problem.php?id=4813 暴力转移就好,考虑以某一个点为根的子树分为是否走回来两种情况 ${f_{i,j}}$ ...
- vscode ----> 学习笔记
java开发环境 jdk配置 maven配置 file --> preferences --> settings 在search settings搜索关键词 java.home , mav ...
- ionicAPP打开第三方APP
近来,碰到一个问题,需要在ionicAPP中打开第三方APP 然后,就找资料,发现了个比较好的解决方案 可以参考:https://blog.csdn.net/a727911438/article/de ...