C# GDI+编程之绘图
在了解绘图之前,我们先讲几个预备知识
一、坐标系
坐标系是图形设计的基础。GDI+使用三个坐标空间:世界、页面和设备,其中,世界坐标是用于建立特殊图形世界模型的坐标系,也是在.NET Framework中传递给方法的坐标系。而页面坐标系是指绘图图画(如窗体、控件)使用的坐标系。设备坐标系是在其上绘制的物理设别(如屏幕和纸张)所使用的坐标系。
坐标系总是以左上角为原点(0,0),除了原点之外,坐标系还包括横坐标(X轴)和纵坐标(Y轴)
二、像素
像素全称为图像元素,它是构成图像的基本单位。通常以像素每英寸PPI(pixels per inch)为单位来表示图像分辨率的大小。例如:1024*768分辨率表示水平方向上每英寸长度上的像素数是1024,垂直方向是768
三、绘图
3.1 画笔
画笔使用Pen类表示,主要用于绘制线条,或者线条组合成的其他几何形状,它的构造函数为:
public Pen(Color color, float width)
参数说明:color 设置Pen的颜色
width 设置Pen的宽度
例如创建一个Pen对象,使其颜色为蓝色,宽度为2
Pen MyPen = new Pen(Color.Blue, );
以上内容参照自MSDN,详细参考 MSDN Pen Class
3.2 画刷
画刷使用Brush类表示,主要用于填充几何图形,如将正方形和圆形填充其他颜色等。它是一个抽象基类,不能实例化。如果要创建一个画刷对象,需要使用从Brush类派生出的类。
Brush类常用的派生类及说明:
| 派生类 | 说明 |
| SolidBrush | 定义单色画刷 |
| HatchBrush | 提供一种特定样式的图形,用来制作填满整个封闭区间的绘图效果 |
| LinerGradientBrush | 提供一种渐变色彩的特效,填充图形的内部区域 |
| TextureBrush | 使用图像来填充图形的内部 |
Brush MyBrush = new SolidBrush(Color.BlueViolet);

HatchBrush hb = new HatchBrush(HatchStyle.DiagonalBrick, Color.Yellow);

LinearGradientBrush linGrBrush = new LinearGradientBrush(

   new Point(, ),

   new Point(, ),

   Color.FromArgb(, , , ),

   Color.FromArgb(, , , ));
上面代码创建了不同类型的画刷对象,创建后面两个画刷对象是需要引入System.Drawing.Drawing2D命名空间
以上内容来自MSDN,详情参看MSDN Brush Class
3.3 绘制直线
调用Graphics类中的DrawLine方法,结合Pen对象可以绘制直线(如果对Graphics类不了解,可以参考我之前写的博客 C#之Graphics类)
DrawLine方法有两种构造函数:
public void DrawLine(Pen pen, Point pt1, Point pt2);
参数说明: pt1 Point结构或PointF结构,表示要连接的第一个点 pt2 表示要连接的第二个点
Point和PointF使用方法完全相同,只是Point的X和Y的类型为int,而PointF的X和Y为float,因此PointF通常用于表示坐标不是整数的情况
public void DrawLine(Pen pen, int x1, int y1, int x2, int y2);

public void DrawLine(Pen pen, float x1, float y1, float x2, float y2);

// x1,y1,x2,y2 分别表示第一个点的横纵坐标和第二个点的横纵坐标
3.4 绘制矩形
通过Graphics类中的DrawRectangle或者FillRectangle方法可以绘制矩形
public void DrawRectangle(Pen pen, float x, float y, float width, float height);

public void DrawRectangle(Pen pen, int x, int y, int width, int height);

//x,y表示要绘制矩形左上角的x坐标和y坐标

//width表示要绘制矩形的宽度,height表示高度
public void FillRectangle(Brush brush, float x, float y, float width, float height);

public void FillRectangle(Brush brush, int x, int y, int width, int height);
DrawRectangle和FillRectangle的区别是DrawRectangle只是绘制图形,FillRectangle是对图形进行填充
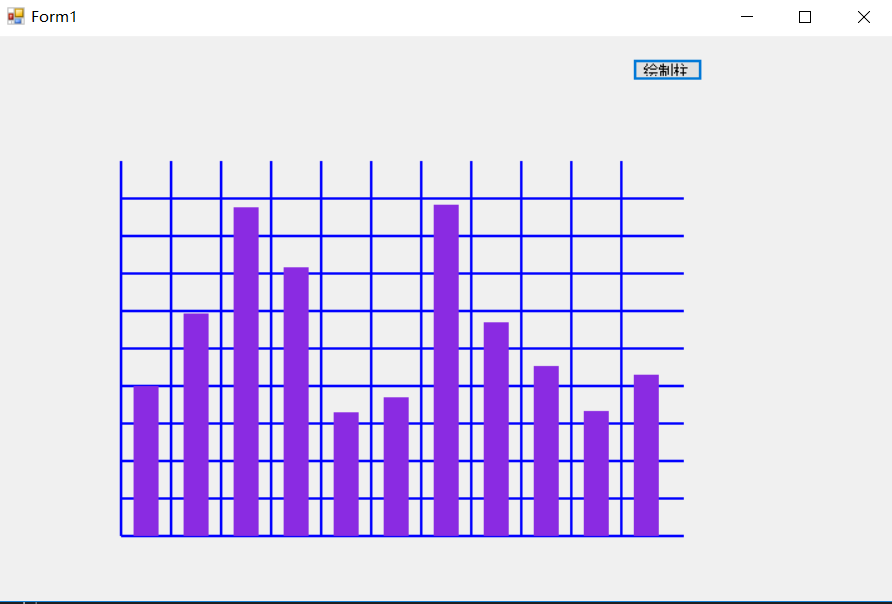
下面示例制作一个柱形图,当点击绘制按钮的时候就会开始绘制,使用到了窗体方面的知识
using System;

using System.Drawing;

using System.Threading;

using System.Windows.Forms;

using System.Drawing.Drawing2D;

namespace GDI_绘图

{

    public partial class Form1 : Form

    {

        public Form1()

        {

            InitializeComponent();

        }

        private void button1_Click(object sender, EventArgs e)

        {

            Graphics g = CreateGraphics();

            Pen MyPen = new Pen(Color.Blue, );

            int x = ;

            for (int i = ; i <= ; i++)   //绘制纵向线条

            {

                g.DrawLine(MyPen, x, , x, );

                x += ;

            }

            Thread.Sleep();  //线程休眠200毫秒,便于观察绘制情况

            int y = ;

            for (int i = ; i < +; i++)   //绘制横向线条

            {

                g.DrawLine(MyPen, , y, , y);

                y -= ;

            }

            Thread.Sleep();

            x = ;

            y = ;

            Brush MyBrush = new SolidBrush(Color.BlueViolet);

            int[] saleNum = { , , , , , , , , , ,  };

            for(int i = ; i<saleNum.Length; i++)

            {

                g.FillRectangle(MyBrush, x, y-saleNum[i], , saleNum[i]);  //绘制填充矩形

                x += ;

            }

        }

    }

}
效果如图:
3.5 绘制椭圆
可以使用Graphics类中的DrawEllipse方法或者FillEllipse方法来绘制椭圆,它的语法为:
public void DrawEllipse(Pen pen, RectangleF rect)

public void DrawEllipse(Pen pen, float x, float y, float width, float height)

public void DrawEllipse(Pen pen, Rectangle rect)

public void DrawEllipse(Pen pen, int x, int y, int width, int height)
它与绘制矩形类似,参数中 rect 是Rectangle结构或RectangleF结构,用来定义椭圆的边界
public void FillEllipse(Brush brush, RectangleF rect);

public void FillEllipse(Brush brush, float x, float y, float width, float height);

public void FillEllipse(Brush brush, Rectangle rect);

public void FillEllipse(Brush brush, int x, int y, int width, int height);
3.6 绘制圆弧
通过DrawArc方法,可以绘制圆弧,其语法入下
public void DrawArc(Pen pen, int x, int y, int width, int height, int startAngle, int sweepAngle);

public void DrawArc(Pen pen, Rectangle rect, float startAngle, float sweepAngle);

public void DrawArc(Pen pen, float x, float y, float width, float height, float startAngle, float sweepAngle);

public void DrawArc(Pen pen, RectangleF rect, float startAngle, float sweepAngle);
参数说明:startAngle:从X轴到弧线的起始点沿顺时针方向度量的角(以度为单位)
sweepAngle: 从startAngle参数到弧线的结束点沿顺时针方向度量的角(以度为单位)
其余参数在前面已经讲过了,就不再赘述
如果你对startAngle和sweepAngle还不是很清楚,可以查看剖析startAngle和sweepAngle
3.7 绘制扇形
DrawPie方法和FillPie方法可以绘制扇形,其中DrawPie可以绘制参数指定的扇形,而FillPie则是填充参数指定的扇形,其语法入下
//

        // 摘要:

        //     绘制一个扇形,该形状由一个坐标对、宽度、高度以及两条射线所指定的椭圆定义。

        //

        // 参数:

        //   pen:

        //     System.Drawing.Pen,它确定扇形的颜色、宽度和样式。

        //

        //   x:

        //     边框的左上角的 x 坐标,该边框定义扇形所属的椭圆。

        //

        //   y:

        //     边框的左上角的 y 坐标,该边框定义扇形所属的椭圆。

        //

        //   width:

        //     边框的宽度,该边框定义扇形所属的椭圆。

        //

        //   height:

        //     边框的高度,该边框定义扇形所属的椭圆。

        //

        //   startAngle:

        //     从 x 轴到扇形的第一条边沿顺时针方向度量的角(以度为单位)。

        //

        //   sweepAngle:

        //     从 startAngle 参数到扇形的第二条边沿顺时针方向度量的角(以度为单位)。

        //

        // 异常:

        //   T:System.ArgumentNullException:

        //     pen 为 null。

        public void DrawPie(Pen pen, float x, float y, float width, float height, float startAngle, float sweepAngle);

        //

        // 摘要:

        //     绘制由一个 System.Drawing.Rectangle 结构和两条射线所指定的椭圆定义的扇形。

        //

        // 参数:

        //   pen:

        //     System.Drawing.Pen,它确定扇形的颜色、宽度和样式。

        //

        //   rect:

        //     System.Drawing.Rectangle 结构,它表示定义该扇形所属的椭圆的边框。

        //

        //   startAngle:

        //     从 x 轴到扇形的第一条边沿顺时针方向度量的角(以度为单位)。

        //

        //   sweepAngle:

        //     从 startAngle 参数到扇形的第二条边沿顺时针方向度量的角(以度为单位)。

        //

        // 异常:

        //   T:System.ArgumentNullException:

        //     pen 为 null。

        public void DrawPie(Pen pen, Rectangle rect, float startAngle, float sweepAngle);

        //

        // 摘要:

        //     绘制一个扇形,该形状由一个坐标对、宽度、高度以及两条射线所指定的椭圆定义。

        //

        // 参数:

        //   pen:

        //     System.Drawing.Pen,它确定扇形的颜色、宽度和样式。

        //

        //   x:

        //     边框的左上角的 x 坐标,该边框定义扇形所属的椭圆。

        //

        //   y:

        //     边框的左上角的 y 坐标,该边框定义扇形所属的椭圆。

        //

        //   width:

        //     边框的宽度,该边框定义扇形所属的椭圆。

        //

        //   height:

        //     边框的高度,该边框定义扇形所属的椭圆。

        //

        //   startAngle:

        //     从 x 轴到扇形的第一条边沿顺时针方向度量的角(以度为单位)。

        //

        //   sweepAngle:

        //     从 startAngle 参数到扇形的第二条边沿顺时针方向度量的角(以度为单位)。

        //

        // 异常:

        //   T:System.ArgumentNullException:

        //     pen 为 null。

        public void DrawPie(Pen pen, int x, int y, int width, int height, int startAngle, int sweepAngle);

        //

        // 摘要:

        //     绘制由一个 System.Drawing.RectangleF 结构和两条射线所指定的椭圆定义的扇形。

        //

        // 参数:

        //   pen:

        //     System.Drawing.Pen,它确定扇形的颜色、宽度和样式。

        //

        //   rect:

        //     System.Drawing.RectangleF 结构,它表示定义该扇形所属的椭圆的边框。

        //

        //   startAngle:

        //     从 x 轴到扇形的第一条边沿顺时针方向度量的角(以度为单位)。

        //

        //   sweepAngle:

        //     从 startAngle 参数到扇形的第二条边沿顺时针方向度量的角(以度为单位)。

        //

        // 异常:

        //   T:System.ArgumentNullException:

        //     pen 为 null。

        public void DrawPie(Pen pen, RectangleF rect, float startAngle, float sweepAngle);
public void FillPie(Brush brush, int x, int y, int width, int height, int startAngle, int sweepAngle);

public void FillPie(Brush brush, Rectangle rect, float startAngle, float sweepAngle);

public void FillPie(Brush brush, float x, float y, float width, float height, float startAngle, float sweepAngle);
3.8 绘制多边形
多边形是指由三条或更多边的闭合图形,如三角形、四边形、五边形等。可以使用DrawPolygon方法或者FillPolygon方法绘制多边形,需要使用Graphics对象,Pen对象和Point(或PointF)对象数组,其语法如下
public void DrawPolygon(Pen pen, PointF[] points);

public void DrawPolygon(Pen pen, Point[] points);

public void FillPolygon(Brush brush, PointF[] points);

public void FillPolygon(Brush brush, Point[] points);
public void FillPolygon(Brush brush, Point[] points, FillMode fillMode);
public void FillPolygon(Brush brush, PointF[] points, FillMode fillMode);
参数中 points为Point或PointF对象数组
fillMode: 确定填充样式的 System.Drawing.Drawing2D.FillMode 枚举的成员。,使用时要引用System.Drawing.Drawing2D命名空间
作为枚举类型,其定义如下
public enum FillMode

    {

        //

        // 摘要:

        //     指定备用填充模式。

        Alternate = ,

        //

        // 摘要:

        //     指定环绕的填充模式。

        Winding =

    }
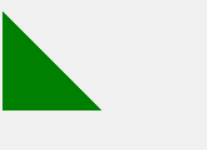
下面举个绘制三角形的例子
private void button2_Click(object sender, EventArgs e)

        {

            Graphics g = CreateGraphics();

            Pen myPen = new Pen(Color.Green,);

            Point p1 = new Point(, );

            Point p2 = new Point(, );

            Point p3 = new Point(, );

            Point[] points = new Point[];

            Brush myBrush = new SolidBrush(Color.Green);

            points[] = p1;

            points[] = p2;

            points[] = p3;

            g.FillPolygon(myBrush, points,FillMode.Winding);

        }
结果:
3.9 绘制图像
可以使用DrawImage方法绘制图像,该方法有多种形式,常用的语法格式为
public void DrawImage(Image image, int x, int y);

public void DrawImage(Image image, int x, int y, int width, int height);
参数说明:img:要绘制的Image
x: 所要绘制图像的左上角的X坐标
y: 所要绘制图像的左上角的y坐标
width:要绘制图像的宽度
height: 要绘制图像的高度
private void button2_Click(object sender, EventArgs e)

        {

            Graphics g = CreateGraphics();

            Image img = Image.FromFile("test.jpg");

            g.DrawImage(img, , , , );

        }
四、颜色
4.1 系统定义的颜色
系统定义的颜色使用Color结构的属性来表示,如:
Color myColor = Color.Red;
4.2 自定义颜色
可以使用Color结构的FromArgb方法,分别制定R、G、B颜色值
public static Color FromArgb(int red, int green, int blue);
参数说明:red:新的红色分量值 System.Drawing.Color。 有效值为 0 到 255 之间。
green:新的绿色分量值 System.Drawing.Color。 有效值为 0 到 255 之间。
blue:新的蓝色分量值 System.Drawing.Color。 有效值为 0 到 255 之间。
也可以制定Alpha透明度
public static Color FromArgb(int alpha, int red, int green, int blue);
alpha:Alpha 分量。 有效值为 0 到 255 之间,当其值为255时表示不透明,0表示完全透明。
五、文本输出
5.1 字体
字体使用Font类表示,用来定义特定的文本格式,常用的构造函数有:
参数:

        //   family:

        //     新 System.Drawing.Font 的 System.Drawing.FontFamily。

        //

        //   emSize:

        //     新字体的全身大小(以磅为单位)。

        //

        //   style:

        //     新字体的 System.Drawing.FontStyle。

        //

        // 异常:

        //   T:System.ArgumentException:

        //     emSize 是小于或等于 0,计算结果为无穷大,或者不是有效的数字。

        //

        //   T:System.ArgumentNullException:

        //     family 为 null。

        public Font(FontFamily family, float emSize, FontStyle style);
例:
Font myFont = new Font("宋体", , FontStyle.Bold);
其中FontStyle使用枚举表示,其成员有:
//

    // 摘要:

    //     指定应用于文本的样式信息。

    [Flags]

    public enum FontStyle

    {

        //

        // 摘要:

        //     普通文本。

        Regular = ,

        //

        // 摘要:

        //     显示为粗体文本。

        Bold = ,

        //

        // 摘要:

        //     斜体文本。

        Italic = ,

        //

        // 摘要:

        //     带下划线的文本。

        Underline = ,

        //

        // 摘要:

        //     有一条线穿过中部的文本。

        Strikeout =

    }
5.2 输出文本
通过DrawString方法,可以指定位置以指定的Brush和Font对象绘制指定的文本字符村,其常用语法格式为:
 // 参数:

        //   s:

        //     要绘制的字符串。

        //

        //   font:

        //     System.Drawing.Font,它定义字符串的文本格式。

        //

        //   brush:

        //     System.Drawing.Brush,它确定所绘制文本的颜色和纹理。

        //

        //   x:

        //     所绘制文本的左上角的 x 坐标。

        //

        //   y:

        //     所绘制文本的左上角的 y 坐标。

        //

        // 异常:

        //   T:System.ArgumentNullException:

        //     brush 为 null。 - 或 - s 为 null。

        public void DrawString(string s, Font font, Brush brush, float x, float y);
例:
private void button2_Click(object sender, EventArgs e)

        {

            Graphics g = CreateGraphics();

            Brush myBrush = new SolidBrush(Color.Green);

            string str = "just for fun";

            Font myFont = new Font("宋体", , FontStyle.Bold);

            g.DrawString(str, myFont, myBrush, , );

        }
点击button2后结果如图

C# GDI+编程之绘图的更多相关文章
- C# GDI+编程之剖析startAngle和sweepAngle
以DrawArc为例,它有一种形式如下的构造函数 public void DrawArc(Pen pen, Rectangle rect, float startAngle, float sweepA ...
- GDI+编程说明及小结
原文地址:http://blog.csdn.net/byxdaz/article/details/5972759 GDI+(Graphics Device Interface Plus图形设备接口加) ...
- GDI编程
图形设备接口(GDI)是一个可执行程序,它接受Windows应用程序的绘图请求(表现为GDI函数调用),并将它们传给相应的设备驱动程序,完成特定于硬件的输出,象打印机输出和屏幕输出.GDI负责Wind ...
- GDI编程小结
图形设备接口(GDI)是一个可运行程序,它接受Windows应用程序的画图请求(表现为GDI函数调用),并将它们传给对应的设备驱动程序,完毕特定于硬件的输出,象打印机输出和屏幕输出.GDI负责Wind ...
- MFC控件GDI编程
MFC控件GDI编程 一丶学习内容 1.了解常用的GDI函数绘图. 2.使用常用的画笔画刷. 二丶常用的GDI函数绘图 上方则为我们常用的GDI函数了. 画线 矩形. 以及圆 等等. 2.1 画线代码 ...
- GDI+编程小结
GDI+(Graphics Device Interface Plus图形设备接口加)是Windows XP和Windows Server 2003操作系统的子系统,也是.NET框架的重要组成部分,负 ...
- 一篇文章让你彻底弄懂WinForm GDI 编程基本原理
一 GDI编程原理 GDI(Graphics Device Interface,图形设备接口),主要负责Windows系统与绘图程序之间的信息交换,处理所有Windows程序的图形输出. GDI的常用 ...
- 【GDI+编程】--从三问开始
一. GDI+三问 1.1 GDI+是什么? GDI+是GDI(Graphics Device Interface)的后继者,是一种图形设备的接口,它构成了Win XP操作系统的子系统的API. 1. ...
- C# windows GDI+仿画图 绘图程序设计
C# windows GDI+仿画图 绘图程序设计 1.介绍 这里分享一个简单的画图程序 原作者:author: ping3108@163.com 2.程序主窗体设计 3.程序设计 本程序工程使用VS ...
随机推荐
- Effective C++ 笔记:条款 30 inline
30 : Understand the ins and outs of inlining 1 inline申请书 1.1 类内部实现函数包含隐藏的inline申请 class Human { publ ...
- IntelliJ IDEA使用心得之Maven项目篇(转)
IntelliJ IDEA使用心得之Maven项目篇 今天和大家分享下,在IDEA中打开Maven项目的方法. 对于新版的IDEA可以直接打开Maven项目,但是对于旧版的IDEA需要使用Mave ...
- spass按位置编码,进行排序题处理与分析
本范例即需建立Q4_1至Q4_4 等四个变项, 各变量的数值则是排序的内容,共有0.1.2.3.4 等五种可能,0代表该选项没有被受测者选取,1.2.3.4分别代表被受测者指为第一至第四顺位. htt ...
- 20154305 齐帅 PC平台逆向破解
Exp1 PC平台逆向破解 一.实践目标 本次实践的对象是一个名为pwn1的linux可执行文件. 该程序正常执行流程是:main调用foo函数,foo函数会简单回显任何用户输入的字符串. 该程序同时 ...
- Android-Java-子类实例化过程(内存图)
案例一: package android.java.oop15; // 描述Person对象 class Person { // 构造方法就算不写 默认有一个隐式的无参构造方法:public Pers ...
- oracle中order by造成分页错误
问题:今天在工作中,在service中调用分页查询列表接口的时候,返回的到页面的数据中总是存在缺失的数据,还有重复的数据. 分析:select * from (select ROWNUM rn,t.* ...
- 闲话ajax,例ajax轮询,ajax上传文件[开发篇]
引语:ajax这门技术早已见怪不怪了,我本人也只是就自己真实的经验去总结一些不足道的话.供不是特别了解的朋友参考参考! 本来早就想写一篇关于ajax的文章的,但是前段时间一直很忙,就搁置了,趁着元旦放 ...
- 【金三银四跳槽季】Java工程师如何在1个月内做好面试准备?
目录 一.写在前面 二.技术广度的快速准备 三.技术深度的快速准备 四.基础功底的快速准备 五.下篇预告 一.写在前面 春节长假转眼已过,即将迎来的是一年一度的金三银四跳槽季. 假如你准备在金三银四跳 ...
- webpack打包工具
目的:平时小项目中例如一些网站需要进行打包压缩,用这个工具可以进行打包压缩,就可以上传到服务器. 使用方法: 1,引进需要打包的项目,把入口html替换掉项目中的index.html,把引进的js,c ...
- win10 插入16k采样的耳机无法播放和录音的问题定位
平时做智能耳机,需要经常在windows上测试不同采样率的声音信号.可是,最近在16k双声道输入的情况下, 无论系统都使用该耳机进行播放,该问题思索了好久,一直没有解决办法. 今天无意中使用了wind ...
