【共享单车】—— React后台管理系统开发手记:员工管理之增删改查
前言:以下内容基于React全家桶+AntD实战课程的学习实践过程记录。最终成果github地址:https://github.com/66Web/react-antd-manager,欢迎star。
一、创建员工表单子组件
- 创建员工、编辑员工、员工详情、删除员工共用一个Modal弹框表单
<Modal

      title={this.state.title}

      visible={this.state.isVisible}

      onOk={this.handleSubmit}

      onCancel={() => {

             this.userForm.props.form.resetFields();

             this.setState({

                  isVisible: false

             })

      }}

      width={600}

      {...footer}

>

     <UserForm type={this.state.type} userInfo={this.state.userInfo} wrappedComponentRef={(inst) => {this.userForm = inst;}}/>

</Modal> - 创建、编辑员工提交:共用handleSubmit(),判断type,通过axios.ajax()调用不同的Easy Mock数据接口请求
//创建编辑员工提交

handleSubmit = () => {

        let type = this.state.types;

        let data = this.userForm.props.form.getFieldsValue();

        axios.ajax({

            url: type=='create'?'/user/add':'/user/edit',

            data: {

                params: data

            }

        }).then((res) => {

            if(res.code === 0){

               this.userForm.props.form.resetFields();

               this.setState({

                   isVisible: false

               })

               this.requestList();

            }

        })

} - 关键:
- getFieldDecorator实现表单数据双向绑定
const {getFieldDecorator} = this.props.form; - 获取this.props.userInfo:【编辑员工】中设置表单默认数据、【员工信息】中显示员工信息
- 判断this.props.type:当type == 'detail'时,直接渲染员工信息userInfo,不再渲染Form表单
- 判断this.state.type:当type == 'detail'时,不显示Modal的footer按钮
let footer = {};

if(this.state.type == 'detail'){

       footer = {

           footer: null

       }

}
- 组件实现
//子组件:创建员工表单

class UserForm extends React.Component{

    getState = (state) => {

        let config = {

            '1':'咸鱼一条',

            '2':'风华浪子',

            '3':'北大才子一枚',

            '4':'百度FE',

            '5':'创业者'

        }

        return config[state];

    }

    render(){

        let type = this.props.type;

        let userInfo = this.props.userInfo || {};

        const {getFieldDecorator} = this.props.form;

        const formItemLayout= {

            labelCol:{span: 5},

            wrapperCol:{span: 19}

        }

        return (

            <Form layout="horizontal">

                  <FormItem label="用户名" {...formItemLayout}>

                        {

                            type == 'detail' ? userInfo.userName :

                            getFieldDecorator('user_name',{

                                initialValue: userInfo.userName

                            })(

                                <Input type="text" placeholder="请输入用户名"/>

                            )

                        }

                  </FormItem>

                  <FormItem label="性别" {...formItemLayout}>

                        {

                            type == 'detail' ? userInfo.sex == 1 ? '男' : '女' :

                            getFieldDecorator('sex',{

                                initialValue: userInfo.sex

                            })(

                                <RadioGroup>

                                    <Radio value={1}>男</Radio>

                                    <Radio value={2}>女</Radio>

                                </RadioGroup>

                            )

                        }

                  </FormItem>

                  <FormItem label="状态" {...formItemLayout}>

                        {

                            type == 'detail' ? this.getState(userInfo.state) :

                            getFieldDecorator('state',{

                                initialValue: userInfo.state

                            })(

                                <Select>

                                    <Option value={1}>咸鱼一条</Option>

                                    <Option value={2}>风华浪子</Option>

                                    <Option value={3}>北大才子一枚</Option>

                                    <Option value={4}>百度FE</Option>

                                    <Option value={5}>创业者</Option>

                                </Select>

                            )

                        }

                  </FormItem>

                  <FormItem label="生日" {...formItemLayout}>

                        {

                            type == 'detail' ? userInfo.birthday :

                            getFieldDecorator('birthday',{

                                initialValue: moment(userInfo.birthday)

                            })(

                                <DatePicker format="YYYY-MM-DD"/>

                            )

                        }

                  </FormItem>

                  <FormItem label="联系地址" {...formItemLayout}>

                        {

                            type == 'detail' ? userInfo.address :

                            getFieldDecorator('address',{

                                initialValue: userInfo.address

                            })(

                                <TextArea rows={3} placeholder="请输入联系地址"/>

                            )

                        }

                  </FormItem>

            </Form>

        )

    }

}

UserForm = Form.create({})(UserForm);
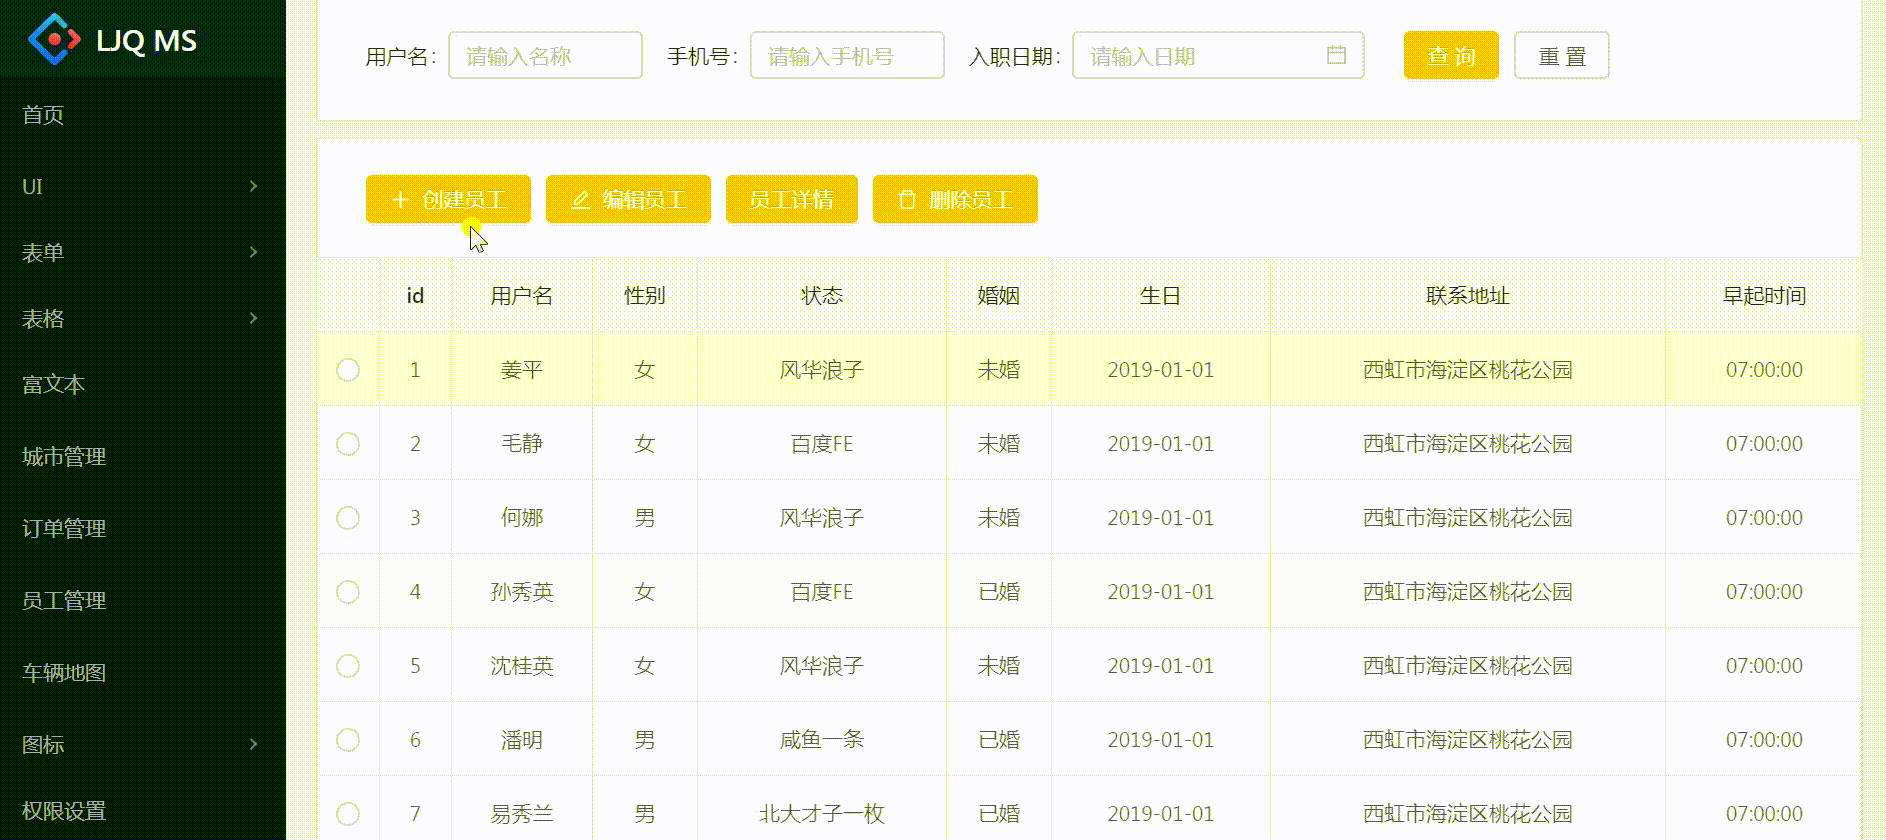
二、功能区操作
- 创建员工、编辑员工、员工详情、删除员工共用一个功能操作函数handleOperate()
 <Card style={{marginTop:10}} className="operate-wrap">

          <Button type="primary" icon="plus" onClick={() => this.handleOperate('create')}>创建员工</Button>

          <Button type="primary" icon="edit" onClick={() => this.handleOperate('edit')}>编辑员工</Button>

          <Button type="primary" onClick={() => this.handleOperate('detail')}>员工详情</Button>

          <Button type="primary" icon="delete" onClick={() => this.handleOperate('delete')}>删除员工</Button>

</Card>
关键:传入不同的参数[type],通过判断type的值,执行不同的操作
 //功能区操作

handleOperate = (type) => {

        let item = this.state.selectedItem;

        if(type == 'create'){

           this.setState({

               type,

               isVisible: true,

               title: '创建员工'

           })

        }else if(type == 'edit'){

           if(!item){

               Modal.info({

                   title: '提示',

                   content: '请选择一个用户'

               })

               return;

           }

           this.setState({

                type,

                isVisible: true,

                title: '编辑员工',

                userInfo: item

           })

        }else if(type == 'detail'){

           if(!item){

                Modal.info({

                    title: '提示',

                    content: '请选择一个用户'

                })

                return;

           }

           this.setState({

                type,

                isVisible: true,

                title: '员工详情',

                userInfo: item

           })

        }else if(type == 'delete'){

            if(!item){

                Modal.info({

                    title: '提示',

                    content: '请选择一个用户'

                })

                return;

           }

           let _this = this;

           Modal.confirm({

               title: '确认删除',

               content: `是否要删除当前选中的员工${item.id}`,

               onOk(){

                   axios.ajax({

                       url: '/user/delete',

                       data: {

                           params: {

                               id: item.id

                           }

                       }

                   }).then((res) => {

                       if(res.code === 0){

                           _this.setState({

                               isVisible: false

                           })

                           _this.requestList();

                       }

                   })

               }

           })

        }

}
实例代码:
import React from 'react'
import {Card, Button, Form, Input, Select,Radio, Icon, Modal, DatePicker} from 'antd'
import axios from './../../axios'
import Utils from './../../utils/utils'
import BaseForm from './../../components/BaseForm'
import ETable from './../../components/ETable'
import moment from 'moment'
const FormItem = Form.Item;
const RadioGroup = Radio.Group;
const TextArea = Input.TextArea;
const Option = Select.Option; export default class User extends React.Component{ state = {
list:[],
isVisible: false
} params = {
page: 1
} formList = [
{
type: 'INPUT',
label: '用户名',
field: 'user_name',
placeholder: '请输入名称',
width: 130
},
{
type: 'INPUT',
label: '手机号',
field: 'user_mobile',
placeholder: '请输入手机号',
width: 130
},
{
type: 'DATE',
label: '入职日期',
field: 'user_date',
placeholder: '请输入日期'
}
] componentDidMount(){
this.requestList();
} handleFilter = (params) => {
this.params = params;
this.requestList();
} requestList = () => {
axios.requestList(this, '/table/list1', this.params);
} //功能区操作
handleOperate = (type) => {
let item = this.state.selectedItem;
if(type == 'create'){
this.setState({
type,
isVisible: true,
title: '创建员工'
})
}else if(type == 'edit'){
if(!item){
Modal.info({
title: '提示',
content: '请选择一个用户'
})
return;
}
this.setState({
type,
isVisible: true,
title: '编辑员工',
userInfo: item
})
}else if(type == 'detail'){
if(!item){
Modal.info({
title: '提示',
content: '请选择一个用户'
})
return;
}
this.setState({
type,
isVisible: true,
title: '员工详情',
userInfo: item
})
}else if(type == 'delete'){
if(!item){
Modal.info({
title: '提示',
content: '请选择一个用户'
})
return;
}
let _this = this;
Modal.confirm({
title: '确认删除',
content: `是否要删除当前选中的员工${item.id}`,
onOk(){
axios.ajax({
url: '/user/delete',
data: {
params: {
id: item.id
}
}
}).then((res) => {
if(res.code === 0){
_this.setState({
isVisible: false
})
_this.requestList();
}
})
}
})
}
} //创建编辑员工提交
handleSubmit = () => {
let type = this.state.types;
let data = this.userForm.props.form.getFieldsValue();
axios.ajax({
url: type=='create'?'/user/add':'/user/edit',
data: {
params: data
}
}).then((res) => {
if(res.code === 0){
this.userForm.props.form.resetFields();
this.setState({
isVisible: false
})
this.requestList();
}
})
} render(){
const columns = [{
title: 'id',
dataIndex: 'id'
}, {
title: '用户名',
dataIndex: 'userName'
}, {
title: '性别',
dataIndex: 'sex',
render(sex){
return sex ==1 ?'男':'女'
}
}, {
title: '状态',
dataIndex: 'state',
render(state){
let config = {
'1':'咸鱼一条',
'2':'风华浪子',
'3':'北大才子一枚',
'4':'百度FE',
'5':'创业者'
}
return config[state];
}
},{
title: '婚姻',
dataIndex: 'isMarried',
render(isMarried){
return isMarried == 1 ?'已婚':'未婚'
}
},{
title: '生日',
dataIndex: 'birthday'
},{
title: '联系地址',
dataIndex: 'address'
},{
title: '早起时间',
dataIndex: 'time'
}
]; let footer = {};
if(this.state.type == 'detail'){
footer = {
footer: null
}
} return (
<div>
<Card>
<BaseForm formList={this.formList} filterSubmit={this.handleFilter}/>
</Card>
<Card style={{marginTop:10}} className="operate-wrap">
<Button type="primary" icon="plus" onClick={() => this.handleOperate('create')}>创建员工</Button>
<Button type="primary" icon="edit" onClick={() => this.handleOperate('edit')}>编辑员工</Button>
<Button type="primary" onClick={() => this.handleOperate('detail')}>员工详情</Button>
<Button type="primary" icon="delete" onClick={() => this.handleOperate('delete')}>删除员工</Button>
</Card>
<div className="content-wrap">
<ETable
columns={columns}
updateSelectedItem={Utils.updateSelectedItem.bind(this)}
selectedRowKeys={this.state.selectedRowKeys}
selectedItem={this.state.selectedItem}
dataSource={this.state.list}
pagination={this.state.pagination}
/>
</div>
<Modal
title={this.state.title}
visible={this.state.isVisible}
onOk={this.handleSubmit}
onCancel={() => {
this.userForm.props.form.resetFields();
this.setState({
isVisible: false
})
}}
width={600}
{...footer}
>
<UserForm type={this.state.type} userInfo={this.state.userInfo} wrappedComponentRef={(inst) => {this.userForm = inst;}}/>
</Modal>
</div>
)
}
} //子组件:创建员工表单
class UserForm extends React.Component{ getState = (state) => {
let config = {
'1':'咸鱼一条',
'2':'风华浪子',
'3':'北大才子一枚',
'4':'百度FE',
'5':'创业者'
}
return config[state];
} render(){
let type = this.props.type;
let userInfo = this.props.userInfo || {};
const {getFieldDecorator} = this.props.form;
const formItemLayout= {
labelCol:{span: 5},
wrapperCol:{span: 19}
}
return (
<Form layout="horizontal">
<FormItem label="用户名" {...formItemLayout}>
{
type == 'detail' ? userInfo.userName :
getFieldDecorator('user_name',{
initialValue: userInfo.userName
})(
<Input type="text" placeholder="请输入用户名"/>
)
}
</FormItem>
<FormItem label="性别" {...formItemLayout}>
{
type == 'detail' ? userInfo.sex == 1 ? '男' : '女' :
getFieldDecorator('sex',{
initialValue: userInfo.sex
})(
<RadioGroup>
<Radio value={1}>男</Radio>
<Radio value={2}>女</Radio>
</RadioGroup>
)
}
</FormItem>
<FormItem label="状态" {...formItemLayout}>
{
type == 'detail' ? this.getState(userInfo.state) :
getFieldDecorator('state',{
initialValue: userInfo.state
})(
<Select>
<Option value={1}>咸鱼一条</Option>
<Option value={2}>风华浪子</Option>
<Option value={3}>北大才子一枚</Option>
<Option value={4}>百度FE</Option>
<Option value={5}>创业者</Option>
</Select>
)
}
</FormItem>
<FormItem label="生日" {...formItemLayout}>
{
type == 'detail' ? userInfo.birthday :
getFieldDecorator('birthday',{
initialValue: moment(userInfo.birthday)
})(
<DatePicker format="YYYY-MM-DD"/>
)
}
</FormItem>
<FormItem label="联系地址" {...formItemLayout}>
{
type == 'detail' ? userInfo.address :
getFieldDecorator('address',{
initialValue: userInfo.address
})(
<TextArea rows={3} placeholder="请输入联系地址"/>
)
}
</FormItem>
</Form>
)
}
}
UserForm = Form.create({})(UserForm);
注:项目来自慕课网
【共享单车】—— React后台管理系统开发手记:员工管理之增删改查的更多相关文章
- 【共享单车】—— React后台管理系统开发手记:主页面架构设计
前言:以下内容基于React全家桶+AntD实战课程的学习实践过程记录.最终成果github地址:https://github.com/66Web/react-antd-manager,欢迎star. ...
- 【共享单车】—— React后台管理系统开发手记:Redux集成开发
前言:以下内容基于React全家桶+AntD实战课程的学习实践过程记录.最终成果github地址:https://github.com/66Web/react-antd-manager,欢迎star. ...
- 【共享单车】—— React后台管理系统开发手记:项目工程化开发
前言:以下内容基于React全家桶+AntD实战课程的学习实践过程记录.最终成果github地址:https://github.com/66Web/react-antd-manager,欢迎star. ...
- 【共享单车】—— React后台管理系统开发手记:城市管理和订单管理
前言:以下内容基于React全家桶+AntD实战课程的学习实践过程记录.最终成果github地址:https://github.com/66Web/react-antd-manager,欢迎star. ...
- 【共享单车】—— React后台管理系统开发手记:AntD Form基础组件
前言:以下内容基于React全家桶+AntD实战课程的学习实践过程记录.最终成果github地址:https://github.com/66Web/react-antd-manager,欢迎star. ...
- 【共享单车】—— React后台管理系统开发手记:Router 4.0路由实战演练
前言:以下内容基于React全家桶+AntD实战课程的学习实践过程记录.最终成果github地址:https://github.com/66Web/react-antd-manager,欢迎star. ...
- 【共享单车】—— React后台管理系统开发手记:权限设置和菜单调整(未完)
前言:以下内容基于React全家桶+AntD实战课程的学习实践过程记录.最终成果github地址:https://github.com/66Web/react-antd-manager,欢迎star. ...
- 【共享单车】—— React后台管理系统开发手记:AntD Table高级表格
前言:以下内容基于React全家桶+AntD实战课程的学习实践过程记录.最终成果github地址:https://github.com/66Web/react-antd-manager,欢迎star. ...
- 【共享单车】—— React后台管理系统开发手记:AntD Table基础表格
前言:以下内容基于React全家桶+AntD实战课程的学习实践过程记录.最终成果github地址:https://github.com/66Web/react-antd-manager,欢迎star. ...
随机推荐
- UVALive4374 Drive through MegaCity
题目戳这里. 首先我们对坐标进行离散化,有用的点就变成了\(O(N)\)个.我们假设\(A\)点\(B\)的右边(从\(A\)往\(B\)跑和从\(B\)往\(A\)跑等价),然后我们很容易发现不会往 ...
- 从K近邻算法、距离度量谈到KD树、SIFT+BBF算法
转载自:http://blog.csdn.net/v_july_v/article/details/8203674/ 从K近邻算法.距离度量谈到KD树.SIFT+BBF算法 前言 前两日,在微博上说: ...
- Installing patches on an ESXi 5.x by the command
Purpose This article outlines the procedure for installing patches on an ESXi 5.x host from the comm ...
- RDM原始设备映射
在一个存储区域网络(SAN)上,有两种方法为虚拟机配置存储.一种方法是使用VMFS,这是VMware Infrastructure(VI)提供的专有高性能集群文件系统.对大多数企业应用来说,在VMFS ...
- Windows转移FSMO角色
转移 FSMO 角色若要使用 Ntdsutil 实用工具转移 FSMO 角色,请按照下列步骤操作:1.登录到基于 Windows 2000 Server 或基于 Windows Server 2003 ...
- 更改mvc版本的时候,手动修改交3.0改到4.0,将razor改到2.0,仍然提示出现错误,mvc3.0
偶然碰到,更改mvc版本,由3.0升级到4.0,但是依然提示3.0的错误 几经周折排查,最终发现 <runtime> <assemblyBinding xmlns="urn ...
- 【Tomcat】一台电脑上运行多个tomcat
效果: 1.首先需要安装Tomcat7,Tomcat8. Tomcat7: Tomcat8: 2.添加两个环境变量,添加CATALINA_HOME1和CATALINA_BASE1指向E:\tomcat ...
- UVA 11045 My T-shirt suits me
一开始就想到网络流..后来一想暴力能不能过.自己写的T了.看了别人有暴力过的. 暴力的思路就是6进制数字表示给予的衣服的数量.然后每个人的需求表示成01 的6位串然后爆搜. 网络流就建一个源一个汇 然 ...
- MySQL学习——基础
本文是MySQL的基础知识. Linux启动MySQL服务命令 : service mysql start Linux关闭MySQL服务命令 : service mysql stop 登录MySQL命 ...
- java 24小时倒计时案例
import java.util.Calendar; import java.util.Date; public class Daojishi { static String Countdown=&q ...