3dContactPointAnnotationTool开发日志(五)
今天要做的第一件事就是把obj文件里不同的对象分割开来。
通过仔细观察发现obj文件中以"o "开头的行会跟着一个对象的名字。g代表对象所属组名,我这里只要用到对象名就行了所以没管组名了。然后这个o的位置在该对象的vn和f之间。记录一下f开始的下标就能够把obj文件中的多个对象分离出来。
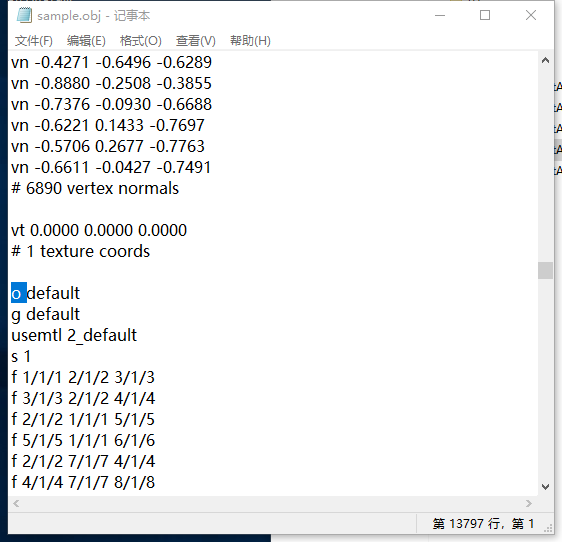
具体代码我也是在别人的代码基础上改的,不过还是贴一贴吧。
这个是ObjFormatAnalyzer.cs的:
using System;

using System.Linq;

using System.Collections;

using System.Collections.Generic;

using UnityEngine;

namespace Hont

{

    public class ObjFormatAnalyzer

    {

        public struct Vector

        {

            public float X;

            public float Y;

            public float Z;

        }

        public struct FacePoint

        {

            public int VertexIndex;

            public int TextureIndex;

            public int NormalIndex;

        }

        public struct Face

        {

            public FacePoint[] Points;

            public bool IsQuad;

        }

        public Vector[] VertexArr;

        public Vector[] VertexNormalArr;

        public Vector[] VertexTextureArr;

        public Face[] FaceArr;

        public int[] ObjFaceBegin;

        public string[] ObjName;

        public void Analyze(string content)

        {

            content = content.Replace("\r", string.Empty).Replace('\t', ' ');

            var lines = content.Split('\n');

            var vertexList = new List<Vector>();

            var vertexNormalList = new List<Vector>();

            var vertexTextureList = new List<Vector>();

            var faceList = new List<Face>();

            var objFaceBeginList = new List<int>();

            var objNameList = new List<string>();

            for (int i = 0; i < lines.Length; i++)

            {

                var currentLine = lines[i];

                //Debug.Log("current line: " + i);

                //Debug.Log("content: " + currentLine);

                //Debug.Log("size: " + currentLine.Length);

                if (currentLine.Contains("#") || currentLine.Length == 0)

                {

                    continue;

                }

                if (currentLine.Contains("v "))

                {

                    var splitInfo = currentLine.Split(" ".ToCharArray(), StringSplitOptions.RemoveEmptyEntries);

                    vertexList.Add(new Vector() { X = float.Parse(splitInfo[1]), Y = float.Parse(splitInfo[2]), Z = float.Parse(splitInfo[3]) });

                }

                else if (currentLine.Contains("vt "))

                {

                    var splitInfo = currentLine.Split(" ".ToCharArray(), StringSplitOptions.RemoveEmptyEntries);

                    vertexTextureList.Add(new Vector() { X = float.Parse(splitInfo[1]), Y = float.Parse(splitInfo[2]), Z = float.Parse(splitInfo[3]) });

                }

                else if (currentLine.Contains("vn "))

                {

                    var splitInfo = currentLine.Split(" ".ToCharArray(), StringSplitOptions.RemoveEmptyEntries);

                    vertexNormalList.Add(new Vector() { X = float.Parse(splitInfo[1]), Y = float.Parse(splitInfo[2]), Z = float.Parse(splitInfo[3]) });

                }

                else if (currentLine.Contains("f "))

                {

                    var splitInfo = currentLine.Split(" ".ToCharArray(), StringSplitOptions.RemoveEmptyEntries);

                    var isQuad = splitInfo.Length > 4;

                    var face1 = splitInfo[1].Split('/');

                    var face2 = splitInfo[2].Split('/');

                    var face3 = splitInfo[3].Split('/');

                    var face4 = isQuad ? splitInfo[4].Split('/') : null;

                    var face = new Face();

                    face.Points = new FacePoint[4];

                    face.Points[0] = new FacePoint() { VertexIndex = int.Parse(face1[0]), TextureIndex = int.Parse(face1[1]), NormalIndex = int.Parse(face1[2]) };

                    face.Points[1] = new FacePoint() { VertexIndex = int.Parse(face2[0]), TextureIndex = int.Parse(face2[1]), NormalIndex = int.Parse(face2[2]) };

                    face.Points[2] = new FacePoint() { VertexIndex = int.Parse(face3[0]), TextureIndex = int.Parse(face3[1]), NormalIndex = int.Parse(face3[2]) };

                    face.Points[3] = isQuad ? new FacePoint() { VertexIndex = int.Parse(face4[0]), TextureIndex = int.Parse(face4[1]), NormalIndex = int.Parse(face4[2]) } : default(FacePoint);

                    face.IsQuad = isQuad;

                    faceList.Add(face);

                }

                else if (currentLine.Contains("o ")) {

                    string objName = "";

                    int p = currentLine.IndexOf('o');

                    int length = currentLine.Length;

                    for (p++; currentLine[p] == ' '; p++) ;

                    for (; p < length; p++)

                        objName += currentLine[p];

                    objFaceBeginList.Add(faceList.Count);

                    objNameList.Add(objName);

                }

            }

            VertexArr = vertexList.ToArray();

            VertexNormalArr = vertexNormalList.ToArray();

            VertexTextureArr = vertexTextureList.ToArray();

            FaceArr = faceList.ToArray();

            ObjFaceBegin = objFaceBeginList.ToArray();

            ObjName = objNameList.ToArray();

        }

    }

}
这个是ObjFormatAnalyzerFactory.cs的:
using UnityEngine;

using System.IO;

using System.Linq;

using System.Collections;

using System.Collections.Generic;

namespace Hont

{

    public static class ObjFormatAnalyzerFactory

    {

        public static List<GameObject> AnalyzeToGameObject(string objFilePath)

        {

            if (!File.Exists(objFilePath)) return null;

            var objFormatAnalyzer = new ObjFormatAnalyzer();

            objFormatAnalyzer.Analyze(File.ReadAllText(objFilePath));

            int length = objFormatAnalyzer.ObjFaceBegin.Length;

            var re = new List<GameObject>();

            var sourceVertexArr = objFormatAnalyzer.VertexArr;

            var sourceUVArr = objFormatAnalyzer.VertexTextureArr;

            var faceArr = objFormatAnalyzer.FaceArr;

            var notQuadFaceArr = objFormatAnalyzer.FaceArr.Where(m => !m.IsQuad).ToArray();

            var quadFaceArr = objFormatAnalyzer.FaceArr.Where(m => m.IsQuad).ToArray();

            for (int objId = 0; objId < length; objId++)

            {

                var go = new GameObject();

                go.name = objFormatAnalyzer.ObjName[objId];

                var meshRenderer = go.AddComponent<MeshRenderer>();

                var meshFilter = go.AddComponent<MeshFilter>();

                var mesh = new Mesh();

                var vertexList = new List<Vector3>();

                var uvList = new List<Vector2>();

                int faceBeginId = objFormatAnalyzer.ObjFaceBegin[objId];

                int faceEndId = faceArr.Length;//左闭右开

                if (objId < length - 1)

                    faceEndId = objFormatAnalyzer.ObjFaceBegin[objId + 1];

                int triangleNum = 0;

                for (int i = faceBeginId; i < faceEndId; i++)

                    if (faceArr[i].IsQuad)

                        triangleNum += 6;

                    else triangleNum += 3;

                var triangles = new int[triangleNum];

                for (int i = faceBeginId, j = 0; i < faceEndId; i++)

                {

                    var currentFace = faceArr[i];

                    triangles[j] = j;

                    triangles[j + 1] = j + 1;

                    triangles[j + 2] = j + 2;

                    var vec = sourceVertexArr[currentFace.Points[0].VertexIndex - 1];

                    vertexList.Add(new Vector3(vec.X, vec.Y, vec.Z));

                    var uv = sourceUVArr[currentFace.Points[0].TextureIndex - 1];

                    uvList.Add(new Vector2(uv.X, uv.Y));

                    vec = sourceVertexArr[currentFace.Points[1].VertexIndex - 1];

                    vertexList.Add(new Vector3(vec.X, vec.Y, vec.Z));

                    uv = sourceUVArr[currentFace.Points[1].TextureIndex - 1];

                    uvList.Add(new Vector2(uv.X, uv.Y));

                    vec = sourceVertexArr[currentFace.Points[2].VertexIndex - 1];

                    vertexList.Add(new Vector3(vec.X, vec.Y, vec.Z));

                    uv = sourceUVArr[currentFace.Points[2].TextureIndex - 1];

                    uvList.Add(new Vector2(uv.X, uv.Y));

                    if (currentFace.IsQuad)

                    {

                        triangles[j + 3] = j + 3;

                        triangles[j + 4] = j + 4;

                        triangles[j + 5] = j + 5;

                        j += 3;

                        vec = sourceVertexArr[currentFace.Points[0].VertexIndex - 1];

                        vertexList.Add(new Vector3(vec.X, vec.Y, vec.Z));

                        uv = sourceUVArr[currentFace.Points[0].TextureIndex - 1];

                        uvList.Add(new Vector2(uv.X, uv.Y));

                        vec = sourceVertexArr[currentFace.Points[2].VertexIndex - 1];

                        vertexList.Add(new Vector3(vec.X, vec.Y, vec.Z));

                        uv = sourceUVArr[currentFace.Points[2].TextureIndex - 1];

                        uvList.Add(new Vector2(uv.X, uv.Y));

                        vec = sourceVertexArr[currentFace.Points[3].VertexIndex - 1];

                        vertexList.Add(new Vector3(vec.X, vec.Y, vec.Z));

                        uv = sourceUVArr[currentFace.Points[3].TextureIndex - 1];

                        uvList.Add(new Vector2(uv.X, uv.Y));

                    }

                    j += 3;

                }

                mesh.vertices = vertexList.ToArray();

                mesh.uv = uvList.ToArray();

                mesh.triangles = triangles;

                meshFilter.mesh = mesh;

                meshRenderer.material = new Material(Shader.Find("Standard"));

                //go.transform.parent = re.transform;

                re.Add(go);

            }

            return re;

        }

    }

}
用的话就这样就行了,让解析出来的obj都成为一个gameObject的儿子。或者随便怎么玩都行。
            var re = ObjFormatAnalyzerFactory.AnalyzeToGameObject(path);

            foreach (var item in re)

                item.transform.parent = model3d.transform;
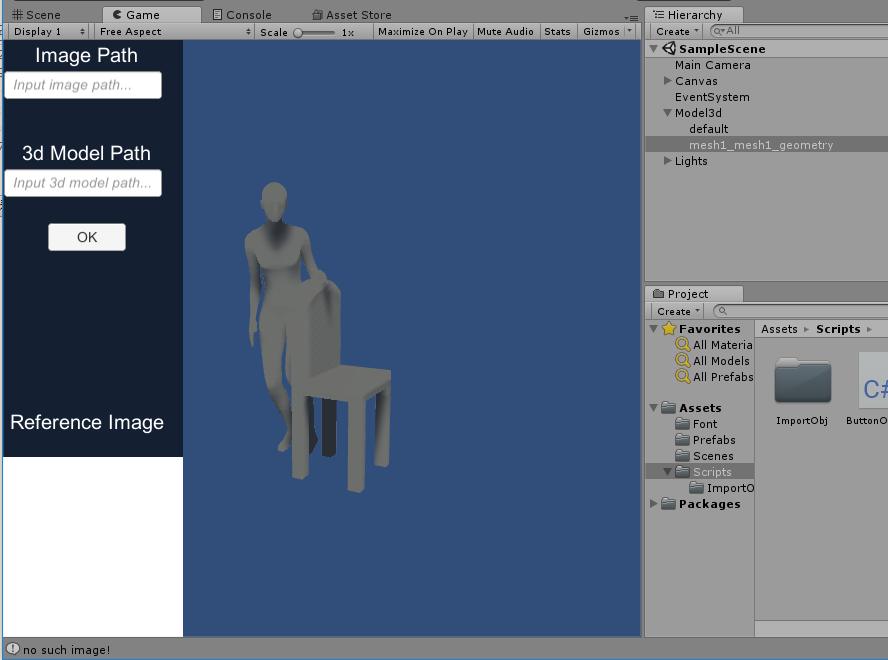
运行一下,可以看见Model3d下有两个对象分别对应人和椅子了。
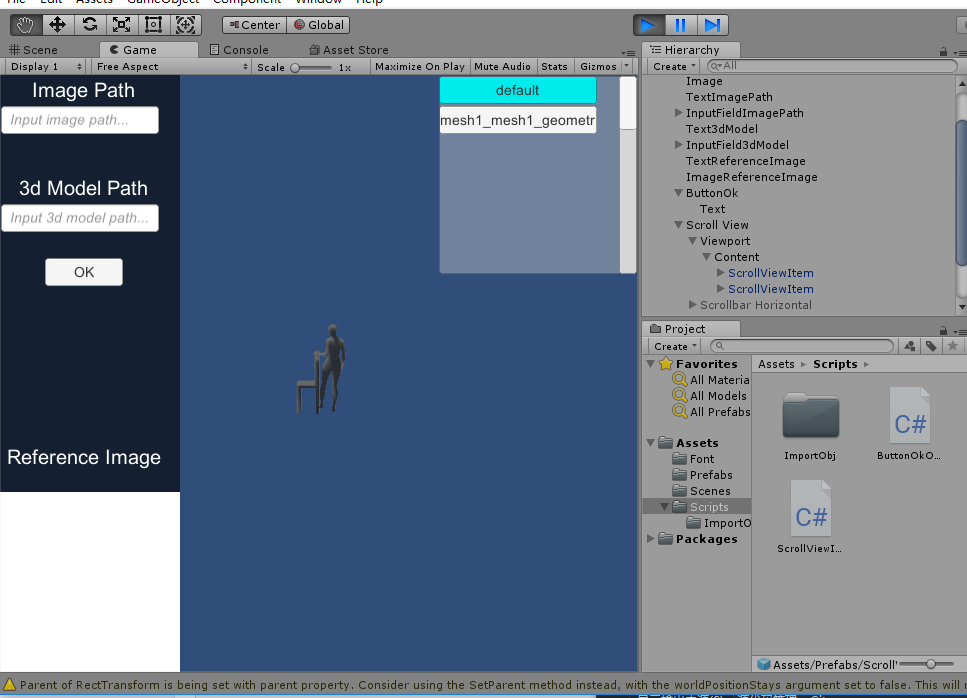
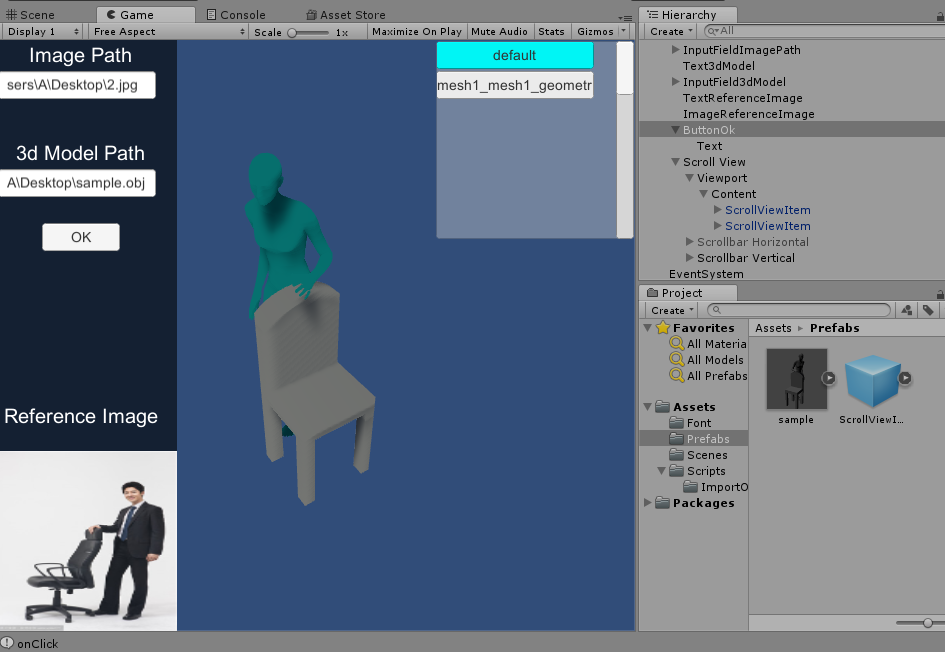
接下来想弄个列表来让使用者可以选中场景里的对象,于是用到了scrollView,具体怎么使用ScrollView请看:Unity5.4.1 Scroll_View的简单使用。把按钮当做content的子对象就成了这副模样,并且实现了点击按钮可以改变按钮颜色表示该物体被选中。
光改变按钮颜色还不够,于是又想着改变按钮对应的模型颜色。我是每个按钮的脚本绑定了对应的模型对象,出发点击事件就直接改变模型材质的颜色即可。具体怎么改变模型颜色请看:Unity——通过脚本给物体改变颜色。然后实现了改变按钮对应模型颜色的功能。
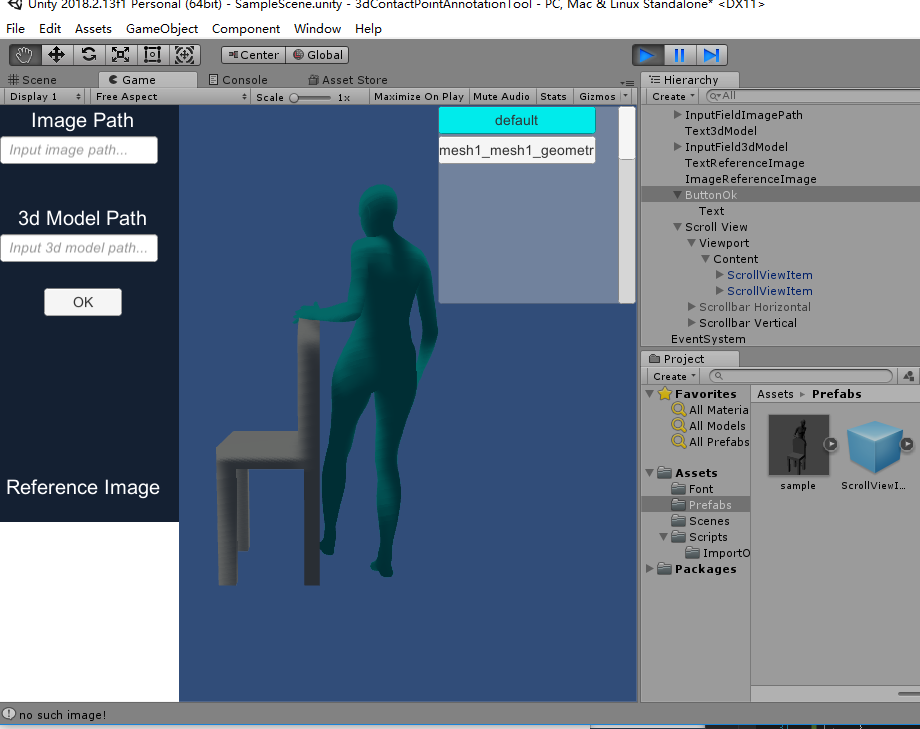
整体效果如下,输入obj模型和图像的路径点击ok会加载obj模型和图像,并在scrollView中添加与obj模型对应的按钮,点击即可选中模型。
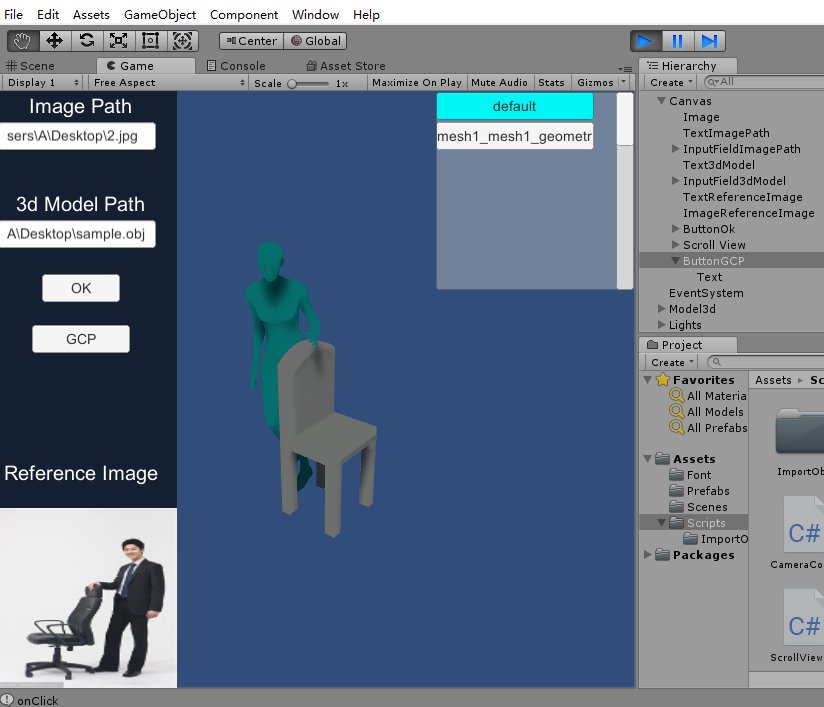
之后的工作是如何自动求解3d模型的接触点了,先添加个按钮,明天再想办法做吧。
3dContactPointAnnotationTool开发日志(五)的更多相关文章
- 3dContactPointAnnotationTool开发日志(二五)
记录一下当前进度:
- 3dContactPointAnnotationTool开发日志(十五)
有时候拖动一个窗口的时候可能直接拖出去了那就再也拖不回来只能reset重新来过: 于是开了个类成员变量在start里记录了一下panel的位置: var lp = panel.GetCompo ...
- Kinect For Windows V2开发日志五:使用OpenCV显示彩色图像及红外图像
彩色图像 #include <iostream> #include <Kinect.h> #include <opencv2\highgui.hpp> using ...
- 3dContactPointAnnotationTool开发日志(三四)
今天就是让背景图可以变大变小,变透明度,然后将3d的点投影到图片上,输出2d接触点信息: 可以看到输出了正确的接触点信息: 然后还把空物体的包围盒大小设置为边长为0.1的的正方体,点击选中 ...
- 3dContactPointAnnotationTool开发日志(三三)
添加背景图片后发现Runtime Transform Gizmo无法选中物体了: 于是改了一下EditorObjectSelection.cs中的WereAnyUIElementsHovere ...
- 3dContactPointAnnotationTool开发日志(三二)
今天就是看怎么把论文的python源码预测出来的smpl模型的姿势和形状参数弄到unity版本的smpl里,但是python版本的和unity版本的不一样. 先看看他的fit_3d.py: ...
- 3dContactPointAnnotationTool开发日志(三一)
在玩的时候遇到了一个python的问题: Traceback (most recent call last): File ".\convert.py", line 13, in ...
- 3dContactPointAnnotationTool开发日志(三十)
在vs2017里生成opencv时遇到了无法打开python27_d.lib的问题,具体解决请看这个,不过我用的是方法2,python37_d.lib找不到同理. Windows下可以用的op ...
- 3dContactPointAnnotationTool开发日志(二九)
今天想着在Windows平台上跑通那个代码,不过它的官网上写的支持平台不包括windows,但我还是想试试,因为看他的依赖好像和平台的关系不是特别大. 看了下它的py代码,不知道是py2还是p ...
随机推荐
- 转载:CSS的组成,三种样式(内联式,嵌入式,外部式),优先级
(仅供自己备份) 原文地址:http://blog.csdn.net/chq11106004389/article/details/50515717 CSS的组成 选择符/选择器+声明(属性+值) 选 ...
- flask日志
日志功能的实现 Python 自身提供了一个用于记录日志的标准库模块:logging. logging 模块 logging 模块定义的函数和类为应用程序和库的开发实现了一个灵活的事件日志系统 log ...
- 观看杨老师(杨旭)Asp.Net Core MVC入门教程记录
观看杨老师(杨旭)Asp.Net Core MVC入门教程记录 ASP.NET Core MVC入门 Asp.Net Core启动和配置 Program类,Main方法 Startup类 依赖注入,I ...
- 北京Uber优步司机奖励政策(1月1日)
滴快车单单2.5倍,注册地址:http://www.udache.com/ 如何注册Uber司机(全国版最新最详细注册流程)/月入2万/不用抢单:http://www.cnblogs.com/mfry ...
- 成都Uber优步司机奖励政策(3月29日)
滴快车单单2.5倍,注册地址:http://www.udache.com/ 如何注册Uber司机(全国版最新最详细注册流程)/月入2万/不用抢单:http://www.cnblogs.com/mfry ...
- 3329: Xorequ
3329: Xorequ https://www.lydsy.com/JudgeOnline/problem.php?id=3329 分析: 因为a+b = a^b + ((a&b)<& ...
- sql server 对Geography 的增(insert)和查询(select)
insert: Location为 Geography类型 INSERT INTO [oss1].[dbo].[Order] ([Location]) VAL ...
- Vs2015 遇到 CL:fatal error c1510 cannot load language clui.dll
网上说什么点击修复VS,修改VS的,经验证都不好使,直接下载这个库,放在system32/64下面皆可以了
- QT 标题栏隐藏可拖拽
这个也是我网上找到了 为了方便,记录一下 void mousePressEvent(QMouseEvent *e); void mouseMoveEvent(QMouseEvent *e); void ...
- Jmeter接口测试(二)工具介绍
一.Jmeter文件目录介绍 ◆ bin:可执行文件目录 Bin 目录文件 jmeter.bat:windows 的启动文件 jmeter.log:日志文件 jmeter.sh:linux 的启动文件 ...
