如何快速使用YOLO3进行目标检测
本文目的:介绍一篇YOLO3的Keras实现项目,便于快速了解如何使用预训练的YOLOv3,来对新图像进行目标检测。
本文使用的是Github上一位大神训练的YOLO3开源的项目。这个项目提供了很多使用 YOLOv3 的模型,包括对象检测、迁移学习、从头开始训练模型等。其中提供了一个脚本文件yolo3_one_file_to_detect_them_all.py,作者表示单独运行即可进行目标检测。
但是经过测试,还是有几个坑。所以我把代码分解成几个功能模块,在jupyter notebook上单独运行,查出bug后,即可正常运行。
本文操作十分方便,直接下载权重文件,将后面三部分代码拷贝至jupyter notebook运行即可(前提是需要安装库numpy、Keras、cv2),不需要其他的脚本文件。
第一步:下载权重文件 https://pjreddie.com/media/files/yolov3.weights
这个权重是在MS COCO上训练的结果,因此可以检测80种目标。
第二步:导入需要的库函数,以及后续待用的函数
import argparse

import os

import numpy as np

from keras.layers import Conv2D, Input, BatchNormalization, LeakyReLU, ZeroPadding2D, UpSampling2D

from keras.layers.merge import add, concatenate

from keras.models import Model

import struct

import cv2

#改动1:这里报错,和我机器不一致,所以注释掉

#np.set_printoptions(threshold=np.nan)

#os.environ["CUDA_DEVICE_ORDER"]="PCI_BUS_ID"

#os.environ["CUDA_VISIBLE_DEVICES"]="0"

argparser = argparse.ArgumentParser(

    description='test yolov3 network with coco weights')

argparser.add_argument(

    '-w',

    '--weights',

    help='path to weights file')

argparser.add_argument(

    '-i',

    '--image',

    help='path to image file')

class WeightReader:

    def __init__(self, weight_file):

        with open(weight_file, 'rb') as w_f:

            major,    = struct.unpack('i', w_f.read(4))

            minor,    = struct.unpack('i', w_f.read(4))

            revision, = struct.unpack('i', w_f.read(4))

            if (major*10 + minor) >= 2 and major < 1000 and minor < 1000:

                w_f.read(8)

            else:

                w_f.read(4)

            transpose = (major > 1000) or (minor > 1000)

            binary = w_f.read()

        self.offset = 0

        self.all_weights = np.frombuffer(binary, dtype='float32')

    def read_bytes(self, size):

        self.offset = self.offset + size

        return self.all_weights[self.offset-size:self.offset]

    def load_weights(self, model):

        for i in range(106):

            try:

                conv_layer = model.get_layer('conv_' + str(i))

                print("loading weights of convolution #" + str(i))

                if i not in [81, 93, 105]:

                    norm_layer = model.get_layer('bnorm_' + str(i))

                    size = np.prod(norm_layer.get_weights()[0].shape)

                    beta  = self.read_bytes(size) # bias

                    gamma = self.read_bytes(size) # scale

                    mean  = self.read_bytes(size) # mean

                    var   = self.read_bytes(size) # variance

                    weights = norm_layer.set_weights([gamma, beta, mean, var])

                if len(conv_layer.get_weights()) > 1:

                    bias   = self.read_bytes(np.prod(conv_layer.get_weights()[1].shape))

                    kernel = self.read_bytes(np.prod(conv_layer.get_weights()[0].shape))

                    kernel = kernel.reshape(list(reversed(conv_layer.get_weights()[0].shape)))

                    kernel = kernel.transpose([2,3,1,0])

                    conv_layer.set_weights([kernel, bias])

                else:

                    kernel = self.read_bytes(np.prod(conv_layer.get_weights()[0].shape))

                    kernel = kernel.reshape(list(reversed(conv_layer.get_weights()[0].shape)))

                    kernel = kernel.transpose([2,3,1,0])

                    conv_layer.set_weights([kernel])

            except ValueError:

                print("no convolution #" + str(i))

    def reset(self):

        self.offset = 0

class BoundBox:

    def __init__(self, xmin, ymin, xmax, ymax, objness = None, classes = None):

        self.xmin = xmin

        self.ymin = ymin

        self.xmax = xmax

        self.ymax = ymax

        self.objness = objness

        self.classes = classes

        self.label = -1

        self.score = -1

    def get_label(self):

        if self.label == -1:

            self.label = np.argmax(self.classes)

        return self.label

    def get_score(self):

        if self.score == -1:

            self.score = self.classes[self.get_label()]

        return self.score

def _conv_block(inp, convs, skip=True):

    x = inp

    count = 0

    for conv in convs:

        if count == (len(convs) - 2) and skip:

            skip_connection = x

        count += 1

        if conv['stride'] > 1: x = ZeroPadding2D(((1,0),(1,0)))(x) # peculiar padding as darknet prefer left and top

        x = Conv2D(conv['filter'],

                   conv['kernel'],

                   strides=conv['stride'],

                   padding='valid' if conv['stride'] > 1 else 'same', # peculiar padding as darknet prefer left and top

                   name='conv_' + str(conv['layer_idx']),

                   use_bias=False if conv['bnorm'] else True)(x)

        if conv['bnorm']: x = BatchNormalization(epsilon=0.001, name='bnorm_' + str(conv['layer_idx']))(x)

        if conv['leaky']: x = LeakyReLU(alpha=0.1, name='leaky_' + str(conv['layer_idx']))(x)

    return add([skip_connection, x]) if skip else x

def _interval_overlap(interval_a, interval_b):

    x1, x2 = interval_a

    x3, x4 = interval_b

    if x3 < x1:

        if x4 < x1:

            return 0

        else:

            return min(x2,x4) - x1

    else:

        if x2 < x3:

             return 0

        else:

            return min(x2,x4) - x3

def _sigmoid(x):

    return 1. / (1. + np.exp(-x))

def bbox_iou(box1, box2):

    intersect_w = _interval_overlap([box1.xmin, box1.xmax], [box2.xmin, box2.xmax])

    intersect_h = _interval_overlap([box1.ymin, box1.ymax], [box2.ymin, box2.ymax])

    intersect = intersect_w * intersect_h

    w1, h1 = box1.xmax-box1.xmin, box1.ymax-box1.ymin

    w2, h2 = box2.xmax-box2.xmin, box2.ymax-box2.ymin

    union = w1*h1 + w2*h2 - intersect

    return float(intersect) / union

def make_yolov3_model():

    input_image = Input(shape=(None, None, 3))

    # Layer  0 => 4

    x = _conv_block(input_image, [{'filter': 32, 'kernel': 3, 'stride': 1, 'bnorm': True, 'leaky': True, 'layer_idx': 0},

                                  {'filter': 64, 'kernel': 3, 'stride': 2, 'bnorm': True, 'leaky': True, 'layer_idx': 1},

                                  {'filter': 32, 'kernel': 1, 'stride': 1, 'bnorm': True, 'leaky': True, 'layer_idx': 2},

                                  {'filter': 64, 'kernel': 3, 'stride': 1, 'bnorm': True, 'leaky': True, 'layer_idx': 3}])

    # Layer  5 => 8

    x = _conv_block(x, [{'filter': 128, 'kernel': 3, 'stride': 2, 'bnorm': True, 'leaky': True, 'layer_idx': 5},

                        {'filter':  64, 'kernel': 1, 'stride': 1, 'bnorm': True, 'leaky': True, 'layer_idx': 6},

                        {'filter': 128, 'kernel': 3, 'stride': 1, 'bnorm': True, 'leaky': True, 'layer_idx': 7}])

    # Layer  9 => 11

    x = _conv_block(x, [{'filter':  64, 'kernel': 1, 'stride': 1, 'bnorm': True, 'leaky': True, 'layer_idx': 9},

                        {'filter': 128, 'kernel': 3, 'stride': 1, 'bnorm': True, 'leaky': True, 'layer_idx': 10}])

    # Layer 12 => 15

    x = _conv_block(x, [{'filter': 256, 'kernel': 3, 'stride': 2, 'bnorm': True, 'leaky': True, 'layer_idx': 12},

                        {'filter': 128, 'kernel': 1, 'stride': 1, 'bnorm': True, 'leaky': True, 'layer_idx': 13},

                        {'filter': 256, 'kernel': 3, 'stride': 1, 'bnorm': True, 'leaky': True, 'layer_idx': 14}])

    # Layer 16 => 36

    for i in range(7):

        x = _conv_block(x, [{'filter': 128, 'kernel': 1, 'stride': 1, 'bnorm': True, 'leaky': True, 'layer_idx': 16+i*3},

                            {'filter': 256, 'kernel': 3, 'stride': 1, 'bnorm': True, 'leaky': True, 'layer_idx': 17+i*3}])

    skip_36 = x

    # Layer 37 => 40

    x = _conv_block(x, [{'filter': 512, 'kernel': 3, 'stride': 2, 'bnorm': True, 'leaky': True, 'layer_idx': 37},

                        {'filter': 256, 'kernel': 1, 'stride': 1, 'bnorm': True, 'leaky': True, 'layer_idx': 38},

                        {'filter': 512, 'kernel': 3, 'stride': 1, 'bnorm': True, 'leaky': True, 'layer_idx': 39}])

    # Layer 41 => 61

    for i in range(7):

        x = _conv_block(x, [{'filter': 256, 'kernel': 1, 'stride': 1, 'bnorm': True, 'leaky': True, 'layer_idx': 41+i*3},

                            {'filter': 512, 'kernel': 3, 'stride': 1, 'bnorm': True, 'leaky': True, 'layer_idx': 42+i*3}])

    skip_61 = x

    # Layer 62 => 65

    x = _conv_block(x, [{'filter': 1024, 'kernel': 3, 'stride': 2, 'bnorm': True, 'leaky': True, 'layer_idx': 62},

                        {'filter':  512, 'kernel': 1, 'stride': 1, 'bnorm': True, 'leaky': True, 'layer_idx': 63},

                        {'filter': 1024, 'kernel': 3, 'stride': 1, 'bnorm': True, 'leaky': True, 'layer_idx': 64}])

    # Layer 66 => 74

    for i in range(3):

        x = _conv_block(x, [{'filter':  512, 'kernel': 1, 'stride': 1, 'bnorm': True, 'leaky': True, 'layer_idx': 66+i*3},

                            {'filter': 1024, 'kernel': 3, 'stride': 1, 'bnorm': True, 'leaky': True, 'layer_idx': 67+i*3}])

    # Layer 75 => 79

    x = _conv_block(x, [{'filter':  512, 'kernel': 1, 'stride': 1, 'bnorm': True, 'leaky': True, 'layer_idx': 75},

                        {'filter': 1024, 'kernel': 3, 'stride': 1, 'bnorm': True, 'leaky': True, 'layer_idx': 76},

                        {'filter':  512, 'kernel': 1, 'stride': 1, 'bnorm': True, 'leaky': True, 'layer_idx': 77},

                        {'filter': 1024, 'kernel': 3, 'stride': 1, 'bnorm': True, 'leaky': True, 'layer_idx': 78},

                        {'filter':  512, 'kernel': 1, 'stride': 1, 'bnorm': True, 'leaky': True, 'layer_idx': 79}], skip=False)

    # Layer 80 => 82

    yolo_82 = _conv_block(x, [{'filter': 1024, 'kernel': 3, 'stride': 1, 'bnorm': True,  'leaky': True,  'layer_idx': 80},

                              {'filter':  255, 'kernel': 1, 'stride': 1, 'bnorm': False, 'leaky': False, 'layer_idx': 81}], skip=False)

    # Layer 83 => 86

    x = _conv_block(x, [{'filter': 256, 'kernel': 1, 'stride': 1, 'bnorm': True, 'leaky': True, 'layer_idx': 84}], skip=False)

    x = UpSampling2D(2)(x)

    x = concatenate([x, skip_61])

    # Layer 87 => 91

    x = _conv_block(x, [{'filter': 256, 'kernel': 1, 'stride': 1, 'bnorm': True, 'leaky': True, 'layer_idx': 87},

                        {'filter': 512, 'kernel': 3, 'stride': 1, 'bnorm': True, 'leaky': True, 'layer_idx': 88},

                        {'filter': 256, 'kernel': 1, 'stride': 1, 'bnorm': True, 'leaky': True, 'layer_idx': 89},

                        {'filter': 512, 'kernel': 3, 'stride': 1, 'bnorm': True, 'leaky': True, 'layer_idx': 90},

                        {'filter': 256, 'kernel': 1, 'stride': 1, 'bnorm': True, 'leaky': True, 'layer_idx': 91}], skip=False)

    # Layer 92 => 94

    yolo_94 = _conv_block(x, [{'filter': 512, 'kernel': 3, 'stride': 1, 'bnorm': True,  'leaky': True,  'layer_idx': 92},

                              {'filter': 255, 'kernel': 1, 'stride': 1, 'bnorm': False, 'leaky': False, 'layer_idx': 93}], skip=False)

    # Layer 95 => 98

    x = _conv_block(x, [{'filter': 128, 'kernel': 1, 'stride': 1, 'bnorm': True, 'leaky': True,   'layer_idx': 96}], skip=False)

    x = UpSampling2D(2)(x)

    x = concatenate([x, skip_36])

    # Layer 99 => 106

    yolo_106 = _conv_block(x, [{'filter': 128, 'kernel': 1, 'stride': 1, 'bnorm': True,  'leaky': True,  'layer_idx': 99},

                               {'filter': 256, 'kernel': 3, 'stride': 1, 'bnorm': True,  'leaky': True,  'layer_idx': 100},

                               {'filter': 128, 'kernel': 1, 'stride': 1, 'bnorm': True,  'leaky': True,  'layer_idx': 101},

                               {'filter': 256, 'kernel': 3, 'stride': 1, 'bnorm': True,  'leaky': True,  'layer_idx': 102},

                               {'filter': 128, 'kernel': 1, 'stride': 1, 'bnorm': True,  'leaky': True,  'layer_idx': 103},

                               {'filter': 256, 'kernel': 3, 'stride': 1, 'bnorm': True,  'leaky': True,  'layer_idx': 104},

                               {'filter': 255, 'kernel': 1, 'stride': 1, 'bnorm': False, 'leaky': False, 'layer_idx': 105}], skip=False)

    model = Model(input_image, [yolo_82, yolo_94, yolo_106])

    return model

def preprocess_input(image, net_h, net_w):

    new_h, new_w, _ = image.shape

    # determine the new size of the image

    if (float(net_w)/new_w) < (float(net_h)/new_h):

        new_h = (new_h * net_w)/new_w

        new_w = net_w

    else:

        new_w = (new_w * net_h)/new_h

        new_h = net_h

    # resize the image to the new size

    resized = cv2.resize(image[:,:,::-1]/255., (int(new_w), int(new_h)))

    # embed the image into the standard letter box

    new_image = np.ones((net_h, net_w, 3)) * 0.5

    #改动2:下面有个坑,源代码中new_h可能会出现小数截断之后不匹配问题,所以提前截断

    #new_image[int((net_h-new_h)//2):int((net_h+new_h)//2), int((net_w-new_w)//2):int((net_w+new_w)//2), :] = resized

    new_image[int((net_h-int(new_h))//2):int((net_h+int(new_h))//2), int((net_w-int(new_w))//2):int((net_w+int(new_w))//2), :] = resized

    new_image = np.expand_dims(new_image, 0)

    return new_image

def decode_netout(netout, anchors, obj_thresh, nms_thresh, net_h, net_w):

    grid_h, grid_w = netout.shape[:2]

    nb_box = 3

    netout = netout.reshape((grid_h, grid_w, nb_box, -1))

    nb_class = netout.shape[-1] - 5

    boxes = []

    netout[..., :2]  = _sigmoid(netout[..., :2])

    netout[..., 4:]  = _sigmoid(netout[..., 4:])

    netout[..., 5:]  = netout[..., 4][..., np.newaxis] * netout[..., 5:]

    netout[..., 5:] *= netout[..., 5:] > obj_thresh

    for i in range(grid_h*grid_w):

        row = i / grid_w

        col = i % grid_w

        for b in range(nb_box):

            # 4th element is objectness score

            objectness = netout[int(row)][int(col)][b][4]

            #objectness = netout[..., :4]

            if(objectness.all() <= obj_thresh): continue

            # first 4 elements are x, y, w, and h

            x, y, w, h = netout[int(row)][int(col)][b][:4]

            x = (col + x) / grid_w # center position, unit: image width

            y = (row + y) / grid_h # center position, unit: image height

            w = anchors[2 * b + 0] * np.exp(w) / net_w # unit: image width

            h = anchors[2 * b + 1] * np.exp(h) / net_h # unit: image height

            # last elements are class probabilities

            classes = netout[int(row)][col][b][5:]

            box = BoundBox(x-w/2, y-h/2, x+w/2, y+h/2, objectness, classes)

            #box = BoundBox(x-w/2, y-h/2, x+w/2, y+h/2, None, classes)

            boxes.append(box)

    return boxes

def correct_yolo_boxes(boxes, image_h, image_w, net_h, net_w):

    if (float(net_w)/image_w) < (float(net_h)/image_h):

        new_w = net_w

        new_h = (image_h*net_w)/image_w

    else:

        new_h = net_w

        new_w = (image_w*net_h)/image_h

    for i in range(len(boxes)):

        x_offset, x_scale = (net_w - new_w)/2./net_w, float(new_w)/net_w

        y_offset, y_scale = (net_h - new_h)/2./net_h, float(new_h)/net_h

        boxes[i].xmin = int((boxes[i].xmin - x_offset) / x_scale * image_w)

        boxes[i].xmax = int((boxes[i].xmax - x_offset) / x_scale * image_w)

        boxes[i].ymin = int((boxes[i].ymin - y_offset) / y_scale * image_h)

        boxes[i].ymax = int((boxes[i].ymax - y_offset) / y_scale * image_h)

def do_nms(boxes, nms_thresh):

    if len(boxes) > 0:

        nb_class = len(boxes[0].classes)

    else:

        return

    for c in range(nb_class):

        sorted_indices = np.argsort([-box.classes[c] for box in boxes])

        for i in range(len(sorted_indices)):

            index_i = sorted_indices[i]

            if boxes[index_i].classes[c] == 0: continue

            for j in range(i+1, len(sorted_indices)):

                index_j = sorted_indices[j]

                if bbox_iou(boxes[index_i], boxes[index_j]) >= nms_thresh:

                    boxes[index_j].classes[c] = 0

def draw_boxes(image, boxes, labels, obj_thresh):

    for box in boxes:

        label_str = ''

        label = -1

        for i in range(len(labels)):

            if box.classes[i] > obj_thresh:

                label_str += labels[i]

                label = i

                print(labels[i] + ': ' + str(box.classes[i]*100) + '%')

        if label >= 0:

            cv2.rectangle(image, (box.xmin,box.ymin), (box.xmax,box.ymax), (0,255,0), 3)

            #改动3:原预测框标签不清晰,所以重新画

            #cv2.putText(image,

            #            label_str + ' ' + str(box.get_score()),

            #            (box.xmin, box.ymin - 13),

            #            cv2.FONT_HERSHEY_SIMPLEX,

            #            1e-3 * image.shape[0],

            #            (0,255,0), 2)

            cv2.rectangle(image, (box.xmin,box.ymin), (box.xmin+125,box.ymin+20), (238,238,0), -1)

            tag = '{}: {:.3f}'.format(label_str, box.get_score())

            cv2.putText(image,

                        tag,

                        (box.xmin+5, box.ymin+15),

                        cv2.FONT_HERSHEY_SIMPLEX,

                        1.4e-3 * image.shape[0],

                        (255,0,0), 2)

    return image
第三步:创建模型,加载权重
#建模并加载权重

weights_path = 'MyFiles/yolov3.weights'  #这里是权重文件路径

# make the yolov3 model to predict 80 classes on COCO

yolov3 = make_yolov3_model()

# load the weights trained on COCO into the model

weight_reader = WeightReader(weights_path)

weight_reader.load_weights(yolov3)
第四步:对新图像做目标检测
需要预测的图像示例:

##########################设置参数###################################

net_h, net_w = 416, 416

obj_thresh, nms_thresh = 0.5, 0.45

anchors = [[116,90,  156,198,  373,326],  [30,61, 62,45,  59,119], [10,13,  16,30,  33,23]]

labels = ["person", "bicycle", "car", "motorbike", "aeroplane", "bus", "train", "truck", \

          "boat", "traffic light", "fire hydrant", "stop sign", "parking meter", "bench", \

          "bird", "cat", "dog", "horse", "sheep", "cow", "elephant", "bear", "zebra", "giraffe", \

          "backpack", "umbrella", "handbag", "tie", "suitcase", "frisbee", "skis", "snowboard", \

          "sports ball", "kite", "baseball bat", "baseball glove", "skateboard", "surfboard", \

          "tennis racket", "bottle", "wine glass", "cup", "fork", "knife", "spoon", "bowl", "banana", \

          "apple", "sandwich", "orange", "broccoli", "carrot", "hot dog", "pizza", "donut", "cake", \

          "chair", "sofa", "pottedplant", "bed", "diningtable", "toilet", "tvmonitor", "laptop", "mouse", \

          "remote", "keyboard", "cell phone", "microwave", "oven", "toaster", "sink", "refrigerator", \

          "book", "clock", "vase", "scissors", "teddy bear", "hair drier", "toothbrush"]

###########################预测图像################################

image_path   = 'MyFiles/zebra.jpg' #要预测的图像路径

# preprocess the image

image = cv2.imread(image_path)

image_h, image_w, _ = image.shape

new_image = preprocess_input(image, net_h, net_w)

# run the prediction

yolos = yolov3.predict(new_image)

boxes = []

for i in range(len(yolos)):

    # decode the output of the network

    boxes += decode_netout(yolos[i][0], anchors[i], obj_thresh, nms_thresh, net_h, net_w)

# correct the sizes of the bounding boxes

correct_yolo_boxes(boxes, image_h, image_w, net_h, net_w)

# suppress non-maximal boxes

do_nms(boxes, nms_thresh)

# draw bounding boxes on the image using labels

draw_boxes(image, boxes, labels, obj_thresh)

# write the image with bounding boxes to file

cv2.imwrite(image_path[:-4] + '_detected' + image_path[-4:], (image).astype('uint8'))
注意:原yolo3_one_file_to_detect_them_all.py文件中对应代码运行后程序有两次报错:
- 第一次是最开始的环境设置代码,直接注释掉即可;
- 第二次错误指向第二步的preprocess_input()函数 ValueError: could not broadcast input array from shape (250,416,3) into shape (251,416,3)。模型输入指定尺寸是(416,416),示例图像的像素是(386,640),将其带入preprocess_input函数后,发现 new_image[...] = resized 这一步出现了浮点数截断带来的问题,因此注释掉,换成本文中代码。
将两处代码修改后,检测结果如图所示:
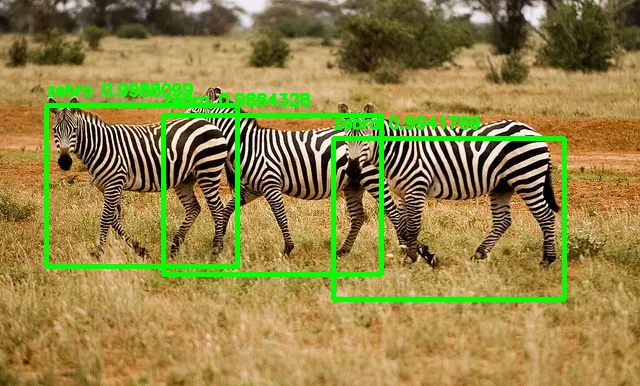
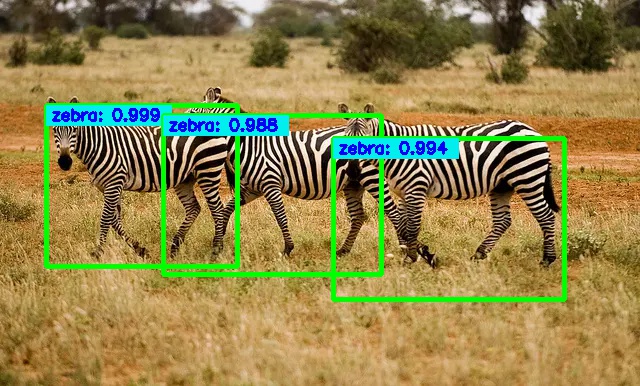
这个检测结果标签不清楚,于是将边框绘制函数 draw_boxes() 改成本文中代码,结果如下,虽然美观不足,但足够清楚。
其他注意点:
Reference:
https://juejin.im/post/5d12eef5e51d455a68490ba8
https://github.com/experiencor/keras-yolo3
https://blog.csdn.net/loovelj/article/details/81097614
如何快速使用YOLO3进行目标检测的更多相关文章
- 第三十五节,目标检测之YOLO算法详解
Redmon, J., Divvala, S., Girshick, R., Farhadi, A.: You only look once: Unified, real-time object de ...
- yolo3(目标检测)实测
yolo是继faster-r-cnn后,原作者在目标检测领域进行的新研究.到了v3版本以后,虽然已经换人支持,但是更注重工程实践,在实际使用过程中突出感受就是 “非常快”,GPU加速以后能够达到实时多 ...
- 快速理解YOLO目标检测
YOLO(You Only Look Once)论文 近些年,R-CNN等基于深度学习目标检测方法,大大提高了检测精度和检测速度. 例如在Pascal VOC数据集上Faster R-CNN的mAP达 ...
- 【目标检测】YOLO:
PPT 可以说是讲得相当之清楚了... deepsystems.io 中文翻译: https://zhuanlan.zhihu.com/p/24916786 图解YOLO YOLO核心思想:从R-CN ...
- [目标检测]YOLO原理
1 YOLO 创新点: 端到端训练及推断 + 改革区域建议框式目标检测框架 + 实时目标检测 1.1 创新点 (1) 改革了区域建议框式检测框架: RCNN系列均需要生成建议框,在建议框上进行分类与回 ...
- 目标检测网络之 YOLOv2
YOLOv1基本思想 YOLO将输入图像分成SxS个格子,若某个物体 Ground truth 的中心位置的坐标落入到某个格子,那么这个格子就负责检测出这个物体. 每个格子预测B个bounding b ...
- 【深度学习】目标检测算法总结(R-CNN、Fast R-CNN、Faster R-CNN、FPN、YOLO、SSD、RetinaNet)
目标检测是很多计算机视觉任务的基础,不论我们需要实现图像与文字的交互还是需要识别精细类别,它都提供了可靠的信息.本文对目标检测进行了整体回顾,第一部分从RCNN开始介绍基于候选区域的目标检测器,包括F ...
- 利用更快的r-cnn深度学习进行目标检测
此示例演示如何使用名为“更快r-cnn(具有卷积神经网络的区域)”的深度学习技术来训练对象探测器. 概述 此示例演示如何训练用于检测车辆的更快r-cnn对象探测器.更快的r-nnn [1]是r-cnn ...
- 目标检测网络之 YOLOv3
本文逐步介绍YOLO v1~v3的设计历程. YOLOv1基本思想 YOLO将输入图像分成SxS个格子,若某个物体 Ground truth 的中心位置的坐标落入到某个格子,那么这个格子就负责检测出这 ...
随机推荐
- 07.整合jsp、整合freemarker、整合thymeleaf
整合jsp pom.xml部分内容 <packaging>war</packaging> </dependencies> <dependency> &l ...
- JavaWeb(二):Servlet
一.本教程使用的Web容器——Tomcat Tomcat是提供一个支持Servlet和JSP运行的容器.Servlet和JSP能根据实时需要,产生动态网页内容.而对于Web服务器来说, Apache仅 ...
- Vue $ref 的用法
<div id="app"> <cpn $ref="item"></cpn> <cpn></cpn> ...
- CNN笔记:通俗理解卷积神经网络
CNN笔记:通俗理解卷积神经网络 2016年07月02日 22:14:50 v_JULY_v 阅读数 250368更多 分类专栏: 30.Machine L & Deep Learning 机 ...
- SQL SERVER视图对查询效率的提高
SQL SERVER视图不仅可以实现许多我们需要的功能,而且对于SQL SERVER查询效率的提高也有帮助,下面一起来了解一下. 有两张数据表:A和B,其中A的记录为2万条左右,而B中的数据为200万 ...
- Android中插件开发篇总结和概述
刚刚终于写完了插件开发的最后一篇文章,下面就来总结一下,关于Android中插件篇从去年的11月份就开始规划了,主要从三个方面去解读Android中插件开发原理.说白了,插件开发的原理就是:动态加载技 ...
- Bugku | Easy_vb
载入ida,直接搜‘ctf’就有了,坑点是不要交“MCTF{XXX}”,要交“flag{XXXX}”
- 前端每日实战:18# 视频演示如何用纯 CSS 创作 404 文字变形为 NON 文字的交互特效
效果预览 按下右侧的"点击预览"按钮可以在当前页面预览,点击链接可以全屏预览. https://codepen.io/comehope/pen/ZoxjXm 可交互视频教程 此视频 ...
- I2C总线协议详解
I2C总线定义 I2C(Inter-Integrated Circuit)总线是一种由PHILIPS公司开发的两线式串行总线,用于连接微控制器及其外围设备.I2C总线产生于在80年代,最初为音 ...
- Php单元测试 phpunit & codecept
phpunit: Windows版本 整体上说,在 Windows 下安装 PHAR 和手工在 Windows 下安装 Composer 是一样的过程: 下载链接:http://pan.baidu.c ...