vue手动制作地址选择器
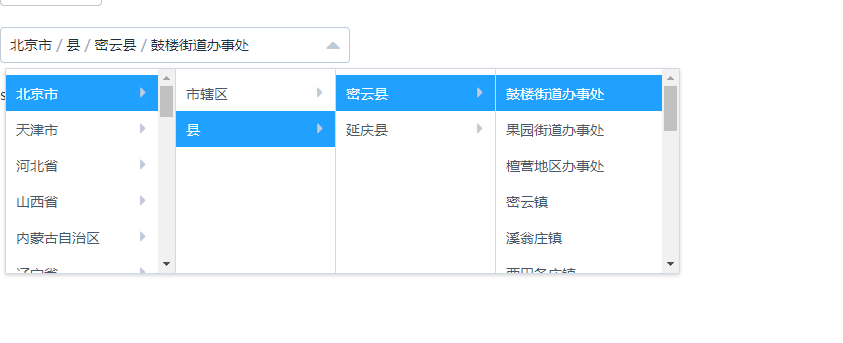
方法一:4级地址选择器(基于elementui Cascader 级联选择器) 推荐
效果图:
组件源码:
<template>

  <div class="select-city" ref="selectCity">

    <el-cascader

      :options="options2"

      @change="change"

      v-model="selCity"

      :props="props"

    ></el-cascader>

  </div>

</template>

<style>

  .select-city .el-input{

    width: 350px;

  }

</style>

<script>

  import addressData from 'common/json/class4new.json'

  export default {

    props: {

      value: {

        required: true

      },

      getCityName: {

      }

    },

    data() {

      return {

        options2: addressData,

        props: {

          label: 'name',

          value: 'id',

          children: 'children'

        },

        selCity: []

      }

    },

    watch: {

      value (val) {

        this.init()

      }

    },

    created() {

      // 组件刚载入并不会触发watch value

    },

    methods: {

      init() {

        let el = this.$refs.selectCity

        if (!this.value) {

          if (this.selCity.length) {

            this.selCity = []

            el.getElementsByClassName('el-cascader__label')[0].innerHTML = ''

            el.getElementsByClassName('el-input__inner')[0].setAttribute('placeholder', '请选择')

          }

        } else {

          if (this.selCity.length===0 || this.selCity[3] !== this.value) {

            this.selCity[0] = this.value.substr(0, 2) + '0000'

            this.selCity[1] = this.value.substr(0, 4) + '00000000'

            this.selCity[2] = this.value.substr(0, 6) + '000000'

            this.selCity[3] = this.value

            let name = this.getNode().join('<span>/</span>')

            el.getElementsByClassName('el-cascader__label')[0].innerHTML = name

            el.getElementsByClassName('el-input__inner')[0].setAttribute('placeholder', '')

          }

        }

      },

      change(val) {

        // 只有选完了,才会将数据返回给父组件

        this.$emit('input', val[3])

        this.returnCityName()

      },

      returnCityName() {

        if (typeof this.getCityName === 'function') {

          this.getCityName(this.getNode().join(''))

        }

      },

      getNode() {

        let name = []

        this.options2.filter(v => {

          if (name[0]) return

          if (v.id===this.selCity[0]) {

            name.push(v.name)

            v.children.filter(v => {

              if (name[1]>0) return

              if (v.id===this.selCity[1]) {

                name.push(v.name)

                v.children.filter(v => {

                  if (name[2]>0) return

                  if (v.id===this.selCity[2]) {

                    name.push(v.name)

                    v.children.filter(v => {

                      if (name[3]>0) return

                      if (v.id===this.selCity[3]) {

                        name.push(v.name)

                        return false

                      }

                    })

                  }

                })

              }

            })

          }

        })

        return name

      }

    }

  }

</script>
方法二:4级地址选择器(基于elementui select选择器 )
适用环境: PC
开发过程中遇到的问题:
1. 自定义组件如何做到双向数据绑定
2. 自定义组件在刚加载完毕,会执行一次created和mounted,当组件上绑定的v-model变化时候,也就是做编辑的时候,触发的watch监听的value方法
3.这个程序刚好是一个自循环,一旦更新了地址组件绑定的值立刻就触发this.$emit,把执行结果返回至父组件。这边需要visible-change(下拉框出现/隐藏时触发, 出现则为 true,隐藏则为 false),来组件地址组件数据的初始化,导致向父组件传递错误数据
小小的程序,把我折腾了好几天,仔细想想,两个2原因:1.缺少自己写组件的经历导致对vue的很多api不熟悉 2.缺乏独自面对困难的恒心
效果图:

地址组件代码:
<style>

  .block .el-select{display: block;}

  .block .el-select{margin-bottom: 20px}

</style>

<template>

  <div>

    <div :class="{block: block}">

      <el-select v-model="proviceCode" popper-class="tab-select" placeholder="请选择省" @change="proviceChange" @visible-change="vChange($event, 'provice')">

        <el-option

          v-for="(item, index) in provice"

          :key="item.id"

          :label="item.name"

          :value="item.id">

        </el-option>

      </el-select>

      <el-select v-model="cityCode" popper-class="tab-select" placeholder="请选择市" @change="cityChange" @visible-change="vChange($event, 'city')">

        <el-option

          v-for="(item, index) in city"

          :key="item.id"

          :label="item.name"

          :value="item.id">

        </el-option>

      </el-select>

      <el-select v-model="areaCode" popper-class="tab-select" placeholder="请选择区或县" @change="areaChange" @visible-change="vChange($event, 'area')">

        <el-option

          v-for="(item, index) in area"

          :key="item.id"

          :label="item.name"

          :value="item.id">

        </el-option>

      </el-select>

      <el-select v-model="villageCode"  popper-class="tab-select" placeholder="请选择乡" @change="villageChange"  @visible-change="vChange($event, 'village')">

        <el-option

          v-for="(item, index) in village"

          :key="item.id"

          :label="item.name"

          :value="item.id">

        </el-option>

      </el-select>

      <input type="hidden" :value="value">

    </div>

  </div>

</template>

<script>

  import address from 'common/json/class4new.json'

  export default {

    props: {

      block: {

        type: Boolean,

        default: false

      },

      value: {

        required: false

      }

    },

    data() {

      return {

        provice: address,

        city: [],

        area: [],

        village: [],

        proviceCode: '',

        cityCode: '',

        areaCode: '',

        villageCode: '',

        isOpen: {

          provice: false,

          city: false,

          area: false,

          village: false

        }

      }

    },

    watch: {

      value (val) {

        if (val.code !== this.villageCode) {

          this.init()

        }

      }

    },

    created() {

      this.villageCode = this.value.code

      this.init()

    },

    mounted () {

      this.$root.eventHub.$on("reset-addressSelect", () => {

        this.city = []

        this.area = []

        this.village = []

        this.proviceCode = ''

        this.cityCode = ''

        this.areaCode = ''

        this.villageCode = ''

      })

    },

    methods: {

      vChange(val, type) {

        this.isOpen[type] = val

      },

      init() {

        let code = this.value.code;

        if (code) {

          let v = code.toString()

          this.proviceCode = v.substr(0,2) + '0000'

          this.cityCode = v.substr(0,4)+'00000000'

          this.areaCode = v.substr(0,6)+'000000'

          this.villageCode = v

          this.proviceChange(this.proviceCode).then(_ => {

            this.cityChange(this.cityCode).then(_ => {

              this.areaChange(this.areaCode)

            })

          })

        } else {

          this.city = []

          this.area = []

          this.village = []

          this.proviceCode = ''

          this.cityCode = ''

          this.areaCode = ''

          this.villageCode = ''

        }

      },

      proviceChange(id) {

        return new Promise((resolve, reject) => {

          if (this.isOpen.provice) {

            this.city = []

            this.area = []

            this.village = []

            this.cityCode = ''

            this.areaCode = ''

            this.villageCode = ''

          }

          this.provice.filter(v => {

            if (v.id === id) {

              this.city = v.children

              resolve()

              return false

            }

          })

        })

      },

      cityChange(id) {

        return new Promise((resolve, reject) => {

          if (this.isOpen.city) {

            this.area = []

            this.village = []

            this.areaCode = ''

            this.villageCode = ''

          }

          this.city.filter(v => {

            if (v.id === id) {

              this.area = v.children

              resolve()

              return false

            }

          })

        })

      },

      areaChange(id) {

        return new Promise((resolve, reject) => {

          if (this.isOpen.area) {

            this.village = []

            this.villageCode = ''

          }

          this.area.filter(v => {

            if (v.id === id) {

              this.village = v.children

              resolve()

              return false

            }

          })

        })

      },

      villageChange(id) {

        var text = []

        this.provice.filter(v => {

          if (v.id === this.proviceCode) {

            text.push(v.name)

            return false

          }

        })

        this.city.filter(v => {

          if (v.id === this.cityCode) {

            text.push(v.name)

            return false

          }

        })

        this.area.filter(v => {

          if (v.id === this.areaCode) {

            text.push(v.name)

            return false

          }

        })

        this.village.filter(v => {

          if (v.id === id) {

            text.push(v.name)

            return false

          }

        })

        this.$emit('input', {

          text: text.join(''),

          code: id

        })

      }

    }

  }

</script>
vue手动制作地址选择器的更多相关文章
- Windows 7 封装篇(一)【母盘定制】[手动制作]定制合适的系统母盘
Windows 7 封装篇(一)[母盘定制][手动制作]定制合适的系统母盘 http://www.win10u.com/article/html/10.html Windows 7 封装篇(一)[母盘 ...
- Vue省市区三级联选择器V-Distpicker的使用
Vue省市区三级联选择器V-Distpicker的使用 最近用的Vue+Element UI时,有些地方需要用到省市区三联选择器,网上安装并尝试了多种类似的插件,但都因为无法正常实现或是没有眼缘而弃用 ...
- 突破css选择器的局限,实现一个css地址选择器?
首先看一个效果,注意地址栏的变化 然后思考一下,用css如何实现? css选择器的局限 选择器是css中的一大特色,用于选择需要添加样式的元素. 选择器的种类有很多,比如 元素选择器 p {color ...
- 通用js地址选择器
用js实现通用的地址选择器,省份,城市,地区自动关联更新 点击下面查看详细代码: http://runjs.cn/code/s8sqkhcv 关键地址库代码: var addr_arr = new A ...
- WPF Excel导出加个手动修改地址
http://blog.csdn.net/sanjiawan/article/details/6818921 以上是CSDN上的WPF Excel导入导出,我看到有人提问怎么能够手动选择地址,正好用到 ...
- 使用Vue.js制作仿Metronic高级表格(一)静态设计
Metronic高级表格是Metonic框架中自行实现的表格,其底层是Datatables.本教程将主要使用Vue实现交互部分,使用Bootstrap做样式库.jQuery做部分用户交互(弹窗). 使 ...
- 定制一个类似地址选择器的view
代码地址如下:http://www.demodashi.com/demo/12832.html 前言: 这几天也是闲来无事,看看有什么和Scroller相关的控件需要巩固下,原因很简单,前几天看到相关 ...
- CVE 2019 0708 安装重启之后 可能造成 手动IP地址丢失.
1. 最近两天发现 更新了微软的CVE 2019-0708的补丁之后 之前设置的手动ip地址会变成 自动获取, 造成ip地址丢失.. 我昨天遇到两个, 今天同事又遇到一个.微软做补丁也不走心啊..
- HTML中使用Vue+Dhtmlxgantt制作任务进度图
HTML中使用Vue+Dhtmlxgantt制作任务进度图 Dhtmlxgantt官网: https://dhtmlx.com/docs/products/dhtmlxGantt/ 参考文章 甘特图配 ...
随机推荐
- POJ 1912 凸包
题目: #include <iostream> #include <cstdio> #include <cstring> #include <cstdlib& ...
- 【C++】char* 和 char[] 区别的理解
string 是一个类,其中有一个 char * 类型的私有变量. 因此可以如下构建一个string类型的变量. string str = "abcd"; 其中,右值“abcd”一 ...
- 今天跟outlook顶上牛了
之前使用的是2007,然后之前弄东西的时候给升到2010了,之前就是把所有的邮件都保存到本地的文件中,我还想使用之前的文件,然后2010就是不好使,后来查了半天发现原来是需要手动创建账户,参考http ...
- express 请求参数的一些问题
先说点别的,项目入口是index.js,运行 node index 启动项目. 路由部分app.get('/', function(req, res) { res.send('hello, expre ...
- LeetCode_1116.打印零与奇偶数(多线程)
LeetCode_1116 LeetCode-1116.打印零与奇偶数 假设有这么一个类: class ZeroEvenOdd { public ZeroEvenOdd(int n) { ... } ...
- MySQL表碎片清理
MySQL大表清理 生产环境data库业务表base_data大小:500G,data_free:31G mysql> SELECT table_schema,table_name,data_f ...
- Hybrid平台
需求说明 离线包管理平台主要负责对需要接入Hybrid平台的应用进行管理,通过这个平台可以实现对应用的静态资源进行构建.发布.生成离线包,版本控制等,核心场景如下: 将需要做预加载的应用在平台上注册, ...
- 在windows下使用Mingw搭建模拟Linux
1.到官网下载最新版Mingw 2.点击安装,最好选择默认路径,如果不是的话,路径中一定不能有空格. 3.选择安装,mingw-developer-toolkit.mingw32-base.mingw ...
- Delphi XE2 之 FireMonkey 入门(40) - 控件基础: TMemo
Delphi XE2 之 FireMonkey 入门(40) - 控件基础: TMemo 值得注意的变化: 1.其父类 TScrollBox 的许多特性也很有用处, 如: Memo1.UseSma ...
- 阶段3 1.Mybatis_09.Mybatis的多表操作_4 完成account一对一操作-建立实体类关系的方式
定义user的实体.然后生成getter和setter 定义一个可以封装Account和User的Map type这里虽然是account类型 这一段只能保证account的数据完成.并不能保证use ...

