组件--Fragment(碎片)第二篇详解
感觉之前看的还是不清楚,重新再研究了一次
Fragment常用的三个类:
android.app.Fragment 主要用于定义Fragment
android.app.FragmentManager 主要用于在Activity中操作Fragment
android.app.FragmentTransaction 保证一些列Fragment操作的原子性,熟悉事务这个词,一定能明白~
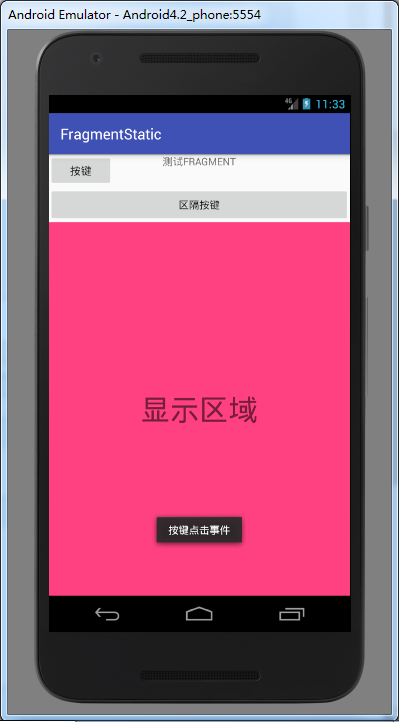
1. 静态调用(就充当普通的控件)
AndroidManifest.xml
<?xml version="1.0" encoding="utf-8"?>

<manifest xmlns:android="http://schemas.android.com/apk/res/android"

    package="viewpagerindicator.com.fragmentstatic">

    <application

        android:allowBackup="true"

        android:icon="@mipmap/ic_launcher"

        android:label="@string/app_name"

        android:roundIcon="@mipmap/ic_launcher_round"

        android:supportsRtl="true"

        android:theme="@style/AppTheme">

        <activity android:name=".MainActivity">

            <intent-filter>

                <action android:name="android.intent.action.MAIN" />

                <category android:name="android.intent.category.LAUNCHER" />

            </intent-filter>

        </activity>

    </application>

</manifest>
activity_main.xml
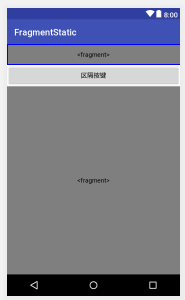
<?xml version="1.0" encoding="utf-8"?>

<LinearLayout xmlns:android="http://schemas.android.com/apk/res/android"

    xmlns:app="http://schemas.android.com/apk/res-auto"

    xmlns:tools="http://schemas.android.com/tools"

    android:layout_width="match_parent"

    android:layout_height="match_parent"

    android:orientation="vertical"

    >

    <!--静态调用fragment的方法:

    就是相当于把fragment当做一个Button或者EditText之类的空间

    其中name就相当于普通空间的ID-->

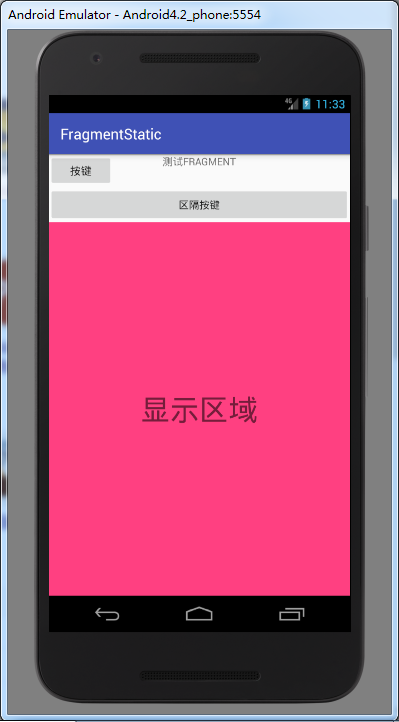
    <fragment

        android:layout_width="match_parent"

        android:layout_height="45dp"

        android:id="@+id/fragment1"

        android:name="viewpagerindicator.com.fragmentstatic.FragmentTittle"/>

    <Button

        android:layout_width="match_parent"

        android:layout_height="wrap_content"

        android:text="区隔按键"/>

    <fragment

        android:layout_width="match_parent"

        android:layout_height="match_parent"

        android:id="@+id/fragment_context_id"

        android:name="viewpagerindicator.com.fragmentstatic.FragmentContext"/>

</LinearLayout>
fragment_tittle.xml
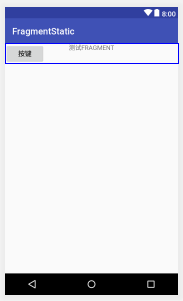
<?xml version="1.0" encoding="utf-8"?>

<RelativeLayout xmlns:android="http://schemas.android.com/apk/res/android"

    android:layout_width="match_parent"

    android:layout_height="45dp"

    android:orientation="horizontal">

    <Button

        android:text="按键"

        android:layout_width="wrap_content"

        android:layout_height="wrap_content"

        android:id="@+id/bt1"

        android:textSize="15sp"

        />

    <TextView

        android:layout_width="match_parent"

        android:layout_height="wrap_content"

        android:text="测试FRAGMENT"

        android:gravity="center"

        />

</RelativeLayout>
fragment_content.xml
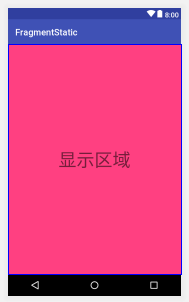
<?xml version="1.0" encoding="utf-8"?>

<LinearLayout xmlns:android="http://schemas.android.com/apk/res/android"

    android:layout_width="match_parent"

    android:layout_height="match_parent"

    android:orientation="horizontal">

    <TextView

        android:layout_width="match_parent"

        android:layout_height="match_parent"

        android:background="@color/colorAccent"

        android:text="显示区域"

        android:textSize="40dp"

        android:gravity="center"/>

</LinearLayout>
MainActivity.java
package viewpagerindicator.com.fragmentstatic;

import android.support.v7.app.AppCompatActivity;

import android.os.Bundle;

import android.util.Log;

public class MainActivity extends AppCompatActivity {

    final  String TAG = "MainActivity";

    @Override

    protected void onCreate(Bundle savedInstanceState) {

        super.onCreate(savedInstanceState);

        setContentView(R.layout.activity_main);

    }

}
FragmentTittle.java
package viewpagerindicator.com.fragmentstatic;

import android.app.Fragment;

import android.content.Context;

import android.support.v7.app.AppCompatActivity;

import android.os.Bundle;

import android.util.AttributeSet;

import android.util.Log;

import android.view.LayoutInflater;

import android.view.View;

import android.view.ViewGroup;

import android.widget.Button;

import android.widget.Toast;

public class FragmentTittle extends Fragment {

    Button mLeftMenu;

    final String TAG = "FragmentTittle";

    public View onCreateView(LayoutInflater inflater, ViewGroup container,

                             Bundle savedInstanceState)

    {

        View view = inflater.inflate(R.layout.fragment_tittle, container, false);

        mLeftMenu = (Button) view.findViewById(R.id.bt1);

        mLeftMenu.setOnClickListener(new View.OnClickListener() {

            @Override

            public void onClick(View view) {

                Toast.makeText(getActivity(), "按键点击事件", Toast.LENGTH_SHORT).show();

            }

        });

        return view;

    }

}
FragmentContext.java
package viewpagerindicator.com.fragmentstatic;

import android.app.Fragment;

import android.os.Bundle;

import android.support.v7.app.AppCompatActivity;

import android.util.Log;

import android.view.LayoutInflater;

import android.view.View;

import android.view.ViewGroup;

public class FragmentContext extends Fragment {

    final String TAG = "FragmentContext";

    //Button mLeftMenu;

    public View onCreateView(LayoutInflater inflater, ViewGroup container,

                             Bundle savedInstanceState)

    {

        View view = inflater.inflate(R.layout.fragment_content, container, false);

        //mLeftMenu = (Button) view.findViewById(R.id.bt1);

        return view;

    }

}
2. 动态调用
组件--Fragment(碎片)第二篇详解的更多相关文章
- Scala进阶之路-Scala函数篇详解
Scala进阶之路-Scala函数篇详解 作者:尹正杰 版权声明:原创作品,谢绝转载!否则将追究法律责任. 一.传值调用和传名调用 /* @author :yinzhengjie Blog:http: ...
- 转载 JS组件Bootstrap Select2使用方法详解
JS组件Bootstrap Select2使用方法详解 作者:懒得安分 字体:[增加 减小] 类型:转载 时间:2016-01-26我要评论 这篇文章主要为大家介绍了JS组件Bootstrap Sel ...
- PHP函数篇详解十进制、二进制、八进制和十六进制转换函数说明
PHP函数篇详解十进制.二进制.八进制和十六进制转换函数说明 作者: 字体:[增加 减小] 类型:转载 中文字符编码研究系列第一期,PHP函数篇详解十进制.二进制.八进制和十六进制互相转换函数说明 ...
- 走向DBA[MSSQL篇] 详解游标
原文:走向DBA[MSSQL篇] 详解游标 前篇回顾:上一篇虫子介绍了一些不常用的数据过滤方式,本篇详细介绍下游标. 概念 简单点说游标的作用就是存储一个结果集,并根据语法将这个结果集的数据逐条处理. ...
- Android UI组件----AppWidget控件入门详解
Widget引入 我们可以把Widget理解成放置在桌面上的小组件(挂件),有了Widget,我们可以很方便地直接在桌面上进行各种操作,例如播放音乐. 当我们长按桌面时,可以看到Widget选项,如下 ...
- Android组件---四大布局的属性详解
[声明] 欢迎转载,但请保留文章原始出处→_→ 文章来源:http://www.cnblogs.com/smyhvae/p/4372222.html Android常见布局有下面几种: LinearL ...
- QuantLib 金融计算——基本组件之天数计算规则详解
目录 天数计算规则详解 定义 30 / 360 法 30/360 US 30/360 Bond Basis 30E/360 30E/360 ISDA Actual 法 Actual/Actual IC ...
- Spring--开篇 (spring优缺点、模块组件、各个jar包详解)
Spring--开篇 分类: SSH&EJB2012-11-23 15:25 4369人阅读 评论(13) 收藏 举报 javaJavaJAVAspringSpringwebWebWEB框架 ...
- Android UI组件----ListView列表控件详解
[声明] 欢迎转载,但请保留文章原始出处→_→ 生命壹号:http://www.cnblogs.com/smyhvae/ 文章来源:http://www.cnblogs.com/smyhvae/p/3 ...
随机推荐
- Enabling Remote Errors in SSRS
January 18, 2011 By default the remote errors property in SQL Server Reporting Services is set to fa ...
- 【cocos2d-x 手游研发小技巧(5)获取网络图片缓存并展示】
今天是年前最后一天上班了,最后一天上班,祝大家马上有各种东西,最后一天也给写一点干货,就是获取网络图片: 经过自己简单封装了一下,实现了获取网络图片,按照比例展示出来,实现方法是cocos2dx - ...
- 调用阿里云API 的demo示例(java/python)
Java 示例 // 创建DefaultAcsClient实例并初始化 DefaultProfile profile = DefaultProfile.getProfile(vo.getAliRegi ...
- 正则表达式的Wed验证应用(40)
电子邮件地址的校验 <?php /* 校验邮件地址*/ function checkMail($email) { //用户名,由“\w”格式字符.“-”或“.”组成 $email_name= & ...
- java简单正则验证手机号
import java.util.regex.Matcher; import java.util.regex.Pattern; /** * @Title:Tadesfza * @Description ...
- C语言 一些算法
1,斐波那契数列 ①递归 时间复杂度O(2^n)#include <stdio.h> int fib(int n){ ||n==) ; ) + fib(n-); } int main(){ ...
- Struts2的优点与Struts1的区别:
单实例与多实例有状态就是有数据存储功能,比如购物车,买一件东西放进去,可以再次购买或者删减.无状态就是一次操作,不能保存数据. 有状态对象,就是有成员属性的对象,可以保存数据,是非线程安全的.无状态对 ...
- springMVC传递一组对象的接受方式
受益此大神:https://blog.csdn.net/cgd_8523/article/details/80022331 同时借鉴代码!!!! 我只用了一种方法,就记下这一种 需求:前台存在动态添加 ...
- springboot自定义配置文件
前言:如果你一点spring的基础没有,建议你不要学习springboot,至少先有一个spring的项目经验或者自己搭建过spring的项目再学习springboot,这样你会发现在spring中搞 ...
- Android脚本打包
最近项目中需要添加应用渠道,我使用的是友盟统计,对于不同渠道需要编译不同版本,对于开发者说编译一次,手动操作还是可以接受的,但是项目发布版本频率较高,而且渠道很多,这就是一个体力活,而且手动打包还比较 ...
