SpringMVC+Mybatis框架搭建
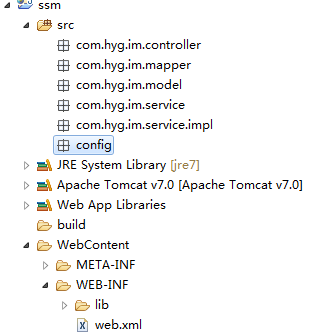
一、新建javaweb项目,并建好相应的包结构
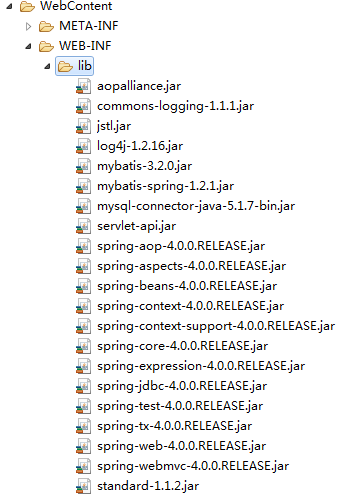
二、添加项目jar到lib目录下
三、在config包中新建配置文件
sping-mvc.xml,内容如下:
<?xml version="1.0" encoding="UTF-8"?>

<beans xmlns="http://www.springframework.org/schema/beans"

	xmlns:xsi="http://www.w3.org/2001/XMLSchema-instance" xmlns:context="http://www.springframework.org/schema/context"

	xmlns:mvc="http://www.springframework.org/schema/mvc"

	xsi:schemaLocation="http://www.springframework.org/schema/beans

	http://www.springframework.org/schema/beans/spring-beans.xsd

	http://www.springframework.org/schema/context

	http://www.springframework.org/schema/context/spring-context-4.0.xsd

	http://www.springframework.org/schema/mvc

	http://www.springframework.org/schema/mvc/spring-mvc-4.0.xsd">

	<!-- 注解扫描包 -->

	<context:component-scan base-package="com.hyg.im" />

	<!-- 开启注解 -->

	<mvc:annotation-driven />

</beans>
spring-common.xml内容如下:
<?xml version="1.0" encoding="UTF-8"?>

<beans xmlns="http://www.springframework.org/schema/beans"

	xmlns:xsi="http://www.w3.org/2001/XMLSchema-instance" xmlns:p="http://www.springframework.org/schema/p"

	xmlns:context="http://www.springframework.org/schema/context" xmlns:tx="http://www.springframework.org/schema/tx"

	xsi:schemaLocation="

		http://www.springframework.org/schema/beans

		http://www.springframework.org/schema/beans/spring-beans-4.0.xsd

		http://www.springframework.org/schema/context

		http://www.springframework.org/schema/context/spring-context-4.0.xsd

		http://www.springframework.org/schema/tx

		http://www.springframework.org/schema/tx/spring-tx-4.0.xsd">

	<!-- 1. 数据源 : DriverManagerDataSource -->

	<bean id="dataSource"

		class="org.springframework.jdbc.datasource.DriverManagerDataSource">

		<property name="driverClassName" value="com.mysql.jdbc.Driver" />

		<property name="url" value="jdbc:mysql://localhost:3306/test" />

		<property name="username" value="root" />

		<property name="password" value="123456" />

	</bean>

	<!--

		2. mybatis的SqlSession的工厂: SqlSessionFactoryBean dataSource:引用数据源

		MyBatis定义数据源,同意加载配置

	-->

	<bean id="sqlSessionFactory" class="org.mybatis.spring.SqlSessionFactoryBean">

		<property name="dataSource" ref="dataSource"></property>

	</bean>

	<!--

		3. mybatis自动扫描加载Sql映射文件/接口 : MapperScannerConfigurer sqlSessionFactory

		basePackage:指定sql映射文件/接口所在的包(自动扫描)

	-->

	<bean class="org.mybatis.spring.mapper.MapperScannerConfigurer">

		<property name="basePackage" value="com.hyg.im.mapper"></property>

		<property name="sqlSessionFactory" ref="sqlSessionFactory"></property>

	</bean>

	<!--

		4. 事务管理 : DataSourceTransactionManager dataSource:引用上面定义的数据源

	-->

	<bean id="txManager"

		class="org.springframework.jdbc.datasource.DataSourceTransactionManager">

		<property name="dataSource" ref="dataSource"></property>

	</bean>

	<!-- 5. 使用声明式事务

		 transaction-manager:引用上面定义的事务管理器

	 -->

	<tx:annotation-driven transaction-manager="txManager" />

</beans>
四、配置web.xml,内容如下:
<?xml version="1.0" encoding="UTF-8"?>

<web-app version="2.5" xmlns="http://java.sun.com/xml/ns/javaee"

	xmlns:xsi="http://www.w3.org/2001/XMLSchema-instance"

	xsi:schemaLocation="http://java.sun.com/xml/ns/javaee

	http://java.sun.com/xml/ns/javaee/web-app_2_5.xsd">

	<!-- 加载Spring容器配置 -->

	<listener>

	<listener-class>org.springframework.web.context.ContextLoaderListener</listener-class>

	</listener>

	<!-- 设置Spring容器加载所有的配置文件的路径 -->

	<context-param>

		<param-name>contextConfigLocation</param-name>

		<param-value>classpath*:config/spring-*.xml</param-value>

	</context-param>

	<!-- 配置SpringMVC核心控制器 -->

	<servlet>

		<servlet-name>springMVC</servlet-name>

		<servlet-class>org.springframework.web.servlet.DispatcherServlet</servlet-class>

		<!-- 配置初始配置化文件,前面contextConfigLocation看情况二选一 -->

		<init-param>

			<param-name>contextConfigLocation</param-name>

			<param-value>classpath*:config/spring-mvc.xml</param-value>

		</init-param>

		<!-- 启动加载一次 -->

		<load-on-startup>1</load-on-startup>

	</servlet>

	<!--为DispatcherServlet建立映射 -->

	<servlet-mapping>

		<servlet-name>springMVC</servlet-name>

		<!-- 此处可以可以配置成*.do,对应struts的后缀习惯 -->

		<url-pattern>/</url-pattern>

	</servlet-mapping>

	<servlet-mapping>

		<servlet-name>default</servlet-name>

		<url-pattern>*.html</url-pattern>

	</servlet-mapping>

	<servlet-mapping>

		<servlet-name>default</servlet-name>

		<url-pattern>*.gif</url-pattern>

	</servlet-mapping>

	<servlet-mapping>

		<servlet-name>default</servlet-name>

		<url-pattern>*.css</url-pattern>

	</servlet-mapping>

	<servlet-mapping>

		<servlet-name>default</servlet-name>

		<url-pattern>*.js</url-pattern>

	</servlet-mapping>

	<servlet-mapping>

		<servlet-name>default</servlet-name>

		<url-pattern>*.jpg</url-pattern>

	</servlet-mapping>

	<servlet-mapping>

		<servlet-name>default</servlet-name>

		<url-pattern>*.png</url-pattern>

	</servlet-mapping>

	<!-- 防止Spring内存溢出监听器 -->

	<listener>

	<listener-class>org.springframework.web.util.IntrospectorCleanupListener</listener-class>

	</listener>

	<!-- 解决工程编码过滤器 -->

	<filter>

		<filter-name>encodingFilter</filter-name>

	<filter-class>org.springframework.web.filter.CharacterEncodingFilter</filter-class>

		<init-param>

			<param-name>encoding</param-name>

			<param-value>UTF-8</param-value>

		</init-param>

		<init-param>

			<param-name>forceEncoding</param-name>

			<param-value>true</param-value>

		</init-param>

	</filter>

	<filter-mapping>

		<filter-name>encodingFilter</filter-name>

		<url-pattern>/*</url-pattern>

	</filter-mapping>

	<welcome-file-list>

		<welcome-file>login.jsp</welcome-file>

	</welcome-file-list>

</web-app>
五、在mysql中创建数据库test,并新建表user_info,字段如下

向user_info中添加几条数据,如下

六、用mybatis生成工具,生成实体类、映射文件
实体类UserInfo.java代码如下:
package com.hyg.im.model;

import java.util.Date;

public class UserInfo {

    private Integer userId;

    private String userName;

    private String password;

    private String trueName;

    private Date addedTime;

    public Integer getUserId() {

        return userId;

    }

    public void setUserId(Integer userId) {

        this.userId = userId;

    }

    public String getUserName() {

        return userName;

    }

    public void setUserName(String userName) {

        this.userName = userName == null ? null : userName.trim();

    }

    public String getPassword() {

        return password;

    }

    public void setPassword(String password) {

        this.password = password == null ? null : password.trim();

    }

    public String getTrueName() {

        return trueName;

    }

    public void setTrueName(String trueName) {

        this.trueName = trueName == null ? null : trueName.trim();

    }

    public Date getAddedTime() {

        return addedTime;

    }

    public void setAddedTime(Date addedTime) {

        this.addedTime = addedTime;

    }

}
UserInfoMapper.java代码如下:
package com.hyg.im.mapper;

import com.hyg.im.model.UserInfo;

public interface UserInfoMapper {

    int deleteByPrimaryKey(Integer userId);

    int insert(UserInfo record);

    int insertSelective(UserInfo record);

    UserInfo selectByPrimaryKey(Integer userId);

    int updateByPrimaryKeySelective(UserInfo record);

    int updateByPrimaryKey(UserInfo record);

}
UserInfoMapper.xml代码如下:
<?xml version="1.0" encoding="UTF-8" ?>

<!DOCTYPE mapper PUBLIC "-//mybatis.org//DTD Mapper 3.0//EN" "http://mybatis.org/dtd/mybatis-3-mapper.dtd" >

<mapper namespace="com.hyg.im.mapper.UserInfoMapper" >

  <resultMap id="BaseResultMap" type="com.hyg.im.model.UserInfo" >

    <id column="userId" property="userId" jdbcType="INTEGER" />

    <result column="userName" property="userName" jdbcType="VARCHAR" />

    <result column="password" property="password" jdbcType="VARCHAR" />

    <result column="trueName" property="trueName" jdbcType="VARCHAR" />

    <result column="addedTime" property="addedTime" jdbcType="DATE" />

  </resultMap>

  <sql id="Base_Column_List" >

    userId, userName, password, trueName, addedTime

  </sql>

  <select id="selectByPrimaryKey" resultMap="BaseResultMap" parameterType="java.lang.Integer" >

    select

    <include refid="Base_Column_List" />

    from user_info

    where userId = #{userId,jdbcType=INTEGER}

  </select>

  <delete id="deleteByPrimaryKey" parameterType="java.lang.Integer" >

    delete from user_info

    where userId = #{userId,jdbcType=INTEGER}

  </delete>

  <insert id="insert" parameterType="com.hyg.im.model.UserInfo" >

    insert into user_info (userId, userName, password,

      trueName, addedTime)

    values (#{userId,jdbcType=INTEGER}, #{userName,jdbcType=VARCHAR}, #{password,jdbcType=VARCHAR},

      #{trueName,jdbcType=VARCHAR}, #{addedTime,jdbcType=DATE})

  </insert>

  <insert id="insertSelective" parameterType="com.hyg.im.model.UserInfo" >

    insert into user_info

    <trim prefix="(" suffix=")" suffixOverrides="," >

      <if test="userId != null" >

        userId,

      </if>

      <if test="userName != null" >

        userName,

      </if>

      <if test="password != null" >

        password,

      </if>

      <if test="trueName != null" >

        trueName,

      </if>

      <if test="addedTime != null" >

        addedTime,

      </if>

    </trim>

    <trim prefix="values (" suffix=")" suffixOverrides="," >

      <if test="userId != null" >

        #{userId,jdbcType=INTEGER},

      </if>

      <if test="userName != null" >

        #{userName,jdbcType=VARCHAR},

      </if>

      <if test="password != null" >

        #{password,jdbcType=VARCHAR},

      </if>

      <if test="trueName != null" >

        #{trueName,jdbcType=VARCHAR},

      </if>

      <if test="addedTime != null" >

        #{addedTime,jdbcType=DATE},

      </if>

    </trim>

  </insert>

  <update id="updateByPrimaryKeySelective" parameterType="com.hyg.im.model.UserInfo" >

    update user_info

    <set >

      <if test="userName != null" >

        userName = #{userName,jdbcType=VARCHAR},

      </if>

      <if test="password != null" >

        password = #{password,jdbcType=VARCHAR},

      </if>

      <if test="trueName != null" >

        trueName = #{trueName,jdbcType=VARCHAR},

      </if>

      <if test="addedTime != null" >

        addedTime = #{addedTime,jdbcType=DATE},

      </if>

    </set>

    where userId = #{userId,jdbcType=INTEGER}

  </update>

  <update id="updateByPrimaryKey" parameterType="com.hyg.im.model.UserInfo" >

    update user_info

    set userName = #{userName,jdbcType=VARCHAR},

      password = #{password,jdbcType=VARCHAR},

      trueName = #{trueName,jdbcType=VARCHAR},

      addedTime = #{addedTime,jdbcType=DATE}

    where userId = #{userId,jdbcType=INTEGER}

  </update>

</mapper>
注意:UserInfoMapper.java和UserInfoMapper.xml的文件名需要一样,并放入包com.hyg.im.mapper中,UserInfo.java放入包com.hyg.im.model中
七、添加业务层方法,查询所有用户信息
接口UserInfoService.java代码如下:
package com.hyg.im.service;

import java.util.List;

import com.hyg.im.model.UserInfo;

public interface UserInfoService {

	/**

	 * 查询所有用户信息

	 */

	List<UserInfo> findUserInfoList();

}
接口实现类UserInfoServiceImpl.java代码如下:
package com.hyg.im.service.impl;

import java.util.List;

import javax.annotation.Resource;

import org.springframework.stereotype.Service;

import org.springframework.transaction.annotation.Transactional;

import com.hyg.im.mapper.UserInfoMapper;

import com.hyg.im.model.UserInfo;

import com.hyg.im.service.UserInfoService;

@Service

@Transactional  //此处不再进行创建SqlSession和提交事务,都已交由spring去管理了。

public class UserInfoServiceImpl implements UserInfoService {

	@Resource

	private UserInfoMapper mapper;

	@Override

	public List<UserInfo> findUserInfoList() {

		return mapper.findUserInfoList();

	}

}
八、添加Dao层方法
UserInfoMapper.java中同样加入 findUserInfoList()接口
代码如下:
List<UserInfo> findUserInfoList();
UserInfoMapper.xml中加入查询sql语句与之对应
  <select id="findUserInfoList" resultMap="BaseResultMap" parameterType="map" >

    select

    <include refid="Base_Column_List" />

    from user_info

  </select>
九、添加controller层代码
在包com.hyg.im.controller中新建UserInfoController.java,代码如下:
package com.hyg.im.controller;

import java.util.List;

import javax.servlet.http.HttpServletRequest;

import javax.servlet.http.HttpServletResponse;

import org.springframework.beans.factory.annotation.Autowired;

import org.springframework.stereotype.Controller;

import org.springframework.web.bind.annotation.RequestMapping;

import org.springframework.web.servlet.ModelAndView;

import com.hyg.im.model.UserInfo;

import com.hyg.im.service.UserInfoService;

@Controller

//@RequestMapping("/user")

public class UserInfoController{

	@Autowired

	private UserInfoService userInfoService;

	/**

	 * 查询用户列表

	 */

	@RequestMapping("/findUserInfoList")

	public ModelAndView findUserInfoList(HttpServletRequest request,HttpServletResponse response){

		ModelAndView mav = new ModelAndView();

        mav.setViewName("/userInfoList.jsp"); //返回的文件路径

        List<UserInfo> userInfoList = userInfoService.findUserInfoList();

        mav.addObject("userInfoList", userInfoList);

        return mav;

	}

}
十、添加view视图层代码
在WebContent根目录新建文件userInfoList.jsp,用于展示用户数据,代码如下:
<%@ page language="java" contentType="text/html; charset=utf-8" pageEncoding="utf-8"%>

<%@ taglib uri="http://java.sun.com/jsp/jstl/core" prefix="c" %>

<!DOCTYPE html PUBLIC "-//W3C//DTD HTML 4.01 Transitional//EN" "http://www.w3.org/TR/html4/loose.dtd">

<html>

<head>

<meta http-equiv="Content-Type" content="text/html; charset=utf-8">

<title>用户列表</title>

</head>

<body>

<table border="1">

 <tr>

  <td>用户ID</td><td>用户名</td><td>真实姓名</td>

 </tr>

 <c:forEach var="row" items="${userInfoList}">

 <tr>

  <td>${row.userId }</td><td>${row.userName }</td><td>${row.trueName}</td>

 </tr>

 </c:forEach>

</table>

</body>

</html>
十一、发布项目到Tomcat
项目右键/Run As/Run On Server,将项目发布到Tomcat
十二、浏览器访问,查看效果
访问地址:http://localhost:8080/ssm/findUserInfoList
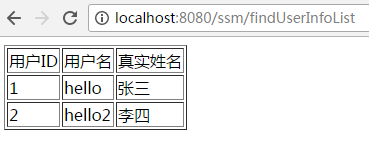
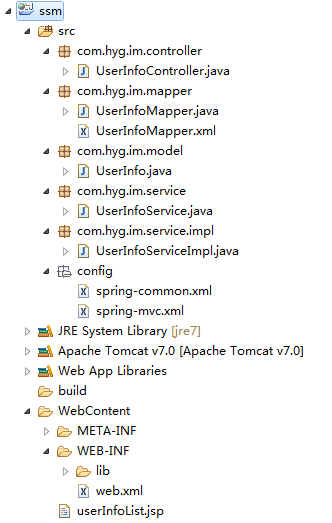
到此,springmvc+spring+mybatis框架搭建成功。
项目最终的目录结构如下图:
SpringMVC+Mybatis框架搭建的更多相关文章
- SSM(Spring +SpringMVC + Mybatis)框架搭建
SSM(Spring +SpringMVC + Mybatis)框架的搭建 最近通过学习别人博客发表的SSM搭建Demo,尝试去搭建一个简单的SSMDemo---实现的功能是对用户增删改查的操作 参考 ...
- spring+springmvc+mybatis框架搭建
一.开发前准备 1)ecplise4.11.0 百度网盘:https://pan.baidu.com/s/1wO9_I52lp0mYNeNTdnj80w 提取码:booa 2)jdk1.6.0_45 ...
- 【SSM 6】Spring+SpringMVC+Mybatis框架搭建步骤
一.整体概览 首先看maven工程的创建 二.各层的文件配置 2.1,SSM父工程 <span style="font-family:KaiTi_GB2312;font-size:18 ...
- 基于Maven的ssm(spring+springMvc+Mybatis)框架搭建
前言 本demo是在idea下搭建的maven项目,数据库使用Mysql,jdk版本是1.8.0_171,ideal:2017.3.5 一.新建项目 1.file->new->porjec ...
- SpringMvc+Mybatis 框架搭建
本文承接上一篇[idea使用maven搭建springmvc] 开篇:在main/resources下新建dbconfig.properties.spring.xml.spring-mybatis.x ...
- Spring+SpringMvc+Mybatis框架集成搭建教程
一.背景 最近有很多同学由于没有过SSM(Spring+SpringMvc+Mybatis , 以下简称SSM)框架的搭建的经历,所以在自己搭建SSM框架集成的时候,出现了这样或者那样的问题,很是苦恼 ...
- 使用intellij idea搭建MAVEN+springmvc+mybatis框架
原文:使用intellij idea搭建MAVEN+springmvc+mybatis框架 1.首先使用idea创建一个maven项目 2.接着配置pom.xml,以下为我的配置 <projec ...
- 用IntelliJ IDEA 开发Spring+SpringMVC+Mybatis框架 分步搭建四:配置springmvc
在用IntelliJ IDEA 开发Spring+SpringMVC+Mybatis框架 分步搭建三:配置spring并测试的基础上 继续进行springmvc的配置 一:配置完善web.xml文件
- 用IntelliJ IDEA 开发Spring+SpringMVC+Mybatis框架 分步搭建三:配置spring并测试
这一部分的主要目的是 配置spring-service.xml 也就是配置spring 并测试service层 是否配置成功 用IntelliJ IDEA 开发Spring+SpringMVC+M ...
随机推荐
- Qt之QSS(Q_PROPERTY-原始属性)
http://blog.csdn.net/liang19890820/article/details/51698536 版权声明:进步始于交流,收获源于分享!纯正开源之美,有趣.好玩.靠谱...作者: ...
- matlab练习程序(圆柱投影)
圆柱投影就是将一张二维的图像投影到三维的圆柱体上,不过在显示图像的时候依然是以二维的形式给出. 投影最重要的步骤就是计算投影变换公式,和图像旋转类似,只要得到变换公式,再依照公式进行代码编写就很容易了 ...
- js判断一个dom中是否包含另一个dom的方法
首先,比较原始(蠢)的方法 function isChildOf(child, parent) { if(child && parent) { let parentNode = chi ...
- BeginInvoke和EndInvoke方法
本系列教程主要包括如下内容:1. BeginInvoke和EndInvoke方法 2. Thread类 3. 线程池 4. 线程同步基础 5. 死锁 6. 线程同步的7种方法 7. 如何在线程中访问G ...
- Python中深浅拷贝 垃圾回收与 super继承(六)
1 python拷贝 深拷贝,浅拷贝 与引用三者的区别 import copy a = [1, 2, 3, 4, ['a', 'b']] #原始对象 b = a #赋值,传对象的引用 c = copy ...
- Tomcat无法正常启动start.bat 一闪而过、只显示USING 故障排除
在云主机上配置tomcat的时候遇到的问题. 1. 开始的时候我将自己用的tomcat6绿色版打包放到了主机上,当我打开bin下面的时候startup.bat时,控制台一闪而过,查看log文件没有任何 ...
- 记录项目代码迁移后,UI测试框架的搭建(配置文件的修改、测试脚本试运行)
前文:记录一次项目代码迁移过程 上文代码迁移的目的就是为了新增vue脚手架自带的UI测试框架,工具有了,就需要实践运行在项目中了(修改配置文件.编写测试脚本等). 一.单元测试 测试框架 karma ...
- Angular5+ 自定义表单验证器
Angular5+ 自定义表单验证器 Custom Validators 标签(空格分隔): Angular 首先阐述一下遇到的问题: 怎样实现"再次输入密码"的验证(两个cont ...
- GitLab 数据备份和恢复
GitLab 备份 /opt/gitlab/bin/gitlab-rake gitlab:backup:create //只是备份各项目的数据 完成后会在默认路径下多出来备份的tar包! /var/o ...
- 初识EMC
EMC,即电磁兼容,是指设备在预期的电磁环境中,能按设计要求正常抵抗电磁干扰的能力.其主要包含3个方面:电磁干扰(EMI),电磁抗扰(EMS)与静电放电抗扰(ESD). 电磁干扰的方式可以大概分为传导 ...