手写数字识别---demo
数据准备
课程中获取数据的方法是从库中直接load_data
from keras.datasets import mnist

(x_train, y_train), (x_test, y_test) = mnist.load_data()
我尝试了一下,报这样的错误:[WinError 10054] 远程主机强迫关闭了一个现有的连接。so,我就直接去官网下载了数据集:http://yann.lecun.com/exdb/mnist/。该数据下载后得到的是idx格式数据,具体处理方法参考了这篇博客https://www.jianshu.com/p/84f72791806f,测试可用的源码如下(规则在注释里写得很详细),在后文中会直接调用里边的函数。
import numpy as np

import struct

import matplotlib.pyplot as plt

# 训练集文件

train_images_idx3_ubyte_file = 'C:\\Users\\小辉\\Desktop\\MNIST\\train-images.idx3-ubyte'

# 训练集标签文件

train_labels_idx1_ubyte_file = 'C:\\Users\\小辉\\Desktop\\MNIST\\train-labels.idx1-ubyte'

# 测试集文件

test_images_idx3_ubyte_file = 'C:\\Users\\小辉\\Desktop\\MNIST\\t10k-images.idx3-ubyte'

# 测试集标签文件

test_labels_idx1_ubyte_file = 'C:\\Users\\小辉\\Desktop\\MNIST\\t10k-labels.idx1-ubyte'

def decode_idx3_ubyte(idx3_ubyte_file):

    """

    解析idx3文件的通用函数

    :param idx3_ubyte_file: idx3文件路径

    :return: 数据集

    """

    # 读取二进制数据

    bin_data = open( train_images_idx3_ubyte_file, 'rb').read()

    # 解析文件头信息,依次为魔数、图片数量、每张图片高、每张图片宽

    offset = 0

    fmt_header = '>iiii'

    magic_number, num_images, num_rows, num_cols = struct.unpack_from(fmt_header, bin_data, offset)

    #print('魔数:%d, 图片数量: %d张, 图片大小: %d*%d' % (magic_number, num_images, num_rows, num_cols))

    # 解析数据集

    image_size = num_rows * num_cols

    offset += struct.calcsize(fmt_header)

    fmt_image = '>' + str(image_size) + 'B'

    images = np.empty((num_images, num_rows, num_cols))

    for i in range(num_images):

        #if (i + 1) % 10000 == 0:

            #print('已解析 %d' % (i + 1) + '张')

        images[i] = np.array(struct.unpack_from(fmt_image, bin_data, offset)).reshape((num_rows, num_cols))

        offset += struct.calcsize(fmt_image)

    return images

def decode_idx1_ubyte(idx1_ubyte_file):

    """

    解析idx1文件的通用函数

    :param idx1_ubyte_file: idx1文件路径

    :return: 数据集

    """

    # 读取二进制数据

    bin_data = open(idx1_ubyte_file, 'rb').read()

    # 解析文件头信息,依次为魔数和标签数

    offset = 0

    fmt_header = '>ii'

    magic_number, num_images = struct.unpack_from(fmt_header, bin_data, offset)

    #print('魔数:%d, 图片数量: %d张' % (magic_number, num_images))

    # 解析数据集

    offset += struct.calcsize(fmt_header)

    fmt_image = '>B'

    labels = np.empty(num_images)

    for i in range(num_images):

        #if (i + 1) % 10000 == 0:

        #    print('已解析 %d' % (i + 1) + '张')

        labels[i] = struct.unpack_from(fmt_image, bin_data, offset)[0]

        offset += struct.calcsize(fmt_image)

    return labels

def load_train_images(idx_ubyte_file=train_images_idx3_ubyte_file):

    """

    TRAINING SET IMAGE FILE (train-images-idx3-ubyte):

    [offset] [type]          [value]          [description]

    0000     32 bit integer  0x00000803(2051) magic number

    0004     32 bit integer  60000            number of images

    0008     32 bit integer  28               number of rows

    0012     32 bit integer  28               number of columns

    0016     unsigned byte   ??               pixel

    0017     unsigned byte   ??               pixel

    ........

    xxxx     unsigned byte   ??               pixel

    Pixels are organized row-wise. Pixel values are 0 to 255. 0 means background (white), 255 means foreground (black).

    :param idx_ubyte_file: idx文件路径

    :return: n*row*col维np.array对象,n为图片数量

    """

    return decode_idx3_ubyte(idx_ubyte_file)

def load_train_labels(idx_ubyte_file=train_labels_idx1_ubyte_file):

    """

    TRAINING SET LABEL FILE (train-labels-idx1-ubyte):

    [offset] [type]          [value]          [description]

    0000     32 bit integer  0x00000801(2049) magic number (MSB first)

    0004     32 bit integer  60000            number of items

    0008     unsigned byte   ??               label

    0009     unsigned byte   ??               label

    ........

    xxxx     unsigned byte   ??               label

    The labels values are 0 to 9.

    :param idx_ubyte_file: idx文件路径

    :return: n*1维np.array对象,n为图片数量

    """

    return decode_idx1_ubyte(idx_ubyte_file)

def load_test_images(idx_ubyte_file=test_images_idx3_ubyte_file):

    """

    TEST SET IMAGE FILE (t10k-images-idx3-ubyte):

    [offset] [type]          [value]          [description]

    0000     32 bit integer  0x00000803(2051) magic number

    0004     32 bit integer  10000            number of images

    0008     32 bit integer  28               number of rows

    0012     32 bit integer  28               number of columns

    0016     unsigned byte   ??               pixel

    0017     unsigned byte   ??               pixel

    ........

    xxxx     unsigned byte   ??               pixel

    Pixels are organized row-wise. Pixel values are 0 to 255. 0 means background (white), 255 means foreground (black).

    :param idx_ubyte_file: idx文件路径

    :return: n*row*col维np.array对象,n为图片数量

    """

    return decode_idx3_ubyte(idx_ubyte_file)

def load_test_labels(idx_ubyte_file=test_labels_idx1_ubyte_file):

    """

    TEST SET LABEL FILE (t10k-labels-idx1-ubyte):

    [offset] [type]          [value]          [description]

    0000     32 bit integer  0x00000801(2049) magic number (MSB first)

    0004     32 bit integer  10000            number of items

    0008     unsigned byte   ??               label

    0009     unsigned byte   ??               label

    ........

    xxxx     unsigned byte   ??               label

    The labels values are 0 to 9.

    :param idx_ubyte_file: idx文件路径

    :return: n*1维np.array对象,n为图片数量

    """

    return decode_idx1_ubyte(idx_ubyte_file)

def run():

    train_images = load_train_images()

    train_labels = load_train_labels()

    test_images = load_test_images()

    test_labels = load_test_labels()

    # 查看前十个数据及其标签以读取是否正确

    for i in range(10):

        print(train_labels[i])

        plt.imshow(train_images[i], cmap='gray')

        plt.show()

    print('done')

if __name__ == '__main__':

    run()
测试用的源码
数据预处理
导入相关包依赖及预处理函数
import numpy as np

from keras.models import Sequential

from keras.layers.core import Dense, Dropout, Activation

from keras.layers import Conv2D, MaxPooling2D, Flatten

from keras.optimizers import SGD, Adam

from keras.utils import np_utils

#clean data

def load_dataset():

    x_train, y_train = load_train_images(), load_train_labels()

    x_test, y_test = load_test_images(), load_test_labels()

    number = 60000

    x_train, y_train = x_train[0:number], y_train[0:number]

    x_train = x_train.reshape(number, 28*28)

    x_test = x_test.reshape(x_test.shape[0], 28*28)

    x_train, x_test = x_train.astype('float32'), x_test.astype('float32')

    y_train, y_test = np_utils.to_categorical(y_train, 10), np_utils.to_categorical(y_test, 10)

    x_train, x_test = x_train / 255, x_test / 255

    return (x_train, y_train), (x_test, y_test)
到此,我们得到了训练和测试网络所需要的数据。
网络的搭建及训练结果
搭建网络训练结果
(x_train, y_train), (x_test, y_test) = load_dataset()
model = Sequential()
#搭建三层网络
model.add(Dense(input_dim=28*28,units=633,activation='sigmoid'))
model.add(Dense(units=633,activation='sigmoid'))
model.add(Dense(units=10,activation='softmax')) model.compile(loss='mse',optimizer=SGD(lr=0.1),metrics=['accuracy'])
model.fit(x_train,y_train,batch_size=100,epochs=20)
result = model.evaluate(x_test,y_test)
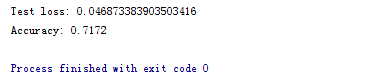
print('Test loss:', result[0])
print('Accuracy:', result[1])
效果如下图所示:
改动地方主要为:
- 激励函数由sigmoid改为relu
- loss function由mse改为categorical_crossentropy
- 增加了Dropout,防止过拟合
改动后构建模型代码:
#搭建网络训练结果

(x_train, y_train), (x_test, y_test) = load_dataset()

model = Sequential()

#搭建三层网络

model.add(Dense(input_dim=28*28,units=700,activation='relu'))

model.add(Dropout(0.2))

model.add(Dense(units=700,activation='relu'))

model.add(Dropout(0.2))

model.add(Dense(units=10,activation='softmax'))

model.compile(loss='categorical_crossentropy',optimizer=SGD(lr=0.1),metrics=['accuracy'])

model.fit(x_train,y_train,batch_size=100,epochs=20,validation_split=0.05)

result = model.evaluate(x_test,y_test)

print('Test loss:', result[0])

print('Accuracy:', result[1])
效果如下所示:
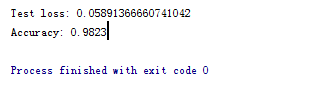
得到了比较好的测试结果。其中,最主要的还是激励函数影响。
1. 采用sigmoid等函数,算激活函数时(指数运算),计算量大,反向传播求误差梯度时,求导涉及除法,计算量相对大,而采用Relu激活函数,整个过程的计算量节省很多。
2. 对于深层网络,sigmoid函数反向传播时,很容易就会出现梯度消失的情况(在sigmoid接近饱和区时,变换太缓慢,导数趋于0,这种情况会造成信息丢失,从而无法完成深层网络的训练。
3. Relu会使一部分神经元的输出为0,这样就造成了网络的稀疏性,并且减少了参数的相互依存关系,缓解了过拟合问题的发生。
参考:https://blog.csdn.net/waple_0820/article/details/79415397
手写数字识别---demo的更多相关文章
- 【问题解决方案】Keras手写数字识别-ConnectionResetError: [WinError 10054] 远程主机强迫关闭了一个现有的连接
参考:台大李宏毅老师视频课程-Keras-Demo 在载入数据阶段报错: ConnectionResetError: [WinError 10054] 远程主机强迫关闭了一个现有的连接 Google之 ...
- 【机器学习】李宏毅机器学习-Keras-Demo-神经网络手写数字识别与调参
参考: 原视频:李宏毅机器学习-Keras-Demo 调参博文1:深度学习入门实践_十行搭建手写数字识别神经网络 调参博文2:手写数字识别---demo(有小错误) 代码链接: 编程环境: 操作系统: ...
- 利用神经网络算法的C#手写数字识别
欢迎大家前往云+社区,获取更多腾讯海量技术实践干货哦~ 下载Demo - 2.77 MB (原始地址):handwritten_character_recognition.zip 下载源码 - 70. ...
- Android+TensorFlow+CNN+MNIST 手写数字识别实现
Android+TensorFlow+CNN+MNIST 手写数字识别实现 SkySeraph 2018 Email:skyseraph00#163.com 更多精彩请直接访问SkySeraph个人站 ...
- 基于tensorflow的MNIST手写数字识别(二)--入门篇
http://www.jianshu.com/p/4195577585e6 基于tensorflow的MNIST手写字识别(一)--白话卷积神经网络模型 基于tensorflow的MNIST手写数字识 ...
- 利用神经网络算法的C#手写数字识别(一)
利用神经网络算法的C#手写数字识别 转发来自云加社区,用于学习机器学习与神经网络 欢迎大家前往云+社区,获取更多腾讯海量技术实践干货哦~ 下载Demo - 2.77 MB (原始地址):handwri ...
- C#中调用Matlab人工神经网络算法实现手写数字识别
手写数字识别实现 设计技术参数:通过由数字构成的图像,自动实现几个不同数字的识别,设计识别方法,有较高的识别率 关键字:二值化 投影 矩阵 目标定位 Matlab 手写数字图像识别简介: 手写 ...
- CNN 手写数字识别
1. 知识点准备 在了解 CNN 网络神经之前有两个概念要理解,第一是二维图像上卷积的概念,第二是 pooling 的概念. a. 卷积 关于卷积的概念和细节可以参考这里,卷积运算有两个非常重要特性, ...
- 【深度学习系列】PaddlePaddle之手写数字识别
上周在搜索关于深度学习分布式运行方式的资料时,无意间搜到了paddlepaddle,发现这个框架的分布式训练方案做的还挺不错的,想跟大家分享一下.不过呢,这块内容太复杂了,所以就简单的介绍一下padd ...
随机推荐
- dir/
dos窗口输入dir命令是显示磁盘目录命令: addslashes()使用反斜线转义字符串: exec($command,$output,$return)执行一个外部程序 $command:要执行的命 ...
- JAVA Get UUID
UUID是通用唯一标识码(Universally Unique Identifier),通过开源软件基金会(OSF)设立的一种算法生成.它的主要作用就是保证生成的字符串在同一时空中所有机器上都是唯一的 ...
- Android界面设计
从继承关系来看,所有组件继承自View.容器也是继承自View,它能容纳别的View. 所有容器继承自ViewGroup.包括 FrameLayout, LinearLayout, RelativeL ...
- MVC--SSM和SSH简介
- ORACLE 查看分区表分区大小
SELECT * FROM dba_segments t WHERE t.segment_name ='table_name'; pratition_name : 分区名 bytes : 分区大小( ...
- 557. Reverse Words in a String III
static int wing=[]() { std::ios::sync_with_stdio(false); cin.tie(NULL); ; }(); class Solution { publ ...
- 2018.09.22 atcoder Snuke's Coloring 2(线段树+单调栈)
传送门 就是给出一个矩形,上面有一些点,让你找出一个周长最大的矩形,满足没有一个点在矩形中. 这个题很有意思. 考虑到答案一定会穿过中线. 于是我们可以把点分到中线两边. 先想想暴力如何解决. 显然就 ...
- HDU 1106 排序 (排序+处理字符串)
题意:略. 析:按照题目说的,把字符串分割,然后把字符串转成十进制,存起来,可以用数组,我用的向量, 排序一下就OK了.注意的是,要考虑多个5相邻的时候,刚开始没考虑WA了一次. 代码如下: #inc ...
- cxf maven依赖
<dependency> <groupId>org.apache.cxf</groupId> <artifactId>cxf-rt-front ...
- C语言printf的格式
例1 int a = 12345;printf("%6d",a); // 输出6位不够左边补空格printf("%.6d",a); // 输出6位不够左边补0例 ...