代码分析在大多数项目中通常是作为最后一个步骤(如果做了的话)完成的。其通常难以配置及与现有代码整合。

本文旨在勾勒出使用 Gradle 整合 PMD 与 FindBugs 的步骤,并将其与一个现有的 Sonar 构建工具进行整合。

PMD、CheckStyle 和 FindBugs

首先要做的就是在我们的 build.gradle 文件中添加插件:

1
2
3
apply plugin: 'checkstyle'
apply plugin: 'pmd'
apply plugin: 'findbugs'

这些插件能在我们的代码中启用 PMD、CheckStyle 和 FindBugs。

ostatsu
翻译于 1个月前

1人顶


 翻译的不错哦!

默认情况下,这些插件将对测试程序和主程序都进行分析。对于我们,需要避免在测试程序上运行FindBugs和PMD,我们使用如下命令:

1
2
3
4
5
6
findbugs{
    findbugsTest.enabled=false
}
pmd {
    pmdTest.enabled=false
}

下面,我们从Gradle中执行:

1
./gradlew clean findBugsMain pmdMain

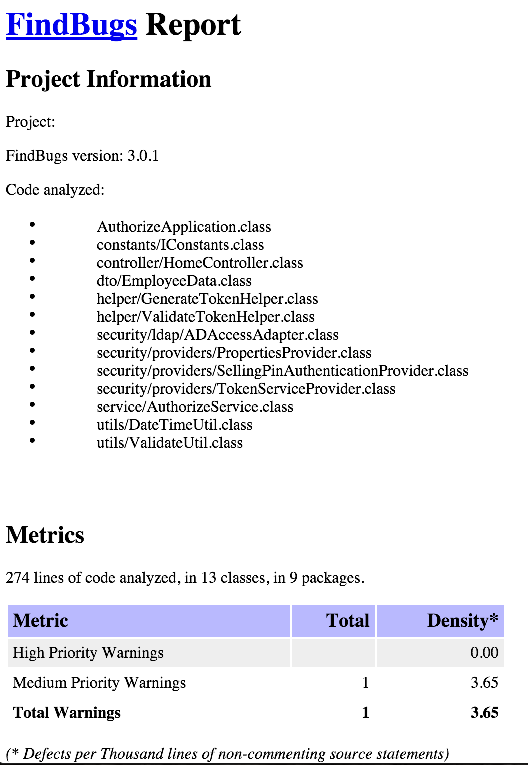
这将对工程进行清理,然后对源代码执行FindBugs和PMD。

输出结果如下:

1
2
3
4
5
6
7
8
9
10
11
12
13
14
15
16
17
18
19
20
:clean
:compileJava
Note: Some input files use unchecked or unsafe operations.
Note: Recompile with -Xlint:unchecked for details.
:processResources
:classes
:findbugsMain FAILED
 
FAILURE: Build failed with an exception.
 
* What went wrong:
Execution failed for task ':findbugsMain'.
> FindBugs rule violations were found. See the report at: file:///myprojects/build/reports/findbugs/main.xml
 
* Try:
Run with --stacktrace option to get the stack trace. Run with --info or --debug option to get more log output.
 
BUILD FAILED
 
Total time: 24.597 secs

由于违背FindBugs规则,还没运行PMD构建已经失败。FindBugs和PMD的输出格式为XML。

结果报告保存在<proj_home>/build/reports文件夹。

社会主义好
翻译于 1周前

1人顶


 翻译的不错哦!

为了生成可读的HTML文档并忽略错误继续构建,我们在build.gradle文件中加入:

1
2
3
4
5
6
7
8
9
10
11
12
13
14
15
16
17
18
19
20
21
22
findbugs{
    ignoreFailures=true
    findbugsTest.enabled=false
 
}
 
tasks.withType(FindBugs) {
    reports {
        xml.enabled = false
        html.enabled = true
    }
}
tasks.withType(Pmd){
    reports{
        xml.enabled=true
        html.enabled=true
    }
}
pmd {
   ignoreFailures = true
    pmdTest.enabled=false
}

task.withType用于对每种任务进行配置,您可以对PMD启用HTML和XML报告,对FindBugs启用HTML报告。

注意:在输出报告时,FindBugs仅支持一种可用的输出格式。

1
2
3
4
5
6
7
8
9
10
11
12
13
14
15
16
17
./gradlew clean findBugsMain pmdMain
:clean
:compileJava
Note: Some input files use unchecked or unsafe operations.
Note: Recompile with -Xlint:unchecked for details.
:processResources
:classes
:findbugsMain
FindBugs rule violations were found. See the report at: file:///myprojects/build/reports/findbugs/main.html
:pmdMain
Removed misconfigured rule: LoosePackageCoupling  cause: No packages or classes specified
174 PMD rule violations were found. See the report at: file:///myprojects/build/reports/pmd/main.html
 
BUILD SUCCESSFUL
 
Total time: 6.013 secs

对于PMD,您可以使用ruleSet选项设置规则集。下面是一些常用的规则集。
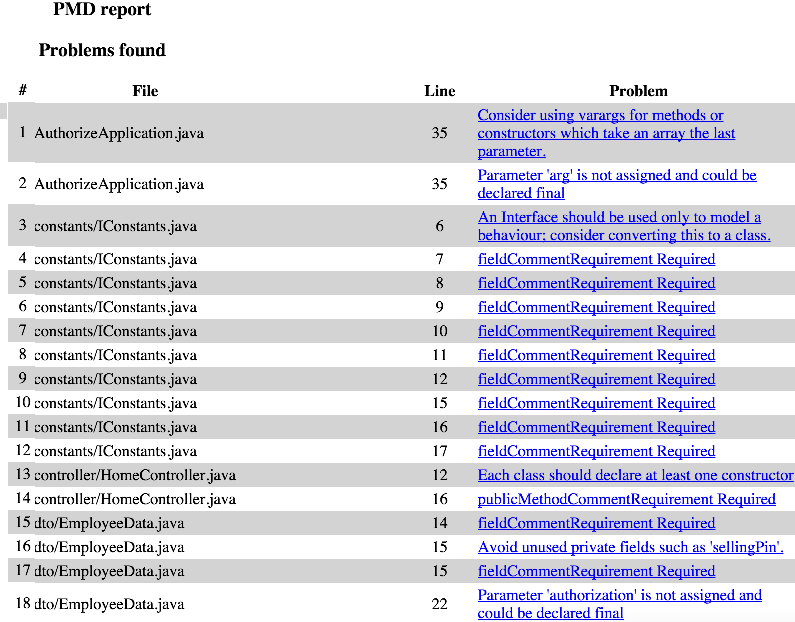
1
2
3
4
5
6
7
8
9
10
11
12
13
14
15
16
17
18
19
20
21
22
23
pmd {
   ignoreFailures = true
    pmdTest.enabled=false
    ruleSets = [
            'java-basic',
            'java-braces',
            'java-clone',
            'java-codesize',
            'java-comments',
            'java-controversial',
            'java-coupling',
            'java-design',
            'java-empty',
            'java-finalizers',
            'java-imports',
            'java-optimizations',
            'java-strictexception',
            'java-strings',
            'java-typeresolution',
            'java-unnecessary',
            'java-unusedcode'
    ]
}

一个输出示例如下:

社会主义好
翻译于 1周前

0人顶


 翻译的不错哦!

与Sonar整合

PMD,Checkstyle和Sonar都是很有用的工具。但是,从一个组织的角度,我们需要追踪项目代码质量的变化和一段时间内的技术债务。我们需要能够对照其它类似的团队。

为了能够做到这些,我们使用Sonar。本文假设您已经安装好了Sonar。

对于这种情况,Altassian提供了相应的Sonar插件。为了使用它,我们需要添加必要的插件。

1
2
3
4
5
6
7
8
9
10
11
buildscript {
    repositories {
        mavenCentral()
        maven { url "http://mvnrepo.nordstrom.net/nexus/content/groups/public" }
        maven { url "http://repo.maven.apache.org/maven2" }
    }
    dependencies {
        classpath "org.sonarsource.scanner.gradle:sonarqube-gradle-plugin:1.2"
    }
 
}

构建脚本安装完毕,我们队sonarqube进行配置:

1
2
3
4
5
6
7
8
9
10
11
12
13
14
15
16
17
18
19
20
apply plugin: "org.sonarqube"
 
sonarqube{
    check
    properties {
        // Sonar Specific properties
        property 'sonar.projectName''Project Services' // This is the display project name
        property 'sonar.host.url','http://sonar:8080/' // This is the Sonar Server
        property 'sonar.projectKey''com.wordpress.mrvivekr:project' // The Key using which the project details are tracked
 
       // JDBC Properties
        property 'sonar.jdbc.url','jdbc:jtds:sqlserver://ABCD:1433/SonarDB;domain=MYCOMP;SelectMethod=Cursor'
 
        property 'sonar.jdbc.username','userName'
        property 'sonar.jdbc.password','Secr#%'
 
      //Which Sonar Profile to use - this is optional
        property 'sonar.profile','JavaProfile'
    }
}

注意:sonar.profile是预配置sonar配置(和规则),应由您的公司预先配置完成。但这是可选而非必须。我的JDBC连接使用SQLServer连接。
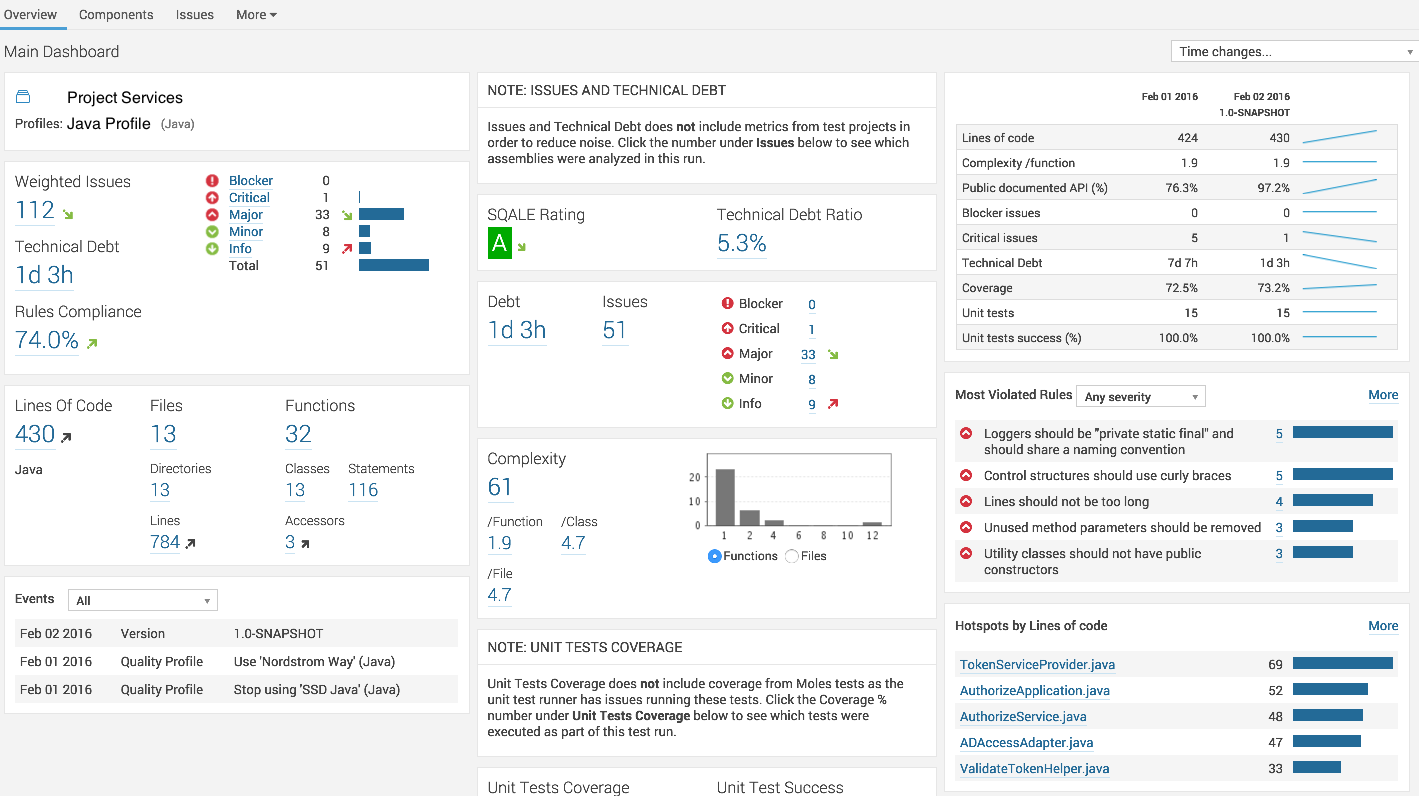
1
./gradlew sonarqube
1
2
3
4
5
6
7
8
9
10
11
12
13
14
15
16
17
18
19
20
21
22
23
24
25
26
27
28
29
30
31
32
33
34
35
36
37
38
39
40
41
42
43
44
45
46
47
48
49
50
51
52
53
54
:compileJava UP-TO-DATE
:processResources UP-TO-DATE
:classes UP-TO-DATE
:compileTestJava
:processTestResources
:testClasses
:test
....... ommitted .....
11:27:36.713 INFO  - Java Main Files AST scan done: 812 ms
11:27:36.714 INFO  - 13/13 source files have been analyzed
11:27:36.715 INFO  - Java bytecode scan...
11:27:36.762 INFO  - Java bytecode scan done: 47 ms
11:27:36.762 INFO  - Java Test Files AST scan...
11:27:36.762 INFO  - 5 source files to be analyzed
11:27:36.885 INFO  - Java Test Files AST scan done: 123 ms
11:27:36.885 INFO  - 5/5 source files have been analyzed
11:27:36.888 INFO  - Package design analysis...
11:27:39.868 INFO  - Package design analysis done: 2980 ms
11:27:39.884 INFO  - Sensor JavaSquidSensor (done) | time=4307ms
11:27:39.884 INFO  - Sensor Lines Sensor
11:27:39.888 INFO  - Sensor Lines Sensor (done) | time=4ms
11:27:39.888 INFO  - Sensor QProfileSensor
11:27:39.891 INFO  - Sensor QProfileSensor (done) | time=3ms
11:27:39.891 INFO  - Sensor InitialOpenIssuesSensor
11:27:45.592 INFO  - Sensor InitialOpenIssuesSensor (done) | time=5701ms
11:27:45.592 INFO  - Sensor ProjectLinksSensor
11:27:45.730 INFO  - Sensor ProjectLinksSensor (done) | time=138ms
11:27:45.730 INFO  - Sensor VersionEventsSensor
11:27:47.690 INFO  - Sensor VersionEventsSensor (done) | time=1960ms
11:27:47.690 INFO  - Sensor org.sonar.plugins.findbugs.FindbugsSensor@7894f007
11:27:47.694 INFO  - Execute Findbugs 3.0.1...
11:27:48.557 INFO  - Found findbugs plugin: /myprojects/build/sonar/findbugs/fb-contrib.jar
11:27:48.596 INFO  - Found findbugs plugin: /myprojects/build/sonar/findbugs/findsecbugs-plugin.jar
11:27:48.612 INFO  - Findbugs output report: /myprojects/build/sonar/findbugs-result.xml
The following classes needed for analysis were missing:
  javax.crypto.spec.SecretKeySpec
11:27:50.846 INFO  - Execute Findbugs 3.0.1 done: 3153 ms
11:29:31.499 INFO  - Sensor org.sonar.plugins.findbugs.FindbugsSensor@7894f007 (done) | time=103809ms
11:29:31.499 INFO  - Sensor SurefireSensor
11:29:31.500 INFO  - parsing /myprojects/build/test-results
11:29:31.558 INFO  - Sensor SurefireSensor (done) | time=59ms
11:29:31.558 INFO  - Sensor JaCoCoOverallSensor
11:29:31.565 WARN  - You are not using the latest JaCoCo binary format version, please consider upgrading to latest JaCoCo version.
11:29:31.565 INFO  - Analysing /myprojects/build/jacoco/test.exec
11:29:31.601 WARN  - You are not using the latest JaCoCo binary format version, please consider upgrading to latest JaCoCo version.
......... Ommitted .............
11:30:38.654 INFO  - ANALYSIS SUCCESSFUL, you can browse http://sonar:8080/dashboard/index/com.wordpress.mrvivekr:project
11:30:38.654 INFO  - Note that you will be able to access the updated dashboard once the server has processed the submitted analysis report.
11:30:38.655 INFO  - Executing post-job class org.sonar.plugins.buildbreaker.AlertBreaker
11:30:38.657 INFO  - Executing post-job class org.sonar.plugins.buildbreaker.ForbiddenConfigurationBreaker
 
BUILD SUCCESSFUL
 
Total time: 5 mins 16.499 secs

您应该看到类似的输出:

享受代码分析吧!

http://www.oschina.net/translate/code-analysis-with-gradle

https://dzone.com/articles/code-analysis-with-gradle

使用 Gradle 插件进行代码分析(转)的更多相关文章

  1. Eclipse插件(导出UML图,打开文件资源管理器插件,静态代码分析工具PMD,在eclipse上安装插件)

    目录 能够导出UML图的Eclipse插件 打开文件资源管理器插件 Java静态代码分析工具PMD 如何在eclipse上安装插件 JProfiler性能分析工具 从更新站点安装EclEmma 能够导 ...

  2. jQuery File Upload 插件 php代码分析

    jquery file upload php代码分析首先进入构造方法 __construct() 再进入 initialize()因为我是post方式传的数据  在进入initialize()中的po ...

  3. CNI bridge 插件实现代码分析

    对于每个CNI 插件在执行函数cmdAdd之前的操作是完全一样的,即从环境变量和标准输入内读取配置.这在http://www.cnblogs.com/YaoDD/p/6410725.html这篇博文里 ...

  4. Docker Libnetwork Bridge插件实现代码分析----创建网络部分

    // drivers/bridge/bridge.go // Create a new network using bridge plugin 1.func (d *driver) CreateNet ...

  5. Docker Libnetwork Bridge插件实现代码分析----初始化部分

    Bridge driver数据结构如下所示: type driver struct { config *configuration network *bridgeNetwork natChain *i ...

  6. Android 热修复Nuwa的原理及Gradle插件源码解析

    现在,热修复的具体实现方案开源的也有很多,原理也大同小异,本篇文章以Nuwa为例,深入剖析.  Nuwa的github地址 https://github.com/jasonross/Nuwa 以及用于 ...

  7. Gradle的构建过程都不会?带你全面了解Android如何自定义Gradle 插件

    目前 Android 工程的默认构建工具为 Gradle,我们在构建 APK 的时候往往会执行 ./gradlew assembleDebug 这样的命令.. 那么这个命令到底代表着什么含义呢?命令的 ...

  8. 完整全面的Java资源库(包括构建、操作、代码分析、编译器、数据库、社区等等)

    构建 这里搜集了用来构建应用程序的工具. Apache Maven:Maven使用声明进行构建并进行依赖管理,偏向于使用约定而不是配置进行构建.Maven优于Apache Ant.后者采用了一种过程化 ...

  9. Android官方技术文档翻译——Gradle 插件用户指南(5)

    昨晚把第五章未译完的几句话攻克了.只是第六章没怎么译,明后天又是周末,假设周一前第六章翻译完的话,周一再发第六章. 本文译自Android官方技术文档<Gradle Plugin User Gu ...

随机推荐

  1. UVA 5875 DP

    题意:给你一堆二维点,每个点有一些分数. 现在要从点(0 , 0 )出发,只能从标号小的点走到大的点,每个人有一个走的距离的限制,问最后能拿到的最高的分数,当然这个人从(0 , 0)出发还得回到( 0 ...

  2. gdb学习(一个)[再版]

    概要 gdb是GNU debugger的缩写,是编程调试工具. 功能 1.启动程序,能够依照用户自己定义的要求随心所欲的执行程序. 2.可让被调试的程序在用户所指定的断点处停住 (断点能够是条件表达式 ...

  3. .net数据根据字段进行分类(linq语句)

    var items = List<实体>; var models = items.GroupBy(r => r.分类字段).ToDictionary(d => d.Key, d ...

  4. jvm(13)-线程安全与锁优化(转)

    0.1)本文部分文字转自“深入理解jvm”, 旨在学习 线程安全与锁优化 的基础知识: 0.2)本文知识对于理解 java并发编程非常有用,个人觉得,所以我总结的很详细: [1]概述 [2]线程安全 ...

  5. HDU5015 233 Matrix(矩阵高速幂)

    HDU5015 233 Matrix(矩阵高速幂) 题目链接 题目大意: 给出n∗m矩阵,给出第一行a01, a02, a03 ...a0m (各自是233, 2333, 23333...), 再给定 ...

  6. html学习 - 自己主动跳转与自己主动刷新

    自己主动刷新 事实上自己主动刷新和跳转没啥差别,刷新就是跳转到本地址. 有几种办法,首先是直接在html的<head>标签里加入以下的代码. html代码 代码都放在<head> ...

  7. cocos2d-x物业现场

    pushScene()和popScene()用法: watermark/2/text/aHR0cDovL2Jsb2cuY3Nkbi5uZXQvcXFfMTYyNjY3MTc=/font/5a6L5L2 ...

  8. Java--调试--单步调试,断言,单元测试

    单步调试:主要查看变量内容的变化    1.设置断点位置,设置在可能出现问题的代码 2.以Debug as方式运行 程序 3.F5 --> step into 进入方法内部进行调试    F6 ...

  9. vb实现多用户登录

    利用vb实现多用户登录,主要是将vb与数据库实现链接,这个问题在作品展中我们的软件“天天迹录”的登录时用到,但是当时自己只是知道有这么个功能,但是那些代码的含义并不明白,在3个月后的我又有机会接触到它 ...

  10. 6月27日CTO俱乐部下午茶印象

    作者:朱金灿 来源:http://blog.csdn.net/clever101 感谢CSDN的邀请,有幸参加了6月27日“CTO俱乐部下午茶时光:CTO在团队管理中所遇到的那些事”活动.本期的主讲嘉 ...