spring整合apache-shiro的简单使用
这里不对shiro进行介绍,介绍什么的没有意义
初学初用,不求甚解,简单使用
一.导入jar包(引入坐标)
<!--shiro和spring整合-->

<dependency>

    <groupId>org.apache.shiro</groupId>

    <artifactId>shiro-spring</artifactId>

    <version>1.3.2</version>

</dependency>

<!--shiro核心包-->

<dependency>

    <groupId>org.apache.shiro</groupId>

    <artifactId>shiro-core</artifactId>

    <version>1.3.2</version>

</dependency>
二.在web.xml中配置shiro的过滤器
<?xml version="1.0" encoding="UTF-8"?>

<web-app xmlns:xsi="http://www.w3.org/2001/XMLSchema-instance"

         xmlns="http://java.sun.com/xml/ns/javaee"

         xsi:schemaLocation="http://java.sun.com/xml/ns/javaee http://java.sun.com/xml/ns/javaee/web-app_2_5.xsd"

         version="2.5">

  <!-- 监听器监听其他的spring配置文件 -->

  <context-param>

    <param-name>contextConfigLocation</param-name>

    <param-value>classpath*:spring/applicationContext-*.xml</param-value>

  </context-param>

  <listener>

    <listener-class>org.springframework.web.context.ContextLoaderListener</listener-class>

  </listener>

  <!-- 解决post乱码 -->

  <filter>

    <filter-name>CharacterEncodingFilter</filter-name>

    <filter-class>org.springframework.web.filter.CharacterEncodingFilter</filter-class>

    <init-param>

      <param-name>encoding</param-name>

      <param-value>utf-8</param-value>

    </init-param>

    <init-param>

      <param-name>forceEncoding</param-name>

      <param-value>true</param-value>

    </init-param>

  </filter>

  <filter-mapping>

    <filter-name>CharacterEncodingFilter</filter-name>

    <url-pattern>/*</url-pattern>

  </filter-mapping>

  <servlet>

    <servlet-name>springmvc</servlet-name>

    <servlet-class>org.springframework.web.servlet.DispatcherServlet</servlet-class>

    <!-- 指定加载的配置文件 ,通过参数contextConfigLocation加载-->

    <init-param>

      <param-name>contextConfigLocation</param-name>

      <param-value>classpath:spring/springmvc.xml</param-value>

    </init-param>

  </servlet>

  <servlet-mapping>

    <servlet-name>springmvc</servlet-name>

    <url-pattern>*.do</url-pattern>

  </servlet-mapping>

  <!--配置shiro的filter-->

  <filter>

    <filter-name>shiroFilter</filter-name>

    <filter-class>org.springframework.web.filter.DelegatingFilterProxy</filter-class>

    <init-param>

      <!--将shiro交给spring管理,不写默认是由tomcat进行管理-->

      <param-name>targetFilterLifecycle</param-name>

      <param-value>true</param-value>

    </init-param>

  </filter>

  <filter-mapping>

    <filter-name>shiroFilter</filter-name>

    <url-pattern>/*</url-pattern>

  </filter-mapping>

</web-app>
web.xml
注意:web.xml文件中的加载顺序为: context-param(ServletContext) -> listener-> filter -> servlet
,并且shiro的过滤器需要使用spring中配置的关于shiro的bean,所以shiro的配置不能写在springmvc的配置文件中,需要写在spring的配置文件中
三.编写shiro的配置(可以写在spring配置文件中,也可以单独一个文件)
本案例中spring配置文件名称为:applicationContext-service.xml
shiro的配置文件名称为:applicationContext-shiro.xml
dao层配置从spring配置中分离出来:applicationContext-dao.xml
在web.xml文件中引用方式为:

三.applicationContext-shiro.xml文件(shiro配置文件)
<!--主要三个东西:shiroFilter,SaasRealm,SecrityManager-->
注意: shiroFilter:这个名字必须和web.xml文件中配置的过滤器的名称一致
SaasRealm:自定义数据源(领域),只要继承抽象类AuthorizingRealm,实现抽象方法即可,其中一个方法是关于登录认证的(doGetAuthenticationInfo),一个方法是权限封装的(doGetAuthorizationInfo).
将从数据库中获取到的数据进行封装(权限)或者和客户端传入的数据进行比对(登录),返回相应的封装数据和登录结果
<beans xmlns="http://www.springframework.org/schema/beans"

       xmlns:xsi="http://www.w3.org/2001/XMLSchema-instance"

       xmlns:context="http://www.springframework.org/schema/context"

       xmlns:aop="http://www.springframework.org/schema/aop"

       xsi:schemaLocation="http://www.springframework.org/schema/beans

        http://www.springframework.org/schema/beans/spring-beans.xsd

        http://www.springframework.org/schema/context

        http://www.springframework.org/schema/context/spring-context.xsd

        http://www.springframework.org/schema/aop

        http://www.springframework.org/schema/aop/spring-aop.xsd">

    <!--由spring整合shiro文件-->

    <!--主要三个东西:shiroFilter,SaasRealm,SecrityManager-->

    <bean id="shiroFilter" class="org.apache.shiro.spring.web.ShiroFilterFactoryBean">

        <!--shiro核心类-->

        <property name="securityManager" ref="securityManager"/>

        <!--登录页面,如果没有登录,会跳转到登录界面,-->

        <property name="loginUrl" value="/login.jsp"/>

        <!--登录后,在访问没有经过授权的方法或界面时,直接跳转到这个界面-->

        <property name="unauthorizedUrl" value="/unauthorized.jsp"/>

        <!--配置过滤器链-->

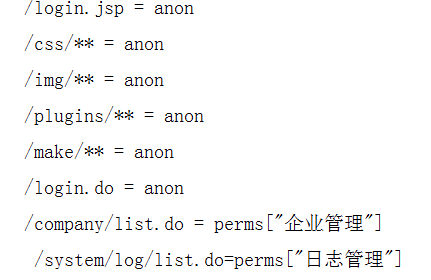
        <property name="filterChainDefinitions">

            <value>

                /login.jsp = anon

                /css/** = anon

                /img/** = anon

                /plugins/** = anon

                /make/** = anon

                /login.do = anon

                /company/list.do = perms["企业管理"]

                 /system/log/list.do=perms["日志管理"]

                 /system/module/list.do=perms["模块管理"]

                 /company/list.do=perms["企业管理"]

                 /=perms["SaaS管理"]

                 /cargo=perms["货运管理"]

                 /stat=perms["统计分析"]

                 /baseinfo=perms["基础信息"]

                 /sysadmin=perms["系统管理"]

                 /cargo/contract/list.do=perms["购销合同"]

                 /cargo/contract/print.do=perms["出货表"]

                 /cargo/export/contractList.do=perms["合同管理"]

                 /cargo/export/list.do=perms["出口报运"]

                 /stat/toCharts.do=perms["生产厂家销售情况"]

                 /stat/toCharts.do=perms["产品销售排行"]

                 /stat/toCharts.do=perms["系统访问压力图"]

                 /system/dept/list.do=perms["部门管理"]

                 /system/user/list.do=perms["用户管理"]

                 /system/role/list.do=perms["角色管理"]

                 /cargo/packing/list.do=perms["装箱管理"]

                 /cargo/shipping/list.do=perms["委托管理"]

                 /cargo/invoice/list.do=perms["发票管理"]

                 /cargo/finance/list.do=perms["财务管理"]

                 /sysadmin/deptAction_toview=perms["查看部门"]

                 /sysadmin/deptAction_tocreate=perms["新增部门"]

                 /sysadmin/deptAction_toupdate=perms["修改部门"]

                 /sysadmin/deptAction_delete=perms["删除部门"]

                /** = authc

            </value>

        </property>

    </bean>

    <!--注入自定义的SaasRealm-->

    <bean id="saamRealm" class="com.ahd.realm.SaasRealm"/>

    <!--配置shiro核心类-->

    <bean id="securityManager" class="org.apache.shiro.web.mgt.DefaultWebSecurityManager">

        <property name="realm" ref="saamRealm"/>

    </bean>

    <!--后来编写的-->

    <!-- 安全管理器 -->

    <bean class="org.apache.shiro.spring.security.interceptor.AuthorizationAttributeSourceAdvisor">

        <property name="securityManager" ref="securityManager"/>

    </bean>

    <!-- 保证实现了Shiro内部lifecycle函数的bean执行 -->

    <bean id="lifecycleBeanPostProcessor" class="org.apache.shiro.spring.LifecycleBeanPostProcessor"/>

    <!-- 生成代理,通过代理进行控制 -->

    <bean class="org.springframework.aop.framework.autoproxy.DefaultAdvisorAutoProxyCreator"

          depends-on="lifecycleBeanPostProcessor">

        <property name="proxyTargetClass" value="true"/>

    </bean>

    <aop:aspectj-autoproxy proxy-target-class="true"/>

</beans>
三.1路径匹配权限太多,不好写,不想使用注解来搞乱代码,自己编写了一个小工具类,实现拼接
package com.ahd.util;

import com.ahd.domain.system.Module;

import com.ahd.service.system.ModuleService;

import org.junit.Test;

import org.junit.runner.RunWith;

import org.springframework.beans.factory.annotation.Autowired;

import org.springframework.context.annotation.Configuration;

import org.springframework.test.context.ContextConfiguration;

import org.springframework.test.context.junit4.SpringJUnit4ClassRunner;

import java.util.List;

@RunWith(SpringJUnit4ClassRunner.class)

@ContextConfiguration("classpath*:spring/applicationContext-*.xml")

public class realmUtil {

    @Autowired

    private ModuleService ms;

    @Test

    public void test() {

        String authorization = "perms";

        List<Module> all = ms.findAll();

        StringBuffer sb = new StringBuffer();

        for (Module module : all) {

            String curl = module.getCurl();

            if(curl!=null){

                if (!curl.contains("?")) {

                    sb.append("/" + curl + "=" + authorization + "[\"" + module.getName() + "\"]\n");

                }else{

                    String[] split = curl.split("\\?");

                    sb.append("/" + split[0] + "=" + authorization + "[\"" + module.getName() + "\"]\n");

                }

            }else{

                sb.append("/" + curl + "=" + authorization + "[\"" + module.getName() + "\"]\n");

            }

        }

        System.out.println(sb.toString());

    }

}
自己编写的小工具
三.2想法
shiro对于路径匹配权限

没有好的解决方案,只能一条一条编写,
想法:编写一个工具类,动态查询数据库,拼接字符串,在spring容器加载之前写入文件(在web.xml中配置监听器)
没有好的解决方案,只能一条一条编写,
想法:编写一个工具类,动态查询数据库,拼接字符串,在spring容器加载之前写入文件(在web.xml中配置监听器)
四.自定义Realm
public class SaasRealm extends AuthorizingRealm {

    @Autowired

    private UserService us;

    @Autowired

    private ModuleService ms;

    @Override

    protected AuthorizationInfo doGetAuthorizationInfo(PrincipalCollection principalCollection) {

        //将用户所有权限存入对象中

        //获取登录的用户对象

        User user = (User) principalCollection.getPrimaryPrincipal();

        //通过查询数据库,查找该用户所具有的的权限

        List<Module> moduleByUser = ms.findModuleByUser(user);

//        Set<String> perms=new HashSet<>();

        //创建SimpleAuthorizationInfo权限对象

        SimpleAuthorizationInfo info=new SimpleAuthorizationInfo();

        for (Module module : moduleByUser) {

            info.addStringPermission(module.getName());

        }

        return info;

    }

    @Override

    protected AuthenticationInfo doGetAuthenticationInfo(AuthenticationToken authenticationToken) throws AuthenticationException {

        UsernamePasswordToken token= (UsernamePasswordToken) authenticationToken;

        //获取页面传递过来的账号密码

        String username_page = token.getUsername();//email

        String password_page = new String(token.getPassword());

        //从数据库中查找该账号的信息

        User user_db = us.findByEmail(username_page);

        String password_db = user_db.getPassword();

        //进行信息比较,如果密码不匹配,返回null,调用者会抛出异常

        if(!password_page.equals(password_db)){

            return null;

        }

        return new SimpleAuthenticationInfo(user_db,user_db.getPassword(),getName());

    }

}
部分代码图片解释:

五.登录代码示例
@RequestMapping(value="login",name = "用户登录")

public String login(String email,String password){

    //登录分析

    //1.首先判断用户邮箱和密码是否为空

    if(StringUtils.isEmpty(email)||StringUtils.isEmpty(password)){

        request.setAttribute("error","邮箱或密码不能为空");

        return "forward:/login.jsp";

    }

    password=new Md5Hash(password,email,1).toString();

    UsernamePasswordToken token=new UsernamePasswordToken(email,password);

    Subject subject = SecurityUtils.getSubject();

    try {

        subject.login(token);

    } catch (AuthenticationException e) {

        request.setAttribute("error","邮箱或密码有误");

        return "forward:/login.jsp";

    }

    //执行到这里,证明登录成功,所以继续封装数据

    //通过shiro的Session域获取user对象

    User user = (User) subject.getPrincipal();

    List<Module> moduleList =ms.findModuleByUser(user);//存入session

    session.setAttribute("modules",moduleList);

    //将登录数据存入session域

    session.setAttribute("loginUser",user);

    return "home/main";

}
登录之后经过以上配置对于权限不需要再进行其他操作
六.注解配置

在路径对应的方法上添加注解@RequiresPermissions (“权限名称”)
七.页面标签展示
1.引入标签库:
<%@ taglib prefix="shiro" uri="http://shiro.apache.org/tags" %>
2.使用标签
<shiro:hasPermission name="删除部门">

    <button type="button" class="btn btn-default" title="删除" onclick='deleteById()'><i class="fa fa-trash-o"></i> 删除</button>

</shiro:hasPermission>
八.优化

使用缓存,避免一项功能查询多次
增加了jvm负担,建议使用redis缓存
九.自定义过滤器
说明:模仿shiro现有的10个过滤器 现在模仿的是perms过滤器
目的:用此配置/system/module/list.do = perms["模块管理","删除模块"]
但凡符合其中的一个权限就应该放行,但是默认的perms过滤器必须两个都有才能放行
第一步:定义一个过滤器,继承一个父类
重写方法
public class MyPermsFilter extends AuthorizationFilter {

    public MyPermsFilter() {

    }

    public boolean isAccessAllowed(ServletRequest request, ServletResponse response, Object mappedValue) throws IOException {

        Subject subject = this.getSubject(request, response);

        String[] perms = (String[])((String[])mappedValue);

//       perms =  ["部门管理","删除部门"]

        if (perms != null && perms.length > 0) {

            for (String perm : perms) {

                if (subject.isPermitted(perm)) {

                    return true;

                }

            }

            return false;

                  }

        return true;

    }

}
第二步:交给spring容器

第三步:把过滤器交个shiro框架

第四步:使用自定义的过滤器

关于缓存的问题,使用redis比较好推荐网页:
SpringDataRedis的操作
https://www.jianshu.com/p/4a9c2fec1079
spring整合apache-shiro的简单使用的更多相关文章
- 快速搭建Spring Boot + Apache Shiro 环境
个人博客网:https://wushaopei.github.io/ (你想要这里多有) 一.Apache Shiro 介绍及概念 概念:Apache Shiro是一个强大且易用的Java安全框 ...
- Apache shiro的简单介绍与使用(与spring整合使用)
apache shiro框架简介 Apache Shiro是一个强大而灵活的开源安全框架,它能够干净利落地处理身份认证,授权,企业会话管理和加密.现在,使用Apache Shiro的人越来越多,因为它 ...
- Apache shiro的简单介绍与使用(与spring整合使用,并加入ehcache缓存权限数据)
apache shiro框架简介 Apache Shiro是一个强大而灵活的开源安全框架,它能够干净利落地处理身份认证,授权,企业会话管理和加密.现在,使用Apache Shiro的人越来越多,因为它 ...
- springboot 整合apache shiro
这几天因为项目需要,学习了下shiro,由此留下一些记录,也希望对初学shiro的朋友有帮助. springboot 是这两年新兴起来的一个项目,它的出现是为了减少springmvc开发过程中需要引入 ...
- SpringMVC整合Apache Shiro
关于什么是Shiro,可以查看这篇文章http://www.cnblogs.com/Laymen/articles/6117751.html 一.添加maven依赖 <dependency> ...
- spring boot 2 + shiro 实现简单的身份验证例子
Shiro是一个功能强大且易于使用的Java安全框架,官网:https://shiro.apache.org/. 主要功能有身份验证.授权.加密和会话管理.其它特性有Web支持.缓存.测试支持.允许一 ...
- SpringBoot整合Apache Shiro权限验证框架
比较常见的权限框架有两种,一种是Spring Security,另一种是Apache Shiro,两种框架各有优劣,个人感觉Shiro更容易使用,更加灵活,也更符合RABC规则,而且是java官方更推 ...
- SpringBoot整合Apache Shiro
Subject 用户主体 (把操作交给SecurityManager)SecurityManager 安全管理器 (关联Realm)Realm Shiro连接数据的桥梁 引入maven依赖 < ...
- spring 整合quartz的方式——简单介绍
一.继承QuartzJobBean,重写executeInternal方法 <bean name="statQuartzJob" class="org.spring ...
- shiro框架的组成和内部结构(下一篇为spring整合shiro)
1.shiro简介 Apache Shiro是Java的一个安全框架.功能强大,使用简单的Java安全框架,它为开发人员提供一个直观而全面的认证,授权,加密及会话管理的解决方案. 实际上,Shir ...
随机推荐
- AttributeError: module 'datetime' has no attribute 'now'
在用时间转化时,一直报AttributeError: module 'datetime' has no attribute 'now', 我用的 import datetime datetime ...
- VirtualBox NAT Host-only模式下,自动分配IP上网。
修改宿主机上,virtualbox自建虚拟网卡Host-Only 2. 因为我使用了两个适配器,所以这两个适配器的名字分别是ifcfg-eth0, ifcfg-eth1. ifcfg-eh0一般默认就 ...
- 3D Computer Grapihcs Using OpenGL - 20 结合Buffer
在上一节的案例中,我们使用了四个Buffer Object,立方体的VertexBuffer,立方体的索引Buffer,四面体的VertexBuffer,四面体的索引Buffer. 我们这节尝试把两个 ...
- onload,domcontentload区别+onload详解
todo onLoad是的在页面所有文件加载完成后执行 DomContentLoad是Dom加载完成后执行,不必等待样式脚本和图片加载 domContentLoad更为合理, 原理: 如果是webki ...
- SPFA算法的SLF优化 ——loj#10081. 「一本通 3.2 练习 7」道路和航线
今天做到一道最短路的题,原题https://loj.ac/problem/10081 题目大意为给一张有n个顶点的图,点与点之间有m1条道路,m2条航线,道路是双向的,且权值非负,而航线是单向的,权值 ...
- 分布式工作流任务调度系统Easy Scheduler正式开源
分布式工作流任务调度系统Easy Scheduler正式开源 1.背景 在多位技术小伙伴的努力下,经过近2年的研发迭代.内部业务剥离及重构,也经历一批种子用户试用一段时间后,EasyScheduler ...
- Maven中的dependency详解
<dependency> <groupId>junit</groupId> <artifactId>junit</artifactId> & ...
- apache-httpd2.4编译安装
centos 6 编译安装httpd-2.4 centos6yum安装的apr版本已经不适用httpd-2.4版本了.所以,需要源码编译apr以及apr-util1. 下载源码:cd /usr/loc ...
- 5.2.k8s.Secret
#Secret Secret存储密码.token.密钥等敏感数据 Secret以Volume或环境变量方式使用 #Secret类型 Opaque : base64 编码格式的 Secret kuber ...
- C# user32.dll 找窗口 填数据
工具:SpyLite [DllImport("user32.dll", EntryPoint = "FindWindow")] private extern s ...
