gateway聚合swagger3统一管理api文档
springboot微服务整合swagger3方法很简单,下文会演示。但是在分布式项目中如果每个微服务都需要单独的分开访问获取接口文档就不方便了,本文将详细讲解springcloud gateway网关如何聚合统一管理swagger接口文档。
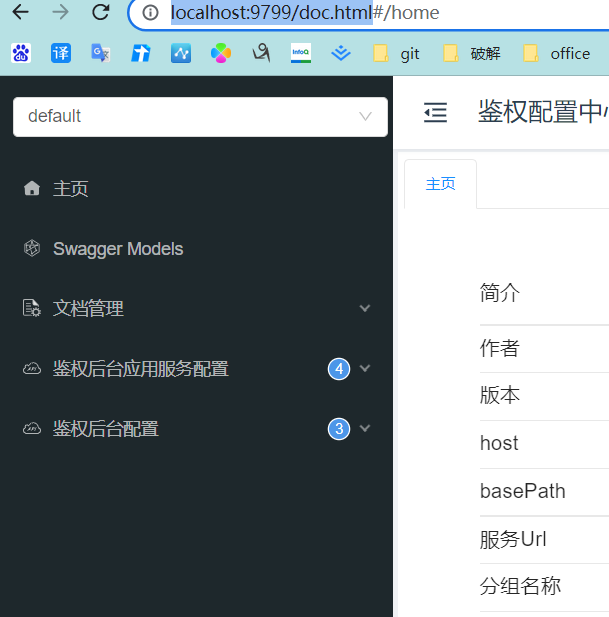
先贴张整合后的效果图(通过切换左上角的下拉窗口获取每个微服务的接口文档):

一、swagger简介
- 基于 OpenAPI 规范(OpenAPI Specification,OAS)构建的开源接口文档自动生成工具,可以让开发人员快速设计、构建、记录以及使用 Rest API。
- 目前的版本有swagger2.0和3.0,swagger2于17年停止维护,现在最新的版本为17年发布的 Swagger3(Open Api3)。
- Swagger 主要包含了以下三个部分:
- Swagger Editor:基于浏览器的编辑器,我们可以使用它编写我们 OpenAPI 规范。
- Swagger UI:它会将我们编写的 OpenAPI 规范呈现为交互式的 API 文档,后文我将使用浏览器来查看并且操作我们的 Rest API。
- Swagger Codegen:它可以通过为 OpenAPI(以前称为 Swagger)规范定义的任何 API 生成服务器存根和客户端 SDK 来简化构建过程。
- SpringFox介绍(是 spring 社区维护的一个非官方项目)
- 是一个开源的API Doc的框架,Marty Pitt编写了一个基于Spring的组件swagger-springmvc,用于将swagger集成到springmvc中来, 它的前身是swagger-springmvc,可以将我们的Controller中的方法以文档的形式展现。官方定义为: Automated JSON API documentation for API's built with Spring。
二、Springboot2.x整合Swagger3.x
首先看下单体微服务是如何整合swagger3的,事实上这也是后面gateway网关聚合统一文档的步骤之一。
步骤一:
SpringBoot添加pom文件依赖
<dependency>

    <groupId>io.springfox</groupId>

    <artifactId>springfox-boot-starter</artifactId>

    <version>3.0.0</version>

</dependency>
如果想让浏览器展示的UI效果更好看一点,需要引入最新的下面的依赖
<!--swagger UI-->

 <dependency>

     <groupId>com.github.xiaoymin</groupId>

     <artifactId>knife4j-spring-ui</artifactId>

     <version>3.0.3</version>

 </dependency>
步骤二:
配置文件增加配置
swagger:

  enable: true

  application-name: 鉴权配置中心接口

  application-version: 1.0

  application-description: 鉴权配置中心
步骤三:
创建配置类
import org.springframework.boot.context.properties.ConfigurationProperties;

import org.springframework.context.annotation.Bean;

import org.springframework.stereotype.Component;

import io.swagger.annotations.ApiOperation;

import lombok.Data;

import springfox.documentation.builders.ApiInfoBuilder;

import springfox.documentation.builders.PathSelectors;

import springfox.documentation.builders.RequestHandlerSelectors;

import springfox.documentation.oas.annotations.EnableOpenApi;

import springfox.documentation.service.ApiInfo;

import springfox.documentation.service.Contact;

import springfox.documentation.spi.DocumentationType;

import springfox.documentation.spring.web.plugins.Docket;

/**

 * @author: shf description: date: 2022/3/28 11:35

 */

@Component

@EnableOpenApi

@ConfigurationProperties(prefix = "swagger")

@Data

public class SwaggerConfig {

    /**

     * 是否开启swagger,生产环境一般关闭,所以这里定义一个变量

     */

    private Boolean enable;

    /**

     * 项目应用名

     */

    private String applicationName;

    /**

     * 项目版本信息

     */

    private String applicationVersion;

    /**

     * 项目描述信息

     */

    private String applicationDescription;

    @Bean

    public Docket docket() {

        return new Docket(DocumentationType.OAS_30)

                .pathMapping("/")

                // 定义是否开启swagger,false为关闭,可以通过变量控制,线上关闭

                .enable(enable)

                //配置api文档元信息

                .apiInfo(apiInfo())

                // 选择哪些接口作为swagger的doc发布

                .select()

                //apis() 控制哪些接口暴露给swagger,

                // RequestHandlerSelectors.any() 所有都暴露

                // RequestHandlerSelectors.basePackage("net.xdclass.*")  指定包位置

                // withMethodAnnotation(ApiOperation.class)标记有这个注解 ApiOperation

                .apis(RequestHandlerSelectors.withMethodAnnotation(ApiOperation.class))

                .paths(PathSelectors.any())

                .build();

    }

    private ApiInfo apiInfo() {

        return new ApiInfoBuilder()

                .title(applicationName)

                .description(applicationDescription)

                .contact(new Contact("鉴权中心平台接口文档", "www.yifeng.com", "123@qq.com"))

                .version(applicationVersion)

                .build();

    }

}
启动服务看下效果:
浏览器访问http://localhost:9799/doc.html
端口号是你服务配置指定的

三、gateway统一聚合
成功完成上面微服务整合swagger的步骤后,还需要在网关中增加配置
步骤一:
同样的引入依赖:
<dependency>

    <groupId>io.springfox</groupId>

    <artifactId>springfox-boot-starter</artifactId>

    <version>3.0.0</version>

</dependency>

<dependency>

    <groupId>com.github.xiaoymin</groupId>

    <artifactId>knife4j-spring-ui</artifactId>

    <version>3.0.3</version>

</dependency>
步骤二:
配置文件:
spring:

  cloud:

    gateway:

      globalcors:

        cors-configurations:

          '[/**]':

            allowCredentials: true

            allowedOrigins: "*"

            allowedMethods: "*"

            allowedHeaders: "*"

      routes:

        - filters:

            - RequestTime=true

            - StripPrefix=1

          id: core-route

          predicates:

            - Path=/core/**

          uri: xxxxxxxx

gateway-config:

  uriWhitelist:

    - /v3/api-docs
在网关的全局过滤器中要将配置的白名单放行。
步骤三:
添加路由枚举类,将上面配置文件中的每个微服务的路由ID替换为中文,即在UI页面的左上角显示的微服务文档名称。
/**

 * 服务路由枚举

 *

 * @author shf

 * @date Created in 2022-03-28 16:28

 */

public enum ServerRouteEnum {

    /**

     * 路由信息

     */

    CORE_ROUTE("core-route", "开放平台鉴权配置接口");

    private String routeId;

    private String swaggerInfo;

    ServerRouteEnum(String routeId, String swaggerInfo) {

        this.routeId = routeId;

        this.swaggerInfo = swaggerInfo;

    }

    /**

     * 根据路由id获取swagger信息

     *

     * @param routId 路由id

     * @return swagger信息

     */

    public static String getSwaggerInfoByRoutId(String routId) {

        for (ServerRouteEnum routeEnum : ServerRouteEnum.values()) {

            if (routId.equals(routeEnum.getRouteId())) {

                return routeEnum.getSwaggerInfo();

            }

        }

        return null;

    }

    /**

     * @return the routeId

     */

    public String getRouteId() {

        return routeId;

    }

    /**

     * @param routeId : the routeId to set

     */

    public void setRouteId(String routeId) {

        this.routeId = routeId;

    }

    /**

     * @return the swaggerInfo

     */

    public String getSwaggerInfo() {

        return swaggerInfo;

    }

    /**

     * @param swaggerInfo : the swaggerInfo to set

     */

    public void setSwaggerInfo(String swaggerInfo) {

        this.swaggerInfo = swaggerInfo;

    }

}
最后一步:
新增配置类:
部分说明:
①SwaggerResource:处理的是UI页面中顶部的选择框,选择服务的swagger页面内容。
②RouteLocator:获取spring cloud gateway中注册的路由
import org.apache.commons.lang3.StringUtils;

import org.springframework.cloud.gateway.config.GatewayProperties;

import org.springframework.cloud.gateway.route.RouteLocator;

import org.springframework.cloud.gateway.support.NameUtils;

import org.springframework.context.annotation.Primary;

import org.springframework.stereotype.Component;

import java.util.ArrayList;

import java.util.List;

import springfox.documentation.swagger.web.SwaggerResource;

import springfox.documentation.swagger.web.SwaggerResourcesProvider;

/**

 * @author: shf description: date: 2022/3/28 14:16

 */

@Component

@Primary

public class SwaggerProvider implements SwaggerResourcesProvider {

    public static final String API_URI = "/v3/api-docs";

    private final RouteLocator routeLocator;

    private final GatewayProperties gatewayProperties;

    public SwaggerProvider(RouteLocator routeLocator, GatewayProperties gatewayProperties) {

        this.routeLocator = routeLocator;

        this.gatewayProperties = gatewayProperties;

    }

    @Override

    public List<SwaggerResource> get() {

        List<SwaggerResource> resources = new ArrayList<>();

        List<String> routes = new ArrayList<>();

        // 取出gateway的route

        routeLocator.getRoutes().subscribe(route -> routes.add(route.getId()));

        // 结合配置的route-路径(Path),和route过滤,只获取在枚举中说明的route节点

        gatewayProperties.getRoutes().stream().filter(routeDefinition -> routes.contains(routeDefinition.getId()))

                .forEach(routeDefinition -> routeDefinition.getPredicates().stream()

                        // 目前只处理Path断言  Header或其他路由需要另行扩展

                        .filter(predicateDefinition -> ("Path").equalsIgnoreCase(predicateDefinition.getName()))

                        .forEach(predicateDefinition -> {

                                    String routeId = routeDefinition.getId();

                                    String swaggerInfo = ServerRouteEnum.getSwaggerInfoByRoutId(routeId);

                                    if (StringUtils.isNotEmpty(swaggerInfo)) {

                                        resources.add(swaggerResource(swaggerInfo, predicateDefinition.getArgs().get(NameUtils.GENERATED_NAME_PREFIX + "0").replace("/**", API_URI)));

                                    }

                                }

                        ));

        return resources;

    }

    private SwaggerResource swaggerResource(String name, String location) {

        SwaggerResource swaggerResource = new SwaggerResource();

        swaggerResource.setName(name);

        swaggerResource.setLocation(location);

        swaggerResource.setSwaggerVersion("3.0");

        return swaggerResource;

    }

}
浏览器访问:
旧版UI:http://localhost:9999/swagger-ui/index.html
新版UI:http://localhost:9999/doc.html
gateway聚合swagger3统一管理api文档的更多相关文章
- ASP.NET Web API 中使用 swagger 来管理 API 文档
本文以 ASP.NET Web API 为后台框架,利用 EF6 连接 postgreSQL 数据库,使用 swagger 来生成 REST APIs文档.文章分二个部分,第一部分主要讲如何用 EF6 ...
- 微服务如何聚合 API 文档?这波秀~
今天这篇文章介绍一下微服务如何聚合Swagger实现接口文档管理. 文章目录如下: 为什么需要聚合? 微服务模块众多,如果不聚合文档,则访问每个服务的API文档都需要单独访问一个Swagger UI界 ...
- API文档管理平台
一.应用场景 在公司中,有很多开发,每个人维护的api接口是不一样的.如果有一个统一的api文档管理平台,每个开发,把自己维护的接口录入进去. 之后再开发别的功能时,不需要重复造轮子,直接调用就可以了 ...
- 随时发布:REST API文档的代码仓库中的持续集成与协作
本文主要内容:API文档提供了预测客户成功的关键路径:在代码附近的文档上进行协作可以更好地检查代码和文档文件,提高自动化效率,并专门针对文档进行质量测试:提供通用文档框架,标准,自动化和工具,以提高团 ...
- 使用Swagger2Markup归档swagger生成的API文档
文章出处: http://blog.didispace.com/swagger2markup-asciidoc/ 说明 项目中使用Swagger之后,我们能够很轻松的管理API文档,并非常简单的模拟接 ...
- springboot学习-jdbc操作数据库--yml注意事项--controller接受参数以及参数校验--异常统一管理以及aop的使用---整合mybatis---swagger2构建api文档---jpa访问数据库及page进行分页---整合redis---定时任务
springboot学习-jdbc操作数据库--yml注意事项--controller接受参数以及参数校验-- 异常统一管理以及aop的使用---整合mybatis---swagger2构建api文档 ...
- REST api文档管理工具
问题: 不同软件/程序在网络中互相传递信息不统一. 交互不便. REST API 作用: RESTful API就是一套协议,用来规范多种形式的前端和同一个后台的交互方式. 原理: 组成/流程/规范: ...
- 白话SpringCloud | 第十一章:路由网关(Zuul):利用swagger2聚合API文档
前言 通过之前的两篇文章,可以简单的搭建一个路由网关了.而我们知道,现在都奉行前后端分离开发,前后端开发的沟通成本就增加了,所以一般上我们都是通过swagger进行api文档生成的.现在由于使用了统一 ...
- Swagger API文档集中化注册管理
接口文档是前后端开发对接时很重要的一个组件.手动编写接口文档既费时,又存在文档不能随代码及时更新的问题,因此产生了像swagger这样的自动生成接口文档的框架.swagger文档一般是随项目代码生成与 ...
随机推荐
- PyTorch 中 torch.matmul() 函数的文档详解
官方文档 torch.matmul() 函数几乎可以用于所有矩阵/向量相乘的情况,其乘法规则视参与乘法的两个张量的维度而定. 关于 PyTorch 中的其他乘法函数可以看这篇博文,有助于下面各种乘法的 ...
- 关于linux下,ls vi等命令失效的解决方法(配置下环境变量出现问题)
转至:https://www.cnblogs.com/afeiiii/p/13824530.html 配置完环境变量source之后,linux的ls vi命令均失效,报错如下: 解决方法 1.输入 ...
- Qt:输出为CSV文件时汉字乱码
参考 (18条消息) QT5写csv文件,文件打开后中文显示乱码的问题解决_yanzi150207348的博客-CSDN博客 解决方法 1.在文件开头写一段: #if _MSC_VER >= 1 ...
- consul-常用命令
1.consul 是B/C架构.服务端和客户端包是一样的.差别在于启动时候的参数. --客户端 ./consul agent -join=172.29.2.65:8301 -bind=172.29.3 ...
- ibv_close_device()函数
int ibv_close_device(struct ibv_context *context); 描述 函数用来关闭一个RDMA设备context: 注意: 函数不能用来释放与该Context关联 ...
- django程序在windows服务器上发布
django程序在windows服务器上发布 参考文献:https://www.cnblogs.com/djangocn/p/10227006.html 1.安装 IIS 和 GCI 打开服务器管理器 ...
- Docker-生成镜像、服务搭建(redis集群、kibana、运行项目jar包)、上传镜像至阿里云
目录 生成自己的镜像 1.下载官方tomcat镜像 2.运行镜像后将webapp目录里新增文件(官方镜像是没有页面的 具体操作见) 3.使用docker ps -a 查看刚刚修改后的容器id 4.执行 ...
- composer 自动载入的四种方式
对于第三方包的自动加载,Composer提供了四种方式的支持,分别是 PSR-0和PSR-4的自动加载,生成class-map,和直接包含files的方式. 首先引入autoload.php,在主文件 ...
- 明火烟雾目标检测项目部署(YoloV5+Flask)
明火烟雾目标检测项目部署 目录 明火烟雾目标检测项目部署 1. 拉取Docker PyToch镜像 2. 配置项目环境 2.1 更换软件源 2.2 下载vim 2.3 解决vim中文乱码问题 3. 运 ...
- 在微信小程序中使用 echarts 图片-例 折线图
首先进入echarts官方[https://echarts.apache.org/handbook/zh/get-started/].这边只需要在小程序中简单应用一下echarts折线图 所以不需要把 ...
