二、ELKStack集群架构设计
一、ELKStack介绍与入门实践
二、Elasticsearch 集群架构图
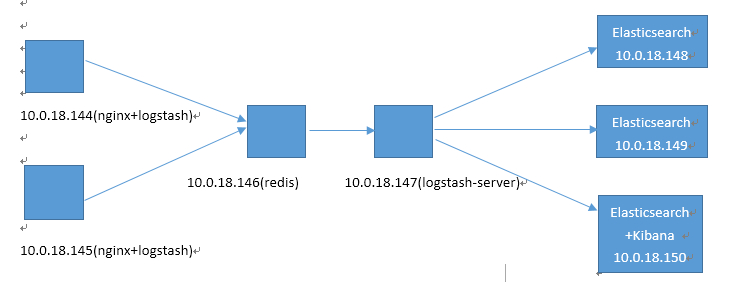
服务器配置:Centos6.6 x86_64 CPU:1核心 MEM:2G (做实验,配置比较低一些)
注:这里配置elasticsearch集群用了3台服务器,可以根据自己的实际情况进行调整。
三、开始安装配置nginx和logstash
注:这里使用yum安装,如果需要较高版本的,可以使用编译安装。
在10.0.18.144上操作,10.0.18.145配置方式和144是一样的。
1、安装nginx
配置yum源并安装nginx
|
1
2
3
4
5
6
7
8
9
10
11
|
#vim /etc/yum.repos.d/nginx.repo[nginx]name=nginx repobaseurl=http://nginx.org/packages/centos/$releasever/$basearch/gpgcheck=0enabled=1安装#yum install nginx -y查看版本#rpm -qa nginxnginx-1.10.1-1.el6.ngx.x86_64 |
修改nginx配置文件,修改为如下:
|
1
2
3
4
5
6
7
8
9
10
11
12
13
14
15
16
17
18
19
20
21
22
23
24
25
26
27
28
29
30
31
32
33
34
35
36
37
38
39
40
41
42
43
|
user nginx;worker_processes 1;error_log /var/log/nginx/error.log notice; #默认是warnpid /var/run/nginx.pid; events { worker_connections 1024;} http { include mime.types; default_type application/octet-stream; log_format main '$remote_addr - $remote_user [$time_local] "$request" ' '$status $body_bytes_sent "$http_referer" ' '"$http_user_agent" $http_x_forwarded_for $request_length $msec $connection_requests $request_time'; ##添加了$request_length $msec $connection_requests $request_time sendfile on; keepalive_timeout 65; server { listen 80; server_name localhost; access_log /var/log/nginx/access.log main; location / { root /usr/share/nginx/html; index index.html index.htm; } error_page 500 502 503 504 /50x.html; location = /50x.html { root /usr/share/nginx/html; } }}修改nginx默认页面#vi /usr/share/nginx/html/index.html<body><h1>Welcome to nginx!</h1>改为<body><h1>Welcome to nginx! 144</h1> |
启动nginx,并访问测试:
|
1
2
3
4
5
6
7
8
9
10
11
12
|
#service nginx start#chkconfig --add nginx#chkconfig nginx on查看启动情况#netstat -tunlpActive Internet connections (only servers)Proto Recv-Q Send-Q Local Address Foreign Address State PID/Program name tcp 0 0 0.0.0.0:22 0.0.0.0:* LISTEN 1023/sshd tcp 0 0 127.0.0.1:25 0.0.0.0:* LISTEN 1101/master tcp 0 0 0.0.0.0:80 0.0.0.0:* LISTEN 1353/nginx tcp 0 0 :::22 :::* LISTEN 1023/sshd tcp 0 0 ::1:25 :::* LISTEN 1101/master |
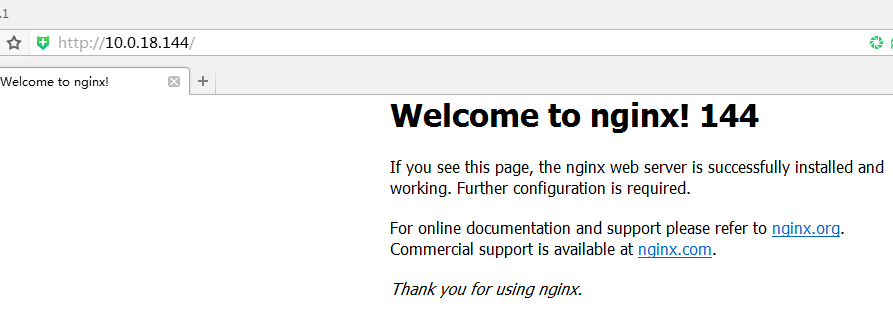
在浏览器访问测试,如下:
2、安装配置java环境
|
1
2
3
4
5
6
7
8
9
10
11
12
13
14
15
16
17
|
直接使用rpm包安装,比较方便#rpm -ivh jdk-8u92-linux-x64.rpm Preparing... ########################################### [100%] 1:jdk1.8.0_92 ########################################### [100%]Unpacking JAR files... tools.jar... plugin.jar... javaws.jar... deploy.jar... rt.jar... jsse.jar... charsets.jar... localedata.jar...#java -versionjava version "1.8.0_92"Java(TM) SE Runtime Environment (build 1.8.0_92-b14)Java HotSpot(TM) 64-Bit Server VM (build 25.92-b14, mixed mode) |
3、安装配置logstash
配置logstash的yum源,如下:
|
1
2
3
4
5
6
7
8
9
10
11
12
|
#vim /etc/yum.repos.d/logstash.repo[logstash-2.3]name=Logstash repository for 2.3.x packagesbaseurl=https://packages.elastic.co/logstash/2.3/centosgpgcheck=1gpgkey=https://packages.elastic.co/GPG-KEY-elasticsearchenabled=1安装logstash#yum install logstash -y查看版本#rpm -qa logstashlogstash-2.3.4-1.noarch |
配置logstash的配置文件
|
1
2
3
4
5
6
7
8
9
10
11
12
13
14
15
16
17
|
#cd /etc/logstash/conf.d#vim logstash.confinput { file { path => ["/var/log/nginx/access.log"] type => "nginx_log" start_position => "beginning" }}output { stdout { codec => rubydebug }}检测语法是否有错#/opt/logstash/bin/logstash -f /etc/logstash/conf.d/logstash.conf --configtestConfiguration OK #语法OK |
启动并查看收集nginx日志情况:
|
1
2
3
4
5
6
7
8
9
10
11
12
13
14
15
16
17
18
19
20
21
22
23
24
|
#列出一部分#/opt/logstash/bin/logstash -f /etc/logstash/conf.d/logstash.conf Settings: Default pipeline workers: 1Pipeline main started{ "message" => "10.0.90.8 - - [26/Aug/2016:15:30:18 +0800] \"GET / HTTP/1.1\" 304 0 \"-\" \"Mozilla/4.0 (compatible; MSIE 7.0; Windows NT 6.1; WOW64; Trident/4.0; SLCC2; .NET CLR 2.0.50727; .NET CLR 3.5.30729; .NET CLR 3.0.30729; Media Center PC 6.0; InfoPath.3; .NET4.0C; .NET4.0E)\" \"-\" 415 1472196618.085 1 0.000", "@version" => "1", "@timestamp" => "2016-08-26T07:30:32.699Z", "path" => "/var/log/nginx/access.log", "host" => "0.0.0.0", "type" => "nginx_log"}{ "message" => "10.0.90.8 - - [26/Aug/2016:15:30:18 +0800] \"GET / HTTP/1.1\" 304 0 \"-\" \"Mozilla/4.0 (compatible; MSIE 7.0; Windows NT 6.1; WOW64; Trident/4.0; SLCC2; .NET CLR 2.0.50727; .NET CLR 3.5.30729; .NET CLR 3.0.30729; Media Center PC 6.0; InfoPath.3; .NET4.0C; .NET4.0E)\" \"-\" 415 1472196618.374 2 0.000", "@version" => "1", "@timestamp" => "2016-08-26T07:30:32.848Z", "path" => "/var/log/nginx/access.log", "host" => "0.0.0.0", "type" => "nginx_log"}………………PS:在网上看到其他版本logstash的pipeline workers是默认为4,但我安装的2.3.4版本这个默认值为1这是因为这个默认值和服务器本身的cpu核数有关,我这里的服务器cpu都是1核,故默认值为1。可以通过 /opt/logstash/bin/logstash -h 命令查看一些参数 |
修改logstash的配置文件,将日志数据输出到redis
|
1
2
3
4
5
6
7
8
9
10
11
12
13
14
15
|
#cat /etc/logstash/conf.d/logstash.confinput { file { path => ["/var/log/nginx/access.log"] type => "nginx_log" start_position => "beginning" }}output { redis { host => "10.0.18.146" key => 'logstash-redis' data_type => 'list' }} |
检查语法并启动服务
|
1
2
3
4
5
6
7
8
|
#/opt/logstash/bin/logstash -f /etc/logstash/conf.d/logstash.conf --configtestConfiguration OK#service logstash startlogstash started.查看启动进程#ps -ef | grep logstashlogstash 2029 1 72 15:37 pts/0 00:00:18 /usr/bin/java -XX:+UseParNewGC -XX:+UseConcMarkSweepGC -Djava.awt.headless=true -XX:CMSInitiatingOccupancyFraction=75 -XX:+UseCMSInitiatingOccupancyOnly -XX:+HeapDumpOnOutOfMemoryError -Djava.io.tmpdir=/var/lib/logstash -Xmx1g -Xss2048k -Djffi.boot.library.path=/opt/logstash/vendor/jruby/lib/jni -XX:+UseParNewGC -XX:+UseConcMarkSweepGC -Djava.awt.headless=true -XX:CMSInitiatingOccupancyFraction=75 -XX:+UseCMSInitiatingOccupancyOnly -XX:+HeapDumpOnOutOfMemoryError -Djava.io.tmpdir=/var/lib/logstash -XX:HeapDumpPath=/opt/logstash/heapdump.hprof -Xbootclasspath/a:/opt/logstash/vendor/jruby/lib/jruby.jar -classpath : -Djruby.home=/opt/logstash/vendor/jruby -Djruby.lib=/opt/logstash/vendor/jruby/lib -Djruby.script=jruby -Djruby.shell=/bin/sh org.jruby.Main --1.9 /opt/logstash/lib/bootstrap/environment.rb logstash/runner.rb agent -f /etc/logstash/conf.d -l /var/log/logstash/logstash.logroot 2076 1145 0 15:37 pts/0 00:00:00 grep logstash |
四、安装配置redis
下载并安装redis
|
1
2
3
4
5
6
7
8
9
10
11
12
13
14
15
16
|
#yum install wget gcc gcc-c++ -y #安装过的,就不需要再安装了#wget http://download.redis.io/releases/redis-3.0.7.tar.gz#tar xf redis-3.0.7.tar.gz#cd redis-3.0.7#make make没问题之后,创建目录#mkdir -p /usr/local/redis/{conf,bin}#cp ./*.conf /usr/local/redis/conf/#cp runtest* /usr/local/redis/#cd utils/#cp mkrelease.sh /usr/local/redis/bin/#cd ../src#cp redis-benchmark redis-check-aof redis-check-dump redis-cli redis-sentinel redis-server redis-trib.rb /usr/local/redis/bin/创建redis数据存储目录#mkdir -pv /data/redis/db#mkdir -pv /data/log/redis |
修改redis配置文件
|
1
2
3
4
5
6
7
8
9
10
11
12
13
14
15
16
17
18
19
|
#cd /usr/local/redis/conf#vi redis.confdir ./ 修改为dir /data/redis/db/保存退出启动redis#nohup /usr/local/redis/bin/redis-server /usr/local/redis/conf/redis.conf &查看redis进程#ps -ef | grep redisroot 4425 1149 0 16:21 pts/0 00:00:00 /usr/local/redis/bin/redis-server *:6379 root 4435 1149 0 16:22 pts/0 00:00:00 grep redis#netstat -tunlpActive Internet connections (only servers)Proto Recv-Q Send-Q Local Address Foreign Address State PID/Program name tcp 0 0 0.0.0.0:22 0.0.0.0:* LISTEN 1402/sshd tcp 0 0 127.0.0.1:25 0.0.0.0:* LISTEN 1103/master tcp 0 0 0.0.0.0:6379 0.0.0.0:* LISTEN 4425/redis-server * tcp 0 0 :::22 :::* LISTEN 1402/sshd tcp 0 0 ::1:25 :::* LISTEN 1103/master tcp 0 0 :::6379 :::* LISTEN 4425/redis-server * |
五、安装配置logstash server
1、安装jdk
|
1
2
3
4
5
6
7
8
9
10
11
12
|
#rpm -ivh jdk-8u92-linux-x64.rpm Preparing... ########################################### [100%] 1:jdk1.8.0_92 ########################################### [100%]Unpacking JAR files... tools.jar... plugin.jar... javaws.jar... deploy.jar... rt.jar... jsse.jar... charsets.jar... localedata.jar... |
2、安装logstash
|
1
2
3
4
5
6
7
8
9
10
|
配置yum源#vim /etc/yum.repos.d/logstash.repo[logstash-2.3]name=Logstash repository for 2.3.x packagesbaseurl=https://packages.elastic.co/logstash/2.3/centosgpgcheck=1gpgkey=https://packages.elastic.co/GPG-KEY-elasticsearchenabled=1安装logstash#yum install logstash -y |
配置logstash server
|
1
2
3
4
5
6
7
8
9
10
11
12
13
14
15
16
17
18
19
20
|
配置文件如下:#cd /etc/logstash/conf.d#vim logstash_server.confinput { redis { port => "6379" host => "10.0.18.146" data_type => "list" key => "logstash-redis" type => "redis-input" }}output { stdout { codec => rubydebug }}检查语法#/opt/logstash/bin/logstash -f /etc/logstash/conf.d/logstash_server.conf --configtestConfiguration OK |
语法没问题之后,测试查看收集nginx日志的情况,如下:
|
1
2
3
4
5
6
7
8
9
10
11
12
13
14
15
16
17
18
19
20
21
22
23
24
25
26
27
28
29
30
31
32
33
34
35
36
37
38
39
40
41
42
43
44
45
46
47
48
49
50
51
52
53
54
55
56
57
58
59
60
61
|
#/opt/logstash/bin/logstash -f /etc/logstash/conf.d/logstash_server.conf Settings: Default pipeline workers: 1Pipeline main started{ "message" => "10.0.90.8 - - [26/Aug/2016:15:42:01 +0800] \"GET /favicon.ico HTTP/1.1\" 404 571 \"-\" \"Mozilla/5.0 (Windows NT 6.1; WOW64) AppleWebKit/537.36 (KHTML, like Gecko) Chrome/31.0.1650.63 Safari/537.36\" \"-\" 263 1472197321.350 1 0.000", "@version" => "1", "@timestamp" => "2016-08-26T08:45:25.214Z", "path" => "/var/log/nginx/access.log", "host" => "0.0.0.0", "type" => "nginx_log"}{ "message" => "10.0.90.8 - - [26/Aug/2016:16:40:53 +0800] \"GET / HTTP/1.1\" 200 616 \"-\" \"Mozilla/5.0 (Windows NT 6.1; Win64; x64) AppleWebKit/537.36 (KHTML, like Gecko) Chrome/49.0.2623.112 Safari/537.36\" \"-\" 374 1472200853.324 1 0.000", "@version" => "1", "@timestamp" => "2016-08-26T08:45:25.331Z", "path" => "/var/log/nginx/access.log", "host" => "0.0.0.0", "type" => "nginx_log"}{ "message" => "10.0.90.8 - - [26/Aug/2016:16:40:53 +0800] \"GET /favicon.ico HTTP/1.1\" 404 571 \"http://10.0.18.144/\" \"Mozilla/5.0 (Windows NT 6.1; Win64; x64) AppleWebKit/537.36 (KHTML, like Gecko) Chrome/49.0.2623.112 Safari/537.36\" \"-\" 314 1472200853.486 2 0.000", "@version" => "1", "@timestamp" => "2016-08-26T08:45:25.332Z", "path" => "/var/log/nginx/access.log", "host" => "0.0.0.0", "type" => "nginx_log"}{ "message" => "10.0.90.8 - - [26/Aug/2016:16:42:05 +0800] \"GET / HTTP/1.1\" 304 0 \"-\" \"Mozilla/5.0 (Windows NT 6.1; Win64; x64) AppleWebKit/537.36 (KHTML, like Gecko) Chrome/49.0.2623.112 Safari/537.36\" \"-\" 481 1472200925.259 1 0.000", "@version" => "1", "@timestamp" => "2016-08-26T08:45:25.332Z", "path" => "/var/log/nginx/access.log", "host" => "0.0.0.0", "type" => "nginx_log"}{ "message" => "10.0.90.9 - - [26/Aug/2016:16:47:35 +0800] \"GET / HTTP/1.1\" 200 616 \"-\" \"Mozilla/5.0 (Windows NT 10.0; WOW64; Trident/7.0; rv:11.0) like Gecko\" \"-\" 298 1472201255.813 1 0.000", "@version" => "1", "@timestamp" => "2016-08-26T08:47:36.623Z", "path" => "/var/log/nginx/access.log", "host" => "0.0.0.0", "type" => "nginx_log"}{ "message" => "10.0.90.9 - - [26/Aug/2016:16:47:42 +0800] \"GET /favicon.ico HTTP/1.1\" 404 169 \"-\" \"Mozilla/5.0 (Windows NT 10.0; Win64; x64; Trident/7.0; rv:11.0) like Gecko\" \"-\" 220 1472201262.653 1 0.000", "@version" => "1", "@timestamp" => "2016-08-26T08:47:43.649Z", "path" => "/var/log/nginx/access.log", "host" => "0.0.0.0", "type" => "nginx_log"}{ "message" => "10.0.90.8 - - [26/Aug/2016:16:48:09 +0800] \"GET / HTTP/1.1\" 200 616 \"-\" \"Mozilla/5.0 (Windows; U; MSIE 6.0; Windows NT 5.1; SV1; .NET CLR 2.0.50727; BIDUBrowser 8.4)\" \"-\" 237 1472201289.662 1 0.000", "@version" => "1", "@timestamp" => "2016-08-26T08:48:09.684Z", "path" => "/var/log/nginx/access.log", "host" => "0.0.0.0", "type" => "nginx_log"}………………………… |
注:执行此命令之后不会立即有信息显示,需要等一会,也可以在浏览器刷新144和145的nginx页面或者同一网段的其他机器访问144、145,就会由如上信息出现。
3、修改logstash配置文件,将搜集到的数据输出到ES集群中
|
1
2
3
4
5
6
7
8
9
10
11
12
13
14
15
16
17
18
19
20
21
22
23
|
#vim /etc/logstash/conf.d/logstash_server.confinput { redis { port => "6379" host => "10.0.18.146" data_type => "list" key => "logstash-redis" type => "redis-input" }}output { elasticsearch { hosts => "10.0.18.149" #其中一台ES 服务器 index => "nginx-log-%{+YYYY.MM.dd}" #定义的索引名称,后面会用到 }}启动logstash#service logstash startlogstash started.查看logstash server 进程#ps -ef | grep logstashlogstash 1740 1 24 17:24 pts/0 00:00:25 /usr/bin/java -XX:+UseParNewGC -XX:+UseConcMarkSweepGC -Djava.awt.headless=true -XX:CMSInitiatingOccupancyFraction=75 -XX:+UseCMSInitiatingOccupancyOnly -XX:+HeapDumpOnOutOfMemoryError -Djava.io.tmpdir=/var/lib/logstash -Xmx1g -Xss2048k -Djffi.boot.library.path=/opt/logstash/vendor/jruby/lib/jni -XX:+UseParNewGC -XX:+UseConcMarkSweepGC -Djava.awt.headless=true -XX:CMSInitiatingOccupancyFraction=75 -XX:+UseCMSInitiatingOccupancyOnly -XX:+HeapDumpOnOutOfMemoryError -Djava.io.tmpdir=/var/lib/logstash -XX:HeapDumpPath=/opt/logstash/heapdump.hprof -Xbootclasspath/a:/opt/logstash/vendor/jruby/lib/jruby.jar -classpath : -Djruby.home=/opt/logstash/vendor/jruby -Djruby.lib=/opt/logstash/vendor/jruby/lib -Djruby.script=jruby -Djruby.shell=/bin/sh org.jruby.Main --1.9 /opt/logstash/lib/bootstrap/environment.rb logstash/runner.rb agent -f /etc/logstash/conf.d -l /var/log/logstash/logstash.logroot 1783 1147 0 17:25 pts/0 00:00:00 grep logstash |
六、安装配置Elasticsearch
在10.0.18.148、10.0.18.149、10.0.18.150三台ES上安装jdk和Elasticsearch!jdk的安装都是一样的,这里不做赘述。
1、添加elasticsearch用户,因为Elasticsearch服务器启动的时候,需要在普通用户权限下来启动。
|
1
2
3
4
5
6
7
|
#adduser elasticsearch#passwd elasticsearch #为用户设置密码#su - elasticsearch下载Elasticsearch包$wget https://download.elastic.co/elasticsearch/release/org/elasticsearch/distribution/tar/elasticsearch/2.3.4/elasticsearch-2.3.4.tar.gz$tar xf elasticsearch-2.3.4.tar.gz $cd elasticsearch-2.3.4 |
将elasticsearch的配置文件末尾添加如下:
|
1
2
3
4
5
6
7
8
9
|
#vim conf/elasticsearch.ymlcluster.name: serverlog #集群名称,可以自定义node.name: node-1 #节点名称,也可以自定义path.data: /home/elasticsearch/elasticsearch-2.3.4/data #data存储路径path.logs: /home/elasticsearch/elasticsearch-2.3.4/logs #log存储路径network.host: 10.0.18.148 #节点iphttp.port: 9200 #节点端口discovery.zen.ping.unicast.hosts: ["10.0.18.149","10.0.18.150"] #集群ip列表discovery.zen.minimum_master_nodes: 3 #集群几点数 |
启动服务
|
1
2
3
4
5
6
7
8
9
10
11
12
13
14
15
16
17
18
19
|
$cd elasticsearch-2.3.4$./bin/elasticsearch -d查看进程$ps -ef | grep elasticsearchroot 1550 1147 0 17:44 pts/0 00:00:00 su - elasticsearch500 1592 1 4 17:56 pts/0 00:00:13 /usr/bin/java -Xms256m -Xmx1g -Djava.awt.headless=true -XX:+UseParNewGC -XX:+UseConcMarkSweepGC -XX:CMSInitiatingOccupancyFraction=75 -XX:+UseCMSInitiatingOccupancyOnly -XX:+HeapDumpOnOutOfMemoryError -XX:+DisableExplicitGC -Dfile.encoding=UTF-8 -Djna.nosys=true -Des.path.home=/home/elasticsearch/elasticsearch-2.3.4 -cp /home/elasticsearch/elasticsearch-2.3.4/lib/elasticsearch-2.3.4.jar:/home/elasticsearch/elasticsearch-2.3.4/lib/* org.elasticsearch.bootstrap.Elasticsearch start -d500 1649 1551 0 18:00 pts/0 00:00:00 grep elasticsearch查看端口$netstat -tunlp(Not all processes could be identified, non-owned process info will not be shown, you would have to be root to see it all.)Active Internet connections (only servers)Proto Recv-Q Send-Q Local Address Foreign Address State PID/Program name tcp 0 0 0.0.0.0:22 0.0.0.0:* LISTEN - tcp 0 0 127.0.0.1:25 0.0.0.0:* LISTEN - tcp 0 0 ::ffff:10.0.18.148:9300 :::* LISTEN 1592/java tcp 0 0 :::22 :::* LISTEN - tcp 0 0 ::1:25 :::* LISTEN - tcp 0 0 ::ffff:10.0.18.148:9200 :::* LISTEN 1592/java |
启动连个端口:9200集群之间事务通信,9300集群之间选举通信。
启动之后,查看三台Elasticsearch的日志,会看到“选举”产生的master节点
第一台:10.0.18.148
|
1
2
3
4
5
6
7
8
9
10
11
12
|
$tail -f logs/serverlog.log …………………………[2016-08-26 17:56:05,771][INFO ][env ] [node-1] heap size [1015.6mb], compressed ordinary object pointers [true][2016-08-26 17:56:05,774][WARN ][env ] [node-1] max file descriptors [4096] for elasticsearch process likely too low, consider increasing to at least [65536][2016-08-26 17:56:09,416][INFO ][node ] [node-1] initialized[2016-08-26 17:56:09,416][INFO ][node ] [node-1] starting ...[2016-08-26 17:56:09,594][INFO ][transport ] [node-1] publish_address {10.0.18.148:9300}, bound_addresses {10.0.18.148:9300}[2016-08-26 17:56:09,611][INFO ][discovery ] [node-1] serverlog/py6UOr4rRCCuK3KjA-Aj-Q[2016-08-26 17:56:39,622][WARN ][discovery ] [node-1] waited for 30s and no initial state was set by the discovery[2016-08-26 17:56:39,633][INFO ][http ] [node-1] publish_address {10.0.18.148:9200}, bound_addresses {10.0.18.148:9200}[2016-08-26 17:56:39,633][INFO ][node ] [node-1] started[2016-08-26 17:59:33,303][INFO ][cluster.service ] [node-1] detected_master {node-2}{k0vpt0khTOG0Kmen8EepAg}{10.0.18.149}{10.0.18.149:9300}, added {{node-3}{lRKjIPpFSd-_NVn7-0-JeA}{10.0.18.150}{10.0.18.150:9300},{node-2}{k0vpt0khTOG0Kmen8EepAg}{10.0.18.149}{10.0.18.149:9300},}, reason: zen-disco-receive(from master [{node-2}{k0vpt0khTOG0Kmen8EepAg}{10.0.18.149}{10.0.18.149:9300}]) |
可以看到自动“选举”node-2,即10.0.18.149为master节点
第二台:10.0.18.149
|
1
2
3
4
5
6
7
8
9
10
11
12
13
14
15
16
17
18
|
$tail -f logs/serverlog.log…………………… [2016-08-26 17:58:20,854][WARN ][bootstrap ] unable to install syscall filter: seccomp unavailable: requires kernel 3.5+ with CONFIG_SECCOMP and CONFIG_SECCOMP_FILTER compiled in[2016-08-26 17:58:21,480][INFO ][node ] [node-2] version[2.3.4], pid[1552], build[e455fd0/2016-06-30T11:24:31Z][2016-08-26 17:58:21,491][INFO ][node ] [node-2] initializing ...[2016-08-26 17:58:22,537][INFO ][plugins ] [node-2] modules [reindex, lang-expression, lang-groovy], plugins [], sites [][2016-08-26 17:58:22,574][INFO ][env ] [node-2] using [1] data paths, mounts [[/ (/dev/mapper/vg_template-lv_root)]], net usable_space [14.9gb], net total_space [17.1gb], spins? [possibly], types [ext4][2016-08-26 17:58:22,575][INFO ][env ] [node-2] heap size [1015.6mb], compressed ordinary object pointers [true][2016-08-26 17:58:22,578][WARN ][env ] [node-2] max file descriptors [4096] for elasticsearch process likely too low, consider increasing to at least [65536][2016-08-26 17:58:26,437][INFO ][node ] [node-2] initialized[2016-08-26 17:58:26,440][INFO ][node ] [node-2] starting ...[2016-08-26 17:58:26,783][INFO ][transport ] [node-2] publish_address {10.0.18.149:9300}, bound_addresses {10.0.18.149:9300}[2016-08-26 17:58:26,815][INFO ][discovery ] [node-2] serverlog/k0vpt0khTOG0Kmen8EepAg[2016-08-26 17:58:56,838][WARN ][discovery ] [node-2] waited for 30s and no initial state was set by the discovery[2016-08-26 17:58:56,853][INFO ][http ] [node-2] publish_address {10.0.18.149:9200}, bound_addresses {10.0.18.149:9200}[2016-08-26 17:58:56,854][INFO ][node ] [node-2] started[2016-08-26 17:59:33,130][INFO ][cluster.service ] [node-2] new_master {node-2}{k0vpt0khTOG0Kmen8EepAg}{10.0.18.149}{10.0.18.149:9300}, added {{node-1}{py6UOr4rRCCuK3KjA-Aj-Q}{10.0.18.148}{10.0.18.148:9300},{node-3}{lRKjIPpFSd-_NVn7-0-JeA}{10.0.18.150}{10.0.18.150:9300},}, reason: zen-disco-join(elected_as_master, [2] joins received)[2016-08-26 17:59:33,686][INFO ][gateway ] [node-2] recovered [0] indices into cluster_state |
也可以看到自动“选举”node-2,即10.0.18.149为master节点
第三台:10.0.18.150
|
1
2
3
4
5
6
7
8
9
10
11
12
13
14
|
$tail -f logs/serverlog.log …………………………[2016-08-26 17:59:25,644][INFO ][node ] [node-3] initializing ...[2016-08-26 17:59:26,652][INFO ][plugins ] [node-3] modules [reindex, lang-expression, lang-groovy], plugins [], sites [][2016-08-26 17:59:26,689][INFO ][env ] [node-3] using [1] data paths, mounts [[/ (/dev/mapper/vg_template-lv_root)]], net usable_space [14.9gb], net total_space [17.1gb], spins? [possibly], types [ext4][2016-08-26 17:59:26,689][INFO ][env ] [node-3] heap size [1015.6mb], compressed ordinary object pointers [true][2016-08-26 17:59:26,693][WARN ][env ] [node-3] max file descriptors [4096] for elasticsearch process likely too low, consider increasing to at least [65536][2016-08-26 17:59:30,398][INFO ][node ] [node-3] initialized[2016-08-26 17:59:30,398][INFO ][node ] [node-3] starting ...[2016-08-26 17:59:30,549][INFO ][transport ] [node-3] publish_address {10.0.18.150:9300}, bound_addresses {10.0.18.150:9300}[2016-08-26 17:59:30,564][INFO ][discovery ] [node-3] serverlog/lRKjIPpFSd-_NVn7-0-JeA[2016-08-26 17:59:33,924][INFO ][cluster.service ] [node-3] detected_master {node-2}{k0vpt0khTOG0Kmen8EepAg}{10.0.18.149}{10.0.18.149:9300}, added {{node-1}{py6UOr4rRCCuK3KjA-Aj-Q}{10.0.18.148}{10.0.18.148:9300},{node-2}{k0vpt0khTOG0Kmen8EepAg}{10.0.18.149}{10.0.18.149:9300},}, reason: zen-disco-receive(from master [{node-2}{k0vpt0khTOG0Kmen8EepAg}{10.0.18.149}{10.0.18.149:9300}])[2016-08-26 17:59:33,999][INFO ][http ] [node-3] publish_address {10.0.18.150:9200}, bound_addresses {10.0.18.150:9200}[2016-08-26 17:59:34,000][INFO ][node ] [node-3] started |
也是可以看到自动“选举”node-2,即10.0.18.149为master节点!
2、其他信息查看
查看健康信息:
|
1
2
3
4
5
6
7
8
9
10
11
12
13
14
15
16
17
18
|
#curl -XGET 'http://10.0.18.148:9200/_cluster/health?pretty'{ "cluster_name" : "serverlog", "status" : "green", "timed_out" : false, "number_of_nodes" : 3, "number_of_data_nodes" : 3, "active_primary_shards" : 0, "active_shards" : 0, "relocating_shards" : 0, "initializing_shards" : 0, "unassigned_shards" : 0, "delayed_unassigned_shards" : 0, "number_of_pending_tasks" : 0, "number_of_in_flight_fetch" : 0, "task_max_waiting_in_queue_millis" : 0, "active_shards_percent_as_number" : 100.0} |
3、查看节点数
|
1
2
3
4
5
|
#curl -XGET 'http://10.0.18.148:9200/_cat/nodes?v'host ip heap.percent ram.percent load node.role master name 10.0.18.148 10.0.18.148 7 51 0.00 d m node-1 10.0.18.150 10.0.18.150 5 50 0.00 d m node-3 10.0.18.149 10.0.18.149 7 51 0.00 d * node-2 |
注意:*表示当前master节点
4、查看节点分片的信息
|
1
2
|
#curl -XGET 'http://10.0.18.148:9200/_cat/indices?v'health status index pri rep docs.count docs.deleted store.size pri.store.size |
还没有看到分片的信息,后面会介绍原因。
5、在三台Elasticsearch节点上安装插件,如下:
|
1
2
3
4
5
6
7
8
9
10
11
12
13
14
15
16
17
18
19
20
21
22
23
24
25
26
27
28
29
30
31
32
33
34
35
36
37
38
39
40
41
42
43
44
45
46
47
48
49
50
51
52
53
54
55
56
57
58
59
60
61
|
#su - elasticsearch$cd elasticsearch-2.3.4$./bin/plugin install license #license插件-> Installing license...Trying https://download.elastic.co/elasticsearch/release/org/elasticsearch/plugin/license/2.3.4/license-2.3.4.zip ...Downloading .......DONEVerifying https://download.elastic.co/elasticsearch/release/org/elasticsearch/plugin/license/2.3.4/license-2.3.4.zip checksums if available ...Downloading .DONEInstalled license into /home/elasticsearch/elasticsearch-2.3.4/plugins/license$ ./bin/plugin install marvel-agent #marvel-agent插件-> Installing marvel-agent...Trying https://download.elastic.co/elasticsearch/release/org/elasticsearch/plugin/marvel-agent/2.3.4/marvel-agent-2.3.4.zip ...Downloading ..........DONEVerifying https://download.elastic.co/elasticsearch/release/org/elasticsearch/plugin/marvel-agent/2.3.4/marvel-agent-2.3.4.zip checksums if available ...Downloading .DONE@@@@@@@@@@@@@@@@@@@@@@@@@@@@@@@@@@@@@@@@@@@@@@@@@@@@@@@@@@@@ WARNING: plugin requires additional permissions @@@@@@@@@@@@@@@@@@@@@@@@@@@@@@@@@@@@@@@@@@@@@@@@@@@@@@@@@@@@* java.lang.RuntimePermission setFactory* javax.net.ssl.SSLPermission setHostnameVerifierSee http://docs.oracle.com/javase/8/docs/technotes/guides/security/permissions.htmlfor descriptions of what these permissions allow and the associated risks.Continue with installation? [y/N]y #输入y,表示同意安装此插件Installed marvel-agent into /home/elasticsearch/elasticsearch-2.3.4/plugins/marvel-agent$ ./bin/plugin install mobz/elasticsearch-head #安装head插件-> Installing mobz/elasticsearch-head...Trying https://github.com/mobz/elasticsearch-head/archive/master.zip ...Downloading ...........................................................................................................................................................................................................................................................................................................................................................................................................................................................................................................................................DONEVerifying https://github.com/mobz/elasticsearch-head/archive/master.zip checksums if available ...NOTE: Unable to verify checksum for downloaded plugin (unable to find .sha1 or .md5 file to verify)Installed head into /home/elasticsearch/elasticsearch-2.3.4/plugins/head安装bigdesk插件$cd plugins/$mkdir bigdesk$cd bigdesk$git clone https://github.com/lukas-vlcek/bigdesk _siteInitialized empty Git repository in /home/elasticsearch/elasticsearch-2.3.4/plugins/bigdesk/_site/.git/remote: Counting objects: 5016, done.remote: Total 5016 (delta 0), reused 0 (delta 0), pack-reused 5016Receiving objects: 100% (5016/5016), 17.80 MiB | 1.39 MiB/s, done.Resolving deltas: 100% (1860/1860), done.修改_site/js/store/BigdeskStore.js文件,大致在142行,如下:return (major == 1 && minor >= 0 && maintenance >= 0 && (build != 'Beta1' || build != 'Beta2'));修改为:return (major >= 1 && minor >= 0 && maintenance >= 0 && (build != 'Beta1' || build != 'Beta2'));添加插件的properties文件:$cat >plugin-descriptor.properties<<EOFdescription=bigdesk - Live charts and statistics for Elasticsearch cluster.version=2.5.1site=truename=bigdeskEOF安装kopf插件$./bin/plugin install lmenezes/elasticsearch-kopf-> Installing lmenezes/elasticsearch-kopf...Trying https://github.com/lmenezes/elasticsearch-kopf/archive/master.zip ...Downloading ................................................................................................................................................................................................................................................................................................................................................................................................................................................................................................................................................................................................................................................................................................................................................................................................................................................................................................................................................................................................................................................................................................................................................................................................................................................................................................DONEVerifying https://github.com/lmenezes/elasticsearch-kopf/archive/master.zip checksums if available ...NOTE: Unable to verify checksum for downloaded plugin (unable to find .sha1 or .md5 file to verify)Installed kopf into /home/elasticsearch/elasticsearch-2.3.4/plugins/kopf |
查看安装的插件,如下:
|
1
2
3
4
5
6
7
8
|
$cd elasticsearch-2.3.4$ ./bin/plugin listInstalled plugins in /home/elasticsearch/elasticsearch-2.3.4/plugins: - head - license - bigdesk - marvel-agent - kopf |
七、安装配置kibana
说明:在10.0.18.150服务器上安装kibana!
1、配置yum源
|
1
2
3
4
5
6
7
8
9
10
11
12
13
|
#vi /etc/yum.repos.d/kibana.repo[kibana-4.5]name=Kibana repository for 4.5.x packagesbaseurl=http://packages.elastic.co/kibana/4.5/centosgpgcheck=1gpgkey=http://packages.elastic.co/GPG-KEY-elasticsearchenabled=1安装kibana#yum install kibana -y查看kibana#rpm -qa kibanakibana-4.5.4-1.x86_64注:使用yum安装的kibana是默认安装到/opt目录下的 |
2、安装插件
|
1
2
3
4
5
6
7
8
9
10
|
#cd /opt/kibana/bin/kibana#./kibana plugin --install elasticsearch/marvel/latestInstalling marvelAttempting to transfer from https://download.elastic.co/elasticsearch/marvel/marvel-latest.tar.gzTransferring 2421607 bytes....................Transfer completeExtracting plugin archiveExtraction completeOptimizing and caching browser bundles...Plugin installation complete |
3、修改kibana配置文件
|
1
2
3
4
|
# vim /opt/kibana/config/kibana.yml #修改为下面3个参数server.port: 5601server.host: "0.0.0.0"elasticsearch.url: "http://10.0.18.150:9200" |
4、启动kibana
|
1
2
3
4
5
6
7
8
9
10
11
12
13
14
15
16
17
18
19
20
|
#service kibana startkibana started查看进程#ps -ef | grep kibanakibana 2050 1 12 20:40 pts/0 00:00:03 /opt/kibana/bin/../node/bin/node /opt/kibana/bin/../src/cliroot 2075 1149 0 20:40 pts/0 00:00:00 grep kibana设置开机自启动#chkconfig --add kibana#chkconfig kibana on查看启动端口#netstat -tunlpActive Internet connections (only servers)Proto Recv-Q Send-Q Local Address Foreign Address State PID/Program name tcp 0 0 0.0.0.0:22 0.0.0.0:* LISTEN 1025/sshd tcp 0 0 127.0.0.1:25 0.0.0.0:* LISTEN 1103/master tcp 0 0 0.0.0.0:5601 0.0.0.0:* LISTEN 2050/node #已经启动成功 tcp 0 0 ::ffff:10.0.18.150:9300 :::* LISTEN 1547/java tcp 0 0 :::22 :::* LISTEN 1025/sshd tcp 0 0 ::1:25 :::* LISTEN 1103/master tcp 0 0 ::ffff:10.0.18.150:9200 :::* LISTEN 1547/java |
在浏览器访问kibana端口并创建index,如下:
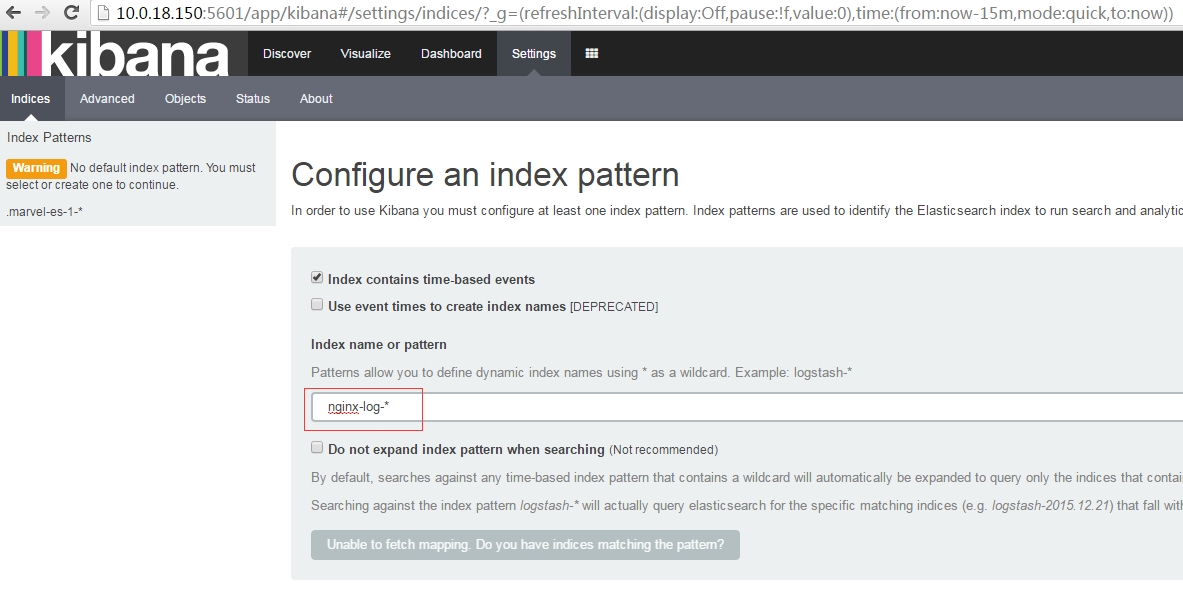
红方框中的索引名称是我在logstash server 服务器的配置文件中配置的index名称,但是无法创建,提示的信息Unable to fetch mapping…… 说明是Elasticsearch没有读取到这个index名称,逐步排查,看日志,最后在10.0.18.144、10.0.18.145上查看logstash的日志,报错如下:
|
1
2
3
4
5
6
7
|
#tail logstash.log {:timestamp=>"2016-08-26T20:33:28.404000+0800", :message=>"failed to open /var/log/nginx/access.log: Permission denied - /var/log/nginx/access.log", :level=>:warn}{:timestamp=>"2016-08-26T20:38:29.110000+0800", :message=>"failed to open /var/log/nginx/access.log: Permission denied - /var/log/nginx/access.log", :level=>:warn}{:timestamp=>"2016-08-26T20:43:30.834000+0800", :message=>"failed to open /var/log/nginx/access.log: Permission denied - /var/log/nginx/access.log", :level=>:warn}{:timestamp=>"2016-08-26T20:48:31.559000+0800", :message=>"failed to open /var/log/nginx/access.log: Permission denied - /var/log/nginx/access.log", :level=>:warn}{:timestamp=>"2016-08-26T20:53:32.298000+0800", :message=>"failed to open /var/log/nginx/access.log: Permission denied - /var/log/nginx/access.log", :level=>:warn}{:timestamp=>"2016-08-26T20:58:33.028000+0800", :message=>"failed to open /var/log/nginx/access.log: Permission denied - /var/log/nginx/access.log", :level=>:warn} |
|
1
2
|
在两台nginx服务器操作#chmod 755 /var/log/nginx/access.log |
重新刷新kibana页面,并创建index名为nginx-log-*的索引,这次就可以了,如下:
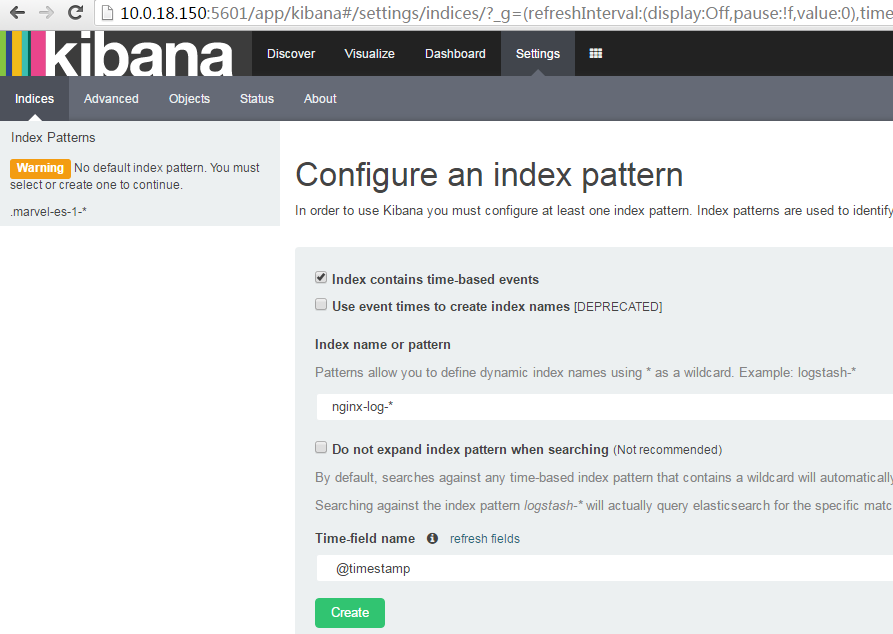
点击绿色按钮“Create”,就可以创建成功了!然后查看kibana界面的“Discovery”,就会看到搜集的nginx日志了,如下:
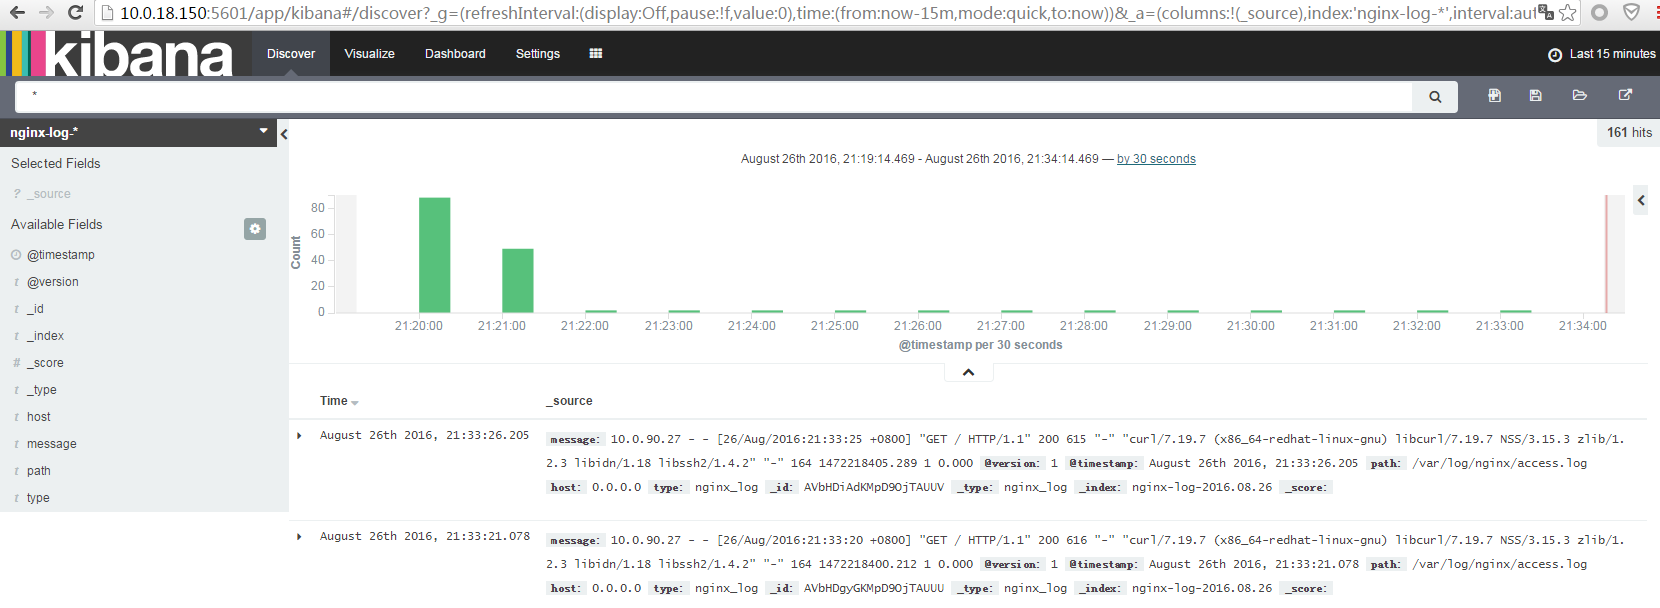
可以看到已经搜集到日志数据了!
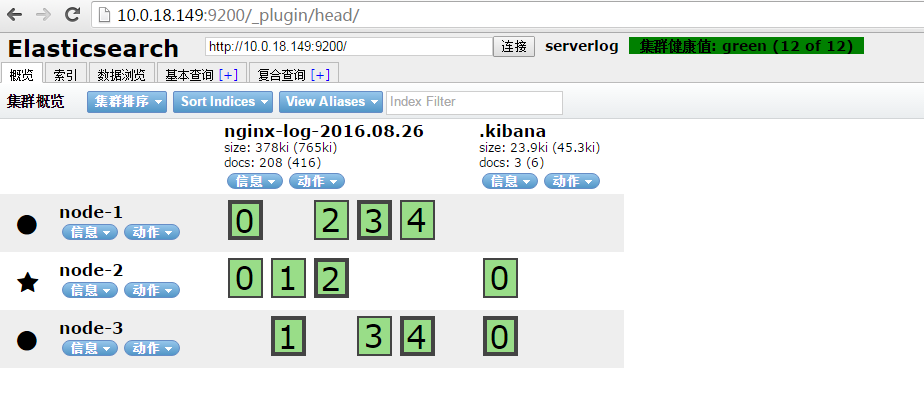
5、访问head,查看集群是否一致,如下图:
6、访问bigdesk,查看信息,如下图:
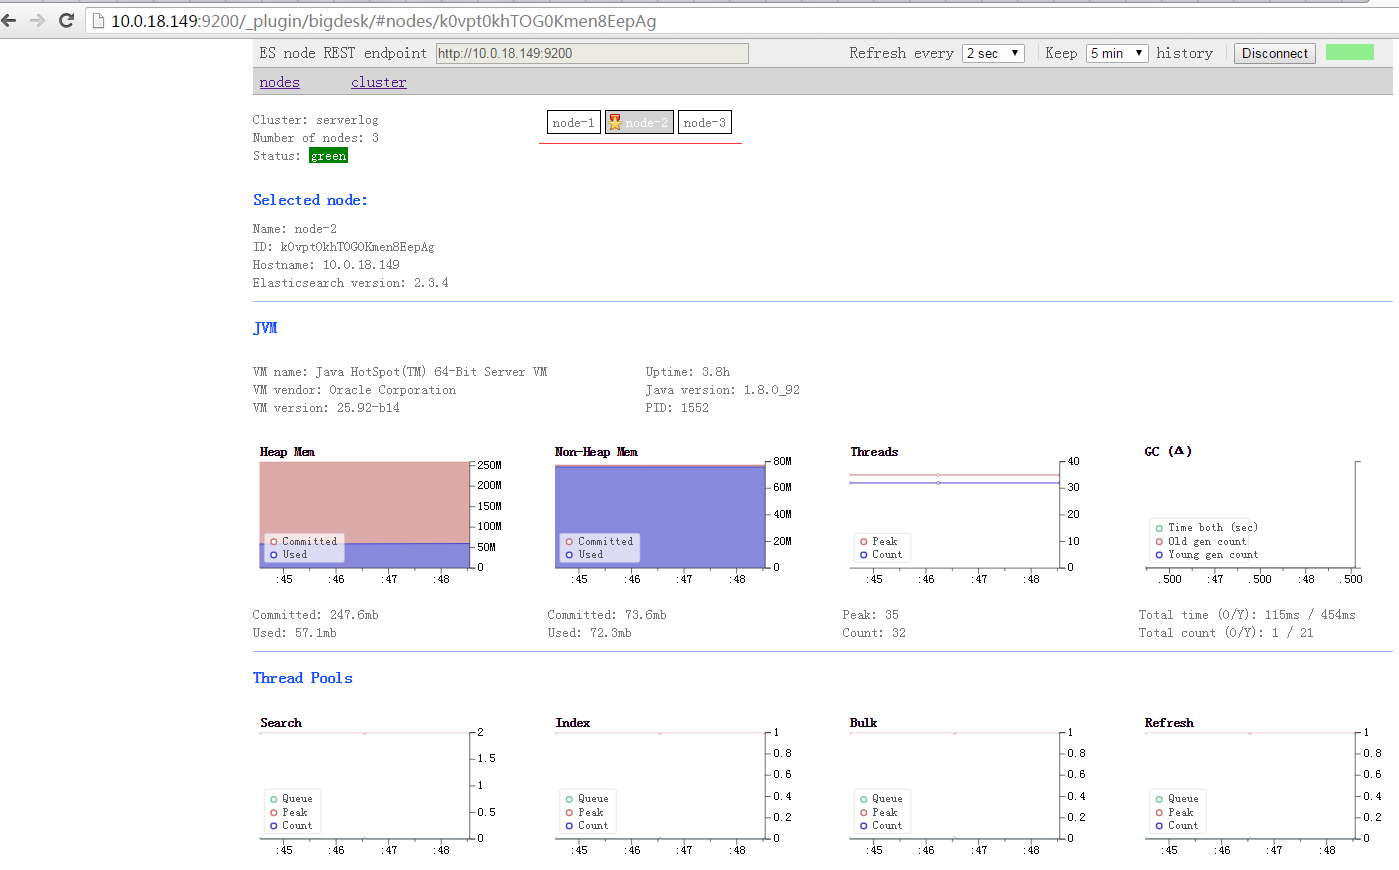
上图中也标记了node-2为master节点(有星星标记),上图显示的数据是不断刷新的!
7、访问kopf,查看信息,如下图:
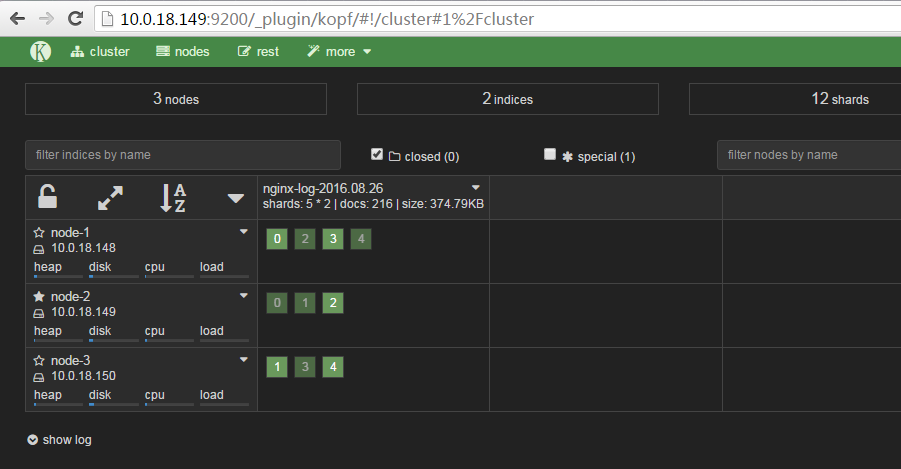
上面提到了查看节点分片的信息,结果是没有数据(因为刚配置好,还没有创建索引,所以分片信息还没有),现在再测试一次,就可以看到数据了,如下图:
|
1
2
3
4
|
#curl -XGET '10.0.18.148:9200/_cat/indices?v'health status index pri rep docs.count docs.deleted store.size pri.store.size green open .kibana 1 1 3 0 45.2kb 23.9kb green open nginx-log-2016.08.26 5 1 222 0 549.7kb 272.4kb |
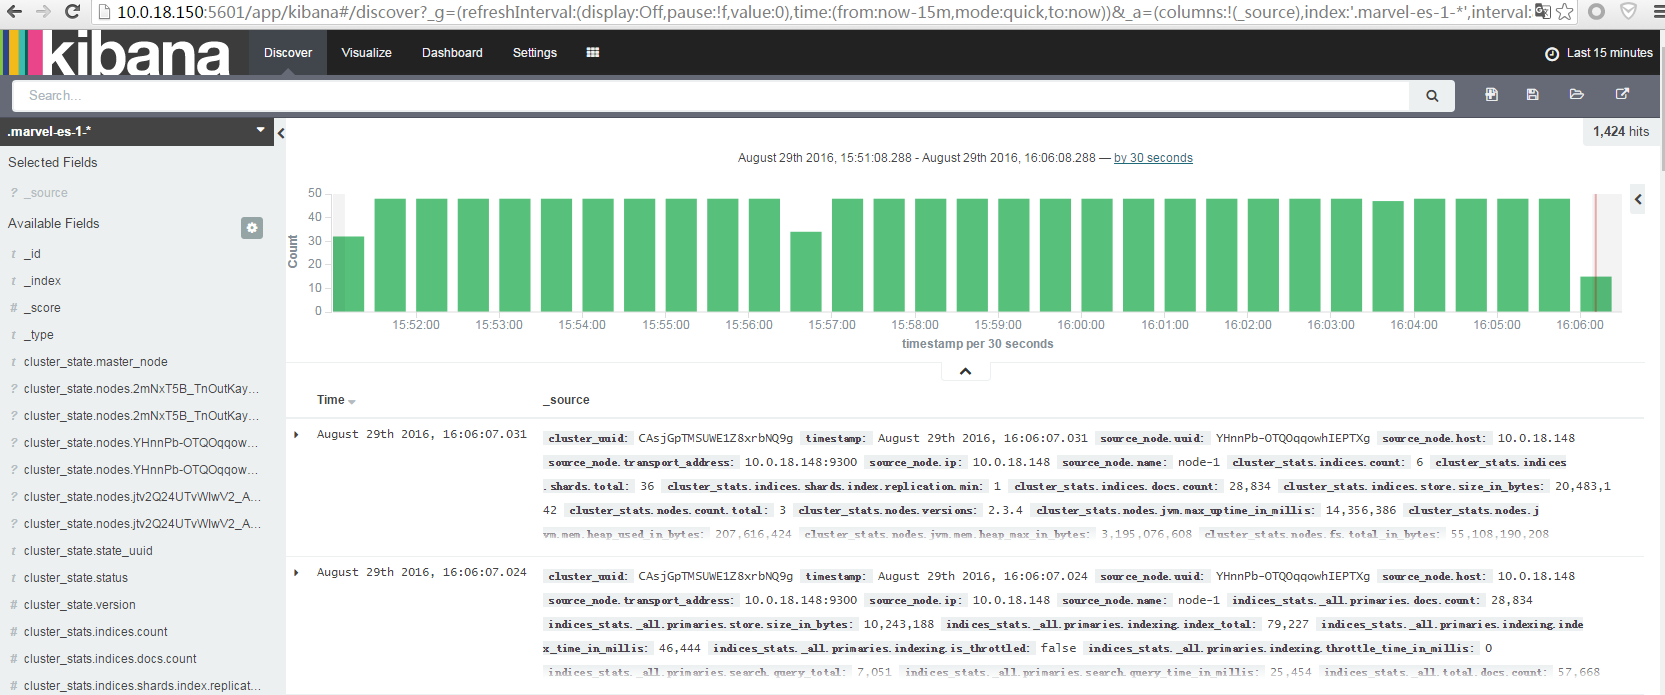
8、在kibana界面可以查看到nginx-log-*这个index搜集到的nginx日志数据,也可以看到Elasticsearch集群的index--marvel-es-1-*关于集群的一些信息,如下图:
八、ELK遇到的一些问题
1、关于kibana端口
配置过kibana的都知道kibana的默认端口是5601,我想修改为80,结果启动kibana报错,如下:
|
1
2
3
4
5
6
7
8
9
10
11
12
13
14
15
16
17
18
19
20
21
22
23
24
25
26
27
28
29
30
31
|
#cat /var/log/kibana/kibana.stderr FATAL { [Error: listen EACCES 0.0.0.0:80] cause: { [Error: listen EACCES 0.0.0.0:80] code: 'EACCES', errno: 'EACCES', syscall: 'listen', address: '0.0.0.0', port: 80 }, isOperational: true, code: 'EACCES', errno: 'EACCES', syscall: 'listen', address: '0.0.0.0', port: 80 }FATAL { [Error: listen EACCES 10.0.18.150:80] cause: { [Error: listen EACCES 10.0.18.150:80] code: 'EACCES', errno: 'EACCES', syscall: 'listen', address: '10.0.18.150', port: 80 }, isOperational: true, code: 'EACCES', errno: 'EACCES', syscall: 'listen', address: '10.0.18.150', port: 80 } #tail /var/log/kibana/kibana.stdout {"type":"log","@timestamp":"2016-08-29T02:54:21+00:00","tags":["fatal"],"pid":3217,"level":"fatal","message":"listen EACCES 10.0.18.150:80","error":{"message":"listen EACCES 10.0.18.150:80","name":"Error","stack":"Error: listen EACCES 10.0.18.150:80\n at Object.exports._errnoException (util.js:873:11)\n at exports._exceptionWithHostPort (util.js:896:20)\n at Server._listen2 (net.js:1237:19)\n at listen (net.js:1286:10)\n at net.js:1395:9\n at nextTickCallbackWith3Args (node.js:453:9)\n at process._tickDomainCallback (node.js:400:17)","code":"EACCES"}} |
没有找到解决方法,只能将端口改为默认的5601了。
2、关于nginx日志问题
本次实验是使用yum安装的nginx,版本是1.10.1,开始是因为nginx日志权限,导致无法读取nginx日志,后来将日志文件权限修改为了755,就可以了。但是,nginx日志是每天进行logrotate的,新生成的日志依然是640的权限,所以依然获取不到日志数据。所以只能修改nginx的默认logrotate文件了:
|
1
2
3
4
5
6
7
8
9
10
11
12
13
14
15
16
17
18
19
20
21
22
23
24
25
26
27
28
29
30
|
#cd /etc/logrotate.d#cat nginx #默认如下/var/log/nginx/*.log { daily missingok rotate 52 compress delaycompress notifempty create 640 nginx adm #可以看到默认权限是640,属主和属组分别是nginx和adm sharedscripts postrotate [ -f /var/run/nginx.pid ] && kill -USR1 `cat /var/run/nginx.pid` endscript}修改后如下:/var/log/nginx/*.log { daily missingok rotate 52 compress delaycompress notifempty create 755 nginx nginx #修改为755,属主和属组都是nginx sharedscripts postrotate [ -f /var/run/nginx.pid ] && kill -USR1 `cat /var/run/nginx.pid` endscript}然后重启nginx,以后在logrotage的日志权限就是755了。 |
3、关于Marvel的问题
说明:Marvel是Elasticsearch集群的monitor ,英文解释如下:
Marvel is the best way to monitor your Elasticsearch cluster and provide actionable insights to help you get the most out of your cluster. It is free to use in both development and production.
Marvel是监控你的Elasticsearch集群,并提供可操作的见解,以帮助您充分利用集群的最佳方式,它是免费的在开发和生产中使用。
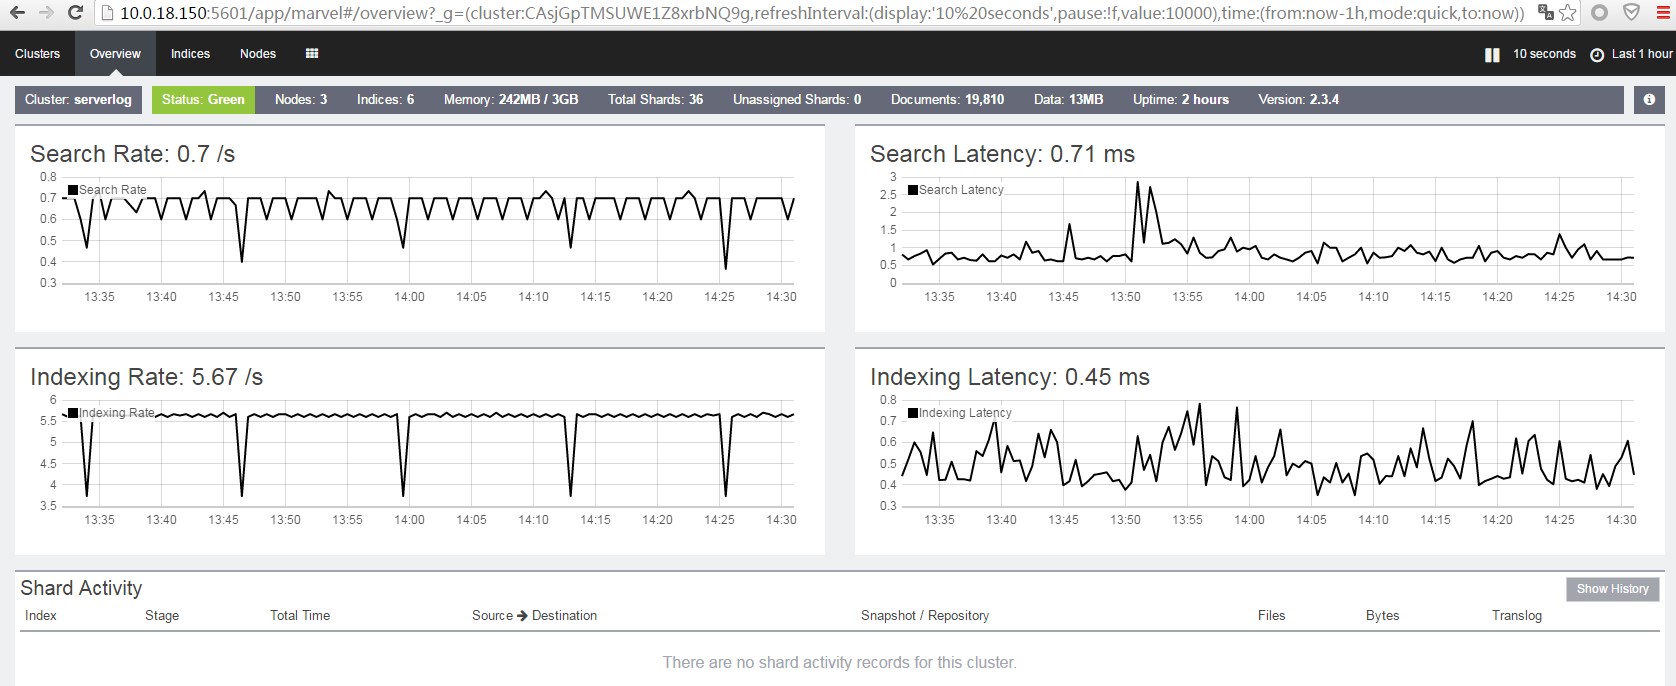
问题:Elasticsearch集群都搭建好之后,在浏览器访问Marvel,查看监控信息的时候页面报错,无法显示监控的信息大致意识是no-data之类的,后来通过排查三台Elasticsearch的log,有一些错误,具体没有搞清楚是什么错,于是重启了三台Elasticsearch的elasticsearch服务,再访问Marvel的监控页面,就OK了,如下图:

可以看到serverlog是我配置的集群名称,点进去继续查看,如下图:
4、节点分片信息相关的问题
在本次实验的过程中,第一次查看分片信息是没有的,因为没有创建索引,后面等创建过索引之后,就可以看到创建的索引信息了,但是还有集群的信息没有显示出来,问题应该和第2个一样,Elasticsearch有问题,重启之后,就查看到了如下:
|
1
2
3
4
5
6
7
8
9
|
查看节点分片信息:#curl -XGET '10.0.18.148:9200/_cat/indices?v'health status index pri rep docs.count docs.deleted store.size pri.store.size green open nginx-log-2016.08.29 5 1 2374 0 1.7mb 902.9kb green open nginx-log-2016.08.27 5 1 2323 0 1mb 528.6kb green open .marvel-es-data-1 1 1 5 3 17.6kb 8.8kb green open .kibana 1 1 3 0 45.2kb 21.3kb green open .marvel-es-1-2016.08.29 1 1 16666 108 12.1mb 6.1mb green open nginx-log-2016.08.26 5 1 1430 0 800.4kb 397.8kb |
5、关于创建多个index索引名称,存储不同类型日志的情况
也许我们不止nginx这一种日志需要搜集分析,还有httpd、tomcat、mysql等日志,但是如果都搜集在nginx-log-*这个索引下面,会很乱,不易于排查问题,如果每一种类型的日志都创建一个索引,这样分类创建索引,会比较直观,实现是在logstash server 服务器上创建多个conf文件,然后逐个启动,如下:
|
1
2
3
4
5
6
7
8
9
10
11
12
13
14
15
16
17
18
19
20
21
22
23
24
25
26
27
28
29
30
31
32
33
34
35
36
37
38
39
40
41
42
43
44
45
46
47
48
49
50
51
52
53
54
|
#cd /etc/logstash/conf.d/#cat logstash_server.confinput { redis { port => "6379" host => "10.0.18.146" data_type => "list" key => "logstash-redis" type => "redis-input" }}output { elasticsearch { hosts => "10.0.18.149" index => "nginx-log-%{+YYYY.MM.dd}" }}#cat logstash_server1.conf input { redis { port => "6379" host => "10.0.18.146" data_type => "list" key => "logstash-redisa" type => "redis-input" }}output { elasticsearch { hosts => "10.0.18.149" index => "httpd-log-%{+YYYY.MM.dd}" }}如果还有其他日志,仿照上面的conf文件即可,不同的是index名称和key然后逐个启动#nohup /opt/logstash/bin/logstash -f /etc/logstash/conf.d/logstash_server.conf &#nohup /opt/logstash/bin/logstash -f /etc/logstash/conf.d/logstash_server1.conf & 再对应的日志服务器(称为客户端)本身配置conf文件,如下:#cat /etc/logstash/conf.d/logstash-web.conf input { file { path => ["/var/log/httpd/access_log"] type => "httpd_log" #type start_position => "beginning" }}output { redis { host => "10.0.18.146" key => 'logstash-redisa' #key data_type => 'list' }}然后启动logstash服务,再到kibana界面创建新的索引httpd-log-*,就可以在这个索引下面查看到搜集到的httpd日志了! |
6、elasticsearch启动之后,提示最大文件数太小的问题
ELK集群搭建好之后,开启elasticsearch,提示下面的warn:
|
1
2
3
4
|
[WARN ][env ] [node-1] max file descriptors [65535] for elasticsearch process likely too low, consider increasing to at least [65536]于是修改文件/etc/security/limits.conf ,添加如下:* soft nofile 65536* hard nofile 65536 |
二、ELKStack集群架构设计的更多相关文章
- 从腾讯QQgame高性能服务器集群架构看“分而治之”与“自治”等分布式架构设计原则
转载:http://space.itpub.net/17007506/viewspace-616852 腾讯QQGame游戏同时在线的玩家数量极其庞大,为了方便组织玩家组队游戏,腾讯设置了大量游戏室( ...
- 【Kubernetes学习之三】Kubernetes分布式集群架构
环境 centos 7 一.Kubernetes分布式集群架构1.Kubernetes服务注册和服务发现问题怎么解决的?每个服务分配一个不变的虚拟IP+端口, 系统env环境变量里有每个服务的服务名称 ...
- Linux集群架构(二)
Linux集群架构(二) 目录 八.LVS DR模式搭建 九.keepalived + LVS 十.扩展 八.LVS DR模式搭建 1.实验环境: 四台机器: client: 10.0.1.50 Di ...
- storm集群架构
一.storm何许人也? Storm 是Twitter的一个开源框架.Storm一个分布式的.容错的实时计算系统,它被托管在GitHub上,遵循 Eclipse Public License 1.0. ...
- 关于RabbitMQ分布式集群架构
RabbitMQ分布式集群架构和高可用性(HA) (一) 功能和原理 设计集群的目的 允许消费者和生产者在RabbitMQ节点崩溃的情况下继续运行 通过增加更多的节点来扩展消息通信的吞吐量 1 集群配 ...
- Memcached 集群架构方面的问题 [z]
集群架构方面的问题 memcached是怎么工作的? Memcached的神奇来自两阶段哈希(two-stage hash).Memcached就像一个巨大的.存储了很多<key,v ...
- Memcached集群架构方面的问题(转)
add by zhj: 这是一个系列中的第二篇,该系列有四篇,英文原文没找到,译文见:http://blog.csdn.net/jarfield/article/details/4336035 ,附上 ...
- Memcached 集群架构问题归纳
集群架构方面的问题o memcached是怎么工作的?o memcached最大的优势是什么?o memcached和MySQL的query cache相比,有什么优缺点?o memcached和服务 ...
- Memcached 集群架构方面的问题
* 集群架构方面的问题 o memcached是怎么工作的? o memcached最大的优势是什么? o memcached和MySQL的query cache相比,有什么优缺点? o memca ...
随机推荐
- asp.net webform 打造私人后台管理系统(附源码)
系统简介 git地址:https://github.com/qingfengjun/XSSystem 不少人让我做公司的网站,要求不多,但是需要有一个后台系统,所以就有了开发的动力.也想做个系统自己学 ...
- 一个Apache安装多个版本的PHP
我的服务器centos6.5安装了xampp,php6.5版本的.已经有好几个网站在上面运行了,但是后面要安装该死的ecshop,无奈要装php5.2,因此就想如何能在一个apache上安装多个版本的 ...
- onethink 重写URL后,apache提示No input file specified
<IfModule mod_rewrite.c> RewriteEngine on RewriteCond %{REQUEST_FILENAME} !-d RewriteCond %{RE ...
- 针对MySql封装的JDBC通用框架类(包含增删改查、JavaBean反射原理)
package com.DBUtils; import java.lang.reflect.Field; import java.sql.Connection; import java.sql.Dri ...
- SpringBoot整合SpringBatch实用简例
SpringBatch主要是一个轻量级的大数据量的并行处理(批处理)的框架. 作用和Hadoop很相似,不过Hadoop是基于重量级的分布式环境(处理巨量数据),而SpringBatch是基于轻量的应 ...
- 分解质因数法求最大公约数(javascrip实现)
<!DOCTYPE html> <html> <head lang="en"> <meta charset="UTF-8&quo ...
- Linux-Oracle 安装配置步骤
一.打开 VMware 安装 VMware 解压 ORACLER11.2_redhat.rar 到 D:\...\machine\oracle-linux 打开 VMware, 选择 打开虚拟机 找到 ...
- cream 的qsqrt 及其原理
首先,是creamk 的qsort: float Q_rsqrt( float number ) { long i; float x2, y; const float threehalfs = 1.5 ...
- Luogu P3362 Cool loves shaxian 生成函数
题意: 定义f(i)=∑ k∣i k^d(i≤n),给出q个询问,每个询问询问区间[l,r]的f(i)的和. n<=1e7 d<=1e18 q<=5e4 可以发现f(i)是个积性函数 ...
- 【状压dp】送餐员
[odevs2800]送餐员 题目描述 Description 有一个送外卖的,他手上有n份订单,他要把n份东西,分别送达n个不同的客户的手上.n个不同的客户分别在1~n个编号的城市中.送外卖的从0号 ...
