吴裕雄 python 机器学习——半监督学习标准迭代式标记传播算法LabelPropagation模型
import numpy as np

import matplotlib.pyplot as plt

from sklearn import  metrics

from sklearn import datasets

from sklearn.semi_supervised import LabelPropagation

def load_data():

    '''

    加载数据集

    '''

    digits = datasets.load_digits()

    ######   混洗样本 ########

    rng = np.random.RandomState(0)

    indices = np.arange(len(digits.data)) # 样本下标集合

    rng.shuffle(indices) # 混洗样本下标集合

    X = digits.data[indices]

    y = digits.target[indices]

    ###### 生成未标记样本的下标集合 ####

    # 只有 10% 的样本有标记

    n_labeled_points = int(len(y)/10)

    # 后面 90% 的样本未标记

    unlabeled_indices = np.arange(len(y))[n_labeled_points:]

    return X,y,unlabeled_indices

#半监督学习标准迭代式标记传播算法LabelPropagation模型

def test_LabelPropagation(*data):

    '''

    测试 LabelPropagation 的用法

    '''

    X,y,unlabeled_indices=data

    # 必须拷贝,后面要用到 y

    y_train=np.copy(y)

    # 未标记样本的标记设定为 -1

    y_train[unlabeled_indices]=-1

    clf=LabelPropagation(max_iter=100,kernel='rbf',gamma=0.1)

    clf.fit(X,y_train)

    ### 获取预测准确率

    # 预测标记

    predicted_labels = clf.transduction_[unlabeled_indices]

    # 真实标记

    true_labels = y[unlabeled_indices]

    print("Accuracy:%f"%metrics.accuracy_score(true_labels,predicted_labels))

    # 或者 print("Accuracy:%f"%clf.score(X[unlabeled_indices],true_labels))

# 获取半监督分类数据集

data=load_data()

# 调用 test_LabelPropagation

test_LabelPropagation(*data)

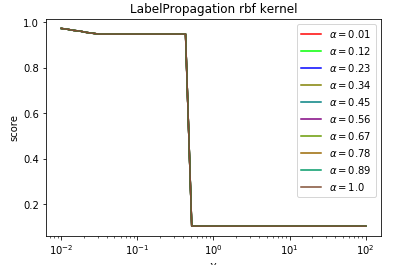
def test_LabelPropagation_rbf(*data):

    '''

    测试 LabelPropagation 的 rbf 核时,预测性能随 alpha 和 gamma 的变化

    '''

    X,y,unlabeled_indices=data

    # 必须拷贝,后面要用到 y

    y_train=np.copy(y)

    # 未标记样本的标记设定为 -1

    y_train[unlabeled_indices]=-1

    fig=plt.figure()

    ax=fig.add_subplot(1,1,1)

    alphas=np.linspace(0.01,1,num=10,endpoint=True)

    gammas=np.logspace(-2,2,num=50)

     # 颜色集合,不同曲线用不同颜色

    colors=((1,0,0),(0,1,0),(0,0,1),(0.5,0.5,0),(0,0.5,0.5),(0.5,0,0.5),(0.4,0.6,0),(0.6,0.4,0),(0,0.6,0.4),(0.5,0.3,0.2))

    ## 训练并绘图

    for alpha,color in zip(alphas,colors):

        scores=[]

        for gamma in gammas:

            clf=LabelPropagation(max_iter=100,gamma=gamma,alpha=alpha,kernel='rbf')

            clf.fit(X,y_train)

            scores.append(clf.score(X[unlabeled_indices],y[unlabeled_indices]))

        ax.plot(gammas,scores,label=r"$\alpha=%s$"%alpha,color=color)

    ### 设置图形

    ax.set_xlabel(r"$\gamma$")

    ax.set_ylabel("score")

    ax.set_xscale("log")

    ax.legend(loc="best")

    ax.set_title("LabelPropagation rbf kernel")

    plt.show()

# 调用 test_LabelPropagation_rbf

test_LabelPropagation_rbf(*data)
def test_LabelPropagation_knn(*data):

    '''

   测试 LabelPropagation 的 knn 核时,预测性能随 alpha 和 n_neighbors 的变化

    '''

    X,y,unlabeled_indices=data

    y_train=np.copy(y) # 必须拷贝,后面要用到 y

    y_train[unlabeled_indices]=-1 # 未标记样本的标记设定为 -1

    fig=plt.figure()

    ax=fig.add_subplot(1,1,1)

    alphas=np.linspace(0.01,1,num=10,endpoint=True)

    Ks=[1,2,3,4,5,8,10,15,20,25,30,35,40,50]

    # 颜色集合,不同曲线用不同颜色

    colors=((1,0,0),(0,1,0),(0,0,1),(0.5,0.5,0),(0,0.5,0.5),(0.5,0,0.5),(0.4,0.6,0),(0.6,0.4,0),(0,0.6,0.4),(0.5,0.3,0.2))

    ## 训练并绘图

    for alpha,color in zip(alphas,colors):

        scores=[]

        for K in Ks:

            clf=LabelPropagation(max_iter=100,n_neighbors=K,alpha=alpha,kernel='knn')

            clf.fit(X,y_train)

            scores.append(clf.score(X[unlabeled_indices],y[unlabeled_indices]))

        ax.plot(Ks,scores,label=r"$\alpha=%s$"%alpha,color=color)

    ### 设置图形

    ax.set_xlabel(r"$k$")

    ax.set_ylabel("score")

    ax.legend(loc="best")

    ax.set_title("LabelPropagation knn kernel")

    plt.show()

# 调用 test_LabelPropagation_knn

test_LabelPropagation_knn(*data)

吴裕雄 python 机器学习——半监督学习标准迭代式标记传播算法LabelPropagation模型的更多相关文章
- 吴裕雄 python 机器学习——半监督学习LabelSpreading模型
import numpy as np import matplotlib.pyplot as plt from sklearn import metrics from sklearn import d ...
- 吴裕雄 python 机器学习——人工神经网络与原始感知机模型
import numpy as np from matplotlib import pyplot as plt from mpl_toolkits.mplot3d import Axes3D from ...
- 吴裕雄 python 机器学习——分类决策树模型
import numpy as np import matplotlib.pyplot as plt from sklearn import datasets from sklearn.model_s ...
- 吴裕雄 python 机器学习——回归决策树模型
import numpy as np import matplotlib.pyplot as plt from sklearn import datasets from sklearn.model_s ...
- 吴裕雄 python 机器学习——线性判断分析LinearDiscriminantAnalysis
import numpy as np import matplotlib.pyplot as plt from matplotlib import cm from mpl_toolkits.mplot ...
- 吴裕雄 python 机器学习——逻辑回归
import numpy as np import matplotlib.pyplot as plt from matplotlib import cm from mpl_toolkits.mplot ...
- 吴裕雄 python 机器学习——ElasticNet回归
import numpy as np import matplotlib.pyplot as plt from matplotlib import cm from mpl_toolkits.mplot ...
- 吴裕雄 python 机器学习——Lasso回归
import numpy as np import matplotlib.pyplot as plt from sklearn import datasets, linear_model from s ...
- 吴裕雄 python 机器学习——岭回归
import numpy as np import matplotlib.pyplot as plt from sklearn import datasets, linear_model from s ...
随机推荐
- 一些java基础知识的备忘
接口和抽象类的区别是什么? 接口的方法默认是 public,所有方法在接口中不能有实现(Java 8 开始接口方法可以有默认实现),而抽象类可以有非抽象的方法. 接口中除了static.final变量 ...
- TCL常用命令
1.删除文件 file delete A file delete -force A 2.建立文件夹 file mkdir A file mkdir A/A 3.判断文件夹是否存在 file exist ...
- PIE-SDK For C++栅格数据的金字塔创建
1.功能简介 金字塔可用于改善性能,可以加快栅格数据的显示速度.随着放大操作的进行,各个更精细的分辨率等级将逐渐得到绘制;但性能将保持不变:目前PIE SDK支持栅格数据的金字塔创建,下面对栅格数据格 ...
- ActiveMQ的p2p模式与发布订阅模式
1.消息中间件:采用异步通讯防止,支持点对点以及发布订阅模式,可以解决高并发问题 传统调用接口,可能发生阻塞,重复提交,超时等等问题,可以利用消息中间件发送异步通讯请求 ...
- C++——指针1
7.关于内存地址 内存空间的访问方式:通过变量名访问,通过地址访问: 地址运算符:& 如:int var; 则&var表示变量var的内存起始地址: //& 出现在声明语句中出 ...
- Oracle 中的 Incarnation 到底是个什么?概念理解篇
高中时候,我深深“爱”上了一位女孩子.那个年纪确实不懂什么是真正的“爱”,反正每天满脑子都是她,只要见到她就会紧张和激动,确切的说是深深的喜欢.你告诉我这叫初恋?不,我的初恋应该是小学3年级,三六班. ...
- JUC-JUC是什么?
一.JUC是什么? java.util.concurrent在并发编程中使用的工具类 进程/线程回顾 1.进程/线程是什么? 进程:进程是一个具有一定独立功能的程序关于某个数据集合的一次运行活动.它是 ...
- Deepin安装常用软件
Deepin安装常用软件 安装git sudo apt-get install git sudo是Debian系列以管理员运行的前缀 卸载软件 sudo apt-get remove package_ ...
- 【网页浏览】国内伪P站搜图网站
蛮好用的国内p站搜图网站(伪p站) 传送链接
- 算法导论2-4 O(nlgn)时间复杂度求逆序对
def mergesort(nums,le,ri): if le>ri-2: return 0 mi=le+(ri-le)//2 a=mergesort(nums,le,mi) b=merges ...