Wix 安装部署教程(三)自定义安装界面和行为
接上一篇自定义安装界面,这篇继续探索,首先介绍下,Wix为我们定义了五种风格,每种风格的UI都是有一定顺序的。我们可以改变安装顺序,也可以完全自定义一个Dialog插入其中。比如Wix_Mondo 风格的顺序就如下,但不一定每个dialog会在安装的时候展示。
BrowseDlg

CustomizeDlg

DiskCostDlg

LicenseAgreementDlg

SetupTypeDlg

WelcomeDlg

In addition, WixUI_Mondo includes the following common dialogs that appear in all WixUI dialog sets:

CancelDlg

ErrorDlg

ExitDlg

FatalError

FilesInUse

MaintenanceTypeDlg

MaintenanceWelcomeDlg

MsiRMFilesInUse

OutOfDiskDlg

OutOfRbDiskDlg

PrepareDlg

ProgressDlg

ResumeDlg

UserExit

VerifyReadyDlg

WaitForCostingDlg
五、改变UI界面的安装顺序
要做到这一步,需要借助Wix的源码了,源码下载:http://wix.codeplex.com/SourceControl/latest 。这里我选的界面风格是 WixUI_Mondo,源码不用全部打开,直接搜WixUI_Mondo.wxs,找到后直接丢到VS中就可以了。我们试着把展示许可证书的这一步跳过,这需要三步:
1)将源码中Fragment中的内容全部copy到Product 元素中 一个ui和一个uiref元素
2)删除两个与LicenseAgreementDlg 相关的Publish 元素,pubulish元素定义了页面了上一步,下一步这些操作。Event="NewDialog" 表示打开一个对话框,value就表示,需要打开的对话框Id。
3)然后同理改变WelcomeDlg和下一步和SetupTypeDlg的上一步 相互在value中指向彼此。
4) 这个时候出现了两个Id="WixUI_Mondo ,将之前UI中的<UIRef Id="WixUI_Mondo" /> 注释掉就可以了。
再次安装,就不再出现许可证书页面了。
全部的代码如下,我们也可以留意下源码中publish元素中的text 其实就是个条件表达式,1就是执行,还有or。 NOT Installed AND NOT PATCH表示没有安装也没有打补丁。 等等
<?xml version="1.0" encoding="UTF-8"?>

<Wix xmlns="http://schemas.microsoft.com/wix/2006/wi">

  <Product Id="*" Name="!(loc.ApplicationName)"

 Language="1033" Version="1.0.0.0" Manufacturer="RJStone" UpgradeCode="3486eddf-0957-45cf-8c26-3de8bceca2b4">

    <Package InstallerVersion="200" Compressed="yes" InstallScope="perMachine" />

    <MajorUpgrade DowngradeErrorMessage="A newer version of [ProductName] is already installed." />

    <MediaTemplate />

    <Feature Id="ProductFeature" Title="Setup07" Level="1">

      <ComponentGroupRef Id="ProductComponents" />

    </Feature>

    <UI>

      <!--<UIRef Id="WixUI_Mondo" />-->

      <Publish Dialog="ExitDialog"

      Control="Finish"

      Event="DoAction"

      Value="LaunchApplication">WIXUI_EXITDIALOGOPTIONALCHECKBOX = 1 and NOT Installed</Publish>

    </UI>

    <WixVariable Id="WixUILicenseRtf" Value="lisences.rtf" />

    <WixVariable Id="WixUIDialogBmp" Value="bb.jpg"/>

    <WixVariable Id="WixUIBannerBmp" Value="top.jpg"/>

    <Property Id="WIXUI_EXITDIALOGOPTIONALTEXT" Value="Thank you for installing this product." />

    <Property Id="WIXUI_EXITDIALOGOPTIONALCHECKBOXTEXT" Value="Launch this Application " />

    <Property Id="WixShellExecTarget" Value="[#myapplication.exe]" />

    <CustomAction Id="LaunchApplication" BinaryKey="WixCA" DllEntry="WixShellExec" Impersonate="yes" />

  <UI Id="WixUI_Mondo">

      <TextStyle Id="WixUI_Font_Normal" FaceName="Tahoma" Size="8" />

      <TextStyle Id="WixUI_Font_Bigger" FaceName="Tahoma" Size="12" />

      <TextStyle Id="WixUI_Font_Title" FaceName="Tahoma" Size="9" Bold="yes" />

      <Property Id="DefaultUIFont" Value="WixUI_Font_Normal" />

      <Property Id="WixUI_Mode" Value="Mondo" />

      <DialogRef Id="ErrorDlg" />

      <DialogRef Id="FatalError" />

      <DialogRef Id="FilesInUse" />

      <DialogRef Id="MsiRMFilesInUse" />

      <DialogRef Id="PrepareDlg" />

      <DialogRef Id="ProgressDlg" />

      <DialogRef Id="ResumeDlg" />

      <DialogRef Id="UserExit" />

      <Publish Dialog="ExitDialog" Control="Finish" Event="EndDialog" Value="Return" Order="999">1</Publish>

      <Publish Dialog="WelcomeDlg" Control="Next" Event="NewDialog" Value="SetupTypeDlg">NOT Installed AND NOT PATCH</Publish>

      <Publish Dialog="WelcomeDlg" Control="Next" Event="NewDialog" Value="VerifyReadyDlg">Installed AND PATCH</Publish>

      <!--<Publish Dialog="LicenseAgreementDlg" Control="Back" Event="NewDialog" Value="WelcomeDlg">1</Publish>

            <Publish Dialog="LicenseAgreementDlg" Control="Next" Event="NewDialog" Value="SetupTypeDlg" Order="2">LicenseAccepted = "1"</Publish>-->

      <Publish Dialog="SetupTypeDlg" Control="Back" Event="NewDialog" Value="WelcomeDlg">1</Publish>

      <Publish Dialog="SetupTypeDlg" Control="TypicalButton" Event="NewDialog" Value="VerifyReadyDlg">1</Publish>

      <Publish Dialog="SetupTypeDlg" Control="CustomButton" Event="NewDialog" Value="CustomizeDlg">1</Publish>

      <Publish Dialog="SetupTypeDlg" Control="CompleteButton" Event="NewDialog" Value="VerifyReadyDlg">1</Publish>

      <Publish Dialog="CustomizeDlg" Control="Back" Event="NewDialog" Value="MaintenanceTypeDlg" Order="1">WixUI_InstallMode = "Change"</Publish>

      <Publish Dialog="CustomizeDlg" Control="Back" Event="NewDialog" Value="SetupTypeDlg" Order="2">WixUI_InstallMode = "InstallCustom"</Publish>

      <Publish Dialog="CustomizeDlg" Control="Next" Event="NewDialog" Value="VerifyReadyDlg">1</Publish>

      <Publish Dialog="VerifyReadyDlg" Control="Back" Event="NewDialog" Value="CustomizeDlg" Order="1">WixUI_InstallMode = "InstallCustom"</Publish>

      <Publish Dialog="VerifyReadyDlg" Control="Back" Event="NewDialog" Value="SetupTypeDlg" Order="2">WixUI_InstallMode = "InstallTypical" OR WixUI_InstallMode = "InstallComplete"</Publish>

      <Publish Dialog="VerifyReadyDlg" Control="Back" Event="NewDialog" Value="CustomizeDlg" Order="3">WixUI_InstallMode = "Change"</Publish>

      <Publish Dialog="VerifyReadyDlg" Control="Back" Event="NewDialog" Value="MaintenanceTypeDlg" Order="4">WixUI_InstallMode = "Repair" OR WixUI_InstallMode = "Remove"</Publish>

      <Publish Dialog="VerifyReadyDlg" Control="Back" Event="NewDialog" Value="WelcomeDlg" Order="2">WixUI_InstallMode = "Update"</Publish>

      <Publish Dialog="MaintenanceWelcomeDlg" Control="Next" Event="NewDialog" Value="MaintenanceTypeDlg">1</Publish>

      <Publish Dialog="MaintenanceTypeDlg" Control="ChangeButton" Event="NewDialog" Value="CustomizeDlg">1</Publish>

      <Publish Dialog="MaintenanceTypeDlg" Control="RepairButton" Event="NewDialog" Value="VerifyReadyDlg">1</Publish>

      <Publish Dialog="MaintenanceTypeDlg" Control="RemoveButton" Event="NewDialog" Value="VerifyReadyDlg">1</Publish>

      <Publish Dialog="MaintenanceTypeDlg" Control="Back" Event="NewDialog" Value="MaintenanceWelcomeDlg">1</Publish>

    </UI>

    <UIRef Id="WixUI_Common" />

  </Product>

  <Fragment>

    <Directory Id="TARGETDIR" Name="SourceDir">

      <Directory Id="ProgramFilesFolder">

        <Directory Id="INSTALLFOLDER" Name="Setup07" />

      </Directory>

    </Directory>

  </Fragment>

  <Fragment>

    <ComponentGroup Id="ProductComponents" Directory="INSTALLFOLDER">

      <!-- TODO: Remove the comments around this Component element and the ComponentRef below in order to add resources to this installer. -->

      <!-- <Component Id="ProductComponent"> -->

      <!-- TODO: Insert files, registry keys, and other resources here. -->

      <Component Id="ProductComponent">

        <File Id="myapplication.exe"  Source="$(var.MyApplication.TargetPath)" />

      </Component>

    </ComponentGroup>

  </Fragment>

</Wix>
六、自定义Dialog
自定义界面,需要借助源码了,这一节,也可以参考 子林的博客 http://blog.csdn.net/duanzilin/article/details/5956727
在找到WixUI_Mondo.wxs 的源码文件夹中,随便找一个名字中有Dlg的wxs文件,丢到vs中就可以看见一个Dlg 是个什么样的结构。 比如LicenseAgreementDlg.wxs 的源码如下
<?xml version="1.0" encoding="UTF-8"?>

<!--

  <copyright file="LicenseAgreementDlg.wxs" company="Outercurve Foundation">

    Copyright (c) 2004, Outercurve Foundation.

    This software is released under Microsoft Reciprocal License (MS-RL).

    The license and further copyright text can be found in the file

    LICENSE.TXT at the root directory of the distribution.

  </copyright>

-->

<Wix xmlns="http://wixtoolset.org/schemas/v4/wxs">

    <Fragment>

        <UI>

            <Dialog Id="LicenseAgreementDlg" Width="370" Height="270" Title="!(loc.LicenseAgreementDlg_Title)">

                <Control Id="BannerBitmap" Type="Bitmap" X="0" Y="0" Width="370" Height="44" TabSkip="no" Text="!(loc.LicenseAgreementDlgBannerBitmap)" />

                <Control Id="BannerLine" Type="Line" X="0" Y="44" Width="370" Height="0" />

                <Control Id="BottomLine" Type="Line" X="0" Y="234" Width="370" Height="0" />

                <Control Id="Description" Type="Text" X="25" Y="23" Width="340" Height="15" Transparent="yes" NoPrefix="yes" Text="!(loc.LicenseAgreementDlgDescription)" />

                <Control Id="Title" Type="Text" X="15" Y="6" Width="200" Height="15" Transparent="yes" NoPrefix="yes" Text="!(loc.LicenseAgreementDlgTitle)" />

                <Control Id="LicenseAcceptedCheckBox" Type="CheckBox" X="20" Y="207" Width="330" Height="18" CheckBoxValue="1" Property="LicenseAccepted" Text="!(loc.LicenseAgreementDlgLicenseAcceptedCheckBox)" />

                <Control Id="Print" Type="PushButton" X="112" Y="243" Width="56" Height="17" Text="!(loc.WixUIPrint)">

                    <Publish Event="DoAction" Value="WixUIPrintEula">1</Publish>

                </Control>

                <Control Id="Back" Type="PushButton" X="180" Y="243" Width="56" Height="17" Text="!(loc.WixUIBack)" />

                <Control Id="Next" Type="PushButton" X="236" Y="243" Width="56" Height="17" Default="yes" Text="!(loc.WixUINext)">

                    <Publish Event="SpawnWaitDialog" Value="WaitForCostingDlg">!(wix.WixUICostingPopupOptOut) OR CostingComplete = 1</Publish>

                    <Condition Action="disable"><![CDATA[LicenseAccepted <> "1"]]></Condition>

                    <Condition Action="enable">LicenseAccepted = "1"</Condition>

                </Control>

                <Control Id="Cancel" Type="PushButton" X="304" Y="243" Width="56" Height="17" Cancel="yes" Text="!(loc.WixUICancel)">

                    <Publish Event="SpawnDialog" Value="CancelDlg">1</Publish>

                </Control>

                <Control Id="LicenseText" Type="ScrollableText" X="20" Y="60" Width="330" Height="140" Sunken="yes" TabSkip="no">

                    <Text SourceFile="!(wix.WixUILicenseRtf=$(var.licenseRtf))" />

                </Control>

            </Dialog>

        </UI>

    </Fragment>

</Wix>
Control 是个主要的元素,相当于vs中的控件了。但这里是个统称,通过Type也决定这个是一个lable 还是个text(edit) type的类型有 Billboard, Bitmap, CheckBox, ComboBox, DirectoryCombo, DirectoryList, Edit, GroupBox, Hyperlink, Icon, Line, ListBox, ListView, MaskedEdit, PathEdit, ProgressBar, PushButton, RadioButtonGroup, ScrollableText, SelectionTree, Text, VolumeCostList, VolumeSelectCombo , 需要定义类型,位置,大小,文本。
自定义一个页面插入进去,需要两步。
1.先新建一个wxs文件,右键 添加 新建项 选择Installer File 。命名为SpecialDlg 修改为
<?xml version="1.0" encoding="UTF-8"?>

<Wix xmlns="http://schemas.microsoft.com/wix/2006/wi">

  <Fragment>

    <UI>

      <Dialog Id="SpecialDlg" Width="370" Height="270" Title="this is a special dialog made by rjstone ">

        <Control Id="BannerBitmap" Type="Bitmap" X="0" Y="0" Width="370" Height="44" TabSkip="no" Text="!(loc.LicenseAgreementDlgBannerBitmap)" />

        <Control Id="BannerLine" Type="Line" X="0" Y="44" Width="370" Height="0" />

        <Control Id="BottomLine" Type="Line" X="0" Y="234" Width="370" Height="0" />

        <Control Id="Description" Type="Text" X="25" Y="23" Width="340" Height="15" Transparent="yes" NoPrefix="yes" Text="!(loc.LicenseAgreementDlgDescription)" />

        <Control Id="Title" Type="Text" X="15" Y="6" Width="200" Height="15" Transparent="yes" NoPrefix="yes" Text="!(loc.LicenseAgreementDlgTitle)" />

        <Control Id="MyLabel" Width="40" Height="40" Type="Text" X="30" Y="63" Text="Soga" />

        <Control Id="Back" Type="PushButton" X="180" Y="243" Width="56" Height="17" Text="!(loc.WixUIBack)" />

        <Control Id="Next" Type="PushButton" X="236" Y="243" Width="56" Height="17" Default="yes" Text="!(loc.WixUINext)"/>

      </Dialog>

    </UI>

  </Fragment>

</Wix>
这就是个简单的对话框,因为不像html或者wpf 那么直观,这个看起来确实有点不“形象” ,生成就是如下的样子。 我们可以看line text title 各自对应的地方
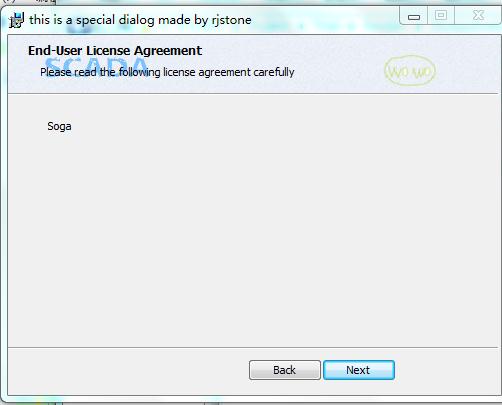
千万不要少了 下面的两个按钮,不然安装到这就傻眼了。 这只是个简单的页面,但我们如何加入到安装目录中呢,需要第二步
2. 插入到安装顺序中,我们先把之前的UI顺序复原,把LicenseAgreementDlg 还原在WelcomeDlg后面,再在这两者之间插入上面的SpecialDlg 。修改Product中的publish元素
      <Publish Dialog="WelcomeDlg" Control="Next" Event="NewDialog" Value="SpecialDlg">NOT Installed AND NOT PATCH</Publish>

      <Publish Dialog="WelcomeDlg" Control="Next" Event="NewDialog" Value="VerifyReadyDlg">Installed AND PATCH</Publish>

      <Publish Dialog="SpecialDlg" Control="Back" Event="NewDialog" Value="WelcomeDlg">1</Publish>

      <Publish Dialog="SpecialDlg" Control="Next" Event="NewDialog" Value="LicenseAgreementDlg">1</Publish>

      <Publish Dialog="LicenseAgreementDlg" Control="Back" Event="NewDialog" Value="SpecialDlg">1</Publish>

      <Publish Dialog="LicenseAgreementDlg" Control="Next" Event="NewDialog" Value="SetupTypeDlg" Order="2">LicenseAccepted = "1"</Publish>
当然,需要复杂的界面,还需要加入自定义的行为,比如让用户输入再检测,并调用dll中的方法,这写wix都是可以做到的。
今天关于自定义界面的就到这里,明天继续。
如过你觉得对你有帮助,就顶一个吧。
Wix 安装部署教程(三)自定义安装界面和行为的更多相关文章
- WIX 安装部署教程(六) 为你收集的七个知识点
前段时间整理5篇WIX(Windows Installer XML)的安装教程,但还不够完善,这里继续整理了七个知识点分享给大家.WIX最新版本3.8,点击下载 WIX安装部署(一)同MSBuild自 ...
- [转帖]VMware Vsphere 6.0安装部署 (三) vCenter Server安装
VMware Vsphere 6.0安装部署 (三) vCenter Server安装 2016年08月29日 14:59:14 dAng1r0Us 阅读数:72942 版权声明:本文为博主原创文 ...
- 自动化部署教程(一) redhat安装jenkins
自动化部署教程(一) redhat安装jenkins 源配置: sudo wget -O /etc/yum.repos.d/jenkins.repo http://pkg.jenkins-ci.or ...
- NideShop项目的安装部署教程
本文档为微信小程序商城NideShop项目的安装部署教程,欢迎star NideShop商城api服务:https://github.com/tumobi/nideshop NideShop微信小程序 ...
- Wix 安装部署教程(九) --用WPF做安装界面
经常安装PC端的应用,特别是重装系统之后,大致分为两类.一类像QQ,搜狗输入法这样的.分三步走的:第一个页面可以自定义安装路径和软件许可.第二个页面显示安装进度条,第三个页面推荐其他应用.先不管人家怎 ...
- Wix 安装部署教程(四) 添加安装文件及快捷方式
通过之前三篇的介绍,大家对wix的xml部署方式也应该有一些认识,今天天气不错,再来一发.主要介绍桌面,开始菜单,卸载等功能的如何添加.希望园友们支持! 一.如何添加文件 Demo打包程序很简单,就一 ...
- Wix 安装部署教程(十五) --CustomAction的七种用法
在WIX中,CustomAction用来在安装过程中执行自定义行为.比如注册.修改文件.触发其他可执行文件等.这一节主要是介绍一下CustomAction的7种用法. 在此之前要了解InstallEx ...
- Wix 安装部署教程(十三) -- 多语言安装包
这几天摸索WIX的多语言安装包(这里是Wix的setup 工程,不是Bundle),终于走通了,感谢网友uni的指点.WIX的多语言安装包能够根据系统环境自动切换界面语言,你也可以通过命令指定语言.下 ...
- Wix 安装部署教程 -CustomAction的七种用法
在WIX中,CustomAction用来在安装过程中执行自定义行为.比如注册.修改文件.触发其他可执行文件等.这一节主要是介绍一下CustomAction的7种用法. 在此之前要了解InstallEx ...
随机推荐
- ---Arch Linux 之AUR
只需下载压缩包,解压,进入文件夹,里面好像也只有一个PKBUILD文件,makepkg -s (自动下载程序然后编译打包), 然后pacman -U xxxx.pkg.xz 就好了
- Mysql命令行中文乱码的解决方法
环境:Windows 8 64位,Mysql 5.0.96 for Win64 (x86) 数据库本身安装时默认已经是使用utf8编码的了,但在命令行中执行查询时,查询到的中文依然乱码,解决方法如下 ...
- {CSDN}{英雄会}{火车调度}
思路: 给定一系列时刻表,求能满足各个时刻的最小火车数量. 打眼一看, 把此题归入到最大流,仔细一想不符合流网络的规律,换思路. 由于是一个最优化问题,自然想到动态规划和贪心. 最后确定贪心.从最早出 ...
- oracle rownum paging issues
rownum是oracle预处理字段,默认标序是1,只有记录集已经满足条件后才会进行后续编号.由于第一条记录rownum默认是1,而你的条件是rownum>=6 对第一条记录比较它的rownum ...
- TinyXML:一个优秀的C++ XML解析器
//-------------------------------------------------------------------------------------------------- ...
- diocp_tcp_client单元源码与注释
(* * Unit owner: d10.天地弦 * blog: http://www.cnblogs.com/dksoft * homePage: www.diocp.org * * 2015-02 ...
- Android四大组件之——Activity的生命周期(图文详解)
转载请在文章开头处注明本博客网址:http://www.cnblogs.com/JohnTsai 联系方式:JohnTsai.Work@gmail.com [Andro ...
- 更改appstore开发商名字
个人账号,名字要改,google了半天也没找出解决方案,最后发邮件求助水果,发来解决办法. 您好: 感谢您参与 Apple 开发者计划.我是 Daniel , 非常荣幸能就更改 iTunes Conn ...
- E. Santa Claus and Tangerines 二分答案 + 记忆化搜索
http://codeforces.com/contest/752/problem/E 首先有一个东西就是,如果我要检测5,那么14我们认为它能产生2个5. 14 = 7 + 7.但是按照平均分的话, ...
- Linux系统下 解决Qt5无法连接MySQL数据库的方法
Linux平台下解决Qt5连接mysql数据库的问题:输入sudo apt-get install libqt5sql5-mysql解决,这种方法只能解决Qt是用sudo apt-get instal ...