STL容器之list
【1】list简介
实质上,list容器就是一个双向链表,可以高效地进行插入、删除操作。
【2】list链表常用方法
(1)构造、赋值、清空、删除、插入、判空等
应用示例代码如下:
 #include <list>

 #include <iostream>

 using namespace std;

 // 打印链表数据信息

 void print (const list<int> & tempList)

 {

     // cbegin 返回指向第一个元素的迭代器

     // cend 返回指向最后一个元素之后位置的迭代器

     list<int>::const_iterator cIter = tempList.cbegin();

     for (; cIter != tempList.cend(); ++cIter)

     {

         cout << (*cIter) << " ";

     }

     cout << endl;

 }

 void main()

 {

     // 构造函数(默认构造函数)

     list<int> myList1;

     // 构造函数(构建一个list,有10个元素,每个元素值都是10)

     list<int> myList2(, );

     print(myList2);

     // 拷贝构造函数

     list<int> myList3(myList2);

     print(myList3);

     // 由区间内的值初始化list

     int nArrayA[] = {, , , , };

     list<int> myList4(nArrayA, nArrayA + );

     print(myList4);

     // 赋值assign(input_iterator start, input_iterator end);

     myList1.assign(nArrayA, nArrayA + );

     print(myList1);

     // 赋值assign(size_type num, const Type & val);

     myList1.assign(, );

     print(myList1);

     // 返回对最后一个元素的引用

     cout << myList4.back() << endl;

     // 返回对第一个元素的引用

     cout << myList4.front() << endl;

     // 清空链表clear

     myList4.clear();

     cout << myList4.empty() << endl;

     // 删除元素erase(iterator pos)

     list<int>::iterator iter = myList1.begin();

     for (; iter != myList1.end(); )

     {

         myList1.erase(iter++);

     }

     cout << myList1.empty() << endl;

     // 删除元素erase(iterator start, iterator end)

     myList3.erase(myList3.begin(), myList3.end());

     cout << myList3.empty() << endl;

     // 插入元素insert(iterator pos, const TYPE& val)

     myList1.insert(myList1.begin(), );

     print(myList1);

     // 插入元素insert(iterator pos, size_type num, const TYPE &val)

     myList1.insert(myList1.begin(), , );

     print(myList1);

     // 插入元素insert(iterator pos, input_iterator start, input_iterator end)

     int nArrayB[] = {, , , };

     myList1.insert(myList1.begin(), nArrayB, nArrayB + );

     print(myList1);

     system("pause");

 }

 // run out:

 /*

 10 10 10 10 10 10 10 10 10 10

 10 10 10 10 10 10 10 10 10 10

 10 20 30 40 50

 10 20 30 40

 100 100 100 100 100 100 100 100 100 100

 50

 10

 1

 1

 1

 110

 23 23 23 23 23 23 23 23 23 23 110

 7 8 9 10 23 23 23 23 23 23 23 23 23 23 110

 请按任意键继续. . .

 */
(2)merge方法
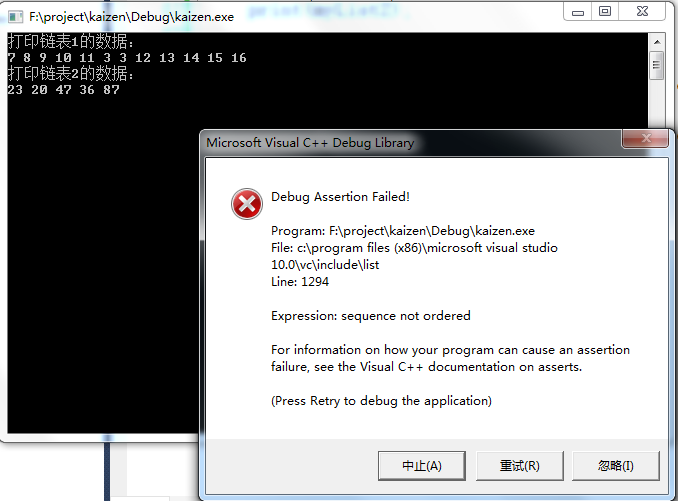
请看如下最常见的崩溃代码:
代码1:链表1无序,链表2无序。
 #include <list>

 #include <iostream>

 using namespace std;

 // 打印链表数据信息

 void print (const list<int> & tempList)

 {

     // cbegin 返回指向第一个元素的迭代器

     // cend 返回指向最后一个元素之后位置的迭代器

     list<int>::const_iterator cIter = tempList.cbegin();

     for (; cIter != tempList.cend(); ++cIter)

     {

         cout << (*cIter) << " ";

     }

     cout << endl;

 }

 void main()

 {

     // 构造函数(默认构造函数)

     list<int> myList1, myList2;

     // 赋值

     myList1.assign(, );

     // 插入元素

     int nArrayA[] = {, , , , };

     myList1.insert(myList1.begin(), nArrayA, nArrayA + );

     // 追加元素

     for (int i = ; i < ; ++i)

     {

         myList1.push_back(i + );

     }

     cout << "打印链表1的数据:" << endl;

     print(myList1);

     myList2.push_back();

     myList2.push_back();

     myList2.push_back();

     myList2.push_back();

     myList2.push_back();

     cout << "打印链表2的数据:" << endl;

     print(myList2);

     myList1.merge(myList2);

     cout << "合并后,打印链表1的数据:" << endl;

     print(myList1);

     cout << "合并后,打印链表2的数据:" << endl;

     print(myList2);

     system("pause");

 }
运行结果如下图:

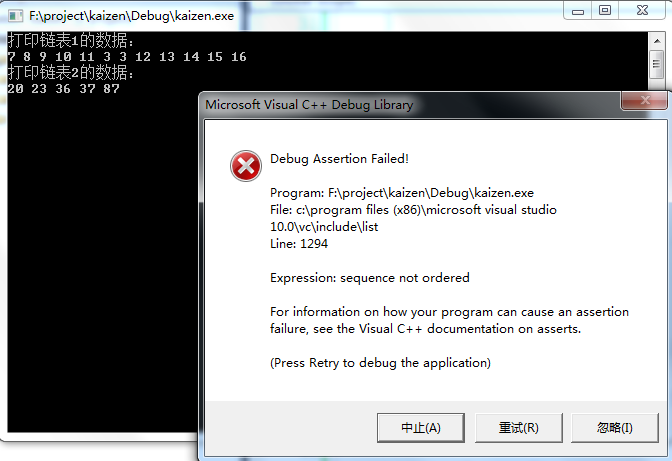
代码2:链表1无序,链表2升序。
 #include <list>

 #include <iostream>

 using namespace std;

 // 打印链表数据信息

 void print (const list<int> & tempList)

 {

     // cbegin 返回指向第一个元素的迭代器

     // cend 返回指向最后一个元素之后位置的迭代器

     list<int>::const_iterator cIter = tempList.cbegin();

     for (; cIter != tempList.cend(); ++cIter)

     {

         cout << (*cIter) << " ";

     }

     cout << endl;

 }

 void main()

 {

     // 构造函数(默认构造函数)

     list<int> myList1, myList2;

     // 赋值

     myList1.assign(, );

     // 插入元素

     int nArrayA[] = {, , , , };

     myList1.insert(myList1.begin(), nArrayA, nArrayA + );

     // 追加元素

     for (int i = ; i < ; ++i)

     {

         myList1.push_back(i + );

     }

     cout << "打印链表1的数据:" << endl;

     print(myList1);

     myList2.push_back();

     myList2.push_back();

     myList2.push_back();

     myList2.push_back();

     myList2.push_back();

     cout << "打印链表2的数据:" << endl;

     print(myList2);

     myList1.merge(myList2);

     cout << "合并后,打印链表1的数据:" << endl;

     print(myList1);

     cout << "合并后,打印链表2的数据:" << endl;

     print(myList2);

     system("pause");

 }
运行结果如下图:

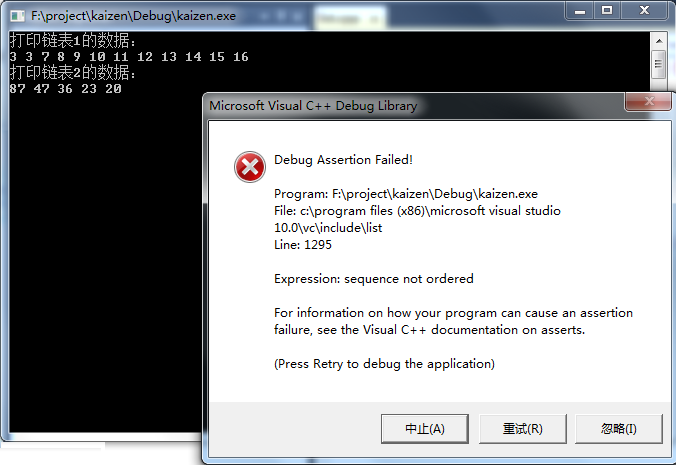
代码3:链表1升序,链表2降序。
 #include <list>

 #include <iostream>

 using namespace std;

 // 打印链表数据信息

 void print (const list<int> & tempList)

 {

     // cbegin 返回指向第一个元素的迭代器

     // cend 返回指向最后一个元素之后位置的迭代器

     list<int>::const_iterator cIter = tempList.cbegin();

     for (; cIter != tempList.cend(); ++cIter)

     {

         cout << (*cIter) << " ";

     }

     cout << endl;

 }

 void main()

 {

     // 构造函数(默认构造函数)

     list<int> myList1, myList2;

     // 赋值

     myList1.assign(, );

     // 插入元素

     int nArrayA[] = {, , , , };

     myList1.insert(myList1.end(), nArrayA, nArrayA + );

     // 追加元素

     for (int i = ; i < ; ++i)

     {

         myList1.push_back(i + );

     }

     cout << "打印链表1的数据:" << endl;

     print(myList1);

     myList2.push_back();

     myList2.push_back();

     myList2.push_back();

     myList2.push_back();

     myList2.push_back();

     cout << "打印链表2的数据:" << endl;

     print(myList2);

     myList1.merge(myList2);

     cout << "合并后,打印链表1的数据:" << endl;

     print(myList1);

     cout << "合并后,打印链表2的数据:" << endl;

     print(myList2);

     system("pause");

 }
运行结果如下图:

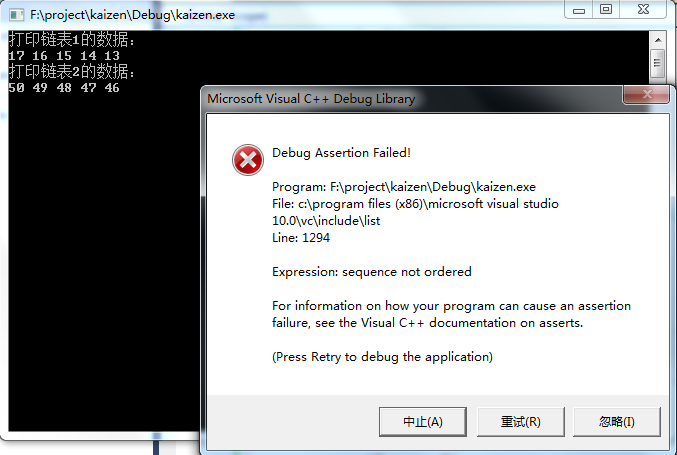
代码4:链表1降序,链表2降序。
 #include <list>

 #include <iostream>

 using namespace std;

 // 打印链表数据信息

 void print (const list<int> & tempList)

 {

     // cbegin 返回指向第一个元素的迭代器

     // cend 返回指向最后一个元素之后位置的迭代器

     list<int>::const_iterator cIter = tempList.cbegin();

     for (; cIter != tempList.cend(); ++cIter)

     {

         cout << (*cIter) << " ";

     }

     cout << endl;

 }

 void main()

 {

     // 构造函数(默认构造函数)

     list<int> myList1, myList2;

     // 追加元素

     for (int i = ; i > ; --i)

     {

         myList1.push_back(i + );

     }

     cout << "打印链表1的数据:" << endl;

     print(myList1);

     myList2.push_back();

     myList2.push_back();

     myList2.push_back();

     myList2.push_back();

     myList2.push_back();

     cout << "打印链表2的数据:" << endl;

     print(myList2);

     myList1.merge(myList2);

     cout << "合并后,打印链表1的数据:" << endl;

     print(myList1);

     cout << "合并后,打印链表2的数据:" << endl;

     print(myList2);

     system("pause");

 }
运行结果如下图:

代码5:链表1升序,链表2升序。
 #include <list>

 #include <iostream>

 using namespace std;

 // 打印链表数据信息

 void print (const list<int> & tempList)

 {

     // cbegin 返回指向第一个元素的迭代器

     // cend 返回指向最后一个元素之后位置的迭代器

     list<int>::const_iterator cIter = tempList.cbegin();

     for (; cIter != tempList.cend(); ++cIter)

     {

         cout << (*cIter) << " ";

     }

     cout << endl;

 }

 void main()

 {

     // 构造函数(默认构造函数)

     list<int> myList1, myList2;

     // 赋值

     myList1.assign(, );

     // 插入元素

     int nArrayA[] = {, , , , };

     myList1.insert(myList1.end(), nArrayA, nArrayA + );

     // 追加元素

     for (int i = ; i < ; ++i)

     {

         myList1.push_back(i + );

     }

     cout << "打印链表1的数据:" << endl;

     print(myList1);

     myList2.push_back();

     myList2.push_back();

     myList2.push_back();

     myList2.push_back(3);

     myList2.push_back();

     cout << "打印链表2的数据:" << endl;

     print(myList2);

     myList1.merge(myList2);

     cout << "合并后,打印链表1的数据:" << endl;

     print(myList1);

     cout << "合并后,打印链表2的数据:" << endl;

     print(myList2);

     system("pause");

 }
运行结果如下图:

经过查资料及源码,发现问题是:
list链表合并merge方法注意事项:
1、合并的两个链表必须均默认升序的。即合并之前,两个链表就应该是由小到大顺序排列的。
2、合并完成后,被合并链表(myList2)数据元素被清空。
3、默认是按升序合并。比如上例4,若想按降序进行合并,需要指定降序。
修改后,如下代码:
 #include <list>

 #include <iostream>

 using namespace std;

 // 打印链表数据信息

 void print (const list<int> & tempList)

 {

     // cbegin 返回指向第一个元素的迭代器

     // cend 返回指向最后一个元素之后位置的迭代器

     list<int>::const_iterator cIter = tempList.cbegin();

     for (; cIter != tempList.cend(); ++cIter)

     {

         cout << (*cIter) << " ";

     }

     cout << endl;

 }

 void main()

 {

     // 构造函数(默认构造函数)

     list<int> myList1, myList2;

     // 追加元素

     for (int i = ; i > ; --i)

     {

         myList1.push_back(i + );

     }

     cout << "打印链表1的数据:" << endl;

     print(myList1);

     myList2.push_back();

     myList2.push_back();

     myList2.push_back();

     myList2.push_back();

     myList2.push_back();

     cout << "打印链表2的数据:" << endl;

     print(myList2);

     myList1.merge(myList2, greater<int>());

     cout << "合并后,打印链表1的数据:" << endl;

     print(myList1);

     cout << "合并后,打印链表2的数据:" << endl;

     print(myList2);

     system("pause");

 }
按降序进行合并。前提必须两个链表均为降序有序排列。
(3)remove方法。删除链表中所有值为val的元素。
 #include <list>

 #include <iostream>

 using namespace std;

 // 打印链表数据信息

 void print (const list<int> & tempList)

 {

     // cbegin 返回指向第一个元素的迭代器

     // cend 返回指向最后一个元素之后位置的迭代器

     list<int>::const_iterator cIter = tempList.cbegin();

     for (; cIter != tempList.cend(); ++cIter)

     {

         cout << (*cIter) << " ";

     }

     cout << endl;

 }

 void main()

 {

     // 构造函数(默认构造函数)

     list<int> myList1;

     myList1.assign(, );

     myList1.insert(myList1.end(), , );

     for (int i = ; i > ; --i)

     {

         myList1.push_back();

     }

     for (int i = ; i < ; ++i)

     {

         myList1.push_front(i + );

     }

     cout << "打印链表的数据:" << endl;

     print(myList1);

     cout << "删除12后,打印链表数据:";

     myList1.remove();

     print(myList1);

     cout << "删除34后,打印链表数据:";

     myList1.remove();

     print(myList1);

     system("pause");

 }

 // run out:

 /*

 打印链表的数据:

 19 18 17 16 15 12 12 12 34 34 34 12 12 12 12 12

 删除12后,打印链表数据:19 18 17 16 15 34 34 34

 删除34后,打印链表数据:19 18 17 16 15

 请按任意键继续. . .

 */
(4)remove_if方法。用一元函数判断是否删除元素,若函数返回true,则删除该元素。
应用示例代码如下:
 #include <list>

 #include <iostream>

 using namespace std;

 // 打印链表数据信息

  void print (const list<int> & tempList)

  {

      list<int>::const_iterator cIter = tempList.cbegin();

      for (; cIter != tempList.cend(); ++cIter)

      {

          cout << (*cIter) << " ";

      }

      cout << endl;

 }

 bool IsDel (int i)

 {

     return ((i % ) == );

 }

 void main ()

 {

   int myInts[] = {, , , , , , , , , };

   list<int> myList(myInts, myInts + );

   cout << "打印链表数据元素:" << endl;

   print(myList);

   myList.remove_if(IsDel);

   cout << "删除(val % 2 == 1)后打印链表数据元素:" << endl;

   print(myList);

   system("pause");

 }

 // run out:

 /*

 打印链表数据元素:

 1 2 3 4 5 6 7 8 9 10

 删除(val % 2 == 1)后打印链表数据元素:

 2 4 6 8 10

 请按任意键继续. . .

 */
(5)unique方法。移除重复元素。
 #include <list>

 #include <iostream>

 using namespace std;

 // 打印链表数据信息

  void print (const list<int> & tempList)

  {

      list<int>::const_iterator cIter = tempList.cbegin();

      for (; cIter != tempList.cend(); ++cIter)

      {

          cout << (*cIter) << " ";

      }

      cout << endl;

 }

 void main()

 {

     list<int> myList;

     myList.assign(, );

     for (int i = ; i < ; ++i)

     {

         myList.push_front(i + );

     }

     for (int i = ; i < ; ++i)

     {

         myList.push_back( + i);

     }

     myList.insert(myList.end(), , );

     print(myList);

     myList.unique(); // 移除重复元素

     print(myList);

     system("pause");

 }

 // run out:

 /*

 6 5 4 3 2 100 100 100 100 100 10 11 12 13 14 45 45 45 45 45

 6 5 4 3 2 100 10 11 12 13 14 45

 请按任意键继续. . .

 */
(6)splice 粘接方法的三种方式
应用示例代码如下:
 #include <list>

 #include <iostream>

 using namespace std;

 // 打印链表数据信息

  void print (const list<int> & tempList)

  {

      list<int>::const_iterator cIter = tempList.cbegin();

      for (; cIter != tempList.cend(); ++cIter)

      {

          cout << (*cIter) << " ";

      }

      cout << endl;

 }

  void main()

  {

      list<int> myList1, myList2, myList3, myList4;

      myList1.assign(, );

      myList2.push_front();

      cout << "打印myList2的数据:" << endl;

      print(myList2);

      cout << "打印myList1的数据:" << endl;

      print(myList1);

      // 粘接方法1:splice(iterator pos, list& lst)

      // 将myList1链表元素粘接到myList2链表的第一个位置(pos及其后元素均后移)

      myList2.splice(myList2.begin(), myList1);

      cout << "粘接后,打印myList2的数据:" << endl;

      print(myList2);

      cout << "粘接后,打印myList1的数据:" << endl;

      print(myList1);

      // 粘接方法2:splice(iterator pos, list& lst, iterator del)

      // 将myList1链表元素从第二个开始粘接到myList3链表的第一个位置

      myList1.assign(, );

      myList3.assign(, );

      cout << endl << "打印myList3的数据:" << endl;

      print(myList3);

      cout << "打印myList1的数据:" << endl;

      print(myList1);

      myList3.splice(myList3.begin(), myList1, ++myList1.begin());

      cout << "粘接后,打印myList3的数据:" << endl;

      print(myList3);

      cout << "粘接后,打印myList1的数据:" << endl;

      print(myList1);

      // 粘接方法3:splice(iterator pos, list& lst, iterator start, iterator end)

      // 将myList1链表元素从第二个开始粘接到myList4链表的第二个位置

      myList1.push_back();

      myList1.push_back();

      myList1.push_back();

      myList1.push_back();

      myList4.assign(, );

      cout << endl << "打印myList4的数据:" << endl;

      print(myList4);

      cout << "打印myList1的数据:" << endl;

      print(myList1);

      myList4.splice(++myList4.begin(), myList1, ++myList1.begin(), myList1.end());

      cout << "粘接后,打印myList4的数据:" << endl;

      print(myList4);

      cout << "粘接后,打印myList1的数据:" << endl;

      print(myList1);

      system("pause");

  }

  // run out:

  /*

  打印myList2的数据:

 22

 打印myList1的数据:

 10 10 10 10 10

 粘接后,打印myList2的数据:

 10 10 10 10 10 22

 粘接后,打印myList1的数据:

 打印myList3的数据:

 22 22

 打印myList1的数据:

 11 11

 粘接后,打印myList3的数据:

 11 22 22

 粘接后,打印myList1的数据:

 11

 打印myList4的数据:

 44 44 44 44

 打印myList1的数据:

 11 12 13 14 15

 粘接后,打印myList4的数据:

 44 12 13 14 15 44 44 44

 粘接后,打印myList1的数据:

 11

 请按任意键继续. . .

  */
(7)swap方法。交换两个链表中的元素。
应用示例代码如下:
 #include <list>

 #include <iostream>

 using namespace std;

 // 打印链表数据信息

  void print (const list<int> & tempList)

  {

      list<int>::const_iterator cIter = tempList.cbegin();

      for (; cIter != tempList.cend(); ++cIter)

      {

          cout << (*cIter) << " ";

      }

      cout << endl;

 }

 void main()

 {

     list<int> myList1, myList2;

     for (int i = ; i < ; ++i)

     {

         myList1.push_back(rand() % );

     }

     for (int j = ; j < ; ++j)

     {

         myList2.push_back(rand() % );

     }

     cout << "打印myList1的数据:" << endl;

     print(myList1);

     cout << "打印myList2的数据:" << endl;

     print(myList2);

     myList1.swap(myList2);

     cout << "交换后,打印myList1的数据:" << endl;

     print(myList1);

     cout << "交换后,打印myList2的数据:" << endl;

     print(myList2);

     system("pause");

 }

 // run out:

 /*

 打印myList1的数据:

 41 67 34 0 69 24 78 58 62 64

 打印myList2的数据:

 105 145 81 27 161 91 195 142 27 36

 交换后,打印myList1的数据:

 105 145 81 27 161 91 195 142 27 36

 交换后,打印myList2的数据:

 41 67 34 0 69 24 78 58 62 64

 请按任意键继续. . .

 */
(8)待续。。。。
【3】list与vector区别总结
数组与链表的优缺点;
数组:
优点:访问效率高,内存为连续的区域。
缺点:添加、删除操作效率低。大小固定,不适合动态存储(不方便动态添加)。
链表:
优点:一般内存不连续。添加、删除效率高。大小可变。
缺点:只能通过指针顺序访问,查询效率低。
Good Good Study, Day Day Up.
顺序 选择 循环 总结
STL容器之list的更多相关文章
- [知识点]C++中STL容器之map
UPDATE(20190416):写完vector和set之后,发现不少内容全部引导到map上了……于是进行了一定的描述补充与更正. 零.STL目录 1.容器之map 2.容器之vector 3.容器 ...
- [知识点]C++中STL容器之set
零.STL目录 1.容器之map 2.容器之vector 3.容器之set 一.前言 继上期的vector之后,我们又迎来了另一个类数组的STL容器——set. 二.用途与特性 set,顾名思义,集合 ...
- [知识点]C++中STL容器之vector
零.STL目录 1.容器之map 2.容器之vector 3.容器之set 一.前言 关于STL和STL容器的概念参见STL系列第一篇——map(见上).今天介绍第二个成员——vector. 二.用途 ...
- STL容器之map
[1]map容器 map 是关联容器.容器中的每一个元素都是由一个键值和一个数据值组成的. set 是一个集合它以其元素作为键值(同一个键值只能出现一次),且默认以升序排列. list 是一个顺序容器 ...
- STL容器之vector
[1]模板类vector 模板类vector可理解为广义数组.广义数组,即与类型无关的数组,具有与数组相同的所有操作. 那么,你或许要问:既然C++语言本身已提供了一个序列式容器array,为什么还要 ...
- C++ STL容器之 stack
STL 中的 stack 是一种容器适配器,而不是一种容器. 它是容器适配器是指,只要支持一系列方法的容器(empty, size, back, push_back, pop_back),都能作为st ...
- STL容器之set
[1]set容器 一个集合(set)是一个容器,它其中所包含的元素的值是唯一的. [2]set容器方法 (1)set构造函数.插入函数.遍历过程 应用示例代码如下: #include <set& ...
- STL容器之deque
[1]deque容器 deque 是对 vector 和 list 优缺点的结合,它是处于两者之间的一种容器. [2]deque方法集 应用示例代码: #include <deque> # ...
- STL容器之Array[转]
转自https://blog.csdn.net/sin_geek/article/details/51067874 作者 Sin_Geek 简介 array在头文件<array> 中定义 ...
随机推荐
- 理解Hbase和BigTable(转)
add by zhj: 这篇文章写的通俗易懂,介绍了HBase最重要的几点特性. 英文原文:https://dzone.com/articles/understanding-hbase-and-big ...
- c# string 扩展方法
场景:只显示一字符串的前50个字符,多余的用“...”省略号替代 如果不用扩展方法当然也可以实现,写一个静态方法,如下: public class StringUtil { /// <summa ...
- $(this) 和 this 关键字在 jquery 中有何不同?
$(this) 返回一个 jQuery 对象,你可以对它调用多个 jQuery 方法,比如用 text() 获取文本,用 val() 获取值等等. 而 this 代表当前元素,它是 javascrip ...
- Linux下Redis的安装与启动
一. 进入目录(我们准备将redis装入opt文件夹) $ cd /opt/ 二.下载redis压缩包 $ wget http://download.redis.io/releases/redis-4 ...
- 【托业】【新托业TOEIC新题型真题】学习笔记3-题库二->P5-6
--------------------------------------单词-------------------------------------- oppose vt. 反对:对抗,抗争 v ...
- mysql 初识sql语句
有了mysql这个数据库软件,就可以将程序员从对数据的管理中解脱出来,专注于对程序逻辑的编写 mysql服务端软件即mysqld帮我们管理好文件夹以及文件,前提是作为使用者的我们,需要下载mysql的 ...
- wordpress站内搜索结果页URL伪静态如何操作
站内搜索页面的优化一直被很多人忽略,只是按cms自带的默认设置,其实搜索结果页是一块宝藏,url重写是提升的重要一步.之前我们写过帝国CMS搜索页伪静态实现方法,那么,wordpress站内搜索结果页 ...
- Delphi启动数据库连接属性对话框
有时候需要客户端进行服务器连接配置,自己写配置窗体,总不如直接使用系统提供的使用方便快捷 例子一: //此例子有个坏处不管用户点了确定还是取消,均返回值 procedure TForm1.Button ...
- 数据库---初识sql语句
初识sql语句 SQL语言主要用于存取数据.查询数据.更新数据和管理关系数据库系统,SQL语言由IBM开发.SQL语言分为3种类型: DDL语句 数据库定义语言: 数据库.表.视图.索引.存储 ...
- huawei
线程堆栈(Thread Stack)和托管堆(Managed Heap) 每个正在运行的程序都对应着一个进程 (process),在一个进程内部,可以有一个或多个线程(thread),每个线程都拥有一 ...
