IdentityServer4:IdentityServer4+API+Client实践OAuth2.0客户端模式(1)
一、OAuth2.0
1、OAuth2.0概念
OAuth2.0(Open Authorization)是一个开放授权协议;第三方应用不需要接触到用户的账户信息(如用户名密码),通过用户的授权访问用户资源
OAuth的步骤一般如下:
1、客户端要求用户给予授权
2、用户同意给予授权
3、根据上一步获得的授权,向认证服务器请求令牌(token)
4、认证服务器对授权进行认证,确认无误后发放令牌
5、客户端使用令牌向资源服务器请求资源
6、资源服务器使用令牌向认证服务器确认令牌的正确性,确认无误后提供资源
该协议的参与者至少包含:
RO (resource owner): 资源所有者:用户。
RS (resource server): 资源服务器:数据中心;它存储资源,并处理对资源的访问请求。如:API资源,相册服务器、博客服务器。
AS (authorization server): 授权服务器
Client: 第三方应用
2、授权模式
四种模式:
1、授权码模式(authorization code)
2、简化模式(implicit)
3、密码模式(resource owner password credentials)
4、客户端模式(client credentials)
二、IdentityServer + API+Client演示客户端模式
客户端模式(ClientCredentials):经常运用于服务器对服务器中间通讯使用;步骤如下:
1、客户端直接用自身的信息向授权服务器请求token:
HTTP请求:
granttype:授权类型
scope:授权范围
     POST /token HTTP/1.1

     Host: server.example.com

     Authorization: Basic czZCaGRSa3F0MzpnWDFmQmF0M2JW

     Content-Type: application/x-www-form-urlencoded

     grant_type=client_credentials&scope=api001
2、授权服务器验证信息后返回token
     HTTP/1.1  OK

     Content-Type: application/json;charset=UTF-

     Cache-Control: no-store

     Pragma: no-cache

     {

       "access_token":"2YotnFZFEjr1zCsicMWpAA",

       "token_type":"example",

       "expires_in":,

       "example_parameter":"example_value"

     }

下面通过一个快速示例理解;快速示例将通过服务器与服务器直接通过api访问数据;
1、授权服务端;
这里将通过IdnetityServer4实现一个标准的Oauth2.0协议的服务端;
引用IdentityServer4包
新建ASP.NET Core Web Application ——Empty项目;这里通过程序包控制台添加IdentityServer4引用包
Install-Package IdentityServer4
定义API资源、定义客户端
新建类Config.cs;定义资源Scopes、Client;
using IdentityServer4.Models;

using System;

using System.Collections.Generic;

using System.Linq;

using System.Threading.Tasks;

namespace Practice.IdentityServer

{

    public class Config

    {

        //scopes定义

        public static IEnumerable<ApiResource> GetApiResource()

        {

            return new List<ApiResource>

            {

                //给api资源定义一个scopes

                new ApiResource("api1","my api")

            };

        }

        //客户端注册,客户端能够访问的资源(通过:AllowedScopes)

        public static IEnumerable<Client> GetClient()

        {

            return new List<Client>

            {

                new Client

                {

                    ClientId="client",

                    AllowedGrantTypes=GrantTypes.ClientCredentials,

                    ClientSecrets={new Secret("secrect".Sha256())},

                    AllowedScopes={"api"}

                }

            };

        }

    }

}
把资源和客户端、存储方式、添加到service container(DI system)
using System;

using System.Collections.Generic;

using System.Linq;

using System.Threading.Tasks;

using Microsoft.AspNetCore.Builder;

using Microsoft.AspNetCore.Hosting;

using Microsoft.AspNetCore.Http;

using Microsoft.Extensions.DependencyInjection;

using Microsoft.Extensions.Logging;

namespace Practice.IdentityServer

{

    public class Startup

    {

        // 添加服务到容器(add services to the container)DI系统.

        public void ConfigureServices(IServiceCollection services)

        {

            services.AddIdentityServer()

                .AddTemporarySigningCredential()

                .AddInMemoryApiResources(Config.GetApiResource())

                .AddInMemoryClients(Config.GetClient());

        }

        //配置HTTP request 管道(pipeline).

        public void Configure(IApplicationBuilder app, IHostingEnvironment env, ILoggerFactory loggerFactory)

        {

            loggerFactory.AddConsole(LogLevel.Debug);

            if (env.IsDevelopment())

            {

                app.UseDeveloperExceptionPage();

            }

            app.UseIdentityServer();

            //app.Run(async (context) =>

            //{

            //    await context.Response.WriteAsync("Hello World!");

            //});

        }

    }

}
配置
注意:使用自宿的方式调试;会把日志输出到控制台;自宿的配置方式:
方法1:

方法2:

配置地址:
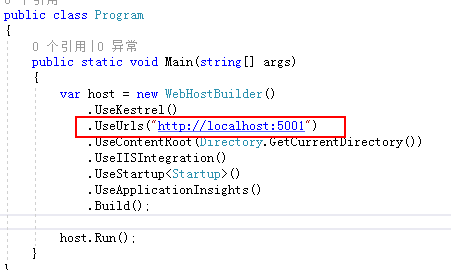
在program.cs添加一句:.UseUrls("http://localhost:5000") 设置调试url;
运行
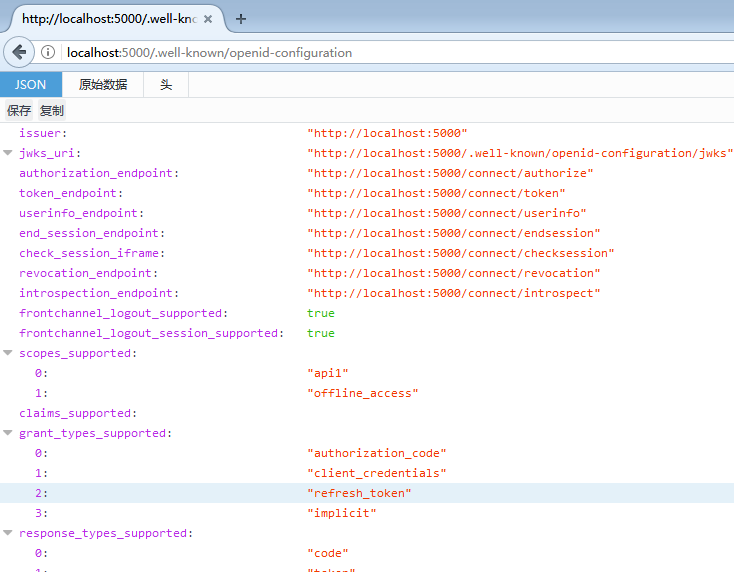
运行、通过http://localhost:5000/.well-known/openid-configuration访问 ;可以看到是一个restful的api;
2、API资源
新建ASP.NET Core Web API 项目;添加中间件IdentityServer4.AccessTokenValidation 包引用

配置api的地址
添加控制器
[Route("identity")]

    [Authorize]

    public class IdentityController : Controller

    {

        [HttpGet]

        public IActionResult Get()

        {

            return new JsonResult(from a in User.Claims select new { a.Type,a.Value});

        }

    }
配置
把授权中间件配置到api host里;IdentityServer4.AccessTokenValidation这里的主要作用
1、验证token令牌,确保token令牌的Issuer发行者是经过注册认证可信任的发行者;
2、验证token令牌,确保这个令牌的授权范围(scope)包括授权使用这个api
    public class Startup

    {

        public Startup(IHostingEnvironment env)

        {

            var builder = new ConfigurationBuilder()

                .SetBasePath(env.ContentRootPath)

                .AddJsonFile("appsettings.json", optional: false, reloadOnChange: true)

                .AddJsonFile($"appsettings.{env.EnvironmentName}.json", optional: true)

                .AddEnvironmentVariables();

            Configuration = builder.Build();

        }

        public IConfigurationRoot Configuration { get; }

        // This method gets called by the runtime. Use this method to add services to the container.

        public void ConfigureServices(IServiceCollection services)

        {

            // Add framework services.

            services.AddMvcCore()

                .AddAuthorization()

                .AddJsonFormatters();

        }

        // This method gets called by the runtime. Use this method to configure the HTTP request pipeline.

        public void Configure(IApplicationBuilder app, IHostingEnvironment env, ILoggerFactory loggerFactory)

        {

            loggerFactory.AddConsole(Configuration.GetSection("Logging"));

            loggerFactory.AddDebug();

            app.UseIdentityServerAuthentication(new IdentityServerAuthenticationOptions {

                Authority = "http://localhost:5000",

                RequireHttpsMetadata=false,

                ApiName="api1"

            });

            app.UseMvc();

        }

    }
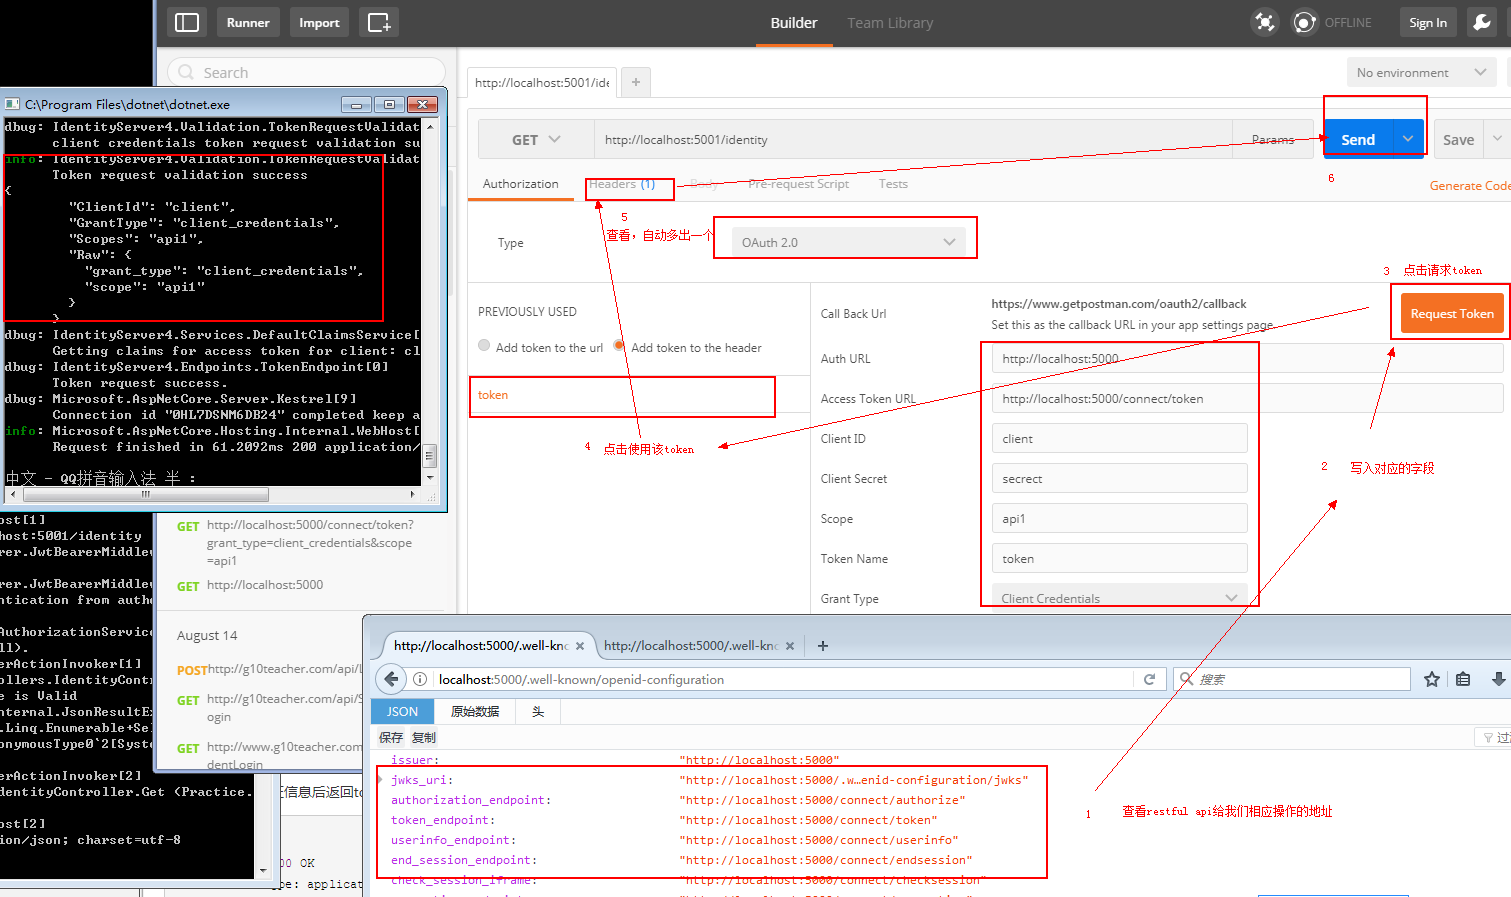
运行后,直接浏览器访问http://localhost:5001/identity会被拒绝说明成功;访问这个api需要在http请求的header加入token才可以访问;
3、Client客户端
新建.Net Core——控制台应用;添加中间件

IdentityModel是官方提供给我们的一个Client类库;当然用户也可以自行构建原始的http协议访问API;
public class Program

    {

        public static void Main(string[] args) => MainAsync().GetAwaiter().GetResult();

        private static async Task MainAsync()

        {

            //

            var dico = await DiscoveryClient.GetAsync("http://localhost:5000");

            //token

            var tokenClient = new TokenClient(dico.TokenEndpoint, "client", "secret");

            var tokenresp = await tokenClient.RequestClientCredentialsAsync("api1");

            if (tokenresp.IsError)

            {

                Console.WriteLine(tokenresp.Error);

                return;

            }

            Console.WriteLine(tokenresp.Json);

            Console.WriteLine("\n\n");

            var client = new HttpClient();

            client.SetBearerToken(tokenresp.AccessToken);

            var resp = await client.GetAsync("http://localhost:5000/identity");

            if (!resp.IsSuccessStatusCode)

            {

                Console.WriteLine(resp.StatusCode);

            }

            else

            {

                var content = await resp.Content.ReadAsStringAsync();

                Console.WriteLine(JArray.Parse(content));

            }

        }

    }
DiscoveryClient类:IdentityModel提供给我们通过基础地址(如:http://localhost:5000)就可以访问令牌服务端;当然可以根据上面的restful api里面的url自行构建;上面就是通过基础地址,获取一个TokenClient;(对应restful的url:token_endpoint "http://localhost:5000/connect/token")
RequestClientCredentialsAsync方法:请求令牌;
获取令牌后,就可以通过构建http请求访问API接口;这里使用HttpClient构建请求,获取内容;
运行效果:

我们换一种原始的方式模拟这个流程
打开Postman:按照restful api页面的说明,依次进行下面的步骤操作,一个很原始的http流程就熟悉了;自行查看原图
资料:
http://wiki.connect.qq.com/%E4%BD%BF%E7%94%A8implicit_grant%E6%96%B9%E5%BC%8F%E8%8E%B7%E5%8F%96access_token
IdentityServer4:IdentityServer4+API+Client实践OAuth2.0客户端模式(1)的更多相关文章
- IdentityServer4:IdentityServer4+API+Client+User实践OAuth2.0密码模式(2)
一.密码模式实操 仍然使用第一节的代码:做如下改动: 1.授权服务端 前面我们使用项目:Practice.IdentityServer作为授权服务器 修改项目的Config.cs类: 添加测试用户,并 ...
- .Net Core身份认证:IdentityServer4实现OAuth 2.0 客户端模式 - 简书
原文:.Net Core身份认证:IdentityServer4实现OAuth 2.0 客户端模式 - 简书 一.客户端模式介绍 客户端模式(Client Credentials Grant)是指客户 ...
- IdentityServer4之SSO(基于OAuth2.0、OIDC)单点登录、登出
IdentityServer4之SSO(基于OAuth2.0.OIDC)单点登录.登出 准备 五个Web站点: 1.localhost:5000 : 认证服务器.2 ...
- Spring Boot Security Oauth2之客户端模式及密码模式实现
Spring Boot Security Oauth2之客户端模式及密码模式实现 示例主要内容 1.多认证模式(密码模式.客户端模式) 2.token存到redis支持 3.资源保护 4.密码模式用户 ...
- Ubuntu宝塔面板设置网站 Apache Server API为Apache 2.0 Handler模式
用过宝塔面板(https://www.bt.cn)的谁用谁知道: 以下来自官网的介绍: “宝塔Linux面板是提升运维效率的服务器管理软件,支持一键LAMP/LNMP/集群/监控/网站/FTP/数据 ...
- oauth2.0密码模式详解
oauth2.0密码模式 欢迎关注博主公众号「Java大师」, 专注于分享Java领域干货文章http://www.javaman.cn/sb2/oauth-password 如果你高度信任某个应用, ...
- .Net Core身份认证:IdentityServer4实现OAuth 2.0 客户端模式
一.客户端模式介绍 客户端模式(Client Credentials Grant)是指客户端直接向认证服务(Authorization Server)发送认证请求,获取token,进行认证,一般适用于 ...
- RESTful API架构和oauth2.0认证机制(概念版)
1. 什么是REST REST全称是Representational State Transfer,中文意思是表述(编者注:通常译为表征)性状态转移. 它首次出现在2000年Roy Fielding的 ...
- [PHP] 调用微博API 发微博OAuth2.0
在实际测试中出现很多问题, 第一就是按照文档调用ACCESS_TOKEN的时候费老劲啦,因为是编辑线上的,有好多中文空格,没有看出来!整了好久! 第二个就是在调用api发微博的时候出现乱码!必须把发送 ...
随机推荐
- C语言迷题:有符号数与无符号数的问题(转)
https://my.oschina.net/kelvinfang/blog/134725
- 启动weblogic报错:string value '2.4' is not a valid enumeration value for web-app-versionType in namespace http://java.sun.com/xml/ns/javaee
启动报错: 原因:有人改动了web.xml的头 解决方法: 在web.xml中修改抬头为: <?xml version="1.0" encoding="UTF-8& ...
- 网易云信&七鱼市场总监姜菡钰:实战解读增长黑客在B端业务的运用
近些年 ,随着互联网的迅速崛起,“增长黑客”一词逐渐映入大众的眼帘,并成为了最热门的话题之一.从2018年开始,线上流量触达天花板,引流之争的激烈程度空前高涨,企业为了获得更多的关注,产品的比拼.流量 ...
- ML.NET教程之客户细分(聚类问题)
理解问题 客户细分需要解决的问题是按照客户之间的相似特征区分不同客户群体.这个问题的先决条件中没有可供使用的客户分类列表,只有客户的人物画像. 数据集 已有的数据是公司的历史商业活动记录以及客户的购买 ...
- [No0000190]vim8安装教程和vim中文帮助文档Vimcdoc安装方法-Vim使用技巧(5)
Vim8.0是近十年来的一次大更新,支持任务.异步I/O.Channels和JSON以及异步计时器.Lambdas 和 Closures等,还包括对GTK + 3的支持.由于ubuntu默认安装的Vi ...
- AngularJS 常用的功能
第一 迭代输出之ng-repeat标签ng-repeat让table ul ol等标签和js里的数组完美结合 例: <ul><li ng-repeat="person in ...
- 机器Coding For WPF
declare @modelcode varchar(90)='AutoProjectType'declare @ns varchar(90)='WpfApplication'declare @dat ...
- 在asp.net中使用瀑布流,无限加载
页面中代码 <%@ Page Language="C#" AutoEventWireup="true" CodeBehind="WebForm1 ...
- Android 出现 activity supporting action_view is not set as browsable报错
<activity android:name=".ThirdActivity"> <intent-filter> <action android:na ...
- 12306微信小程序上线 提供余票查询暂不支持购票
12306微信小程序正式上线,如图所示,目前小程序提供余票查询.时刻表查询和正晚点查询三大功能,用户可在这里随时查看剩余车票以及列车时刻表.而且小程序支持用户添加行程,方便出行. 目前这款小程序还不支 ...