vagrant在windows下的安装和配置
记录一下安装和配置过程中的一些坑
步骤一
分别下载vagrant和VirtualBox,我这里下载的是vagrant_1.9.1.msi 和 VirtualBox-5.1.14-112924-Win.exe
步骤二
这两个东东安装好之后,我在e盘创建了一个myvagrant目录,作为工程目录,进入该目录,进行添加box

其中centos7.0是自定义的box的名字,后面是本地box的路径
添加完后 vagrant init cento7.0然后就会在myvagrant目录下生成一个vagrantfile文件


然后打开这个文件,修改一下这里


=================================================
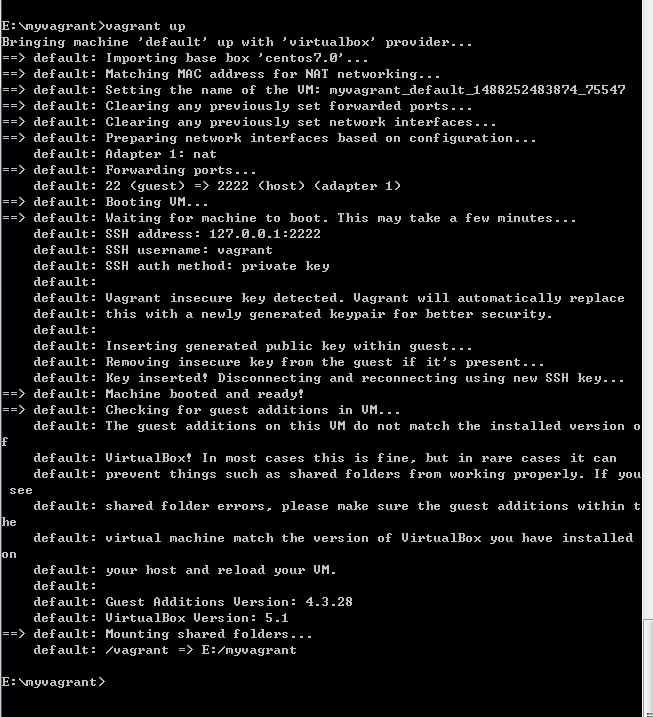
配置好后,输入vagrant up

这样就启动成功了。
坑一:
就是在vagrant up的时候出现如下错误
If the provider you're using has a GUI that comes with it,
it is often helpful to open that and watch the machine, since the
GUI often has more helpful error messages than Vagrant can retrieve.
For example, if you're using VirtualBox, run `vagrant up` while the
VirtualBox GUI is open.
The primary issue for this error is that the provider you're using
is not properly configured. This is very rarely a Vagrant issue.
然后在stackoverflow看了答案,跟着改了还是无果,最后我卸载掉原来安装好的virtualbox,然后去官网下载最新的virtualbox,版本是VirtualBox-5.1.14-112924-Win.exe
然后在vagrant up的时候这个错误就消失了,virtualbox版本的原因
坑二:
If you're using a custom box, make sure that networking is properly

working and you're able to connect to the machine. It is a common

problem that networking isn't setup properly in these boxes.

Verify that authentication configurations are also setup properly,

as well.

If the box appears to be booting properly, you may want to increase

the timeout ("config.vm.boot_timeout") value.

因为配置的时候开启了调用virtualbox可视化界面,所以出现这个提示的时候,virtualbox那也会弹出一个警告
VT-x/AMD-V硬件加速在您的系统中不可用。您的64-位虚拟机将无法检测到 64-位处理器,从而无法启动。

在网上找到解决办法是重启按f2进入bios设置,然后开启虚拟化支持,然后保存,重新启动,这个时候再用vagrant up就成功了。
vagrant在windows下的安装和配置的更多相关文章
- vagrant在windows下的安装和配置(一)
记录一下安装和配置过程中的一些坑步骤一分别下载vagrant和VirtualBox,我这里下载的是vagrant_1.9.1.msi 和 VirtualBox-5.1.14-112924-Win.ex ...
- vagrant在windows下的安装和配置(二)
在(一)中安装和配置好后 框框中的信息是登录vagrant up后的系统用的 我这里登录用的是xshell-----下载一个xshell然后安装 打开xshell 按确定之后生成一个新的会话,然后登录 ...
- Windows下pry安装和配置
Windows下pry安装和配置 pry是一个增强型的交互式命令行工具,比irb强大. 有自动完成功能,自动缩进,有颜色.有更强大的调试功能. pry 安装很简单. 在终端输入: gem instal ...
- windows下redis安装和配置
windows下redis安装和配置 redis介绍 Redis是一个开源,高级的键值存储和一个适用的解决方案,用于构建高性能,可扩展的Web应用程序. Redis有三个主要特点,使它优越于其它键值数 ...
- solr在windows下的安装及配置
solr在windows下的安装及配置 首先,solr是基于Java开发的,所以使用的话需要先进行java环境的配置,在Java环境配置好之后就可以去http://www.apache.org/dyn ...
- Lua在Windows下的安装、配置、运行
Lua在Windows下的安装.配置.运行 本文链接:https://blog.csdn.net/ChinarCSDN/article/details/78667262 展开 # Windows下安装 ...
- windows下手动安装和配置xamarin
安装xamarin xamarin官方给出了两种安装方式,自动安装和手动安装. 自动安装比较简单,到http://xamarin.com/download下载xamarininstaller.exe ...
- QT在windows下的安装与配置
先了解Qt: Qt一直以来,分为商业.开源两个版本,商业版本为用户提供了二级制的动态库,直接安装既可以使用,但是需要花钱购买license,而开源版本则遵守GPL协议,提供了源码,用户需要自行编译,才 ...
- windows下nginx安装、配置与使用(转载)
目前国内各大门户网站已经部署了Nginx,如新浪.网易.腾讯等:国内几个重要的视频分享网站也部署了Nginx,如六房间.酷6等.新近发现Nginx 技术在国内日趋火热,越来越多的网站开始部署Nginx ...
随机推荐
- Linux 修改最大连接数脚本
#!/bin/bashfileMax=$(grep "fs.file-max" /etc/sysctl.conf | wc -l)if [ $fileMax -eq 1 ];the ...
- 20155219 《Java程序设计》实验一(Java开发环境的熟悉)实验报告
一.实验内容及步骤 1.使用JDK编译.运行简单的java程序 先在命令行中按老师要求输入,之后编译运行,如下图. 具体代码如下: package src.shiyan1; import java.u ...
- C4-ResNet-TF-小象cv-code
https://blog.csdn.net/chaipp0607/article/details/75577305 https://blog.csdn.net/leastsq/article/deta ...
- ACM-ICPC 2018 焦作赛区网络预赛- G:Give Candies(费马小定理,快速幂)
There are N children in kindergarten. Miss Li bought them NNN candies. To make the process more inte ...
- 基于PaaS和SaaS研发平台体系
基于PaaS和SaaS研发的商业云平台实战 背景介绍 SaaS.PaaS.IaaS等云服务模式已经被大家普遍认可,在研发过程中借力一些PaaS和SaaS平台,能够提升产品的研发速度和功能稳定程度.本文 ...
- 2017.7.12 Python的6种内建序列及操作
数据结构是通过某种方式(例如对元素进行编号)组织在一起的数据元素的集合,这些数据元素可以是数字或者字符,甚至可以是其他数据结构. 在Python中,最基本的数据结构是序列(sequence).序列中的 ...
- java 彻底理解 byte char short int float long double
遇到过很多关于 数值类型范围的问题了,在这做一个总结,我们可以从多方面理解不同数值类型的所能表示的数值范围 在这里我们只谈论 java中的数值类型 首先说byte: 这段是摘自jdk中 Byte.ja ...
- LeetCode - Trim a Binary Search Tree
Given a binary search tree and the lowest and highest boundaries as L and R, trim the tree so that a ...
- Cassandra基础2
========================================================= gossip协议1.点对点(peer to perr)的网络通信协议,节点间地位相同 ...
- zeebe docker-compose 运行(包含monitor)
环境准备 docker-compose 文件 version: "3" services: db: image: oscarfonts/h2 container_name: zee ...
