centos 安装oracle 11g r2(一)-----软件安装
centos 安装oracle 11g r2(一)-----软件安装
1、进入管理员权限
[anzerong@localhost ~]# su - root

password

[root@localhost ~]#
2、创建用户组oinstall
[root@localhost ~]# groupadd oinstall
3、创建用户组dba
[root@localhost ~]# groupadd dba
4、创建oracle用户,并加入到oinstall和dba用户组
[root@localhost ~]# useradd -g oinstall -g dba -m oracle
5、设置用户oracle的登陆密码,不设置密码,在CentOS的图形登陆界面没法登陆
[root@localhost ~]# passwd oracle

Changing password for user oracle.

New password: # 密码

BAD PASSWORD: The password is shorter than 8 characters

Retype new password: # 再次输入密码

passwd: all authentication tokens updated successfully.
6、查看新建的oracle用户
[root@localhost ~]# id oracle

uid=1001(oracle) gid=1002(dba) groups=1002(dba)
7、进入根目录
[root@localhost ~]# cd /.
8、创建oracle数据库安装目录
[root@localhost /]# mkdir -p /data/oracle
9、创建oracle数据库配置文件目录
[root@localhost /]# mkdir -p /data/oraInventory
10、创建oracle数据库软件包解压目录
[root@localhost /]# mkdir -p /data/database
11、创建完后检查一下
[root@localhost /]# cd /data

[root@localhost data]# ls

database  oracle  oraInventory
12、设置目录所有者为oinstall用户组的oracle用户
[root@localhost data]# chown -R oracle:oinstall /data/oracle

[root@localhost data]# chown -R oracle:oinstall /data/oraInventory

[root@localhost data]# chown -R oracle:oinstall /data/database
13、修改OS系统标识(oracle默认不支持CentOS系统安装,但是centos与redhat的关系自行百度)
[root@localhost data]# cat /proc/version

Linux version 3.10.0-514.26.2.el7.x86_64 (builder@kbuilder.dev.centos.org) (gcc version 4.8.5 20150623 (Red Hat 4.8.5-11) (GCC) ) #1 SMP Tue Jul 4 15:04:05 UTC 2017

[root@localhost data]# cat /etc/redhat-release

CentOS Linux release 7.3.1611 (Core)

[root@localhost data]# vi /etc/redhat-release

[root@localhost data]# cat /etc/redhat-release

redhat-7
14、安装oracle数据库所需要的软件包
[root@localhost data]# yum install binutils compat-libcap1 gcc gcc-c++ glibc glibc-devel ksh libaio libaio-devel libgcc libstdc++ libstdc++-devel libXi libXtst make sysstat unixODBC unixODBC-devel glibc elfutils-libelf-devel compat*
15、查看防火墙状态(运行中)
[root@localhost data]# systemctl status firewalld.service

● firewalld.service - firewalld - dynamic firewall daemon

   Loaded: loaded (/usr/lib/systemd/system/firewalld.service; enabled; vendor preset: enabled)

   Active: active (running) since Wed 2017-09-13 09:23:08 CST; 25min ago

     Docs: man:firewalld(1)

 Main PID: 641 (firewalld)

   CGroup: /system.slice/firewalld.service

           └─641 /usr/bin/python -Es /usr/sbin/firewalld --nofork --nopid

Sep 13 09:22:58 localhost.localdomain systemd[1]: Starting firewalld - dynami...

Sep 13 09:23:08 localhost.localdomain systemd[1]: Started firewalld - dynamic...

Hint: Some lines were ellipsized, use -l to show in full.
16、关闭防火墙
[root@localhost data]# systemctl stop firewalld.service
17、查看防火墙状态(已关闭)
[root@localhost data]# systemctl status firewalld.service

● firewalld.service - firewalld - dynamic firewall daemon

   Loaded: loaded (/usr/lib/systemd/system/firewalld.service; enabled; vendor preset: enabled)

   Active: inactive (dead) since Wed 2017-09-13 09:48:55 CST; 10s ago

     Docs: man:firewalld(1)

  Process: 641 ExecStart=/usr/sbin/firewalld --nofork --nopid $FIREWALLD_ARGS (code=exited, status=0/SUCCESS)

 Main PID: 641 (code=exited, status=0/SUCCESS)

Sep 13 09:22:58 localhost.localdomain systemd[1]: Starting firewalld - dynami...

Sep 13 09:23:08 localhost.localdomain systemd[1]: Started firewalld - dynamic...

Sep 13 09:48:54 localhost.localdomain systemd[1]: Stopping firewalld - dynami...

Sep 13 09:48:55 localhost.localdomain systemd[1]: Stopped firewalld - dynamic...

Hint: Some lines were ellipsized, use -l to show in full.
18、禁止使用防火墙(重启也是禁止的)
[root@localhost data]# systemctl disable firewalld.service

Removed symlink /etc/systemd/system/dbus-org.fedoraproject.FirewallD1.service.

Removed symlink /etc/systemd/system/basic.target.wants/firewalld.service.
19、关闭selinux(需重启生效)
[root@localhost data]# vi /etc/selinux/config

[root@localhost data]# cat /etc/selinux/config
/etc/selinux/config 最终文档为:
# This file controls the state of SELinux on the system.
# SELINUX= can take one of these three values:
# enforcing - SELinux security policy is enforced.
# permissive - SELinux prints warnings instead of enforcing.
# disabled - No SELinux policy is loaded.
SELINUX=disabled #此处修改为disabled
# SELINUXTYPE= can take one of three two values:
# targeted - Targeted processes are protected,
# minimum - Modification of targeted policy. Only selected processes are protected.
# mls - Multi Level Security protection.
SELINUXTYPE=targeted
20、修改内核参数(加入斜体部分)
[root@local++host data]# vi /etc/sysctl.conf

[root@localhost data]# cat /etc/sysctl.conf
# sysctl settings are defined through files in
# /usr/lib/sysctl.d/, /run/sysctl.d/, and /etc/sysctl.d/.
#
# Vendors settings live in /usr/lib/sysctl.d/.
# To override a whole file, create a new file with the same in
# /etc/sysctl.d/ and put new settings there. To override
# only specific settings, add a file with a lexically later
# name in /etc/sysctl.d/ and put new settings there.
#
# For more information, see sysctl.conf(5) and sysctl.d(5).
net.ipv4.icmp_echo_ignore_broadcasts = 1
net.ipv4.conf.all.rp_filter = 1
fs.file-max = 6815744 #设置最大打开文件数
fs.aio-max-nr = 1048576
kernel.shmall = 2097152 #共享内存的总量,8G内存设置:2097152*4k/1024/1024
kernel.shmmax = 2147483648 #最大共享内存的段大小
kernel.shmmni = 4096 #整个系统共享内存端的最大数
kernel.sem = 250 32000 100 128
net.ipv4.ip_local_port_range = 9000 65500 #可使用的IPv4端口范围
net.core.rmem_default = 262144
net.core.rmem_max= 4194304
net.core.wmem_default= 262144
net.core.wmem_max= 1048576
21、使配置修改内核的参数生效
[root@localhost data]# sysctl -p
net.ipv4.icmp_echo_ignore_broadcasts = 1
net.ipv4.conf.all.rp_filter = 1
sysctl: setting key "fs.file-max": Invalid argument
fs.file-max = 6815744 #设置最大打开文件数
fs.aio-max-nr = 1048576
sysctl: setting key "kernel.shmall": Invalid argument
kernel.shmall = 2097152 #共享内存的总量,8G内存设置:2097152*4k/1024/1024
sysctl: setting key "kernel.shmmax": Invalid argument
kernel.shmmax = 2147483648 #最大共享内存的段大小
sysctl: setting key "kernel.shmmni": Invalid argument
kernel.shmmni = 4096 #整个系统共享内存端的最大数
kernel.sem = 250 32000 100 128
sysctl: setting key "net.ipv4.ip_local_port_range": Invalid argument
net.ipv4.ip_local_port_range = 9000 65500 #可使用的IPv4端口范围
net.core.rmem_default = 262144
net.core.rmem_max = 4194304
net.core.wmem_default = 262144
net.core.wmem_max = 1048576
22、对oracle用户设置限制,提高软件运行性能(斜体为添加部分)
[root@localhost data]# vi /etc/security/limits.conf

[root@localhost data]# cat /etc/security/limits.conf
# /etc/security/limits.conf
#
#This file sets the resource limits for the users logged in via PAM.
#It does not affect resource limits of the system services.
#
#Also note that configuration files in /etc/security/limits.d directory,
#which are read in alphabetical order, override the settings in this
#file in case the domain is the same or more specific.
#That means for example that setting a limit for wildcard domain here
#can be overriden with a wildcard setting in a config file in the
#subdirectory, but a user specific setting here can be overriden only
#with a user specific setting in the subdirectory.
#
#Each line describes a limit for a user in the form:
#
#
#
#Where:
# can be:
# - a user name
# - a group name, with @group syntax
# - the wildcard *, for default entry
# - the wildcard %, can be also used with %group syntax,
# for maxlogin limit
#
# can have the two values:
# - "soft" for enforcing the soft limits
# - "hard" for enforcing hard limits
#
# can be one of the following:
# - core - limits the core file size (KB)
# - data - max data size (KB)
# - fsize - maximum filesize (KB)
# - memlock - max locked-in-memory address space (KB)
# - nofile - max number of open file descriptors
# - rss - max resident set size (KB)
# - stack - max stack size (KB)
# - cpu - max CPU time (MIN)
# - nproc - max number of processes
# - as - address space limit (KB)
# - maxlogins - max number of logins for this user
# - maxsyslogins - max number of logins on the system
# - priority - the priority to run user process with
# - locks - max number of file locks the user can hold
# - sigpending - max number of pending signals
# - msgqueue - max memory used by POSIX message queues (bytes)
# - nice - max nice priority allowed to raise to values: [-20, 19]
# - rtprio - max realtime priority
#
#
##* soft core 0
#* hard rss 10000
#@student hard nproc 20
#@faculty soft nproc 20
#@faculty hard nproc 50
#ftp hard nproc 0
#@student - maxlogins 4oracle soft nproc 2047
oracle hard nproc 16384
oracle soft nofile 1024
oracle hard nofile 65536# End of file
23、配置用户的环境变量(斜体部分为添加代码)
[root@localhost data]# vi /home/oracle/.bash_profile

[root@localhost data]# cat /home/oracle/.bash_profile
# .bash_profile
# Get the aliases and functions
if [ -f ~/.bashrc ]; then
. ~/.bashrc
fi# User specific environment and startup programs
PATH=$PATH:$HOME/.local/bin:$HOME/bin
export PATH
export ORACLE_BASE=/data/oracle #oracle数据库安装目录
export ORACLE_HOME=$ORACLE_BASE/product/11.2.0/db_1 #oracle数据库路径
export ORACLE_SID=orcl #oracle启动数据库实例名
export ORACLE_TERM=xterm #xterm窗口模式安装
export PATH=$ORACLE_HOME/bin:/usr/sbin:$PATH #添加系统环境变量
export LD_LIBRARY_PATH=$ORACLE_HOME/lib:/lib:/usr/lib #添加系统环境变量
export LANG=C #防止安装过程出现乱码
export NLS_LANG=AMERICAN_AMERICA.ZHS16GBK #设置Oracle客户端字符集,必须与Oracle安装时设置的字符集保持一致
24、使用户的环境变量配置立即生效
[root@localhost data]# source /home/oracle/.bash_profile
25、将安装包移动到/usr/local/src路径下
[root@localhost ~]# cd /.

[root@localhost /]# cd /home/anzerong/Desktop/

[root@localhost Desktop]# ls

linux.x64_11gR2_database_1of2.zip  linux.x64_11gR2_database_2of2.zip

[root@localhost Desktop]# mv linux.x64_11gR2_database_1of2.zip /usr/local/src

[root@localhost Desktop]# ls

linux.x64_11gR2_database_2of2.zip

[root@localhost Desktop]# mv linux.x64_11gR2_database_2of2.zip /usr/local/src
26、重启系统,确保所有设置生效
[root@localhost Desktop]# reboot
27、从oracle用户进入/usr/local/src目录
[oracle@localhost /]$ cd /usr/local/src

[oracle@localhost src]$ ls

linux.x64_11gR2_database_1of2.zip  linux.x64_11gR2_database_2of2.zip
28、解压两个软件包至/data/database/目录下
[oracle@localhost src]$ unzip linux.x64_11gR2_database_1of2.zip -d /data/database/  #解压

(省略...)

[oracle@localhost src]$ unzip linux.x64_11gR2_database_2of2.zip -d /data/database/  #解压

(省略...)
29、进入管理员权限
[oracle@localhost src]$ su root

Password:
30、设置目录所有者为oinstall用户组的oracle用户
[root@localhost src]# chown -R oracle:oinstall /data/database/database/
31、执行安装脚本
[oracle@localhost /]$ cd /data/database/database/

[oracle@localhost database]$ ls

doc  install  response  rpm  runInstaller  sshsetup  stage  welcome.html

[oracle@localhost database]$ ./runInstaller

Starting Oracle Universal Installer...

(省略...)
oracle图形化安装界面打开
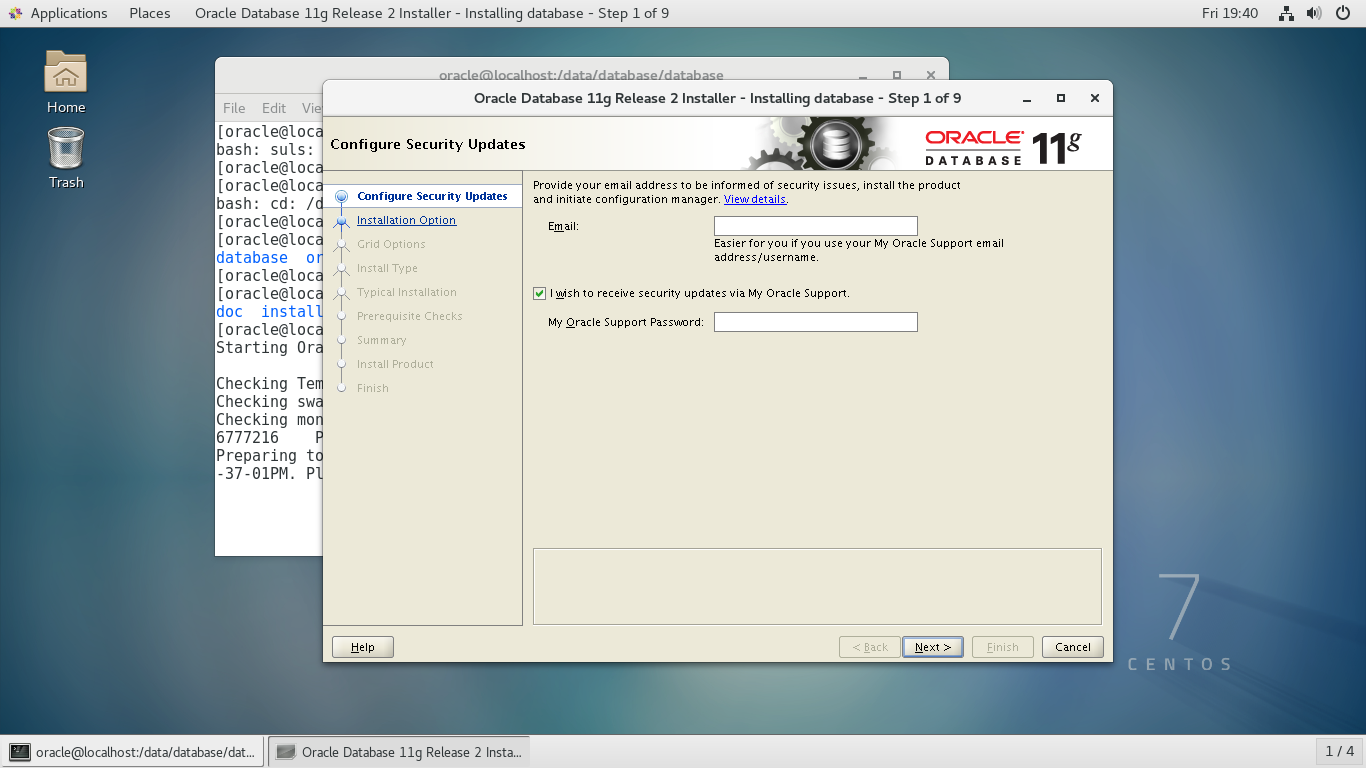
32、++Configure Security Updates++
去掉 I wish to receive security updates via My Oracle Support.
点击 “Nest >”

33、++Installation Option++
选择第二项 Install database software only
点击 “Nest >”

34、++Grid Options++
选择单例模式 Single instance database installation
点击 “Nest >”

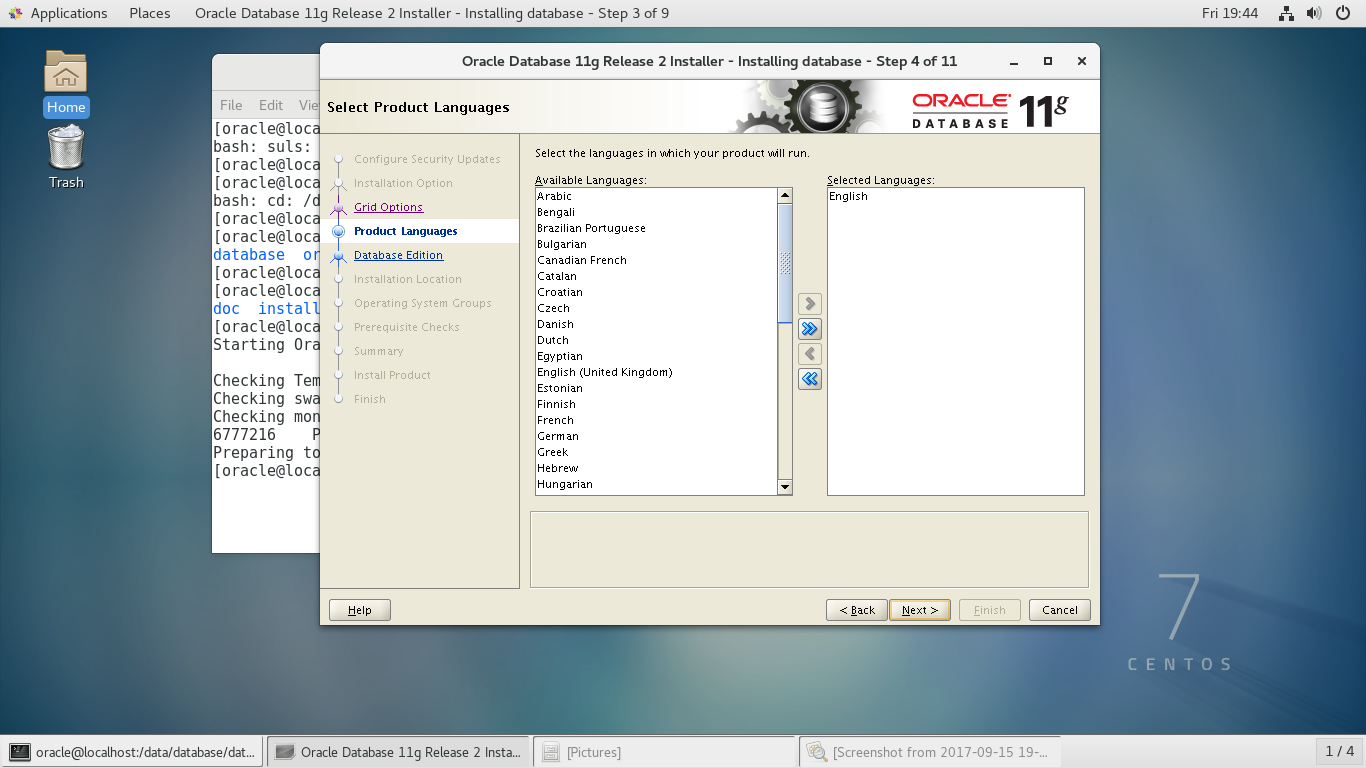
35、++Product Languages++
选择英语 English(根据系统默认选择好了)
点击 “Nest >”
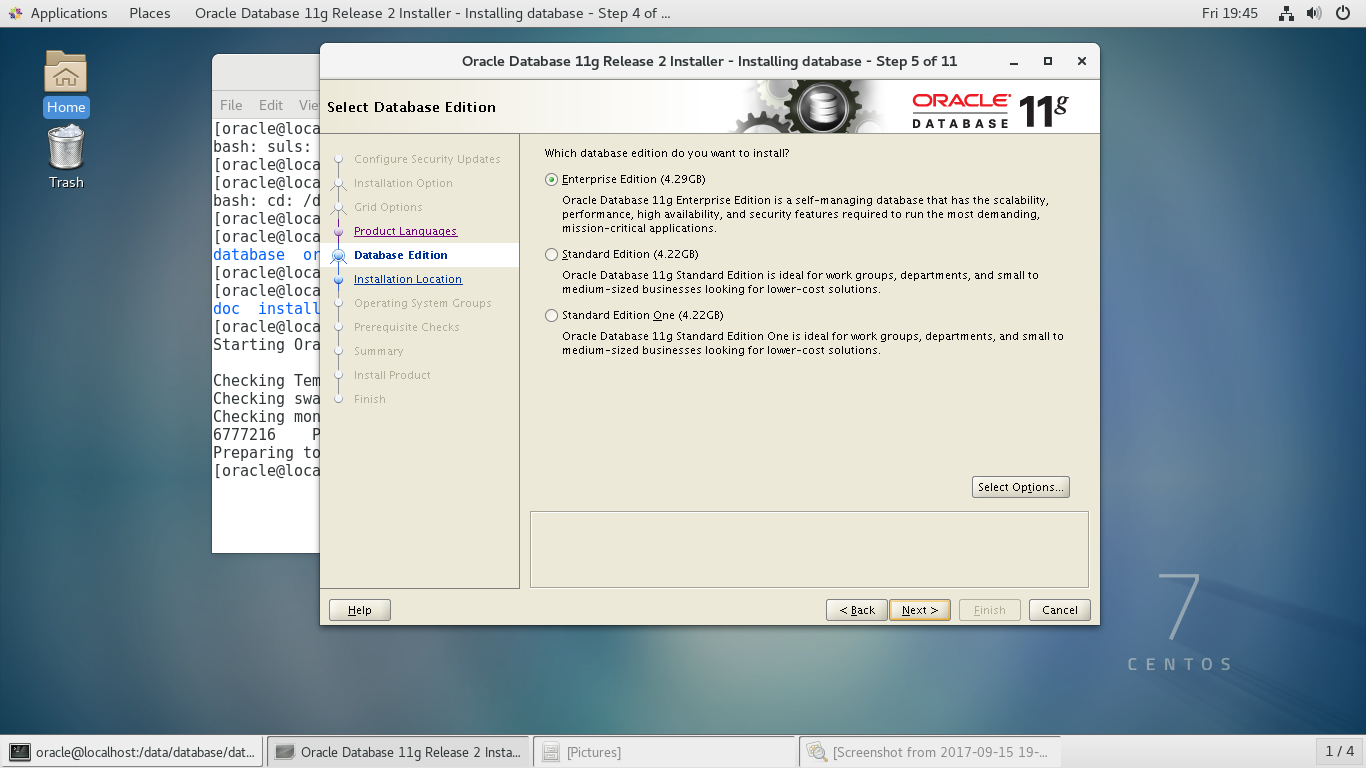
36、++Database Edition++
选择第一个企业版
37、++Installation Location++
确定数据软件的安装路径,自动读取前面Oracle环境变量中配置的值
点击 “Nest >”

38、++Create Inventory++
选择默认,不做修改
点击 “Nest >”

39、++Operation System Groups++
全部使用dba用户组
点击 “Nest >”

40、++Prepequisite Checks++
按照提示信息一个一个解决
点击 “Nest >”


PS:pdksh安装
1、卸载已安装的ksh
[root@localhost Desktop]# rpm -e pdksh*

[root@localhost Desktop]# rpm -e ksh*
2、下载pdksh-5.2.14-21.x86_64.rpm
3、安装
[root@localhost Desktop]# rpm -ivh pdksh-5.2.14-21.x86_64.rpm --force --nodeps
按提示解决缺少的依赖包,之后点击 “Check Again”
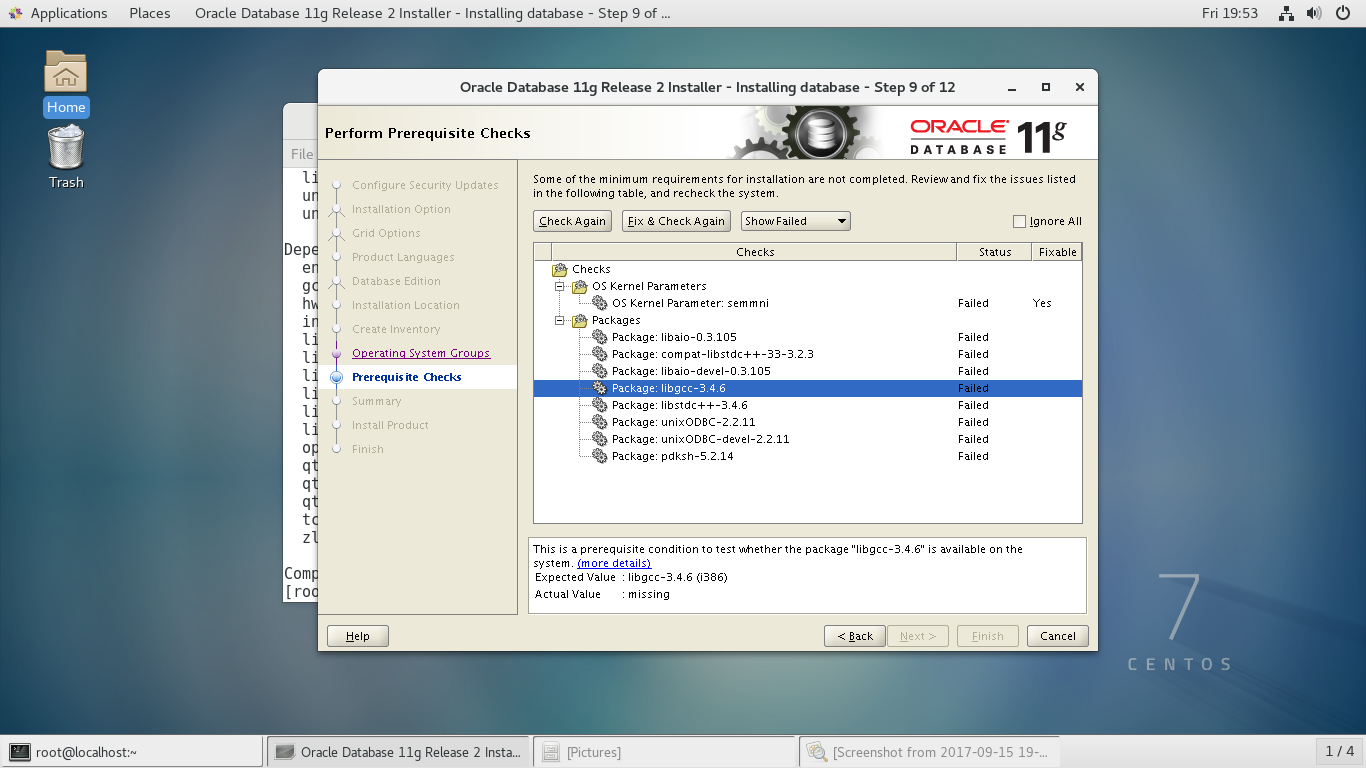
可以忽略缺少的32bit依赖包

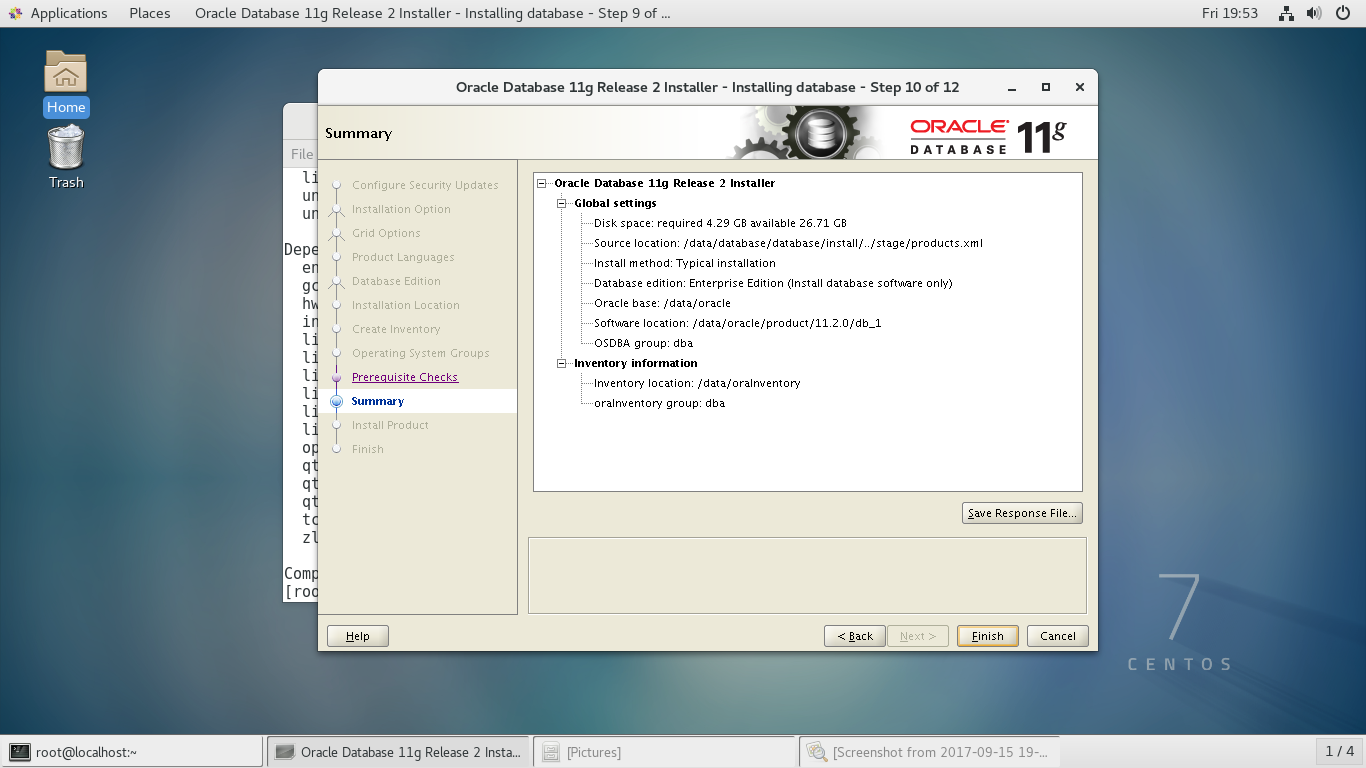
41、++Summary++
点击 “Finsh”
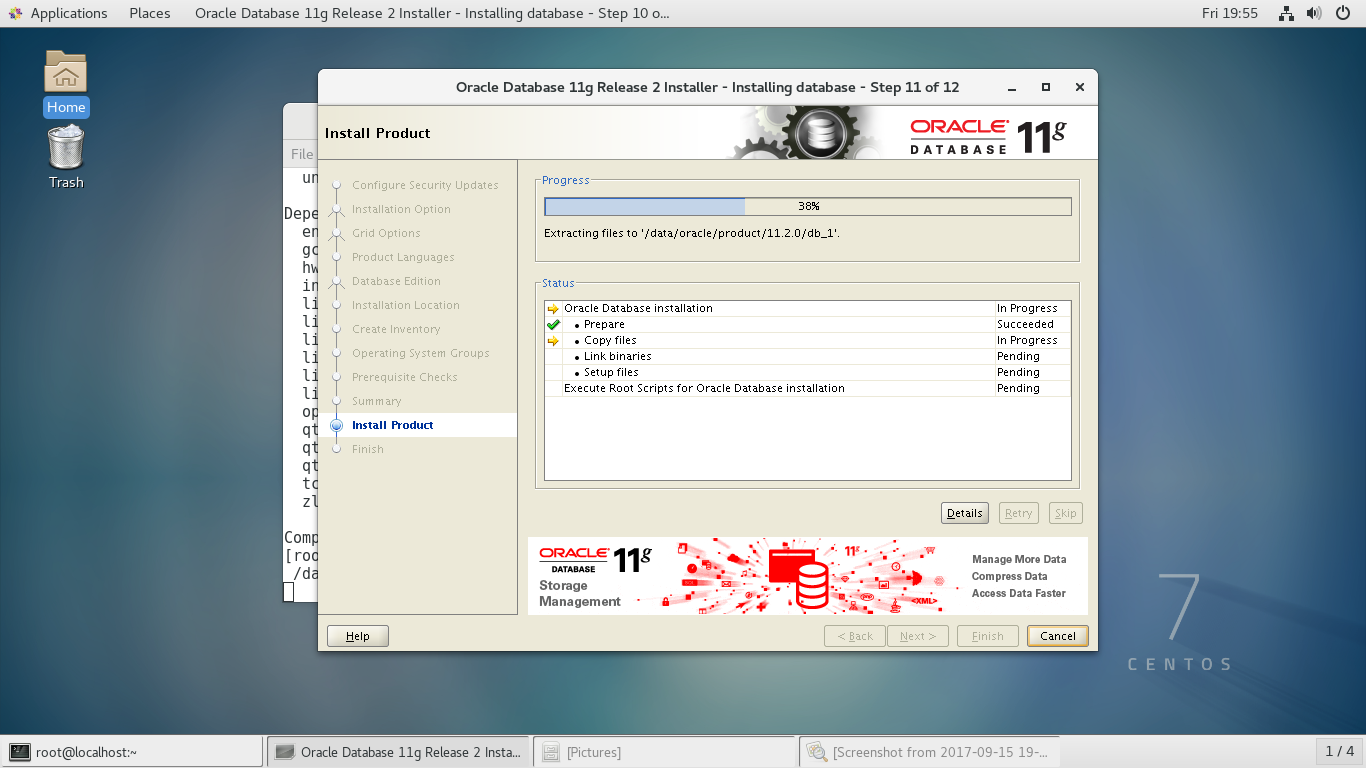
42、++Install Product++
在此过程中,安装界面会变成黑色,有一长条出现(其实是一个提示框),调整高度与宽度查看,
或者可以直接右键选择close

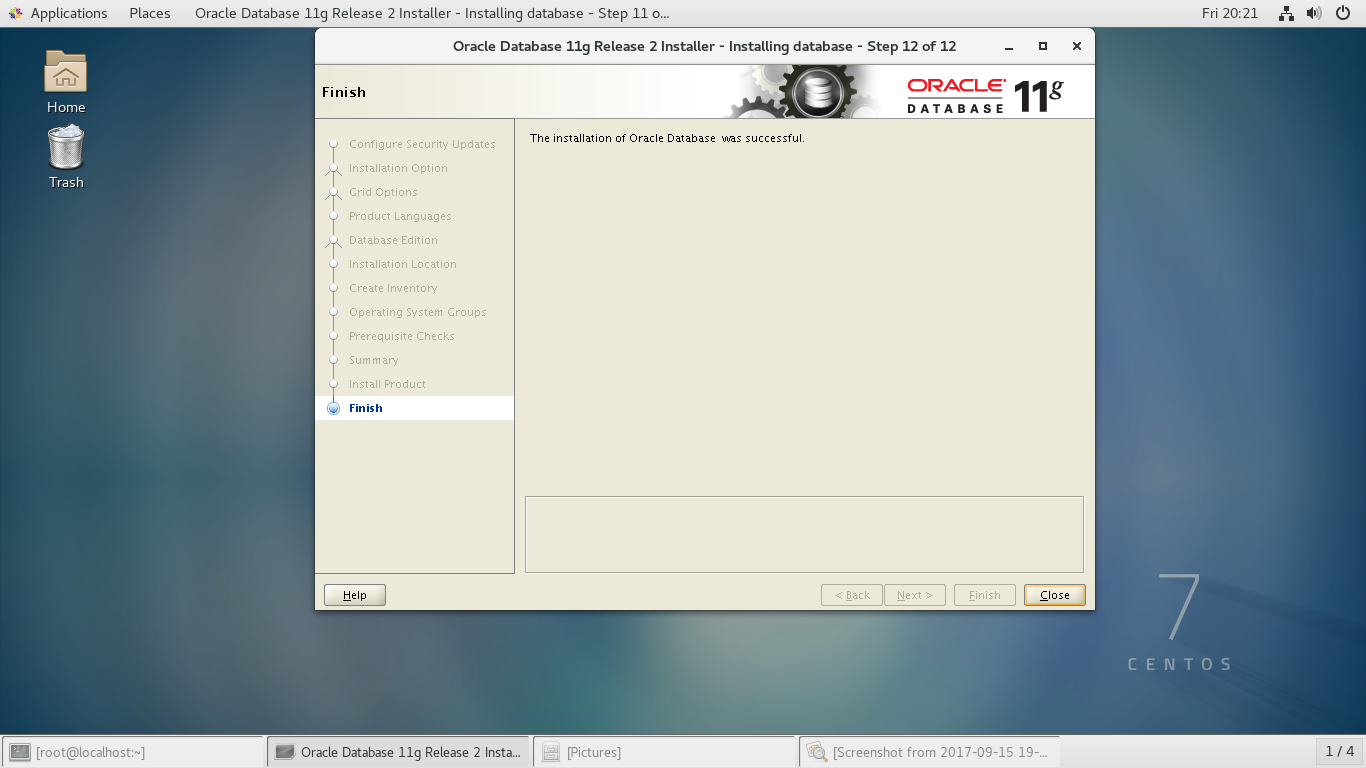
43、++Finish++
参考:http://www.linuxidc.com/Linux/2016-04/130559.htm
centos 安装oracle 11g r2(二)-----监听配置与创建数据库实例
http://www.cnblogs.com/anzerong2012/p/7940850.html
centos 安装oracle 11g r2(三)-----表空间创建
http://www.cnblogs.com/anzerong2012/p/7941179.html
centos 安装oracle 11g r2(一)-----软件安装的更多相关文章
- CentOS 7静默安装Oracle 11g R2数据库软件
之前安装Oracle 11g R2数据库软件都是建立在图形界面上的,不过现在大部分服务器上都没有安装图形界面.图形界面安装较为方便,安装选项清晰,步骤明确,但Oracle还支持另一种安装方式,就是通过 ...
- CentOS5.5 正式开始安装 Oracle 11g r2(图形界面安装)
一.下载oracle 官方网站, 可以下载最新版本 Oracle Database 11g Release http://www.oracle.com/index.html CentOS5. i386 ...
- Oracle 11g R2 Sample Schemas 安装
最近准备对之前学习SQL*Loader的笔记进行整理,希望通过官方文档中的示例学习(Case Studies)来进行,但是官方文档中示例学习相关的脚本文件在数据库软件安装完成之后默认并没有提供,而是整 ...
- centos 安装oracle 11g r2(三)-----表空间创建
centos 安装oracle 11g r2(三)-----表空间创建 创建表空间前要保证监听与数据库实例已经启动 1.启动监听 [oracle@localhost ~]$ lsnrctl start ...
- centos 安装oracle 11g r2(二)-----监听配置与创建数据库实例
centos 安装oracle 11g r2(二)-----监听配置与创建数据库实例 一.监听配置(命令:netca) 1.以 oracle 用户输入命令,启动图形化工具配置监听 [oracle@lo ...
- CentOS 安装Oracle 11g R2
CentOS 安装Oracle 11g R2 学习了-/ https://www.osyunwei.com/archives/5445.html
- Redhat Linux 下安装Oracle 11g R2
能够下载:http://download.csdn.net/detail/ykh554541184/8086647文档方便查阅 官方文档:http://docs.oracle.com/cd/E1188 ...
- Oracle Linux 6.3下安装Oracle 11g R2(11.2.0.3)
本文主要描写叙述了在Oracle Linux 6.3下安装Oracle 11gR2(11.2.0.3).从Oracle 11g開始,Oracle官方站点不再提供其Patch的下载链接,须要使用Meat ...
- Linux x64系统上安装 oracle 11g R2 x64
1.首先到官网上下载oracle 11g x64位软件包 下载地址: http://download.oracle.com/otn/linux/oracle11g/R2/linux.x64_11gR2 ...
随机推荐
- jackson实现java对象转支付宝/微信模板消息
一.支付宝消息模板大致长这样 { "to_user_id": "", "telephone": "xxxxx", &qu ...
- 【原创】ABP之IConventionalDependencyRegistra接口分析
类图: 作用: abp中默认把对象的注册分为5中约定注册方式: 1.AbpAspNetCoreConventionalRegistrar public class AbpAspNetCoreConve ...
- C++ 指针悬挂和赋值操作符的重载,拷贝构造函数实现
指针悬挂: 问题:使用new申请的内存内存空间无法访问,也无法释放. 原因:直接对指向new申请的存储空间的指针变量进行赋值修改 后果:失去了原来的地址,原来的空间无法访问也无法释放,造成内存泄漏 还 ...
- db2 OLAP函数使用
说起 DB2 在线分析处理,可以用很好很强大来形容.这项功能特别适用于各种统计查询,这些查询用通常的SQL很难实现,或者根本就无发实现.首先,我们从一个简单的例子开始,来一步一步揭开它神秘的面纱,请看 ...
- python:爬虫入门
直接上代码吧: 一.爬取某外卖平台的指定商家菜品信息 from urllib import request import json import random url = "https:// ...
- Java 注释类之常用元注解
Java 注释类之常用元注解 自定义Java注释类时,我们使用方式如下: @Retention(RetentionPolicy.RUNTIME)@Target(ElementType.METHOD ...
- .Net性能的方方面面(必看官方经典)
更多性能提高相关文章,必看 https://msdn.microsoft.com/en-us/library/hh917314.aspx Chapter 1 - Fundamentals of Eng ...
- Hessian学习总结(一)——Hessian入门
一.远程通讯协议的基本原理 网络通信需要做的就是将流从一台计算机传输到另外一台计算机,基于传输协议和网络 IO 来实现,其中传输协议比较出名的有 http . tcp . udp 等等, http . ...
- mysql 5.7 离线安装
删除原有的mariadbrpm -qa|grep mariadbrpm -e --nodeps mariadb-libs 安装rpm -ivh mysql-community-common-5.7.2 ...
- 4种事务的隔离级别,InnoDB怎样巧妙实现?
版权声明:本文为博主原创文章,未经博主同意不得转载. https://blog.csdn.net/z50L2O08e2u4afToR9A/article/details/82186189 事务ACID ...