SpringBoot30 整合Mybatis-Plus、整合Redis、利用Ehcache实现二级缓存、利用SpringCache和Redis作为缓存
1 环境说明
JDK: 1.8
MAVEN: 3.
SpringBoot: 2.0.4

2 SpringBoot集成Mybatis-Plus
2.1 创建SpringBoot
利用IDEA创建SpringBoot项目,引入web mysql mybatis-plus lombok devtools依赖
技巧01:SpringBoot没有mybatis的启动依赖,需要到maven仓库查询
        <dependency>

            <groupId>com.baomidou</groupId>

            <artifactId>mybatis-plus-boot-starter</artifactId>

            <version>3.0.</version>

        </dependency>
<?xml version="1.0" encoding="UTF-8"?>

<project xmlns="http://maven.apache.org/POM/4.0.0" xmlns:xsi="http://www.w3.org/2001/XMLSchema-instance"

    xsi:schemaLocation="http://maven.apache.org/POM/4.0.0 http://maven.apache.org/xsd/maven-4.0.0.xsd">

    <modelVersion>4.0.</modelVersion>

    <groupId>com.example</groupId>

    <artifactId>spring_mybatisplus_redis</artifactId>

    <version>0.0.-SNAPSHOT</version>

    <packaging>jar</packaging>

    <name>spring_mybatisplus_redis</name>

    <description>Demo project for Spring Boot</description>

    <parent>

        <groupId>org.springframework.boot</groupId>

        <artifactId>spring-boot-starter-parent</artifactId>

        <version>2.0..RELEASE</version>

        <relativePath/> <!-- lookup parent from repository -->

    </parent>

    <properties>

        <project.build.sourceEncoding>UTF-</project.build.sourceEncoding>

        <project.reporting.outputEncoding>UTF-</project.reporting.outputEncoding>

        <java.version>1.8</java.version>

    </properties>

    <dependencies>

        <!--<dependency>-->

            <!--<groupId>org.springframework.boot</groupId>-->

            <!--<artifactId>spring-boot-starter-data-redis</artifactId>-->

        <!--</dependency>-->

        <dependency>

            <groupId>com.baomidou</groupId>

            <artifactId>mybatis-plus-boot-starter</artifactId>

            <version>3.0.</version>

        </dependency>

        <dependency>

            <groupId>org.springframework.boot</groupId>

            <artifactId>spring-boot-devtools</artifactId>

            <scope>runtime</scope>

        </dependency>

        <dependency>

            <groupId>mysql</groupId>

            <artifactId>mysql-connector-java</artifactId>

            <scope>runtime</scope>

        </dependency>

        <dependency>

            <groupId>org.projectlombok</groupId>

            <artifactId>lombok</artifactId>

            <optional>true</optional>

        </dependency>

        <dependency>

            <groupId>org.springframework.boot</groupId>

            <artifactId>spring-boot-starter-test</artifactId>

            <scope>test</scope>

        </dependency>

    </dependencies>

    <build>

        <plugins>

            <plugin>

                <groupId>org.springframework.boot</groupId>

                <artifactId>spring-boot-maven-plugin</artifactId>

            </plugin>

        </plugins>

    </build>

</project>
pom.xml
2.2 配置数据库连接
在 application.yml中配置数据库的连接信息

2.3 创建实体类
根据数据表创建对应的实体类
/*

Navicat MySQL Data Transfer

Source Server         : mysql5.4

Source Server Version : 50540

Source Host           : localhost:3306

Source Database       : testdemo

Target Server Type    : MYSQL

Target Server Version : 50540

File Encoding         : 65001

Date: 2018-09-16 22:55:16

*/

SET FOREIGN_KEY_CHECKS=;

-- ----------------------------

-- Table structure for `student`

-- ----------------------------

DROP TABLE IF EXISTS `student`;

CREATE TABLE `student` (

  `id` int() NOT NULL AUTO_INCREMENT,

  `name` varchar() NOT NULL,

  `age` int() NOT NULL,

  `address` varchar() DEFAULT NULL,

  PRIMARY KEY (`id`)

) ENGINE=InnoDB AUTO_INCREMENT= DEFAULT CHARSET=utf8mb4;

-- ----------------------------

-- Records of student

-- ----------------------------

INSERT INTO `student` VALUES ('', 'wys', '', '重庆');

INSERT INTO `student` VALUES ('', '王杨帅', '', '重庆');

INSERT INTO `student` VALUES ('', '王杨帅', '', '渝足');

INSERT INTO `student` VALUES ('', '王杨帅', '', '重庆');

INSERT INTO `student` VALUES ('', '杨玉林', '', '大足');

INSERT INTO `student` VALUES ('', '杨玉林', '', '渝足');

INSERT INTO `student` VALUES ('', '杨玉林', '', '重庆');

INSERT INTO `student` VALUES ('', '杨玉林', '', '大足');

INSERT INTO `student` VALUES ('', 'wys', '', '渝足');

INSERT INTO `student` VALUES ('', '杨玉林', '', '重庆');

INSERT INTO `student` VALUES ('', '杨玉林', '', '渝足');

INSERT INTO `student` VALUES ('', '杨玉林', '', '大足');

INSERT INTO `student` VALUES ('', '杨玉林', '', '重庆');

INSERT INTO `student` VALUES ('', '三少', '', '渝足');

INSERT INTO `student` VALUES ('', '杨玉林', '', '大足');

INSERT INTO `student` VALUES ('', '杨玉林', '', '渝足');

INSERT INTO `student` VALUES ('', 'wys', '', '重庆');

INSERT INTO `student` VALUES ('', '杨玉林', '', '渝足');

INSERT INTO `student` VALUES ('', '杨玉林', '', null);
student.sql
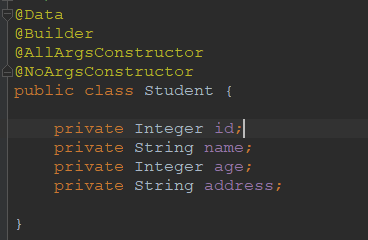
2.4 创建持久层接口
技巧01:由于使用的是mybatis-plus,所以持久层接口只要继承了BaseMapper就可以拥有简单的CRUD功能,这一点跟SpringData JPA 很相似

2.5 启动类配置
在启动类上添加@MapperScan注解来扫描持久层接口,只有添加了这个注解才可以依赖注入持久层接口

2.6 测试
》依赖注入持久层接口
》调用mybatis-plus默认提供的方法进行CRUD操作

3 SpringBoot集成Mybatis-Plus进阶
说明:在第2节中是利用mybatis-plus提供的方法进行CRUD操作,其实mybatis-plus是对mybatis的封装,它同样可以向mybatis那样利用xml映射文件来实现数据库操作
3.1 创建mybatis配置文件
<?xml version="1.0" encoding="UTF-8" ?>

<!DOCTYPE configuration PUBLIC "-//mybatis.org//DTD Config 3.0//EN" "http://mybatis.org/dtd/mybatis-3-config.dtd">

<configuration>

    <settings>

        <!-- 打印SQL语句到控制台 -->

        <setting name="logImpl" value="STDOUT_LOGGING" />

    </settings>

</configuration>
mybatis-config.xml
3.2 创建映射文件
技巧01:在resources目录下创建一个xml文件用来存放映射文件
技巧02:在映射接口中声明一个方法
package com.example.spring_mybatisplus_redis.mapper;

import com.baomidou.mybatisplus.core.mapper.BaseMapper;

import com.example.spring_mybatisplus_redis.pojo.dataobject.Student;

/**

 * @author 王杨帅

 * @create 2018-09-16 22:31

 * @desc

 **/

public interface StudentMapper extends BaseMapper<Student> {

    Student getById(Long id);

}
StudentMapper.java
<?xml version="1.0" encoding="UTF-8" ?>

<!DOCTYPE mapper

        PUBLIC "-//mybatis.org//DTD Mapper 3.0//EN"

        "http://mybatis.org/dtd/mybatis-3-mapper.dtd">

<mapper namespace="com.example.spring_mybatisplus_redis.mapper.StudentMapper">

    <select id="getById" resultType="Student">

        SELECT *

        FROM student

        WHERE id = #{id}

    </select>

</mapper>
StudentMapper.xml
3.3 配置文件
在 application.yml 中配置mybatis配置文件和映射文件位置

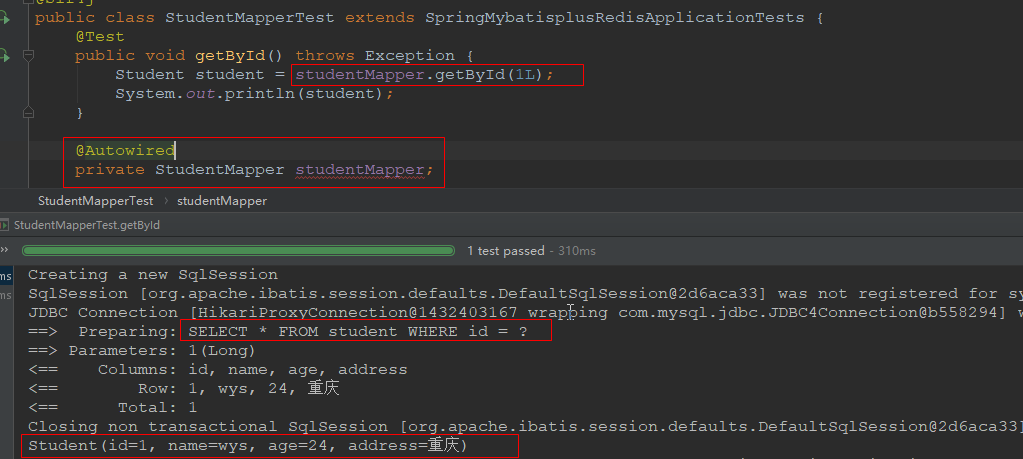
3.4 测试效果
4 MyBatis-Plus开启二级缓存
技巧01:mybatis的以及缓存默认是开启的,二级缓存默认是关闭的
技巧02:一级缓存是SqlSession级别,二级缓存是SqlSessionFactory级别
技巧03:从二级换粗中获取到的数据都是缓存数据的副本,从一级缓存中获取到的数据是缓存数据的引用
4.1 Mybatis默认的二级缓存
技巧01:直接在映射文件中添加 <cache /> 即可开启二级缓存
技巧02:mybatis默认的二级缓存是利用Map实现的
4.1.1 序列化实体类
使用二级缓存时必须对实体类进行序列化

4.1.2 映射文件修改
在映射文件中添加 <cache />

4.1.3 利用映射器进行数据操作
技巧01:映射器 = 映射接口 + 映射文件
说明:本案例比较简单,直接在controller类中依赖注入映射器接口,实际开发中应该在service中进行的

4.1.4 测试效果
启动应用后,访问多次 /test/{id}
技巧01:第一次访问时会从数据库中读取数据,后面的就会从二级缓存中读取数据
技巧02:delete、update、insert操作都会清空二级缓存,前提是这三种操作对应的标签上的 flushCache属性值为true(默认值就是true)

4.2 利用EhCache实现二级缓存
4.2.1 引入ehcache依赖
        <dependency>

            <groupId>org.mybatis.caches</groupId>

            <artifactId>mybatis-ehcache</artifactId>

            <version>1.1.0</version>

        </dependency>
4.2.2 配置EhCache
<?xml version="1.0" encoding="UTF-8"?>

<ehcache xmlns:xsi="http://www.w3.org/2001/XMLSchema-instance"

    xsi:noNamespaceSchemaLocation="ehcache.xsd">

    <diskStore path="java.io.tmpdir/Tmp_EhCache" />

    <defaultCache eternal="false" maxElementsInMemory="1000"

        overflowToDisk="false" diskPersistent="false" timeToIdleSeconds="0"

        timeToLiveSeconds="3600" memoryStoreEvictionPolicy="LRU" />

    <cache name="content" maxEntriesLocalHeap="200"

        timeToLiveSeconds="3600">

    </cache>

</ehcache>
ehcache.xml
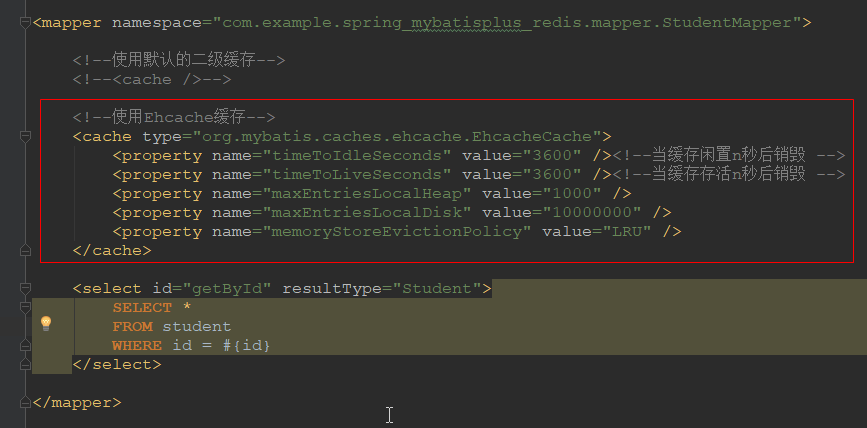
4.2.3 修改映射文件
4.2.4 测试效果
启动应用多次访问 /student/{id}

4.3 利用Spring Cache实现缓存
4.3.1 新建一个SpringBoot项目
引入web springcache依赖
        <dependency>

            <groupId>org.springframework.boot</groupId>

            <artifactId>spring-boot-starter-web</artifactId>

        </dependency>

        <dependency>

            <groupId>org.springframework.boot</groupId>

            <artifactId>spring-boot-starter-cache</artifactId>

        </dependency>
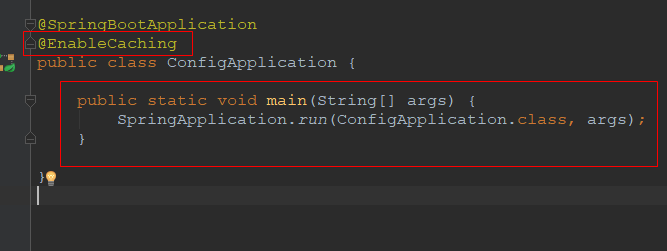
4.3.2 开启SpringCache依赖
在启动类上利用@EnableCaching来引入SpringCache的默认配置
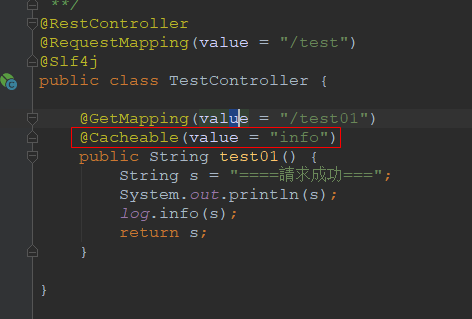
4.3.3 如何使用
在需要使用缓存的方法上添加相关注解就可以啦,例如
4.4.4 测试效果
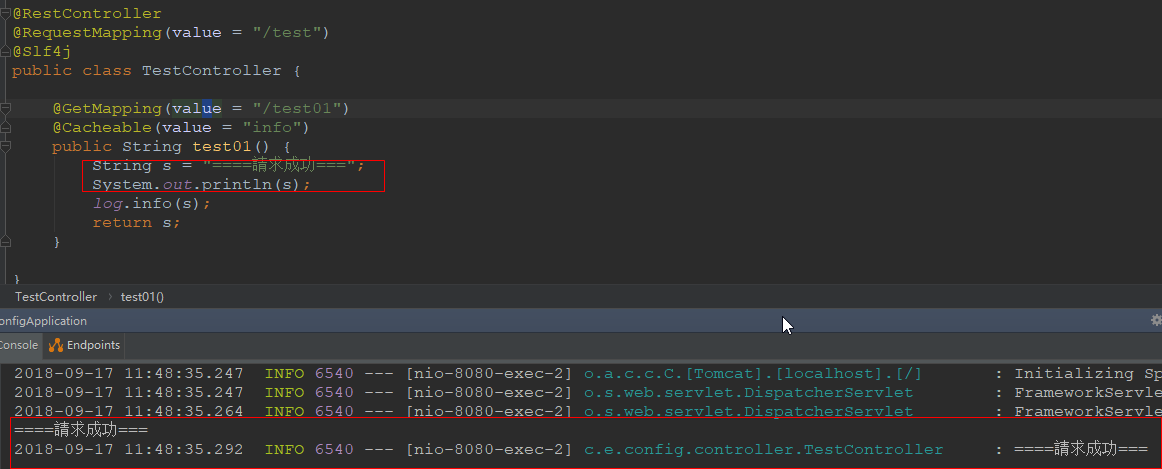
启动应用,多次访问 /test/test01 时,只打印了一次日志,因为从第二次开始就会到SpringCache中去寻找对应的缓存数据
说明:SpringCache一般用于service层中的方法的,这里只是为了达到测试效果就直接在controller层中进行了测试
4.4 利用Redis实现缓存
注意使用Redis实现缓存时需要用到SpringCache相关技术,因为SrpingCache支持多种缓存实现
SpringBoot项目集成好SpringCache和Redis后,只需要在application.yml文件中配置 spring.cache.type=redis 就可以啦
技巧01:具体使用时在方法上添加@Cacheable等类似注解就可以啦
spring:

  datasource:

    url: jdbc:mysql://127.0.0.1/javaarchitect?characterEncoding=utf-8&useSSL=false

    username: root

    password:

  thymeleaf:

    cache: false

  redis:

    host: 127.0.0.1

    port:

  cache:

    type: redis

  jpa:

    properties:

      hibernate:

        format_sql: true

        show_sql: true

mybatis-plus:

  type-aliases-package: com.example.homework.pojo

  config-location: classpath:/mybatis-config.xml

  mapper-locations: classpath:xml/*Mapper.xml
application.yml
5 SpringBoot 集成 Spring Cache
请参见第4.3小节
6 SpringBoot集成Redis
6.1 安装redis服务器
6.2 创建SpringBoot项目
引入web redis lombok devtools依赖
        <dependency>

            <groupId>org.springframework.boot</groupId>

            <artifactId>spring-boot-starter-data-redis</artifactId>

        </dependency>
6.3 配置redis服务信息
spring.redis.host=127.0.0.1

spring.redis.port=6379
6.4 重写配置RedisTemplate对应Bean的配置
主要是为了设置序列化方式

package com.example.spring_redis02.configs;

import com.fasterxml.jackson.databind.ObjectMapper;

import org.springframework.context.annotation.Bean;

import org.springframework.context.annotation.Configuration;

import org.springframework.data.redis.connection.RedisConnectionFactory;

import org.springframework.data.redis.core.RedisTemplate;

import org.springframework.data.redis.serializer.Jackson2JsonRedisSerializer;

import java.net.UnknownHostException;

@Configuration

public class RedisConfiguration {

    /**

     * 重写RedisTemplate的Bean

     * @param redisConnectionFactory

     * @return

     * @throws UnknownHostException

     */

    @Bean

    public RedisTemplate redisTemplate(RedisConnectionFactory redisConnectionFactory) throws UnknownHostException {

        RedisTemplate<Object, Object> template = new RedisTemplate();

        template.setConnectionFactory(redisConnectionFactory);

        Jackson2JsonRedisSerializer jackson2JsonRedisSerializer = new Jackson2JsonRedisSerializer(Object.class);

        jackson2JsonRedisSerializer.setObjectMapper(new ObjectMapper());

        template.setKeySerializer(jackson2JsonRedisSerializer);

        template.setValueSerializer(jackson2JsonRedisSerializer);

        return template;

    }

}
RedisConfiguration.java
6.5 编写RedisTemplate工具类
技巧01:这个工具类只是为了简化操作而言的,没有也没关系
package com.example.spring_redis02.utils;

import java.util.List;

import java.util.Map;

import java.util.Set;

import java.util.concurrent.TimeUnit;

import org.springframework.beans.factory.annotation.Autowired;

import org.springframework.data.redis.core.RedisTemplate;

import org.springframework.stereotype.Component;

import org.springframework.util.CollectionUtils;

@Component

public class RedisUtil {

    @Autowired

    private RedisTemplate redisTemplate;

    /**

     * 指定缓存失效时间

     *

     * @param key  键

     * @param time 时间(秒)

     * @return

     */

    public boolean expire(String key, long time) {

        try {

            if (time > 0) {

                redisTemplate.expire(key, time, TimeUnit.SECONDS);

            }

            return true;

        } catch (Exception e) {

            e.printStackTrace();

            return false;

        }

    }

    /**

     * 根据key 获取过期时间

     *

     * @param key 键 不能为null

     * @return 时间(秒) 返回0代表为永久有效

     */

    public long getExpire(String key) {

        return redisTemplate.getExpire(key, TimeUnit.SECONDS);

    }

    /**

     * 判断key是否存在

     *

     * @param key 键

     * @return true 存在 false不存在

     */

    public boolean hasKey(String key) {

        try {

            return redisTemplate.hasKey(key);

        } catch (Exception e) {

            e.printStackTrace();

            return false;

        }

    }

    /**

     * 删除缓存

     *

     * @param key 可以传一个值 或多个

     */

    @SuppressWarnings("unchecked")

    public void del(String... key) {

        if (key != null && key.length > 0) {

            if (key.length == 1) {

                redisTemplate.delete(key[0]);

            } else {

                redisTemplate.delete(CollectionUtils.arrayToList(key));

            }

        }

    }

    //============================String=============================

    /**

     * 普通缓存获取

     *

     * @param key 键

     * @return 值

     */

    public Object get(String key) {

        return key == null ? null : redisTemplate.opsForValue().get(key);

    }

    /**

     * 普通缓存放入

     *

     * @param key   键

     * @param value 值

     * @return true成功 false失败

     */

    public boolean set(String key, Object value) {

        try {

            redisTemplate.opsForValue().set(key, value);

            return true;

        } catch (Exception e) {

            e.printStackTrace();

            return false;

        }

    }

    /**

     * 普通缓存放入并设置时间

     *

     * @param key   键

     * @param value 值

     * @param time  时间(秒) time要大于0 如果time小于等于0 将设置无限期

     * @return true成功 false 失败

     */

    public boolean set(String key, Object value, long time) {

        try {

            if (time > 0) {

                redisTemplate.opsForValue().set(key, value, time, TimeUnit.SECONDS);

            } else {

                set(key, value);

            }

            return true;

        } catch (Exception e) {

            e.printStackTrace();

            return false;

        }

    }

    /**

     * 递增

     *

     * @param key 键

     * @param by  要增加几(大于0)

     * @return

     */

    public long incr(String key, long delta) {

        if (delta < 0) {

            throw new RuntimeException("递增因子必须大于0");

        }

        return redisTemplate.opsForValue().increment(key, delta);

    }

    /**

     * 递减

     *

     * @param key 键

     * @param by  要减少几(小于0)

     * @return

     */

    public long decr(String key, long delta) {

        if (delta < 0) {

            throw new RuntimeException("递减因子必须大于0");

        }

        return redisTemplate.opsForValue().increment(key, -delta);

    }

    //================================Map=================================

    /**

     * HashGet

     *

     * @param key  键 不能为null

     * @param item 项 不能为null

     * @return 值

     */

    public Object hget(String key, String item) {

        return redisTemplate.opsForHash().get(key, item);

    }

    /**

     * 获取hashKey对应的所有键值

     *

     * @param key 键

     * @return 对应的多个键值

     */

    public Map<Object, Object> hmget(String key) {

        return redisTemplate.opsForHash().entries(key);

    }

    /**

     * HashSet

     *

     * @param key 键

     * @param map 对应多个键值

     * @return true 成功 false 失败

     */

    public boolean hmset(String key, Map<String, Object> map) {

        try {

            redisTemplate.opsForHash().putAll(key, map);

            return true;

        } catch (Exception e) {

            e.printStackTrace();

            return false;

        }

    }

    /**

     * HashSet 并设置时间

     *

     * @param key  键

     * @param map  对应多个键值

     * @param time 时间(秒)

     * @return true成功 false失败

     */

    public boolean hmset(String key, Map<String, Object> map, long time) {

        try {

            redisTemplate.opsForHash().putAll(key, map);

            if (time > 0) {

                expire(key, time);

            }

            return true;

        } catch (Exception e) {

            e.printStackTrace();

            return false;

        }

    }

    /**

     * 向一张hash表中放入数据,如果不存在将创建

     *

     * @param key   键

     * @param item  项

     * @param value 值

     * @return true 成功 false失败

     */

    public boolean hset(String key, String item, Object value) {

        try {

            redisTemplate.opsForHash().put(key, item, value);

            return true;

        } catch (Exception e) {

            e.printStackTrace();

            return false;

        }

    }

    /**

     * 向一张hash表中放入数据,如果不存在将创建

     *

     * @param key   键

     * @param item  项

     * @param value 值

     * @param time  时间(秒)  注意:如果已存在的hash表有时间,这里将会替换原有的时间

     * @return true 成功 false失败

     */

    public boolean hset(String key, String item, Object value, long time) {

        try {

            redisTemplate.opsForHash().put(key, item, value);

            if (time > 0) {

                expire(key, time);

            }

            return true;

        } catch (Exception e) {

            e.printStackTrace();

            return false;

        }

    }

    /**

     * 删除hash表中的值

     *

     * @param key  键 不能为null

     * @param item 项 可以使多个 不能为null

     */

    public void hdel(String key, Object... item) {

        redisTemplate.opsForHash().delete(key, item);

    }

    /**

     * 判断hash表中是否有该项的值

     *

     * @param key  键 不能为null

     * @param item 项 不能为null

     * @return true 存在 false不存在

     */

    public boolean hHasKey(String key, String item) {

        return redisTemplate.opsForHash().hasKey(key, item);

    }

    /**

     * hash递增 如果不存在,就会创建一个 并把新增后的值返回

     *

     * @param key  键

     * @param item 项

     * @param by   要增加几(大于0)

     * @return

     */

    public double hincr(String key, String item, double by) {

        return redisTemplate.opsForHash().increment(key, item, by);

    }

    /**

     * hash递减

     *

     * @param key  键

     * @param item 项

     * @param by   要减少记(小于0)

     * @return

     */

    public double hdecr(String key, String item, double by) {

        return redisTemplate.opsForHash().increment(key, item, -by);

    }

    //============================set=============================

    /**

     * 根据key获取Set中的所有值

     *

     * @param key 键

     * @return

     */

    public Set<Object> sGet(String key) {

        try {

            return redisTemplate.opsForSet().members(key);

        } catch (Exception e) {

            e.printStackTrace();

            return null;

        }

    }

    /**

     * 根据value从一个set中查询,是否存在

     *

     * @param key   键

     * @param value 值

     * @return true 存在 false不存在

     */

    public boolean sHasKey(String key, Object value) {

        try {

            return redisTemplate.opsForSet().isMember(key, value);

        } catch (Exception e) {

            e.printStackTrace();

            return false;

        }

    }

    /**

     * 将数据放入set缓存

     *

     * @param key    键

     * @param values 值 可以是多个

     * @return 成功个数

     */

    public long sSet(String key, Object... values) {

        try {

            return redisTemplate.opsForSet().add(key, values);

        } catch (Exception e) {

            e.printStackTrace();

            return 0;

        }

    }

    /**

     * 将set数据放入缓存

     *

     * @param key    键

     * @param time   时间(秒)

     * @param values 值 可以是多个

     * @return 成功个数

     */

    public long sSetAndTime(String key, long time, Object... values) {

        try {

            Long count = redisTemplate.opsForSet().add(key, values);

            if (time > 0) expire(key, time);

            return count;

        } catch (Exception e) {

            e.printStackTrace();

            return 0;

        }

    }

    /**

     * 获取set缓存的长度

     *

     * @param key 键

     * @return

     */

    public long sGetSetSize(String key) {

        try {

            return redisTemplate.opsForSet().size(key);

        } catch (Exception e) {

            e.printStackTrace();

            return 0;

        }

    }

    /**

     * 移除值为value的

     *

     * @param key    键

     * @param values 值 可以是多个

     * @return 移除的个数

     */

    public long setRemove(String key, Object... values) {

        try {

            Long count = redisTemplate.opsForSet().remove(key, values);

            return count;

        } catch (Exception e) {

            e.printStackTrace();

            return 0;

        }

    }

    //===============================list=================================

    /**

     * 获取list缓存的内容

     *

     * @param key   键

     * @param start 开始

     * @param end   结束  0 到 -1代表所有值

     * @return

     */

    public List<Object> lGet(String key, long start, long end) {

        try {

            return redisTemplate.opsForList().range(key, start, end);

        } catch (Exception e) {

            e.printStackTrace();

            return null;

        }

    }

    /**

     * 获取list缓存的长度

     *

     * @param key 键

     * @return

     */

    public long lGetListSize(String key) {

        try {

            return redisTemplate.opsForList().size(key);

        } catch (Exception e) {

            e.printStackTrace();

            return 0;

        }

    }

    /**

     * 通过索引 获取list中的值

     *

     * @param key   键

     * @param index 索引  index>=0时, 0 表头,1 第二个元素,依次类推;index<0时,-1,表尾,-2倒数第二个元素,依次类推

     * @return

     */

    public Object lGetIndex(String key, long index) {

        try {

            return redisTemplate.opsForList().index(key, index);

        } catch (Exception e) {

            e.printStackTrace();

            return null;

        }

    }

    /**

     * 将list放入缓存

     *

     * @param key   键

     * @param value 值

     * @param time  时间(秒)

     * @return

     */

    public boolean lSet(String key, Object value) {

        try {

            redisTemplate.opsForList().rightPush(key, value);

            return true;

        } catch (Exception e) {

            e.printStackTrace();

            return false;

        }

    }

    /**

     * 将list放入缓存

     *

     * @param key   键

     * @param value 值

     * @param time  时间(秒)

     * @return

     */

    public boolean lSet(String key, Object value, long time) {

        try {

            redisTemplate.opsForList().rightPush(key, value);

            if (time > 0) expire(key, time);

            return true;

        } catch (Exception e) {

            e.printStackTrace();

            return false;

        }

    }

    /**

     * 将list放入缓存

     *

     * @param key   键

     * @param value 值

     * @param time  时间(秒)

     * @return

     */

    public boolean lSet(String key, List<Object> value) {

        try {

            redisTemplate.opsForList().rightPushAll(key, value);

            return true;

        } catch (Exception e) {

            e.printStackTrace();

            return false;

        }

    }

    /**

     * 将list放入缓存

     *

     * @param key   键

     * @param value 值

     * @param time  时间(秒)

     * @return

     */

    public boolean lSet(String key, List<Object> value, long time) {

        try {

            redisTemplate.opsForList().rightPushAll(key, value);

            if (time > 0) expire(key, time);

            return true;

        } catch (Exception e) {

            e.printStackTrace();

            return false;

        }

    }

    /**

     * 根据索引修改list中的某条数据

     *

     * @param key   键

     * @param index 索引

     * @param value 值

     * @return

     */

    public boolean lUpdateIndex(String key, long index, Object value) {

        try {

            redisTemplate.opsForList().set(key, index, value);

            return true;

        } catch (Exception e) {

            e.printStackTrace();

            return false;

        }

    }

    /**

     * 移除N个值为value

     *

     * @param key   键

     * @param count 移除多少个

     * @param value 值

     * @return 移除的个数

     */

    public long lRemove(String key, long count, Object value) {

        try {

            Long remove = redisTemplate.opsForList().remove(key, count, value);

            return remove;

        } catch (Exception e) {

            e.printStackTrace();

            return 0;

        }

    }

}
RedisUtil.java
6.6 测试效果


SpringBoot30 整合Mybatis-Plus、整合Redis、利用Ehcache实现二级缓存、利用SpringCache和Redis作为缓存的更多相关文章
- springBoot第二种配置文件yaml书写方式及读取数据、整合myBatis和整合junit
一.yaml文件格式:key-value形式:可以表示对象 集合 1.语法:key:value 冒号后面必须跟一个空格再写value值 key1: key2: key3:value 2.属性取值:a. ...
- 框架整合——Spring与MyBatis框架整合
Spring整合MyBatis 1. 整合 Spring [整合目标:在spring的配置文件中配置SqlSessionFactory以及让mybatis用上spring的声明式事务] 1). 加入 ...
- springboot(二)整合mybatis,多数据源和事务管理
-- 1.整合mybatis -- 2.整合多数据源 -- 3. 整合事务 代码地址:https://github.com/showkawa/springBoot_2017/tree/master/ ...
- MyBatis原理,Spring、SpringBoot整合MyBatis
1. MyBatis概述 MyBatis 是支持定制化 SQL.存储过程以及高级映射的优秀的持久层框架.MyBatis 避免了几乎所有的 JDBC 代码和手动设置参数以及获取结果集.MyBatis 可 ...
- Java开发学习(三十九)----SpringBoot整合mybatis
一.回顾Spring整合Mybatis Spring 整合 Mybatis 需要定义很多配置类 SpringConfig 配置类 导入 JdbcConfig 配置类 导入 MybatisConfig ...
- Mybatis整合(Redis、Ehcache)实现二级缓存
目的: Mybatis整合Ehcache实现二级缓存 Mybatis整合Redis实现二级缓存 Mybatis整合ehcache实现二级缓存 ssm中整合ehcache 在POM中导入相关依赖 < ...
- SSM+redis整合(mybatis整合redis做二级缓存)
SSM:是Spring+Struts+Mybatis ,另外还使用了PageHelper 前言: 这里主要是利用redis去做mybatis的二级缓存,mybaits映射文件中所有的select都会刷 ...
- [原创]mybatis中整合ehcache缓存框架的使用
mybatis整合ehcache缓存框架的使用 mybaits的二级缓存是mapper范围级别,除了在SqlMapConfig.xml设置二级缓存的总开关,还要在具体的mapper.xml中开启二级缓 ...
- Spring+SpringMVC+MyBatis+easyUI整合进阶篇(九)Linux下安装redis及redis的常用命令和操作
redis简介 Redis是完全开源免费的,遵守BSD协议,是一个高性能的key-value数据库. Redis与其他key-value缓存产品有以下三个特点: Redis支持数据的持久化,可以将内存 ...
随机推荐
- Nunit中如何进行事务性单元测试
单元测试要求:单元测试方法并不真正去变更数据库,也就是说单元测试不依赖于数据库中的数据.那我们如何解决执行单元测试方法后,不变更数据库中数据呢? 一般的解决方案有两种: 1. 新建一个单元测试数据库, ...
- sql分割字符串详解
create function f_split(@c varchar(2000),@split varchar(2)) returns @t table(col varchar(20)) as beg ...
- Python基本序列-字典
Python 基本序列-字典 字典(dict)是"键-值 对"的无序可变序列,字典中的每个元素包含两部分,"键"和"值". 字典中的&quo ...
- 【学步者日记】C#使用线程
http://note.youdao.com/noteshare?id=2810300cdfa3f4d973792dcf30a31db9 System.Threading.Thread th; th ...
- Oracle参数修改是否需要重启等
Oracle参数修改小结Oracle中有些参数是可以在session级别修改,有些则必须在system级别修改,有些参数不需要重启就能马上生效,有些参数必须重启才能生效,那么如何知道这些信息呢?可以从 ...
- 负载均衡的时候如何实现相同的session被分配到同一个服务器
http://www.zhihu.com/question/19651970 session共享那个问题时,有人说:其实从负载均衡的层面来看,大多数硬件/软件的负载均衡方案,都支持session状态保 ...
- System.Security.Cryptography.CryptographicException: 系统找不到指定的文件
默认为false 改为true
- Rhythmk 一步一步学 JAVA (14) Spring-3 @Autowired,@Qualifier @Required @Resource @Component,@Service,@Controller,@Repository @PostConstruct,@PreDestroy
1.@Autowired 注解:首先在使用时候需要引入配置: <!-- 该 BeanPostProcessor 将自动起作用,对标注 @Autowired 的 Bean 进行自动注入 --> ...
- vue表单验证--veevalidate使用教程
vue表单验证----vee-validate使用教程 官网:https://baianat.github.io/vee-validate/ 一.安装 npm install vee-validate ...
- 【微信小程序常识】如何绑定微信小程序体验者
转自:https://blog.csdn.net/futruejet/article/details/53223826 一.操作步骤 (1)打开微信小程序公众平台->点击右边菜单[用户身份]-& ...
