Opencv 图像矩
#include <iostream>
#include <opencv2/opencv.hpp>
using namespace std;
using namespace cv;
Mat img1, img2, img3, img4, img_result, img_gray1, img_gray2, img_gray3, img_canny1;
char win1[] = "window1";
char win2[] = "window2";
char win3[] = "window3";
char win4[] = "window4";
char win5[] = "window5";
int thread_value = 100;
int max_value = 255;
RNG rng1(12345);
int Demo_Moments();
void Demo_1(int, void*);
//图像矩
int Demo_Moments()
{
namedWindow(win1, CV_WINDOW_AUTOSIZE);
namedWindow(win2, CV_WINDOW_AUTOSIZE);
//namedWindow(win3, CV_WINDOW_AUTOSIZE);
img1 = imread("D://images//19.png");
//img2 = imread("D://images//1//p5_1.jpg");
if (img1.empty())
{
cout << "could not load image..." << endl;
return 0;
}
imshow(win1, img1);
//img4 = Mat::zeros(img1.size(), CV_8UC3);
//转灰度图
cvtColor(img1, img_gray1, CV_BGR2GRAY);
//模糊处理
//blur(img_gray1, img2, Size(3, 3), Point(-1, -1), BORDER_DEFAULT);
GaussianBlur(img1, img2, Size(3, 3), 0, 0);
createTrackbar("track", win1, &thread_value, max_value, Demo_1);
Demo_1(0, 0);
return 0;
}
void Demo_1(int, void*)
{
vector<vector<Point>> vec_p;
vector<Vec4i> vec_4i;
img4 = Mat::zeros(img1.size(), CV_8UC3);
//threshold(img2, img3, thread_value, max_value, THRESH_BINARY);
Canny(img2, img3, thread_value, thread_value * 2, 3, false);
findContours(img3, vec_p, vec_4i, RETR_TREE, CHAIN_APPROX_SIMPLE, Point(0, 0));
//vector<vector<Point>> convexs(vec_p.size());
vector<Moments> contours_moments(vec_p.size());
vector<Point2f> ccs(vec_p.size());
for (size_t i = 0; i<vec_p.size(); i++)
{
contours_moments[i] = moments(vec_p[i]);
ccs[i] = Point(static_cast<float>(contours_moments[i].m10/contours_moments[i].m00),static_cast<float>(contours_moments[i].m01/contours_moments[i].m00));
}
for (size_t j = 0; j<vec_p.size(); j++)
{
if (vec_p[j].size() <100)
{
continue;
}
Scalar color_1 = Scalar(rng1.uniform(0, 255), rng1.uniform(0, 255), rng1.uniform(0, 255));
printf("center point x : %.2f y : %.2f\n", ccs[j].x, ccs[j].y);
printf("contours %d area : %.2f arc length : %.2f\n", j, contourArea(vec_p[j]), arcLength(vec_p[j], true));
drawContours(img4, vec_p, j, color_1, 2, LINE_8, vec_4i, 0, Point(0, 0));
circle(img4,ccs[j],2,color_1,2,8);
}
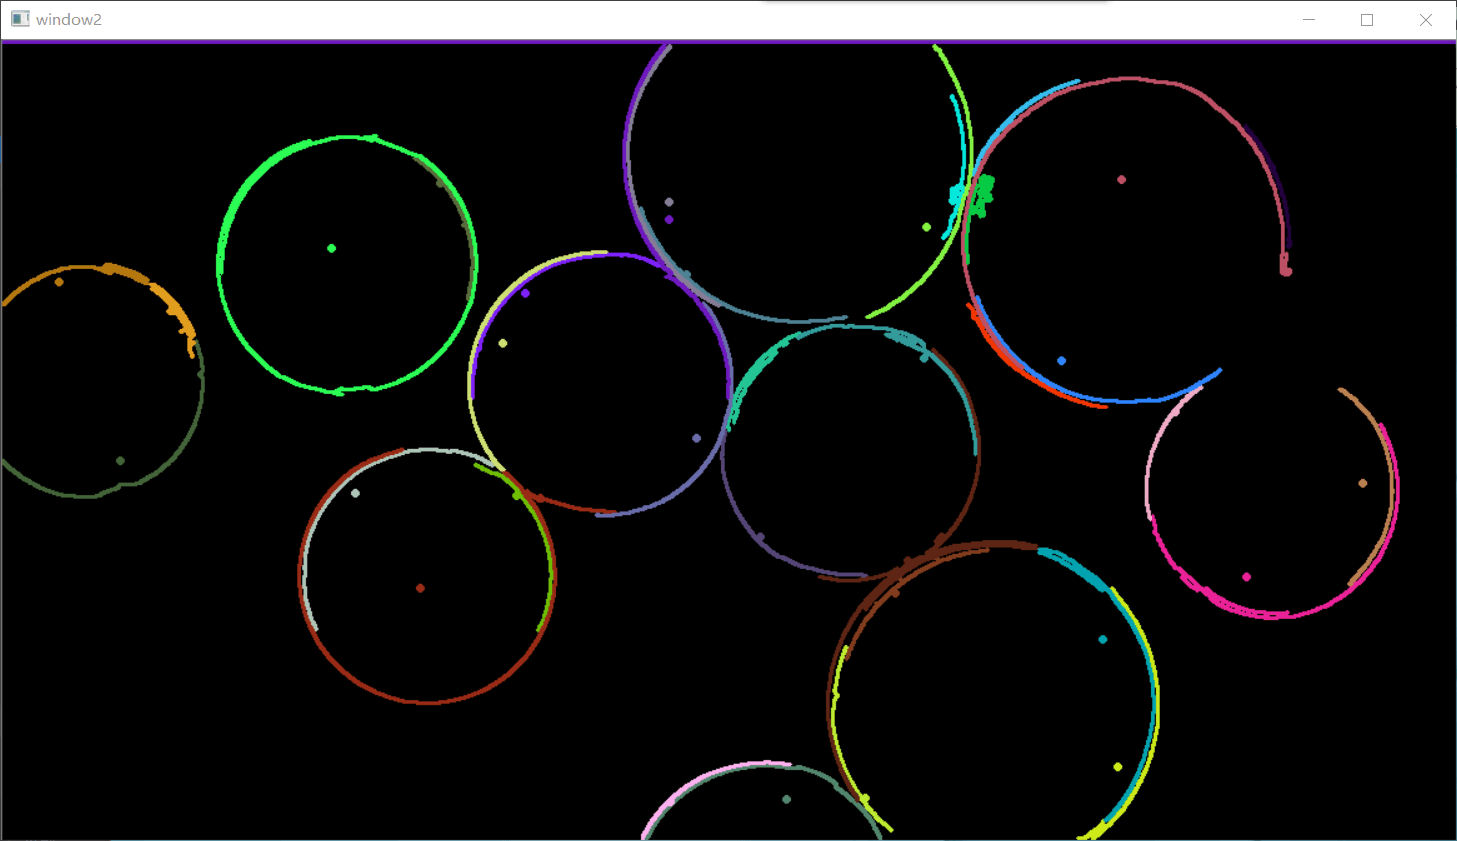
imshow(win2, img4);
}
int main()
{
Demo_Moments();
waitKey(0);
return 0;
}

--------------------------------------------------------------------------
center point x : 627.00 y : 607.00
contours 5 area : 68.00 arc length : 498.84
center point x : 534.00 y : 609.00
contours 7 area : 41.50 arc length : 300.15
center point x : 691.00 y : 611.00
contours 8 area : 20.00 arc length : 207.97
center point x : 896.00 y : 570.00
contours 10 area : 56.00 arc length : 478.90
center point x : 880.00 y : 479.00
contours 11 area : 103.00 arc length : 691.15
center point x : 721.00 y : 427.00
contours 12 area : 26.50 arc length : 320.84
center point x : 411.00 y : 364.00
contours 16 area : 32.50 arc length : 333.81
center point x : 282.00 y : 362.00
contours 18 area : 53.50 arc length : 543.83
center point x : 334.00 y : 439.00
contours 19 area : 150.50 arc length : 1344.58
center point x : 606.00 y : 397.00
contours 21 area : 38.50 arc length : 389.95
center point x : 1017.00 y : 425.00
contours 23 area : 88.50 arc length : 742.42
center point x : 1088.00 y : 352.00
contours 27 area : 46.50 arc length : 380.23
center point x : 723.00 y : 416.00
contours 37 area : 119.50 arc length : 1088.67
center point x : 851.00 y : 268.00
contours 40 area : 26.50 arc length : 361.46
center point x : 96.00 y : 336.00
contours 43 area : 63.00 arc length : 541.73
center point x : 739.00 y : 255.00
contours 47 area : 46.00 arc length : 432.82
center point x : 806.00 y : 253.00
contours 53 area : 56.50 arc length : 310.58
center point x : 556.00 y : 318.00
contours 56 area : 58.50 arc length : 492.17
center point x : 100.00 y : 186.00
contours 63 area : 12.50 arc length : 163.78
center point x : 552.00 y : 193.00
contours 65 area : 32.50 arc length : 318.49
center point x : 420.00 y : 199.00
contours 66 area : 44.50 arc length : 372.09
center point x : 400.00 y : 242.00
contours 67 area : 61.00 arc length : 519.73
center point x : 735.00 y : 187.00
contours 71 area : 50.50 arc length : 246.63
center point x : 350.00 y : 114.00
contours 75 area : 31.50 arc length : 267.52
center point x : 202.00 y : 184.00
contours 77 area : 83.50 arc length : 604.34
center point x : 299.00 y : 153.00
contours 79 area : 139.50 arc length : 1052.33
center point x : 761.00 y : 126.00
contours 83 area : 15.50 arc length : 298.55
center point x : 983.00 y : 66.00
contours 85 area : 51.50 arc length : 433.06
center point x : 533.00 y : 129.00
contours 86 area : 58.00 arc length : 515.19
center point x : 533.00 y : 143.00
contours 88 area : 79.50 arc length : 3004.34
--------------------------------------------------------------------------
Opencv 图像矩的更多相关文章
- opencv::图像矩(Image Moments)
矩的概念介绍 1.几何矩 2.中心距 3.中心归一化距 4.图像中心Center(x0, y0) 计算矩 moments( InputArray array, // 输入数据 bool binaryI ...
- opencv 3.2图像矩(Image Moments)
图像矩乍看比较难理解,看了很多资料,大概明白了一些,但还是无法在脑海里形成一个模型概念,于是从源码中寻找它的应用. 今天就通过公式和程序抓取数据,来进一步理解图像矩 先看一个图片 这是程序运行结果, ...
- OpenCV——图像的矩(计算矩、轮廓面积、轮廓或曲线长度)
图像矩描述了图像的全局特征 一阶矩与形状有关 二阶距显示曲线围绕直线平均值的扩展程度 三阶矩是关于平均值的对称性测量 由二阶和三阶矩可以导出7个不变矩,不变矩是图像的统计特性,满足平移.伸缩.旋转的不 ...
- OpenCV图像金字塔:高斯金字塔、拉普拉斯金字塔与图片尺寸缩放
这篇已经写得很好,真心给作者点个赞.题目都是直接转过来的,直接去看吧. Reference Link : http://blog.csdn.net/poem_qianmo/article/detail ...
- 【OpenCV新手教程之十三】OpenCV图像金字塔:高斯金字塔、拉普拉斯金字塔与图片尺寸缩放
本系列文章由@浅墨_毛星云 出品,转载请注明出处. 文章链接:http://blog.csdn.net/poem_qianmo/article/details/26157633 作者:毛星云(浅墨) ...
- Opencv 图像叠加 添加水印
Opencv 图像叠加 添加水印 C++: void Mat::copyTo(OutputArray m) const C++: void Mat::copyTo(OutputArray m, Inp ...
- opencv图像读取-imread
前言 图像的读取和保存一定要注意imread函数的各个参数及其意义,尽量不要使用默认参数,否则就像数据格式出现错误(here)一样,很难查找错误原因的: re: 1.opencv图像的读取与保存; 完
- 学习 opencv---(12)OpenCV 图像金字塔:高斯金字塔,拉普拉斯金字塔与图片尺寸缩放
在这篇文章里,我们一起学习下 图像金字塔 的一些基本概念,如何使用OpenCV函数pyrUp和pyrDown 对图像进行向上和向下采样,以及了解专门用于缩放图像尺寸的resize函数的用法.此博文一共 ...
- [OpenCV Qt教程] 在Qt图形界面中显示OpenCV图像的OpenGL Widget(第二部分)
本文译自:http://www.robot-home.it/blog/en/software/tutorial-opencv-qt-opengl-widget-per-visualizzare-imm ...
随机推荐
- 安装xamp之后,appach、mysql等问题的总结
问题一:无法启动的问题 如果他们无法启动,大多数情况是端口号被占用. 首先就是查看端口号:点击“netstart“按钮查看端口号的使用详情 如果被占用就点击"config”按钮,进行端口号的 ...
- pat1022__字符串查找
主要是对字符串的查找,为了方便并且快速的实现查找,用map会比较方便 同时如何把一个带有空格的字符串变成多个单词也有一个小技巧 char *point=book[i].keyWord;//关键词分离 ...
- 将h264和aac码流合成flv文件
在视频应用中,经常需要将接收到h264和aac数据保存成文件. 本来想用mp4格式,但是mp4在没有正常关闭的情况下会导致文件打不开,而在实际应用中经常会出现设备直接拔电,程序不是正常结束的情况.于是 ...
- GITBOOK/HEXO TRAVIS GITHUB-PAGES 博客搭建
简介 这年头要是没有个博客都不好意思给别人说你是程序员,我用XX笔记呀,不行吗?不行,这玩意儿要么不能公开分享,要么公开分享要会员,现在到处都是开源,自己学到了东西都不能分享给需要帮助的人,真是伤心呀 ...
- node中express的中间件之methodOverride
methodOverride中间件必须结合bodyParser中间件一起使用,为bodyParser中间件提供伪HTTP方法支持. index.html代码: <!DOCTYPE html> ...
- node 通过指令创建一个package.json文件
描述包的文件是package.json文件. 一个这样的文件,里面的信息还是挺大的.我们可以放弃手动建立.为了练手我们有命令行来建一个这样的包; 完成name,varsion....license ...
- Druid.io系列(一):简介
原文链接: https://blog.csdn.net/njpjsoftdev/article/details/52955676 Druid.io(以下简称Druid)是面向海量数据的.用于实时查询与 ...
- Android:ScaleType与Matrix相关
关于ScaleType,网上介绍这个枚举对象的文章很多了,不过基本都只是介绍了它的效果.我在做可缩放移动的ImageView时,为了实现图片的缩放和拖动,需要记录图片的原始Matrix,在使用过程中发 ...
- 数据结构和算法之单向链表二:获取倒数第K个节点
我们在做算法的时候或多或少都会遇到这样的问题,那就是我们需要获取某一个数据集的倒数或者正数第几个数据.那么今天我们来看一下这个问题,怎么去获取倒数第K个节点.我们拿到这个问题的时候自然而然会想到我们让 ...
- django之分页器
view from django.shortcuts import render,HttpResponse # Create your views here. from app01.models im ...