spring boot2.0.4集成druid,用jmeter并发测试工具调用接口,druid查看监控的结果
一、项目介绍(本项目用的编程语言是jdk8,项目源码: https://github.com/zhzhair/mybatis-druid-spring-boot.git)
1.引入pom依赖:
<dependencies>
<dependency>
<groupId>org.springframework.boot</groupId>
<artifactId>spring-boot-starter-data-redis</artifactId>
</dependency>
<dependency>
<groupId>org.springframework.boot</groupId>
<artifactId>spring-boot-starter-web</artifactId>
</dependency>
<dependency>
<groupId>org.mybatis.spring.boot</groupId>
<artifactId>mybatis-spring-boot-starter</artifactId>
<version>1.3.2</version>
</dependency>
<dependency>
<groupId>mysql</groupId>
<artifactId>mysql-connector-java</artifactId>
<scope>runtime</scope>
</dependency>
<dependency>
<groupId>org.springframework.boot</groupId>
<artifactId>spring-boot-starter-test</artifactId>
<scope>test</scope>
</dependency>
<dependency>
<groupId>com.alibaba</groupId>
<artifactId>druid-spring-boot-starter</artifactId>
<version>1.1.14</version>
</dependency>
</dependencies>
由引入的jar包可知,项目用MySQL + mybatis + redis架构,数据库连接池用阿里的druid
2.配置文件application.yml配置(配置MySQL数据源、druid连接池及监控、redis):
spring:
datasource:
driver-class-name: com.mysql.jdbc.Driver
url: "jdbc:mysql://127.0.0.1:3306/demo?useUnicode=true&characterEncoding=UTF-8&useSSL=false"
username: root
password: 123456
type: com.alibaba.druid.pool.DruidDataSource
druid:
max-active: 100
min-idle: 10
max-wait: 60000
filter:
stat:
merge-sql: true
slow-sql-millis: 200
test-on-borrow: true
validation-query: SELECT 1
use-global-data-source-stat: true
# 配置监控统计拦截的filters,去掉后监控界面sql无法统计,'wall'用于防火墙
# http://127.0.0.1:8080/druid2/index.html
filters: stat,wall,slf4j
pool-prepared-statements: true
max-pool-prepared-statement-per-connection-size: 20
redis:
host: 127.0.0.1
password:
database: 0
timeout: PT1M1S
jedis:
pool.max-active: 200
pool.max-idle: 50
pool.max-wait: PT-1S
pool.min-idle: 10
table-num: 64
3.引入druid配置类(sql和uri监控访问地址:http://localhost:8080/druid/index.html,用户名和密码分别是admin和123456):
    package com.example.demo.config.druid;

    import com.alibaba.druid.support.http.StatViewServlet;

    import com.alibaba.druid.support.http.WebStatFilter;

    import org.springframework.boot.web.servlet.FilterRegistrationBean;

    import org.springframework.boot.web.servlet.ServletRegistrationBean;

    import org.springframework.context.annotation.Bean;

    import org.springframework.context.annotation.Configuration;

    @Configuration

    public class DruidConfiguration {

        @Bean

        public ServletRegistrationBean DruidStatViewServle2() {

            //org.springframework.boot.context.embedded.ServletRegistrationBean提供类的进行注册.

            ServletRegistrationBean<StatViewServlet> servletRegistrationBean = new ServletRegistrationBean<>(new StatViewServlet(), "/druid2/*");

            //添加初始化参数:initParams

            servletRegistrationBean.addUrlMappings("/druid/*");

            //白名单:

    //        servletRegistrationBean.addInitParameter("allow","192.168.1.106");

            //IP黑名单 (存在共同时,deny优先于allow) : 如果满足deny的话提示:Sorry, you are not permitted to view this page.

            // servletRegistrationBean.addInitParameter("deny", "192.168.1.73");

            //登录查看信息的账号密码.

            servletRegistrationBean.addInitParameter("loginUsername","admin");

            servletRegistrationBean.addInitParameter("loginPassword","123456");

            //是否能够重置数据.

            servletRegistrationBean.addInitParameter("resetEnable","false");

            return servletRegistrationBean;

        }

        @Bean

        public FilterRegistrationBean druidStatFilter2(){

            FilterRegistrationBean<WebStatFilter> filterRegistrationBean = new FilterRegistrationBean<>(new WebStatFilter());

            filterRegistrationBean.setName("druidFilter2");

            //添加过滤规则.

            filterRegistrationBean.addUrlPatterns("/*");

            //添加不需要忽略的格式信息.

            filterRegistrationBean.addInitParameter("exclusions","*.js,*.gif,*.jpg,*.png,*.css,*.ico,/druid2/*");

            return filterRegistrationBean;

        }

    }
4.在测试类创建表user_*和user_mobile_*:
    @RunWith(SpringRunner.class)

    @SpringBootTest

    public class DemoApplicationTests {

        @Resource

        private TestUserService userService;

        @Test

        public void contextLoads() {

            userService.dropTables();

            userService.createTables();

        }

    }

    @Service

    public class TestUserServiceImpl implements TestUserService {

        @Resource

        private UserMapper userMapper;//jdbc操作接口

        @Value("${table-num}")

        private int tableNum;//分表的个数

        @Override

        public void dropTables() {

            IntStream.range(0,tableNum).parallel().forEach(this::dropTables);

        }

        private void dropTables(int i){

            userMapper.dropTable("user_" + i);

            userMapper.dropTable("user_mobile_" + i);

        }

        @Override

        public void createTables() {

            IntStream.range(0,tableNum).parallel().forEach(this::createTables);

        }

        private void createTables(int i){

            String suffix = String.valueOf(i);

            userMapper.createTableUser(suffix);

            userMapper.createTableUserMobile(suffix);

        }

    }
5.编写restful风格的接口(包括登录和注册):
    @RestController

    @RequestMapping("test/user")

    public class TestUserController extends BaseController {

        @Resource

        private TestUserService userService;

        @Resource

        private TokenManager tokenManager;//给登录用户生成token,并放到redis

        @RequestMapping(value = "/loginByMobile", method = {RequestMethod.GET}, produces = {MediaType.APPLICATION_JSON_VALUE})

        public BaseResponse<LoginResponse> loginByMobile() {

            BaseResponse<LoginResponse> baseResponse = new BaseResponse<>();

            Integer userId = userService.getUserIdByMobile();

            if(userId != null){

                baseResponse.setCode(0);

                baseResponse.setMsg("手机号登录成功");

                String token = tokenManager.generateToken(userId);

                LoginResponse loginResponse = new LoginResponse();

                loginResponse.setUserId(userId);

                loginResponse.setToken(token);

                loginResponse.setExpire(System.currentTimeMillis() + 3600 * 1000);

                baseResponse.setData(loginResponse);

            }else{

                baseResponse.setCode(-3);

                baseResponse.setMsg("手机号未注册");

            }

            return baseResponse;

        }

        @RequestMapping(value = "/register", method = {RequestMethod.POST}, produces = {MediaType.APPLICATION_JSON_VALUE})

        public BaseResponse<User> register() {

            BaseResponse<User> baseResponse = new BaseResponse<>();

            Integer userId = userService.getUserIdByMobile();

            if(userId == null){

                User user = userService.register();

                baseResponse.setCode(0);

                baseResponse.setData(user);

                baseResponse.setMsg("注册成功");

            }else{

                baseResponse.setCode(1);

                baseResponse.setMsg("手机号已被注册");

            }

            return baseResponse;

        }

    }

    @Service

    public class TestUserServiceImpl implements TestUserService {

        @Resource

        private UserService userService;

        @Value("${table-num}")

        private int tableNum;//分表的个数

        @Override

        public Integer getUserIdByMobile() {

            return userService.getUserIdByMobile(getMobileStr());

        }

        @Override

        public User register() {

            UserRequest userRequest = new UserRequest();

            userRequest.setMobile(getMobileStr());

            userRequest.setIcon("http://127.0.0.1/"+getMobileStr()+".jpg");

            int rand = new Random().nextInt(4);

            userRequest.setNickname(new String[]{"xiaoming","xiaohong","xiaoqiang","xiaoli"}[rand]);

            return userService.register(userRequest);

        }

        /**

         * 模拟手机号

         */

        private String getMobileStr(){

            String[] strings = {"13","15","16","18"};

            String beginString = strings[new Random().nextInt(4)];

            int a = new Random().nextInt(10_0000_0000);

            String endString = String.valueOf(a);

            int length = 9 - endString.length();

            StringBuilder stringBuilder = new StringBuilder(beginString);

            for (int i = 0; i < length; i++) {

                stringBuilder.append("0");

            }

            return stringBuilder.append(endString).toString();

        }

    }

    @Service

    public class UserServiceImpl implements UserService {

        private final String USER_ID_INC = "USER_ID_INC";

        @Resource

        private UserMapper userMapper;//jdbc操作接口

        @Resource(name = "stringRedisTemplate")

        private RedisTemplate<String, String> redisTemplate;

        @Value("${table-num}")

        private int tableNum;//分表的个数

        @Transactional(isolation = Isolation.REPEATABLE_READ)

        @Override

        public User register(UserRequest userRequest) {

            String usercode = redisTemplate.opsForValue().get(USER_ID_INC);

            Integer userId;

            if(usercode == null){//如果redis的数据丢失,就找出最大的userId,并给USER_ID_INC赋值

                int temp = 0;

                for (int i = 0; i < tableNum; i++) {

                    Integer maxUserId = userMapper.getMaxUserId(String.valueOf(i));

                    if(maxUserId != null && temp < maxUserId){

                        temp = maxUserId;

                    }

                }

                userId = temp + 1;

                redisTemplate.opsForValue().set(USER_ID_INC,String.valueOf(userId));

            }else{

                Long num = redisTemplate.opsForValue().increment(USER_ID_INC,1);

                userId = Integer.valueOf(num + "");

            }

            User user = new User();

            user.setUserId(userId);

            user.setMobile(userRequest.getMobile());

            user.setIcon(userRequest.getIcon());

            user.setNickname(userRequest.getNickname());

            int rem = userId % tableNum;

            userMapper.insertUser(user,String.valueOf(rem));

            int rem0 = Math.abs(userRequest.getMobile().hashCode()) % tableNum;

            String mobile = userRequest.getMobile();

            userMapper.insertUserMobile(mobile,userId,String.valueOf(rem0));

            return user;

        }

        @Override

        public Integer getUserIdByMobile(String mobile) {

            int rem = Math.abs(mobile.hashCode()) % tableNum;

            return userMapper.getUserByMobile(mobile,String.valueOf(rem));

        }

    }
二、用jmeter做并发测试(jmeter版本4.0):
1.双击打开bin目录下的jmeter.bat文件,菜单选简体中文:Options->Choose language->Chinese(Simplified)。点文件夹图标可以选择已有的jmeter脚本。
2.右键测试计划->添加->Threads(Users)->线程组,然后配置执行线程数、持续时间等信息。登录和注册我都建了单独的线程组,其中:登录的线程数36000,持续时间600秒;注册的线程数6000,持续时间600秒。
3.右键测试计划->添加->监听器->(查看结果数和聚合报告等,用于分析并发测试结果)。
4.分别右键选中登录和注册的线程组->添加->sampler->HTTP请求,配置如下:
登录和注册的协议都填http,IP都填127.0.0.1,端口号都填8080。登录的方式选GET,注册的方式选POST。登录的路径填/test/user/loginByMobile,注册的路径填/test/user/register。
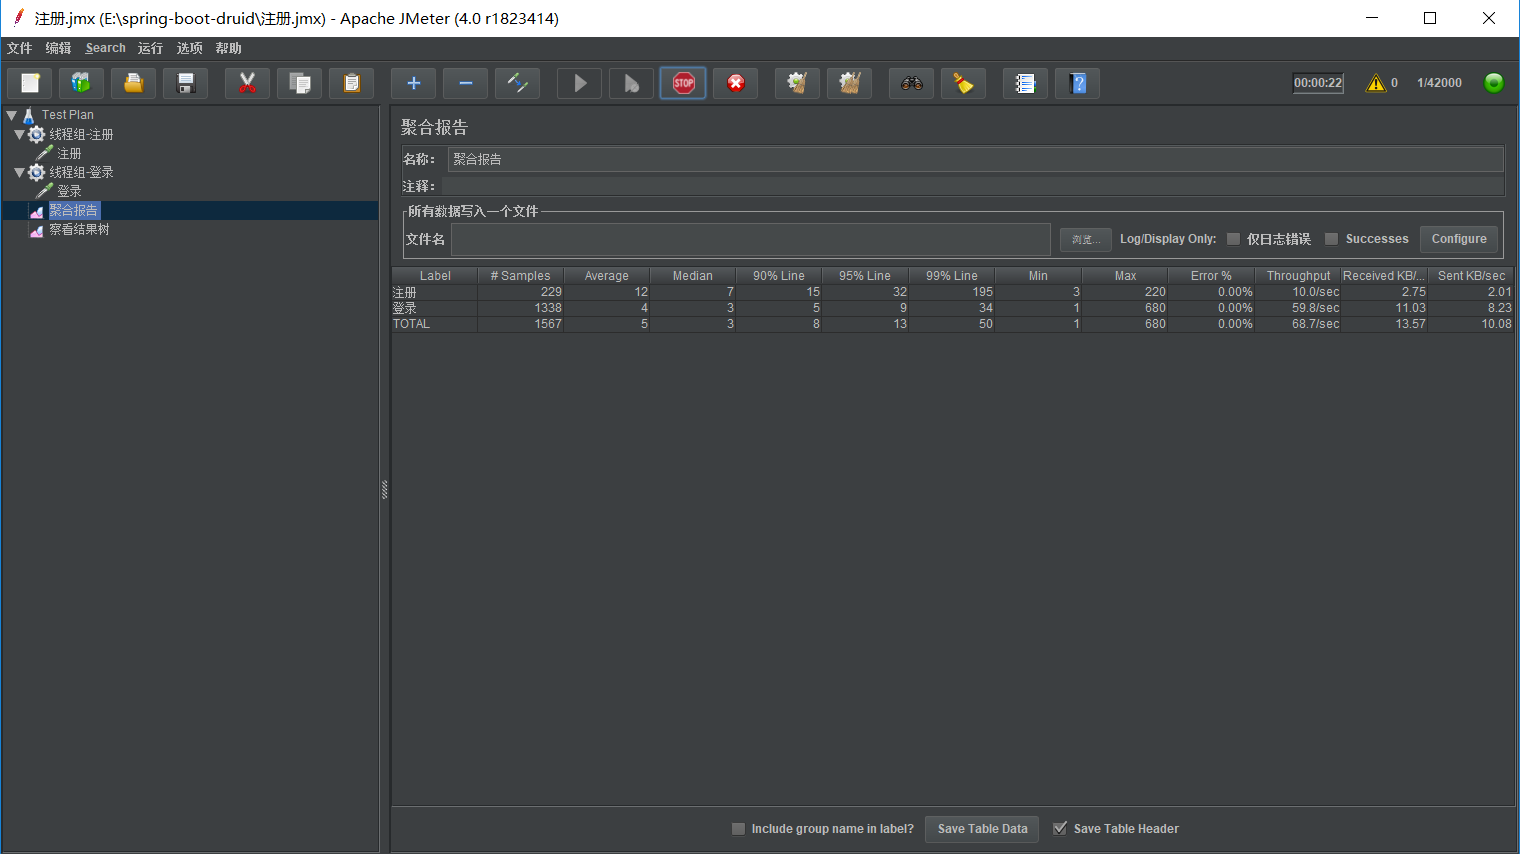
5.点击打开聚合报告,启动项目,点击菜单栏绿色的三角形图标运行,观察聚合报告的结果如下图所示:
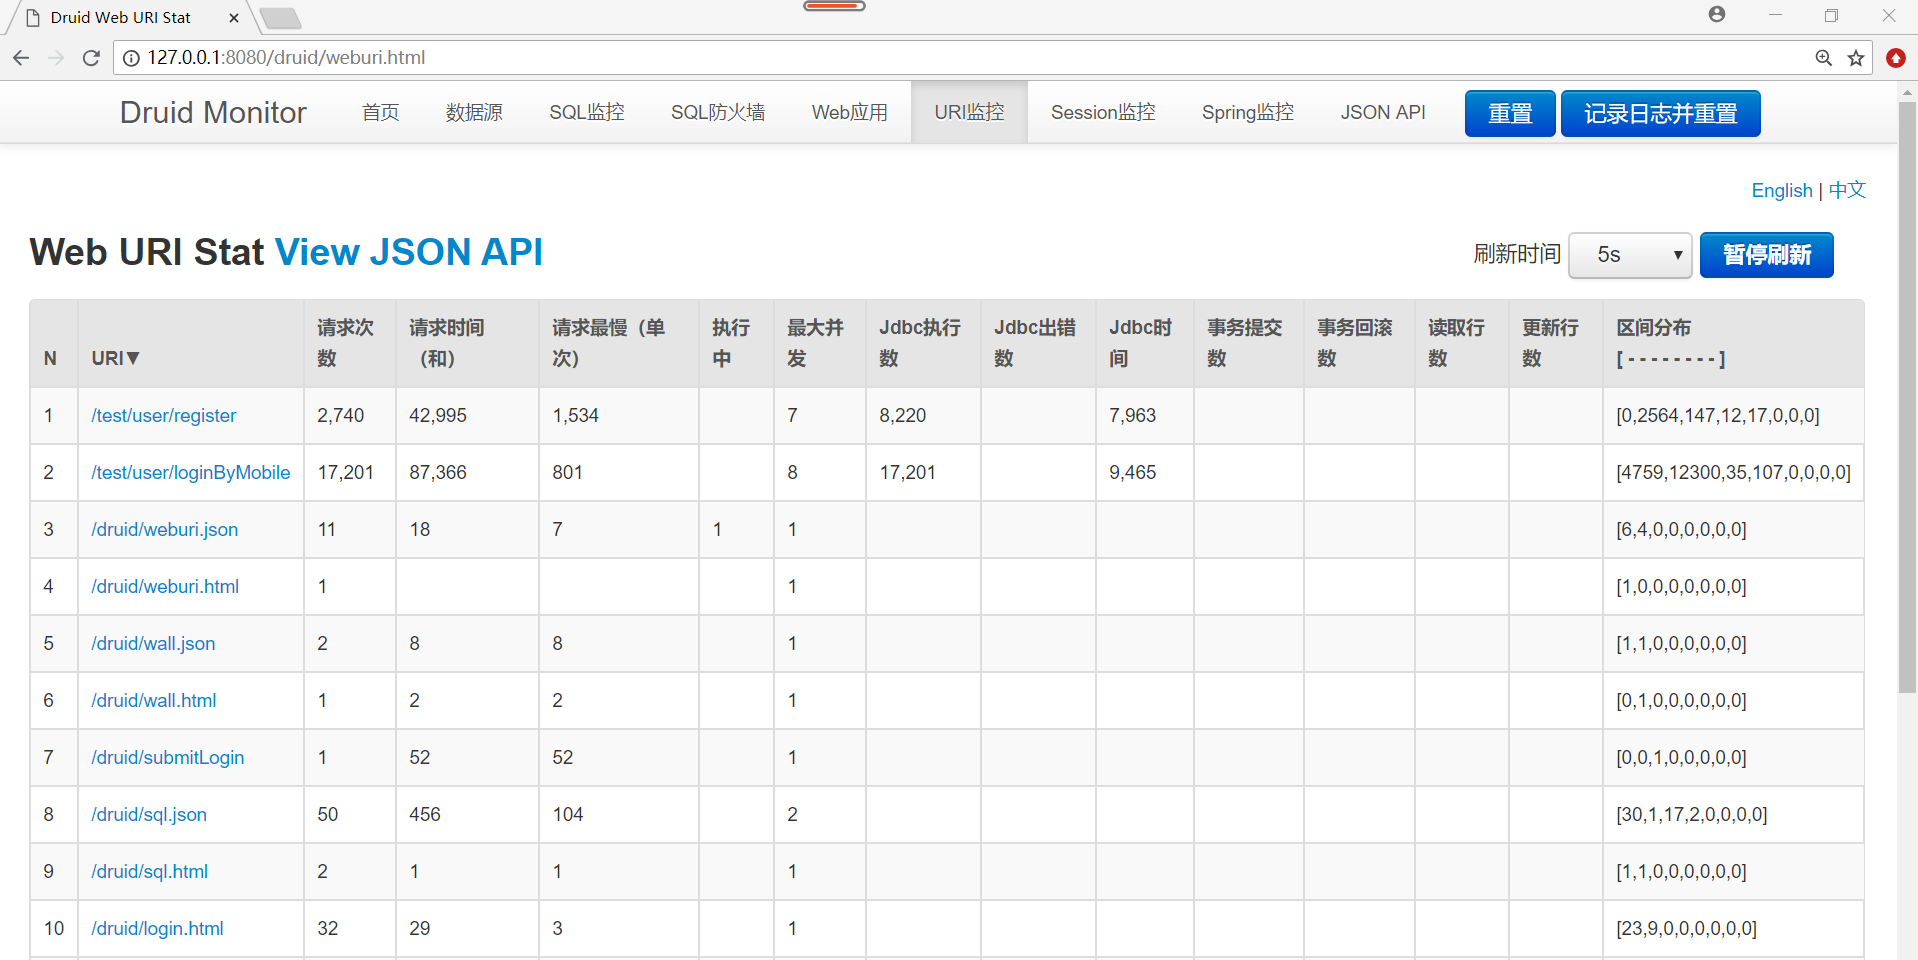
三、查看druid的sql监控和uri监控:
jmeter运行时,访问http://localhost:8080/druid/index.html,sql监控和webUI等监控结果如图所示:

spring boot2.0.4集成druid,用jmeter并发测试工具调用接口,druid查看监控的结果的更多相关文章
- 【spring cloud】spring cloud2.X spring boot2.0.4调用feign配置Hystrix Dashboard 和 集成Turbine 【解决:Hystrix仪表盘Unable to connect to Command Metric Stream】【解决:Hystrix仪表盘Loading...】
环境: <java.version>1.8</java.version><spring-boot.version>2.0.4.RELEASE</spring- ...
- Spring Boot2.0使用Spring Security
一.Spring Secutity简介 Spring 是一个非常流行和成功的 Java 应用开发框架.Spring Security 基于 Spring 框架,提供了一套 Web 应用安全性 ...
- spring boot 2.0(一)权威发布spring boot2.0
Spring Boot2.0.0.RELEASE正式发布,在发布Spring Boot2.0的时候还出现一个小插曲,将Spring Boot2.0同步到Maven仓库的时候出现了错误,然后Spring ...
- Spring Boot2.0之整合事物管理
首先Spring 事务分类 1.声明事务 原理:基于编程事务的 2.编程事务 指定范围 扫包去解决 3.事务原理:AOP技术 通过环绕通知进行了拦截 使用Spring 事务注意事项: 不要tr ...
- 基于spring boot2.0+spring security +oauth2.0+ jwt微服务架构
github地址:https://github.com/hankuikuide/microservice-spring-security-oauth2 项目介绍 该项目是一个演示项目,主要演示了,基于 ...
- Spring Boot2.0 设置拦截器
所有功能完成 配置登录认证 配置拦截器 在spring boot2.0 之后 通过继承这个WebMvcConfigurer类 就可以完成拦截 新建包com.example.interceptor; 创 ...
- Spring Boot2.0 静态资源被拦截问题
在Spring Boot2.0+的版本中,只要用户自定义了拦截器,则静态资源会被拦截.但是在spring1.0+的版本中,是不会拦截静态资源的. 因此,在使用Spring Boot2.0+时,配置拦截 ...
- spring boot2.0(一 ) 基础环境搭建
1.基础配置 开发环境:window jdk版本:1.8(spring boot2.0最低要求1.8) 开发工具:eclipse 构建方式:maven3 2.POM配置文件 <project x ...
- Spring Boot2.0 整合 Kafka
Kafka 概述 Apache Kafka 是一个分布式流处理平台,用于构建实时的数据管道和流式的应用.它可以让你发布和订阅流式的记录,可以储存流式的记录,并且有较好的容错性,可以在流式记录产生时就进 ...
随机推荐
- Python----多项式回归
多项式线性回归 1.多项式线性方程: 与多元线性回归相比,它只有一个自变量,但有不同次方数. 2.举例: import numpy as np import matplotlib.pyplot as ...
- 我的CSS
外框 固定宽高 内容居中 height: 200px ; width:200px; margin: 50rpx auto 0 auto; //上下居中 text-align: center; ...
- HTML事件属性
1.常用窗口事件属性 属性 值 描述 onbeforeonload script 在文档加载之前运行脚本 onblur script 当窗口失去焦点时运行脚本 onerror script 当错误发生 ...
- WebSocket介绍,与Socket的区别
WebSocket介绍与原理 WebSocket protocol 是HTML5一种新的协议.它实现了浏览器与服务器全双工通信(full-duplex).一开始的握手需要借助HTTP请求完成. ——百 ...
- linux 系统工具图
- wx.request 使用数据
小程序中,怎么使用wx.request返回的数据??? 在你的js页面中 主要是这句话 var that=this; 为什么呢?因为使用过jquery的ajax的朋友都知道.在ajax函数中的this ...
- CF802C Heidi and Library (hard)
题目描述 你有一个容量为k的空书架,现在共有n个请求,每个请求给定一本书ai,如果你的书架里没有这本书,你就必须以ci的价格购买这本书放入书架.当然,你可以在任何时候丢掉书架里的某本书.请求出完成这n ...
- POJ 1848 Tree 树形DP
题目大意: 给出一棵树,现在要往这棵树上加边,使得所有的点都在环中,且每个点只能属于一个环 题解: 考虑DP: \(dp[i][0]\)表示使\(i\)这颗子树的每个点都在环内需要加的最少边数. \( ...
- go实现dgraph的各种操作
go实现dgraph的各种操作 import "github.com/dgraph-io/dgo" import "github.com/dgraph-io/dgo/pr ...
- cookie session token
HTTP HTTP是无状态(stateless)的网络协议.HTTP协议自身不对请求和响应之间的通信状态进行保存.也就是说HTTP协议对于发送过的请求或响应都不做持久化处理. 为了实现保持状态功 ...