转入墙内:SAS HBA crossflashing or flashing to IT mode, Dell Perc H200 and H310
Default firmware for this guide is:
2118it.bin
Version 20.00.07.00
Release date: 11-FEB-16
所有资源已转到百度盘:
链接: https://pan.baidu.com/s/1hsG9rXq 密码: vp4g
WARNING: If you have an Integrated, Mini or Mini Mono Perc H310 do NOT try to crossflash with these steps.
So this guide will be the update to my first guide… without double checking everything I’m pretty sure it’s almost identical except for the link to the ZIP file. So I’m not sure why I retyped all of this instead of just updating the ZIP file in the old guide. Anyway…. the difference between the old and new ZIP file is the sas2flsh and sas2flash versions. The default sas2flsh.exe and sas2flash.efi in this new ZIP file are p5 which allows you to pretty much overwrite/downgrade any firmware. This will help mainly those who were getting stuck on the H200 cards. I’ve also included driver, firmware and sas2flash folders that contain a wide array of sometimes hard to find versions.
If you’re just looking for a list of commands that need to be executed then check the very bottom of this page.
Things you’ll need:
- Bootable USB (link). You can follow this post on using Rufus to create a quick FreeDOS bootable USB Drive.
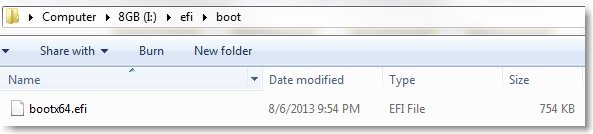
- For those with newer UEFI motherboards you’ll need bootx64.efi (link) (alternate link).
- You’ll want the version: Precompiled x86_64 UEFI Shell v1 Binary.
- This should already be included in the LSI-9211i8i.zip I’ve provided in the next link.
- LSI-9211-8i.zip (link). The main firmware file in this ZIP is P20. This has been updated to support the latest version of FreeNAS. The ZIP also contains versions of the tools that will make this process a bit easier. The default sas2flash tools are P05 which allow downgrading and flashing of non-compatible firmware in many cases.
- Thanks to mobilenvidia and Bryan Vyhmeister (brycv.com) for providing/finding a lot of the files and information used here.
- Both of these guys have provided great guides on flashing IBM M1015 cards and other great information.
- If you have a Dell Perc H310 and your computer won’t boot then you’ll need to cover PCIe pins B5 and B6. You can cover them with a thin piece of electrical tape. Thanks to Andy_Steb from AVS for sharing this tip he found.
- Make sure you don’t cover the A pins on the other side.
 B Pins that need to be covered
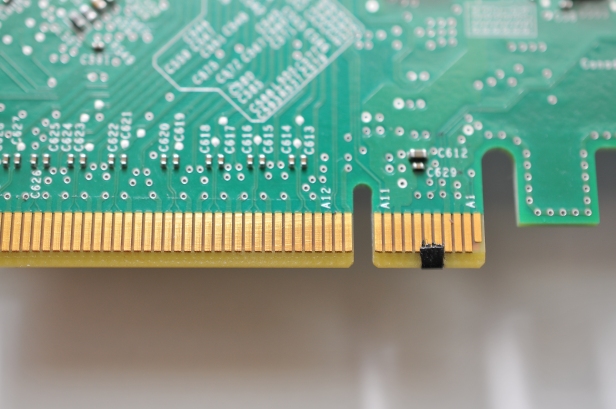 A Pins that should be left exposed
- Make sure you don’t cover the A pins on the other side.
- Your card may have a sticker on it marked SAS Address. If it does then write this down so it’s easily accessible.
Moving on to the steps:
- First thing we need to do is prepare the USB drive.
- Once you’ve created the bootable USB drive in step 1 you want to copy the contents of LSI-9211-8i.zip onto the USB drive.
- The root of the USB drive should look like this:

- Next we’ll want to reboot and boot into FreeDOS/MS-DOS.
- With the bootable USB drive inserted (may work best in a USB2.0 port on the back of the computer) a reboot may boot directly into the USB drive. If not you will need to select the drive from a boot menu. This will be different for every motherboard but should be similar.
- In the below screen shot you can see an ASUS UEFI BIOS Utility screen. At this screen you can hit F8 and select a boot device. The USB drive shows up indented and labeled Patriot Memory. Yours will most likely be labeled by whatever type of drive you have.

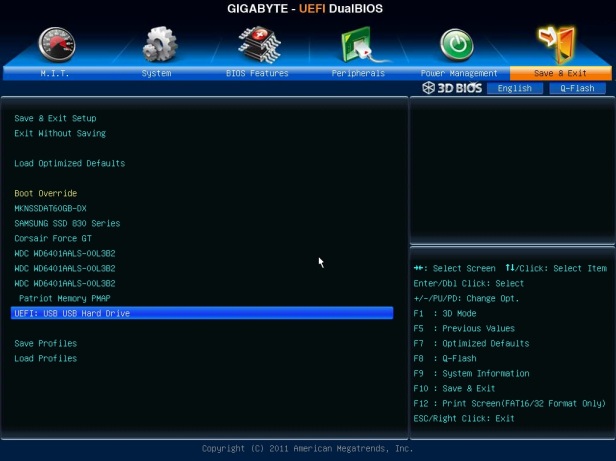
- In the below screen shot you can see a GIGABYTE UEFI BIOS screen. This is presented on the Save & Exit tab. The drive also shows up indented here and labeled Patriot Memory PMAP.
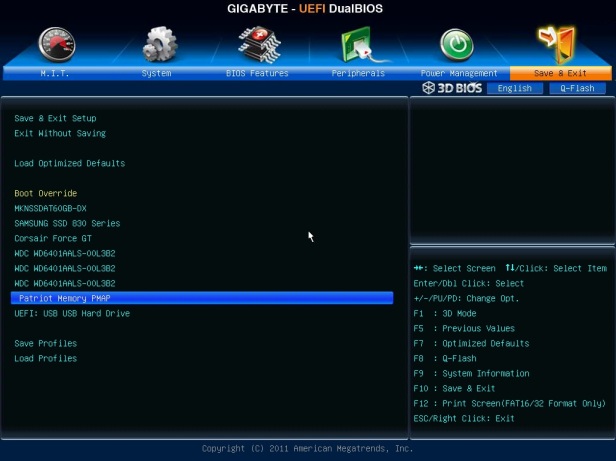
- Clicking or Double-clicking on Patriot Memory should boot into the DOS environment as shown below.

- Next we can begin flashing the card.
- If your card doesn’t have a sticker with the SAS Address you should be able to follow these steps to obtain the address.
- If you have a Dell Perc H310 then follow these steps.
megacli.exe -AdpAllInfo -aAll -page 20- Hit enter once or twice and you should scroll through screens that look like this:

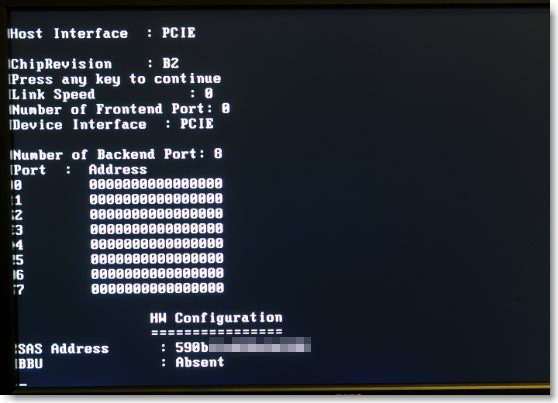
- Write down the SAS Address.
- If you have a Dell Perc H200 then follow the below steps. (If you have a UEFI motherboard then see the steps below for UEFI motherboards)
- To save the SAS Address we’ll need to use sas2flash.
sas2flsh.exe -listall- You should get a listing of all the cards installed.

- Use the number in the first column to get the SAS Address for the card.
sas2flsh.exe -c 0 -list- This should dump all the information for the card including the SAS Address.

- Write down the SAS Address and continue to the next steps.
- Flash the card with the Dell 6gbps HBA Firmware.
- The steps for flashing the H310 and H200 will be the same.
megarec.exe -writesbr 0 sbrempty.bin- If this command fails it should be safe to proceed to step 2.
megarec.exe -cleanflash 0- Reboot the computer and boot back into the USB drive.
sas2flsh.exe -o -f 6GBPSAS.fwIf flashing a M1015 you can use the 2118p7.bin instead of the 6GBPSAS.FWs2fp19.exe -o -sasadd 500xxxxxxxxxxxxx(replace this address with the one you wrote down in the first steps).- Reboot the computer and boot back into the USB drive.
- Flash the card with the LSI 9211-8i Firmware.
- The same steps will flash the card to a LSI 9211-8i.
sas2flsh.exe -o -f 2118it.bin- It should ask you if you want to flash anyway. Type Y to proceed.
- Reboot the computer back into your OS. You may need to remove your USB drive if it was automatically booting.
- Alternatively you can use sas2flsh.exe to flash the 2118p7.bin and then use s2fp19.exe to flash the 2118it.bin. Depending on the revision of the card this method can provide cleaner output for the card details.
- If you’re running linux or BSD then you should be finished. If you’re running Windows 7/2008 R2 and possibly Windows 8.1 then you’ll want to update your drivers.
- Click this (link) to take you back to my previous guide on how to update the drivers.
UEFI Motherboards
- Now if you have a UEFI motherboard and received an error like this:
"ERROR: Failed to initialize PAL. Exiting program."
when trying to run sas2flsh then you’re going to have to run the flashing steps in an efi shell. All of the other instructions should work fine. When you reboot after runningmegarec -cleanflash 0is when you’ll need to enter the efi shell. - As noted above for the H200 you will need to run sas2flash from the UEFI shell in order to save the SAS Address.
- The EFI boot shell should already be on the USB drive.
- After the
megarec -cleanflash 0completes, instead of rebooting into the USB drive we’ll want to reboot into the UEFI shell.
- After the
- Using the same two UEFI BIOS configuration screens I’ll show you how to enter the UEFI shell.
- With the GIGABYTE board we will just select the UEFI USB option highlighted below.
- With the ASUS boards you will most likely need to disable secure boot first. This could pertain to other boards as well.
- For the board I was using this was under the Boot tab and named Secure Boot in the Advanced section of the utility.
- Open that option and select Other OS.


- Save those settings and reboot back into the UEFI BIOS utility.
- I had issues launching the UEFI shell from the below menu in the exit screen.

- You should be able to select Launch EFI Shell from filesystem device but that did not work for me.
- I was however able to select ASUS EZ Mode and then use F8 to select the boot device.
- Selecting UEFI: Patriot Memory this time.
- This should launch a shell that looks like this:
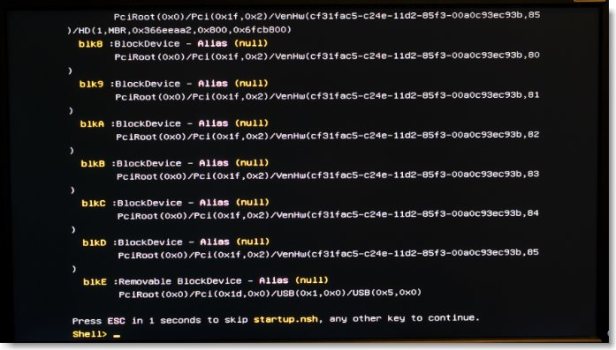
- From here you’ll need to select your USB drive.
- Type the following command to display the devices with a -b to pause on each full screen.
map -b
- As long as you have 1 USB drive inserted it will most likely be the first device that shows up labeled
fs0.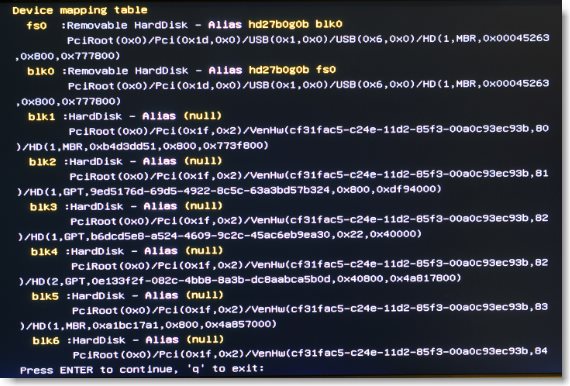
- To select that device type:
fs0:
- Your
Shell>prompt should change to afs0:\>prompt.
- Now you can run your sas2flash command. Note that the efi executable is named sas2flash.efi instead of sas2flsh.exe.
- To save the SAS Address for the Perc H200 run the following commands:
sas2flash.efi -listall
- You should get a listing of all the cards installed.
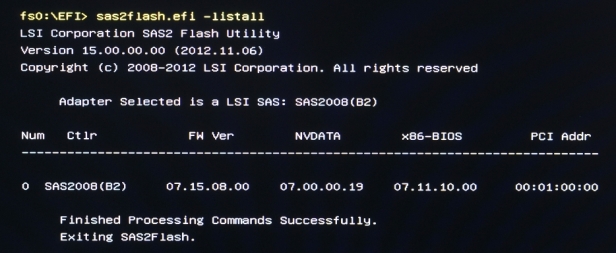
- Use the number from the first column to get the SAS Address for the card.
sas2flash.efi -c 0 -list- This should dump all the information for the card including the SAS Address.
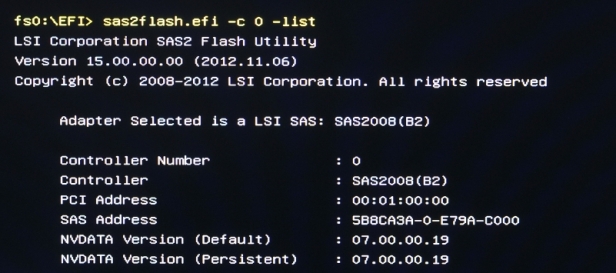
- Write down the SAS Address and continue to the next steps.
sas2flash.efi -o -f 6GBPSAS.FWIf flashing a M1015 you can use the 2118p7.bin instead of the 6GBPSAS.FWsas2flash_p19.efi -o -sasadd 500xxxxxxxxxxxxx(replace this address with the one you wrote down)- Reboot the computer and boot back into the UEFI shell.
- The same steps will flash the card to a LSI 9211-8i.
sas2flash.efi -o -f 2118it.bin- It should ask if you want to flash anyway. Type Y to proceed.
- Reboot the computer back into your OS. You may need to remove the USB drive.
- Alternatively you can use sas2flsh.exe to flash the 2118p7.bin and then use s2fp19.exe to flash the 2118it.bin. Depending on the revision of the card this method can provide cleaner output for the card details.
- If you’re running linux or BSD then you should be finished. If you’re running Windows 7/2008 R2 and possibly Windows 8.1 then you’ll want to update your drivers.
- Click this (link) to take you back to my previous guide on how to update the drivers.
- With the GIGABYTE board we will just select the UEFI USB option highlighted below.
Here is a quick summary of steps to reference:
megacli.exe -AdpAllInfo -aAll -page 20Write down SAS address.megarec.exe -writesbr 0 sbrempty.binIf this fails move on to next step.megarec.exe -cleanflash 0Reboot.sas2flsh.exe -o -f 6GBPSAS.fwReboot.sas2flsh.exe -o -f 2118it.bin- or sas2flsh.exe -0 -f 2118p7.bin, reboot, then s2fp19.exe -o -f 2118it.bin
s2fp19.exe -o -sasadd 500xxxxxxxxxxxxx
sas2flsh.exe -c 0 -listWrite down SAS address.megarec.exe -writesbr 0 sbrempty.binIf this fails move on to next step.megarec.exe -cleanflash 0Reboot.sas2flsh.exe -o -f 6GBPSAS.fwReboot.sas2flsh.exe -o -f 2118it.bin- or sas2flsh.exe -o -f 2118p7.bin, reboot, then s2fp19.exe -o -f 2118it.bin
s2fp19.exe -o -sasadd 500xxxxxxxxxxxxx
- Run the following commands in the DOS prompt:
megacli.exe -AdpAllInfo -aAll -page 20Write down SAS address.megarec.exe -writesbr 0 sbrempty.binIf this fails move on to next step.megarec.exe -cleanflash 0
- Reboot into UEFI shell and run the following commands:
sas2flash.efi -o -f 6GBPSAS.FWReboot and return to UEFI shell.sas2flash.efi -o -f 2118it.bin- or sas2flash.efi -o -f 2118p7.bin, reboot, then
sas2flash_p19.efi -o -f 2118it.bin
- or sas2flash.efi -o -f 2118p7.bin, reboot, then
sas2flash_p19.efi -o -sasadd 500xxxxxxxxxxxxx
- Boot into UEFI shell:
sas2flash.efi -c 0 -listWrite down SAS address.
- Reboot into DOS prompt:
megarec.exe -writesbr 0 sbrempty.binIf this fails move on to next step.megarec.exe -cleanflash 0
- Reboot into UEFI shell:
sas2flash.efi -o -f 6GBPSAS.FWReboot and return to UEFI shell.sas2flash.efi -o -f 2118it.bin- or sas2flash.efi -o -f 2118p7.bin, reboot, then
sas2flash_p19.efi -o -f 2118it.bin
- or sas2flash.efi -o -f 2118p7.bin, reboot, then
sas2flash_p19.efi -o -sasadd 500xxxxxxxxxxxxx
Please leave a comment if these instructions were helpful or if you found them to be too confusing. Thanks!
转入墙内:SAS HBA crossflashing or flashing to IT mode, Dell Perc H200 and H310的更多相关文章
- VS2015墙内创建ionic2 【利用nrm更换源,完美!】
STEP 1 设置cnpm npm install -g cnpm --registry=https://registry.npm.taobao.org 一句话建立cnpm STEP 2 安装nr ...
- Atom读写MarkDown插件选择,以及墙内安装markdown-preview-enhanced,及markdown和mermaid使用教程
1.Atom自带markdown-preview 功能太少,需要大量拓展. 2.markdown-preview-plus 功能还不错,但是其中的滚动条插件markdown-scroll-sync和最 ...
- debian系linux墙内安装安全工具集
虽然有kali linux这样集合了很多安全工具的操作系统,但是kali的软件源相对老旧,没有ubuntu等主流debian系统丰富,kali默认使用su权限进入图形化界面也是违背linux权限机制的 ...
- sdk墙内更新方法
因为GFW有“保护”,我们能“安全”的遨游在中华互联局域网内.如何快速地更新sdk,一直是Android开发者的心病.网上流传着五花八门的方法,在这我记录一些我用过的切实可行的方法供给有需要的人.同时 ...
- 墙内安装nautilus-dropbox 1.6.0-2
软件包:nautilus-dropbox 版本号:1.6.0-2 # aptitude install nautilus-dropbox # less `which dropbox` 查找到下载链接: ...
- VS2015墙内创建ionic2
开始学习ionic2,试验各种方法,感觉以下是紧跟rc版本的最佳方案 STEP1 设置cnpm npm install -g cnpm --registry=https://registry.npm. ...
- Android SDK 墙内更新方法 速度杠杠的
- 【墙内备份】Android 6.0 APIs
Android 6.0 APIs In this documentSHOW MORE Fingerprint Authentication Confirm Credential App Linking ...
- 墙内下载DropBox离线安装包的方法
让你的浏览器FQ,然后进入官网,点击下载,你会看到这个网页: 现在,只需要在原下载的链接后加上“&full=1”即可.就像这样: https://www.dropbox.com/downloa ...
随机推荐
- django的url反向解析
目的:防止页面中url地址改变,其他与这个URL地址有关联的都要改,减少耦合度 使用:主要分为在html中和视图函数中的使用 HTML中的使用: 如果我们在项目的url文件中通过include导入了应 ...
- 示例, linq分组
public class HIS_CLIREGISTER : BaseModel{ private String _FBCODE;[StringLength(8)]/// <summary> ...
- html-webpack-plugin 遇到 throw new Error('Cyclic dependency' + nodeRep)
今天遇到了 html-webpack-plugin 遇到 throw new Error('Cyclic dependency' + nodeRep) 错. 刚查到一篇文章,<手摸手,带你用合理 ...
- vue用hbuilderX打包app嵌入h5方式云打包和遇到的问题
vue用hbuilderX打包app嵌入h5方式云打包和遇到的问题 vue用hbuilderX打包app就可以了,不过有兼容性问题,转换rem的用不了,嵌入到app的webview里面变得很小了,另外 ...
- QGraphicsItem的paint函数的一些相关问题
在QGraphicsItem中,一个成员函数paint(),其声明如下: void QGraphicsItem::paint ( QPainter * painter, const QStyleOpt ...
- Xml & Tomcat
文档声明: 简单声明, version : 解析这个xml的时候,使用什么版本的解析器解析 <?xml version="1.0" ?> encoding : 解析xm ...
- NOIP 2018 划水记
(此处不应有目录) (本来想咕掉这篇游记) Day -1 今天信心题,这个毒瘤出题人怎么出了一堆垃圾题(smallfat批判这个垃圾题). T2,T3是送分题.T1考了个noip根本不会考得类欧几里德 ...
- Python中关于列表嵌套列表的处理
在处理列表的时候我们经常会遇到列表中嵌套列表的结构,如果我们要把所有元素放入一个新列表,或者要计算所有元素的个数的话应该怎么做呢? 第一个例子 对于上图中的这样一组数据,如果我们要知道这个CSV文件中 ...
- javascript 之 面向对象【理解对象】
第五版本 6.1.1 属性类型 1/数据属性 :包含有数据值的问题.有内部有特性和属性,是为了实现javaScript引擎用的,在javaScript中不能直接访问 [[Configur ...
- speech
1.李开复:一个人的成功,15%靠专业知识,其余15%人际沟通,公众演讲,以及影响他人的能力 2.演讲是一门遗憾的艺术 3.没有准备就等于准备失败 4.追求完美,就是在追求完蛋 5.宁可千日无机会,不 ...