SSM + VUE 实现简单的 CRUD
一、项目分析
1、需求
(1)使用 ssm + vue 实现一个crud(数据库增删改查)的简单实现。
(2)前后端分离,前端页面展示+后台管理。
2、技术点
(1)基础框架: SSM(Spring,SpringMVC,Mybatis)
(2)数据库: Mysql
(3)前端: UI框架 iView + vue
(4)项目依赖管理: maven
(5)分页: pagehelper
(6)逆向工程: Mybatis Generator
(7)开发工具:IDEA + Chrome + HBuilder X
二、项目地址、截图
1、项目地址
front:https://github.com/lyh-man/ssm_crud-front.git
back:https://github.com/lyh-man/ssm_crud-back.git
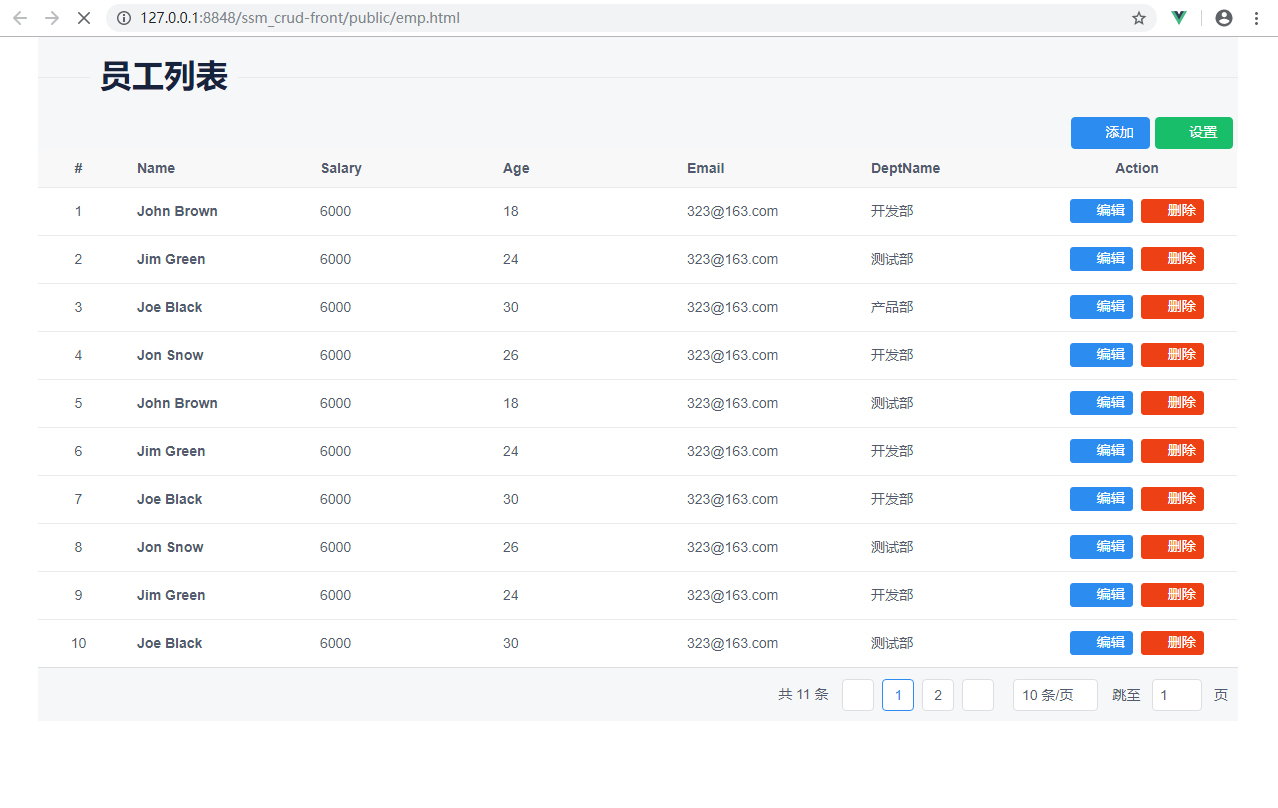
2、项目截图
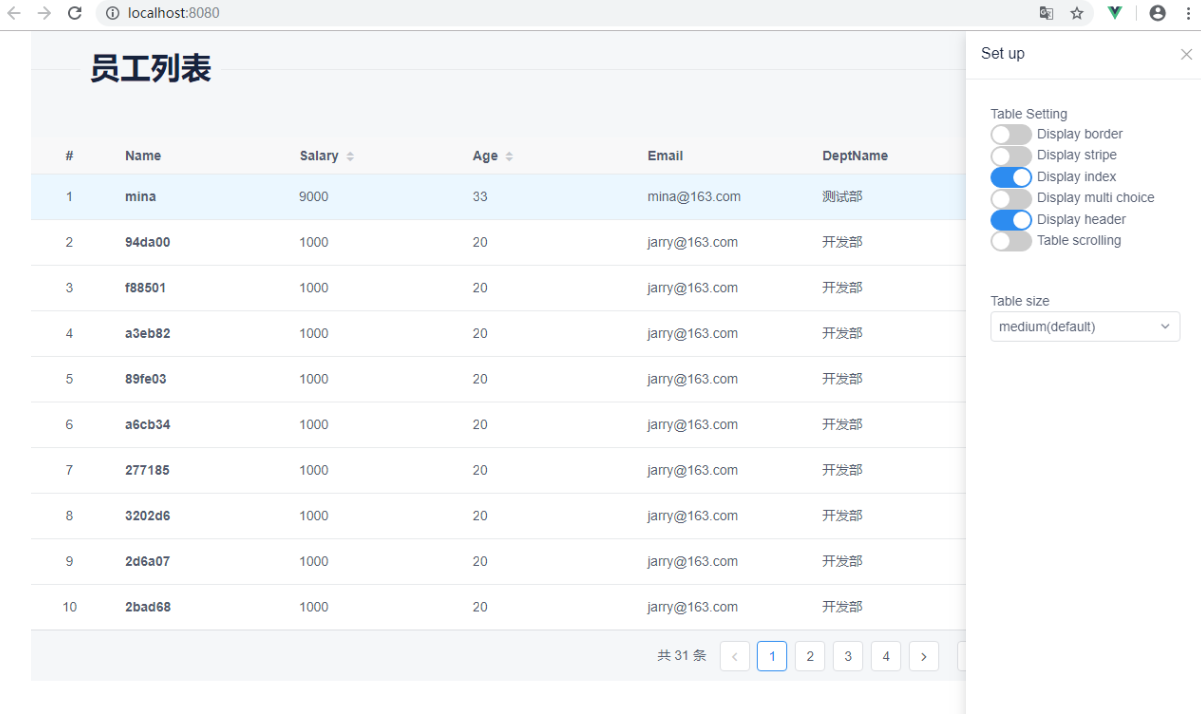
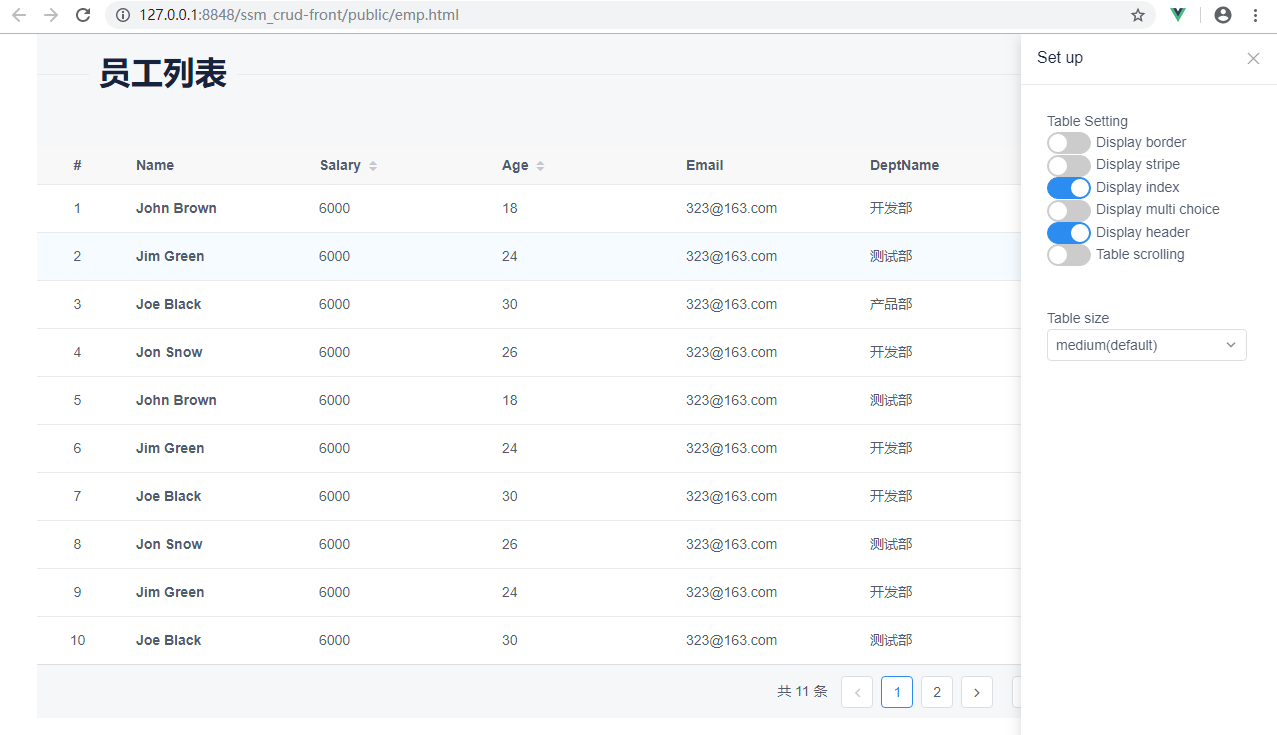
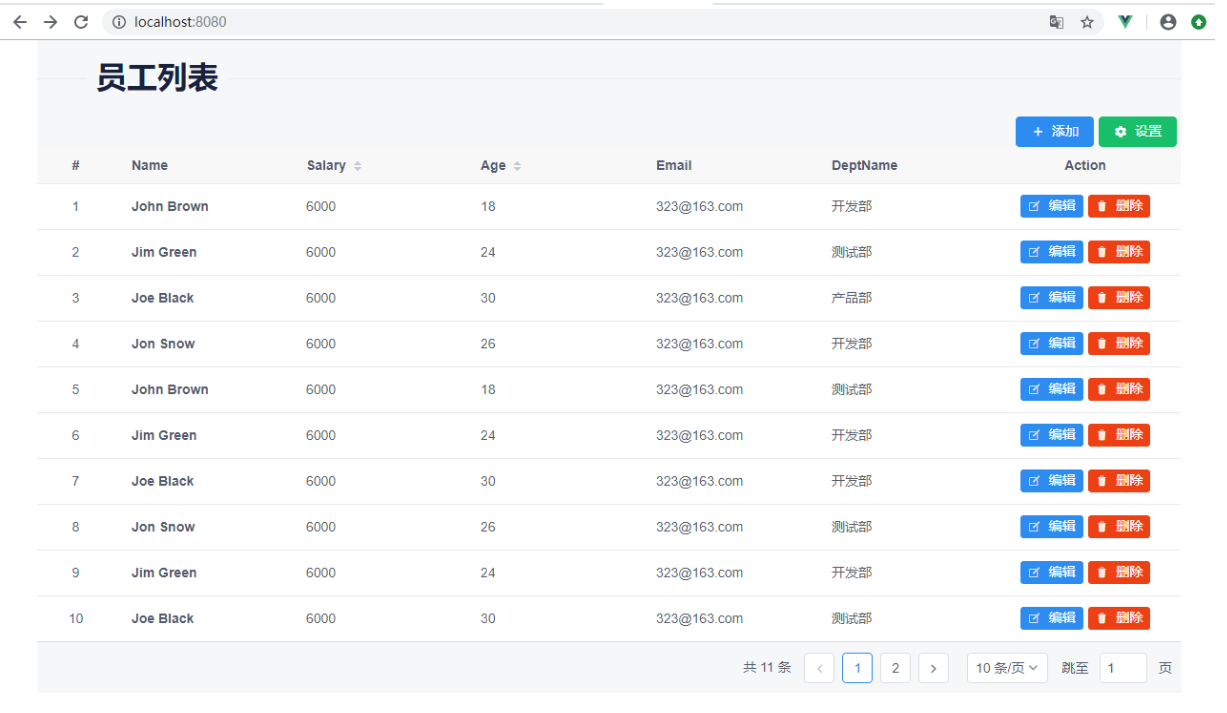
(1)初始界面(查数据)
Step1:初始化界面(获取第一页数据)

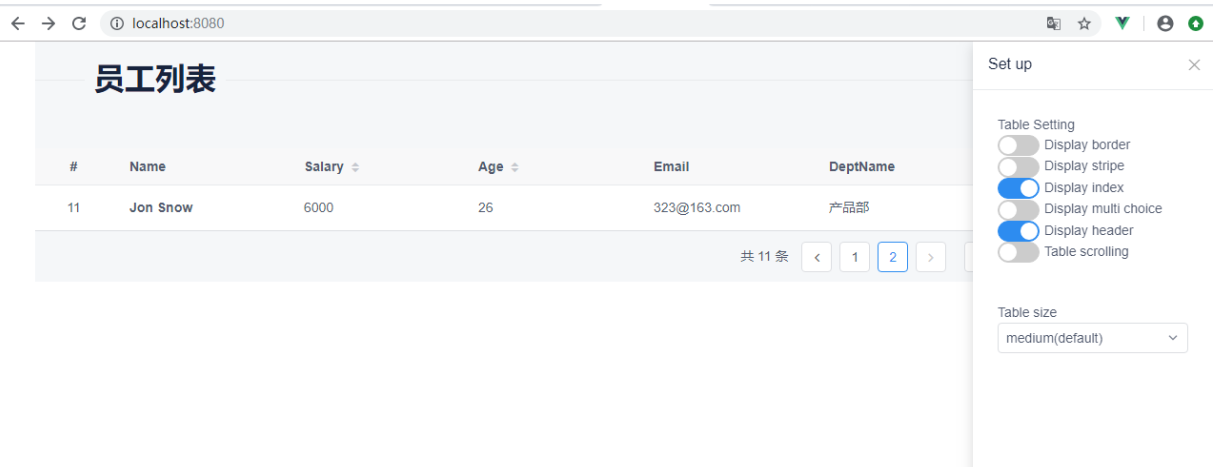
Step2:可以设置每页数据的条数,如下,设置 20条/页

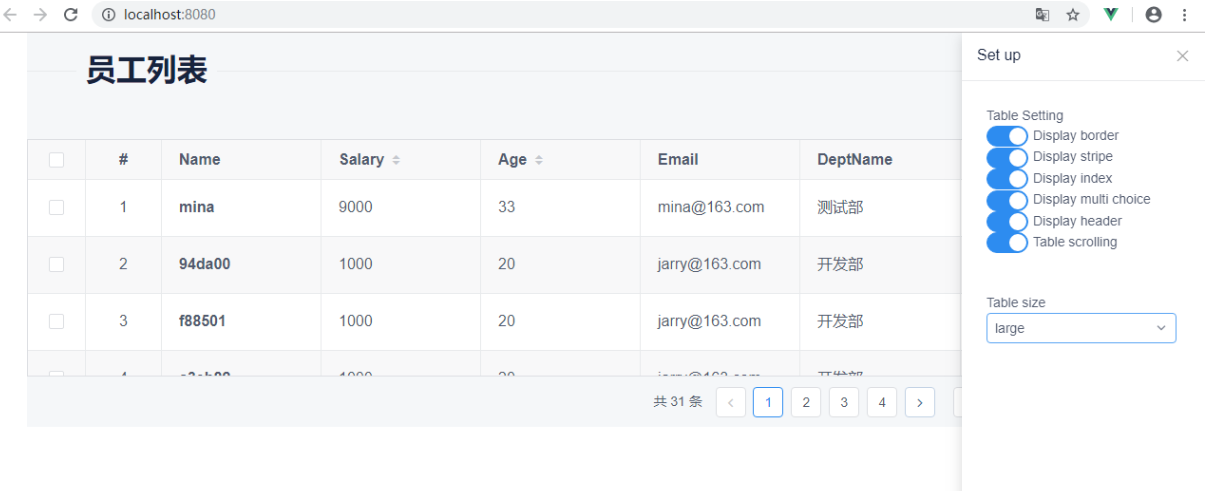
Step3:点击设置按钮,可以设置表格样式。
Step4:切换页面,数据刷新(根据当前页码向后台发送请求,获取数据)

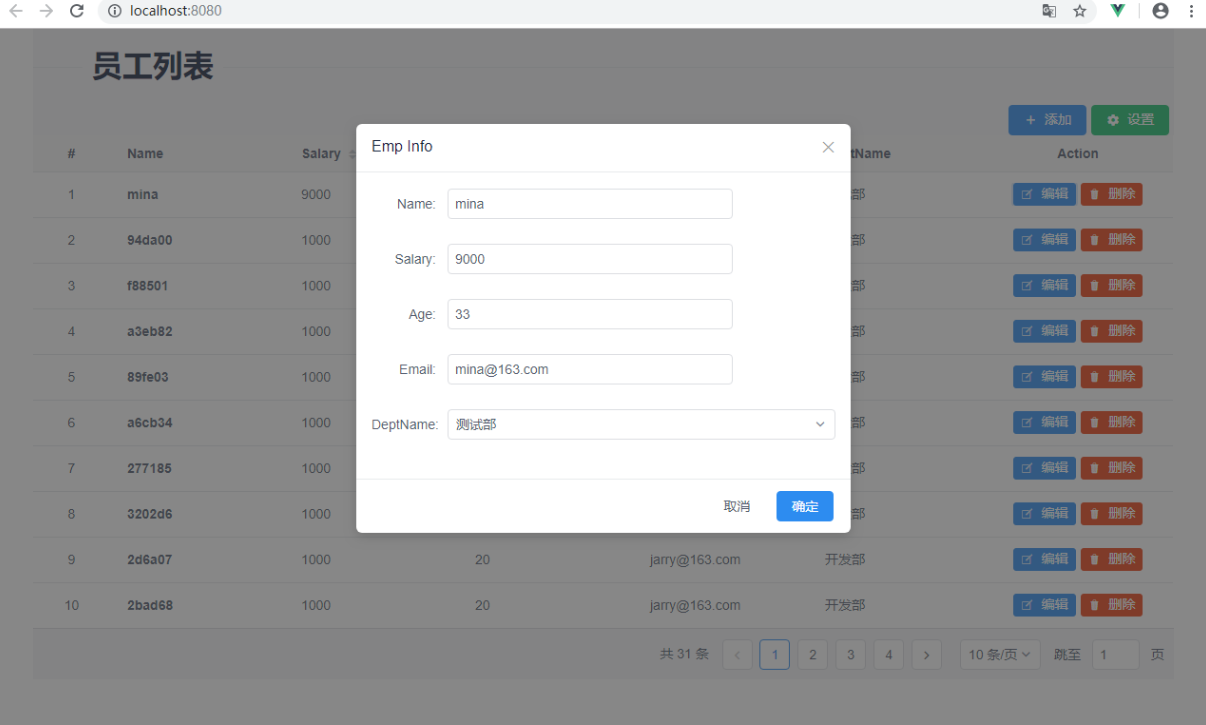
(2)修改数据
Step1:点击编辑按钮(如下,选择第一条数据,展示所选择的数据。)
Step2:修改数据

Step3:修改后,展示数据

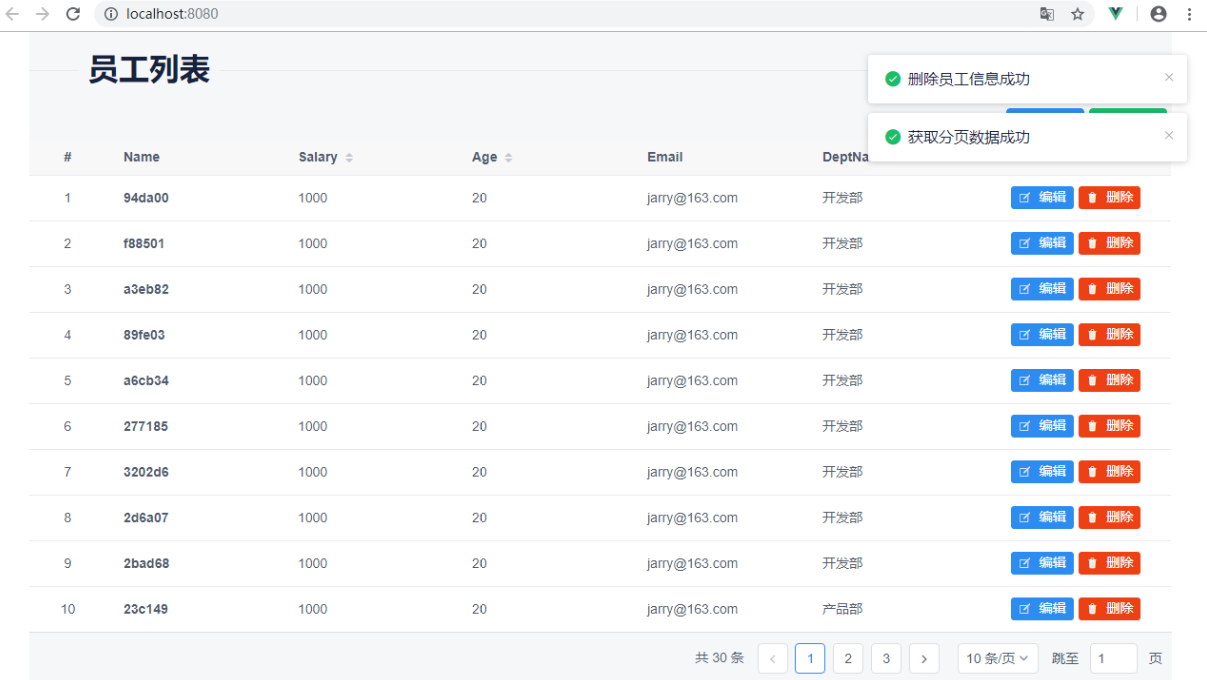
(3)删除数据
Step1:点击删除按钮(比如第一条数据),会弹出一个提示框
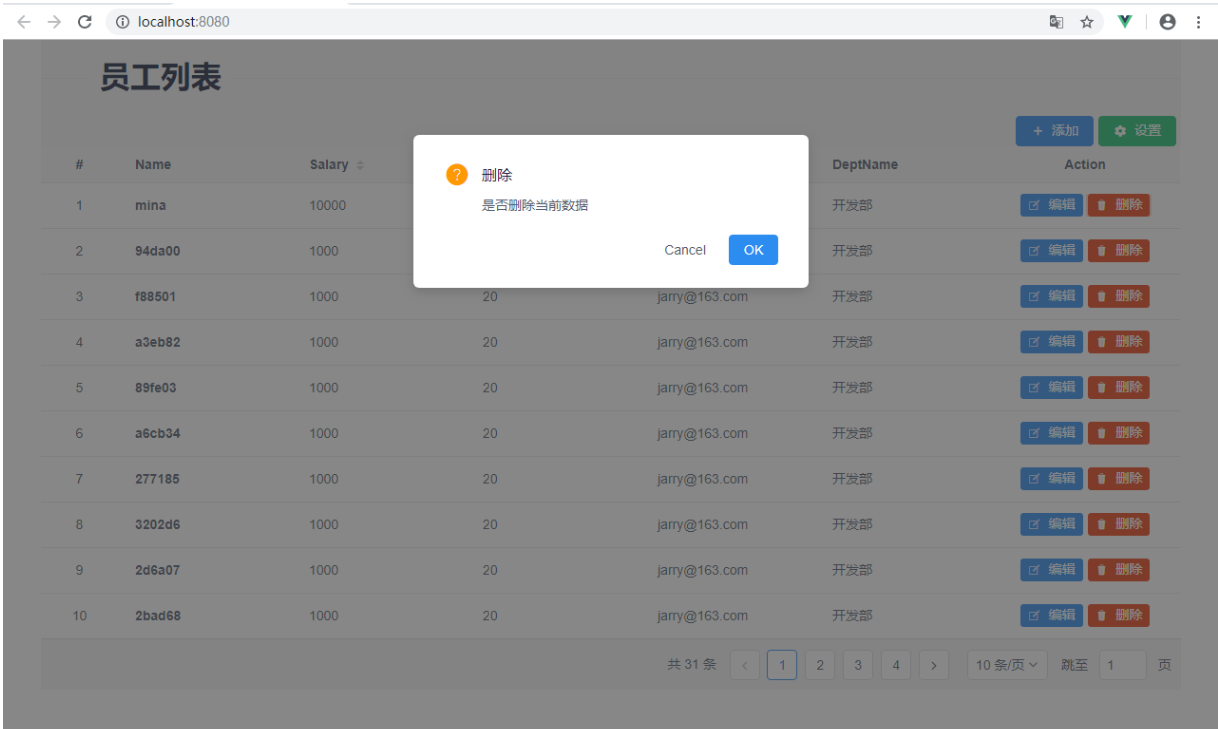
Step2:选择 Ok,删除该数据
(3)添加数据
Step1:点击添加按钮
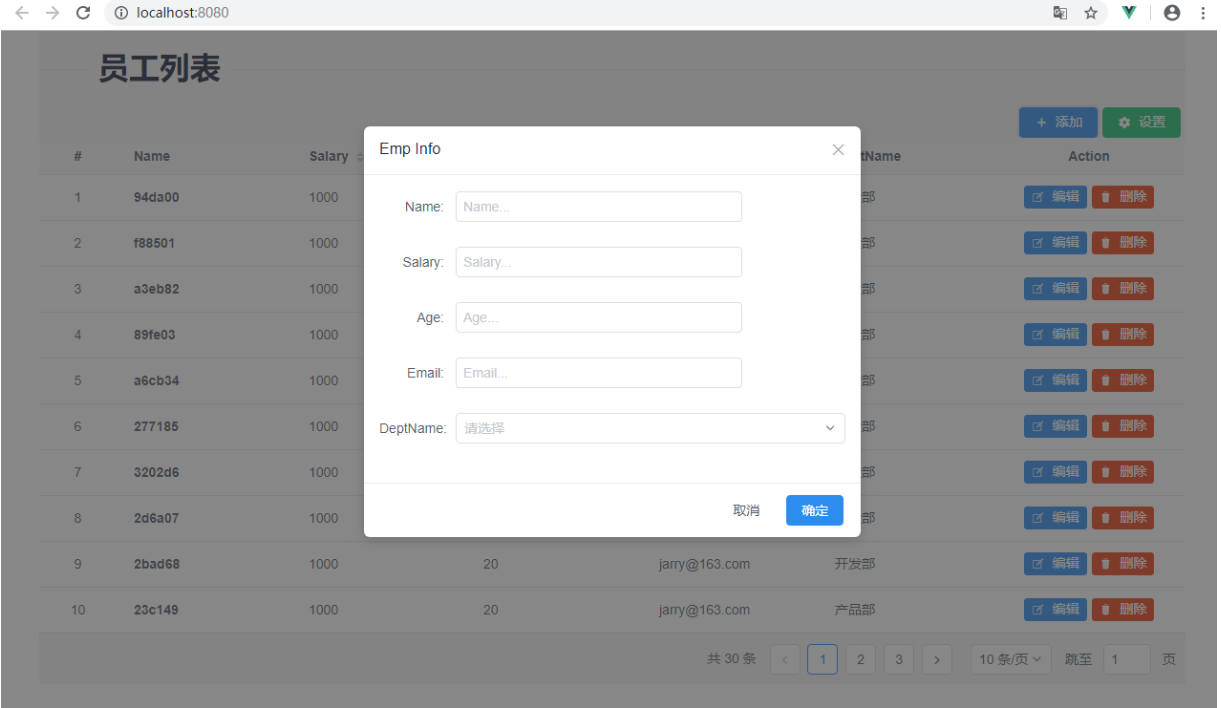
Step2:填写信息
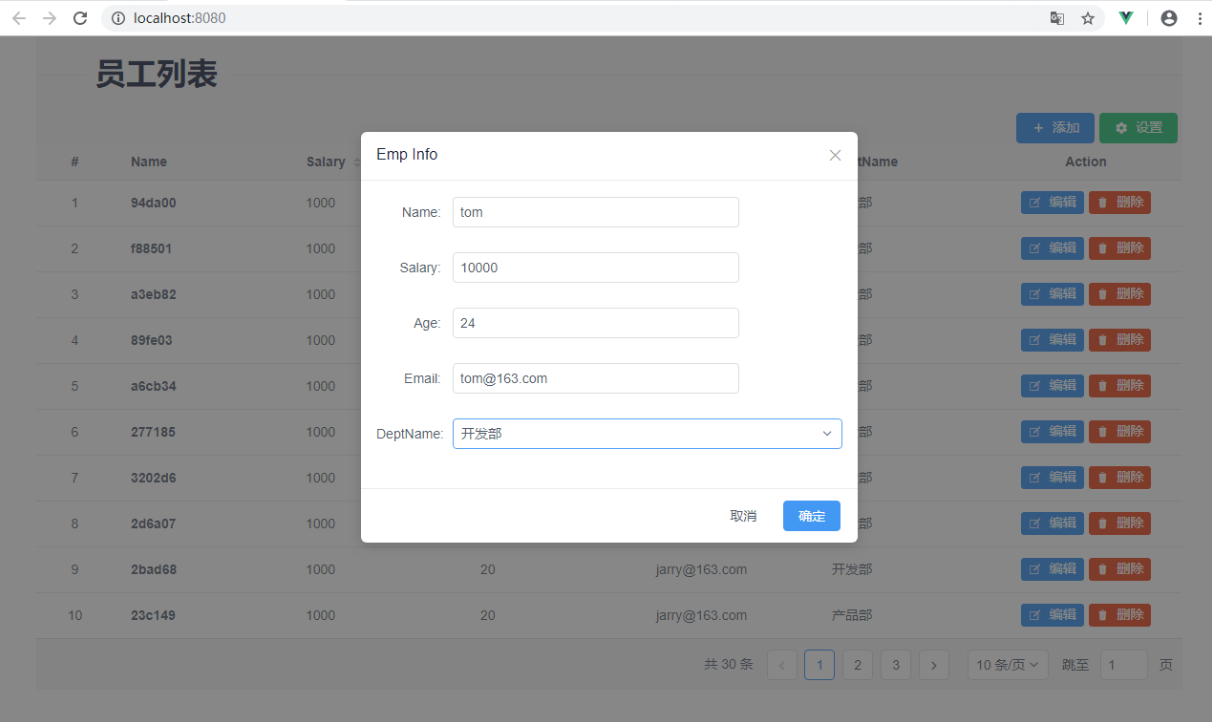
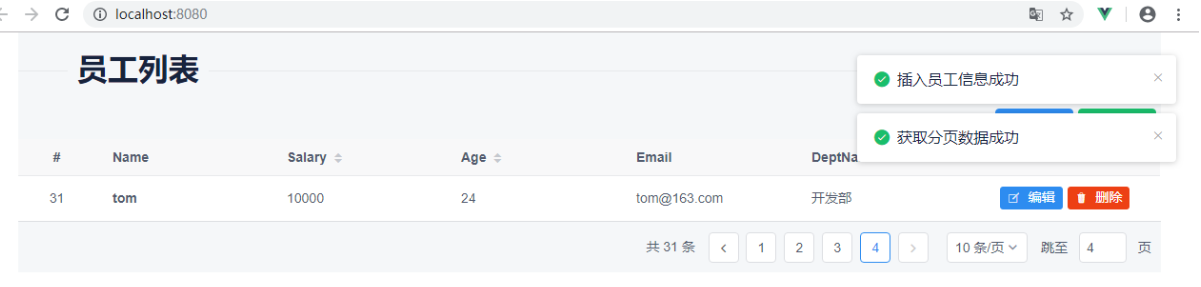
Step3:点击确定,插入数据,并跳转到最后一页
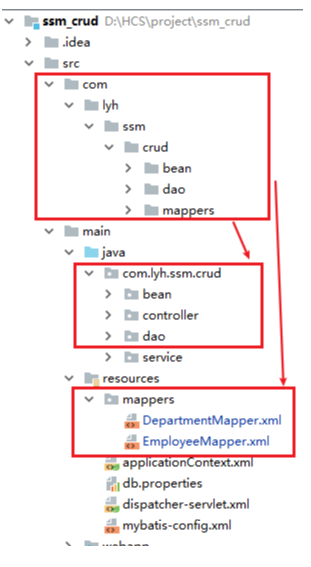
三、后端项目环境搭建
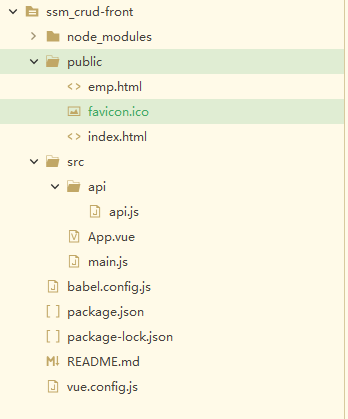
搭建后的整个文件结构:

1、使用IDEA创建一个maven工程。
可以参考 https://www.cnblogs.com/l-y-h/p/11454933.html
2、引入项目依赖的jar包(配置依赖信息)。
需要配置Spring,SpringMVC,mybatis,数据库连接池,数据库驱动包,以及其他的jar包,比如junit等。
- 【pom.xml】
- <?xml version="1.0" encoding="UTF-8"?>
- <project xmlns="http://maven.apache.org/POM/4.0.0" xmlns:xsi="http://www.w3.org/2001/XMLSchema-instance"
- xsi:schemaLocation="http://maven.apache.org/POM/4.0.0 http://maven.apache.org/xsd/maven-4.0.0.xsd">
- <modelVersion>4.0.0</modelVersion>
- <groupId>com.lyh</groupId>
- <artifactId>crud</artifactId>
- <version>1.0-SNAPSHOT</version>
- <packaging>war</packaging>
- <name>crud Maven Webapp</name>
- <!-- FIXME change it to the project's website -->
- <url>http://www.example.com</url>
- <properties>
- <jar.version>4.3.17.RELEASE</jar.version>
- </properties>
- <dependencies>
- <!-- Spring WebMVC -->
- <!-- https://mvnrepository.com/artifact/org.springframework/spring-webmvc -->
- <dependency>
- <groupId>org.springframework</groupId>
- <artifactId>spring-webmvc</artifactId>
- <version>${jar.version}</version>
- </dependency>
- <!-- Spring JDBC -->
- <!-- https://mvnrepository.com/artifact/org.springframework/spring-jdbc -->
- <dependency>
- <groupId>org.springframework</groupId>
- <artifactId>spring-jdbc</artifactId>
- <version>${jar.version}</version>
- </dependency>
- <!-- Spring Aspects -->
- <!-- https://mvnrepository.com/artifact/org.springframework/spring-aspects -->
- <dependency>
- <groupId>org.springframework</groupId>
- <artifactId>spring-aspects</artifactId>
- <version>${jar.version}</version>
- </dependency>
- <!-- Mybatis -->
- <!-- https://mvnrepository.com/artifact/org.mybatis/mybatis -->
- <dependency>
- <groupId>org.mybatis</groupId>
- <artifactId>mybatis</artifactId>
- <version>3.4.6</version>
- </dependency>
- <!-- spring 与 mybatis 的整合包 -->
- <!-- https://mvnrepository.com/artifact/org.mybatis/mybatis-spring -->
- <dependency>
- <groupId>org.mybatis</groupId>
- <artifactId>mybatis-spring</artifactId>
- <version>1.3.2</version>
- </dependency>
- <!-- 数据库连接池,c3p0 -->
- <!-- https://mvnrepository.com/artifact/com.mchange/c3p0 -->
- <dependency>
- <groupId>com.mchange</groupId>
- <artifactId>c3p0</artifactId>
- <version>0.9.5.4</version>
- </dependency>
- <!-- mysql驱动包 -->
- <!-- https://mvnrepository.com/artifact/mysql/mysql-connector-java -->
- <dependency>
- <groupId>mysql</groupId>
- <artifactId>mysql-connector-java</artifactId>
- <version>8.0.18</version>
- </dependency>
- <!-- jstl -->
- <!-- https://mvnrepository.com/artifact/jstl/jstl -->
- <dependency>
- <groupId>jstl</groupId>
- <artifactId>jstl</artifactId>
- <version>1.2</version>
- </dependency>
- <!-- servlet-api -->
- <!-- https://mvnrepository.com/artifact/javax.servlet/javax.servlet-api -->
- <dependency>
- <groupId>javax.servlet</groupId>
- <artifactId>javax.servlet-api</artifactId>
- <version>4.0.1</version>
- <scope>provided</scope>
- </dependency>
- <!-- junit -->
- <!-- https://mvnrepository.com/artifact/junit/junit -->
- <dependency>
- <groupId>junit</groupId>
- <artifactId>junit</artifactId>
- <version>4.12</version>
- <scope>test</scope>
- </dependency>
- <!-- 逆向工程所需的依赖信息 -->
- <!-- https://mvnrepository.com/artifact/org.mybatis.generator/mybatis-generator-core -->
- <dependency>
- <groupId>org.mybatis.generator</groupId>
- <artifactId>mybatis-generator-core</artifactId>
- <version>1.3.5</version>
- </dependency>
- <!-- Spring test -->
- <!-- https://mvnrepository.com/artifact/org.springframework/spring-test -->
- <dependency>
- <groupId>org.springframework</groupId>
- <artifactId>spring-test</artifactId>
- <version>${jar.version}</version>
- <scope>test</scope>
- </dependency>
- <!-- Json -->
- <!-- https://mvnrepository.com/artifact/com.fasterxml.jackson.core/jackson-databind -->
- <dependency>
- <groupId>com.fasterxml.jackson.core</groupId>
- <artifactId>jackson-databind</artifactId>
- <version>2.10.0</version>
- </dependency>
- <!-- pagehelper 分页插件 -->
- <!-- https://mvnrepository.com/artifact/com.github.pagehelper/pagehelper -->
- <dependency>
- <groupId>com.github.pagehelper</groupId>
- <artifactId>pagehelper</artifactId>
- <version>5.0.0</version>
- </dependency>
- </dependencies>
- <build>
- <finalName>crud</finalName>
- <pluginManagement><!-- lock down plugins versions to avoid using Maven defaults (may be moved to parent pom) -->
- <plugins>
- <plugin>
- <artifactId>maven-clean-plugin</artifactId>
- <version>3.1.0</version>
- </plugin>
- <!-- see http://maven.apache.org/ref/current/maven-core/default-bindings.html#Plugin_bindings_for_war_packaging -->
- <plugin>
- <artifactId>maven-resources-plugin</artifactId>
- <version>3.0.2</version>
- </plugin>
- <plugin>
- <artifactId>maven-compiler-plugin</artifactId>
- <version>3.8.0</version>
- </plugin>
- <plugin>
- <artifactId>maven-surefire-plugin</artifactId>
- <version>2.22.1</version>
- </plugin>
- <plugin>
- <artifactId>maven-war-plugin</artifactId>
- <version>3.2.2</version>
- </plugin>
- <plugin>
- <artifactId>maven-install-plugin</artifactId>
- <version>2.5.2</version>
- </plugin>
- <plugin>
- <artifactId>maven-deploy-plugin</artifactId>
- <version>2.8.2</version>
- </plugin>
- </plugins>
- </pluginManagement>
- </build>
- </project>
3、配置ssm整合的文件(详细过程后续展开)。
web.xml,spring,springmvc,mybatis。
4、官方文档:
Spring:http://spring.io/docs
MyBatis:http://mybatis.github.io/mybatis-3/
分页组件的使用: https://github.com/pagehelper/Mybatis-PageHelper/blob/master/wikis/en/HowToUse.md
三、(3.1)SSM基本配置--配置web.xml
1、配置Spring容器
用于获取 Spring 配置文件(applicationContext.xml) 的读取位置。
<context-param>直接配置在web.xml的<web-app>标签中,属于上下文参数,在整个web应用中都可以使用。它是全局的,因此存放在servletContext对象中(即application对象)。通过getServletContext().getInitParameter("contextParam")的方式可以获取。
- 【在web.xml中配置】
- <!-- step1: 配置全局的参数,启动Spring容器 -->
- <context-param>
- <param-name>contextConfigLocation</param-name>
- <!-- 若没有提供值,默认会去找/WEB-INF/applicationContext.xml。 -->
- <param-value>classpath:applicationContext.xml</param-value>
- </context-param>
- <listener>
- <listener-class>org.springframework.web.context.ContextLoaderListener</listener-class>
- </listener>
2、配置SpringMVC的前端控制器
用于拦截请求,并指定Spring MVC配置文件的读取位置。
<init-parm>配置在<servlet>标签中,用来初始化当前的Servlet的。属于当前Servlet的配置,因此存放在servletConfig对象(servlet对象)中。
通过getServletConfig().getInitParameter("initParam")的方式可以获取。
- 【在web.xml中配置】
- <!-- step2: 配置SpringMVC的前端控制器,用于拦截所有的请求 -->
- <servlet>
- <servlet-name>springmvcDispatcherServlet</servlet-name>
- <servlet-class>org.springframework.web.servlet.DispatcherServlet</servlet-class>
- <init-param>
- <param-name>contextConfigLocation</param-name>
- <!-- 若没有提供值,默认会去找WEB-INF/*-servlet.xml。 -->
- <param-value>classpath:dispatcher-servlet.xml</param-value>
- </init-param>
- <!-- 启动优先级,数值越小优先级越大 -->
- <load-on-startup>1</load-on-startup>
- </servlet>
- <servlet-mapping>
- <servlet-name>springmvcDispatcherServlet</servlet-name>
- <!-- 将DispatcherServlet请求映射配置为"/",则Spring MVC将捕获Web容器所有的请求,包括静态资源的请求 -->
- <url-pattern>/</url-pattern>
- </servlet-mapping>
注:
spring框架在加载web配置文件的时候。首先加载的是context-param配置的内容,而并不会去初始化servlet。只有进行了网站的跳转,经过DispatcherServlet的时候,才会初始化servlet,从而加载init-param中的内容。
3、配置解决乱码问题的过滤器
用于解决乱码问题。
- 【在web.xml中配置】
- <!-- step3: characterEncodingFilter字符编码过滤器,放在所有过滤器的前面 -->
- <filter>
- <filter-name>characterEncodingFilter</filter-name>
- <filter-class>org.springframework.web.filter.CharacterEncodingFilter</filter-class>
- <init-param>
- <!--要使用的字符集,一般我们使用UTF-8(保险起见UTF-8最好)-->
- <param-name>encoding</param-name>
- <param-value>UTF-8</param-value>
- </init-param>
- <init-param>
- <!--是否强制设置request的编码为encoding,默认false,不建议更改-->
- <param-name>forceRequestEncoding</param-name>
- <param-value>false</param-value>
- </init-param>
- <init-param>
- <!--是否强制设置response的编码为encoding,建议设置为true-->
- <param-name>forceResponseEncoding</param-name>
- <param-value>true</param-value>
- </init-param>
- </filter>
- <filter-mapping>
- <filter-name>characterEncodingFilter</filter-name>
- <!--这里不能留空或者直接写 ' / ' ,否则可能不起作用-->
- <url-pattern>/*</url-pattern>
- </filter-mapping>
4、配置Rest风格的URI
由于浏览器form表单只支持GET与POST请求,而DELETE、PUT等method并不支持,spring3.0添加了一个过滤器(HiddenHttpMethodFilter),可以将这些请求转换为标准的http方法,使得支持GET、POST、PUT与DELETE请求。
- 【在web.xml中配置】
- <!-- step4: 配置过滤器,将post请求转为delete,put -->
- <filter>
- <filter-name>HiddenHttpMethodFilter</filter-name>
- <filter-class>org.springframework.web.filter.HiddenHttpMethodFilter</filter-class>
- </filter>
- <filter-mapping>
- <filter-name>HiddenHttpMethodFilter</filter-name>
- <url-pattern>/*</url-pattern>
- </filter-mapping>
注:
web.xml 的加载顺序是:[context-param -> listener -> filter -> servlet -> spring] ,而同类型节点之间的实际程序调用的时候的顺序是根据对应的 mapping 的顺序进行调用的。
5、web.xml完整配置
- <?xml version="1.0" encoding="UTF-8"?>
- <web-app xmlns="http://xmlns.jcp.org/xml/ns/javaee"
- xmlns:xsi="http://www.w3.org/2001/XMLSchema-instance"
- xsi:schemaLocation="http://xmlns.jcp.org/xml/ns/javaee http://xmlns.jcp.org/xml/ns/javaee/web-app_3_1.xsd"
- version="3.1">
- <!-- step1: 配置全局的参数,启动Spring容器 -->
- <context-param>
- <param-name>contextConfigLocation</param-name>
- <!-- 若没有提供值,默认会去找/WEB-INF/applicationContext.xml。 -->
- <param-value>classpath:applicationContext.xml</param-value>
- </context-param>
- <listener>
- <listener-class>org.springframework.web.context.ContextLoaderListener</listener-class>
- </listener>
- <!-- step2: 配置SpringMVC的前端控制器,用于拦截所有的请求 -->
- <servlet>
- <servlet-name>springmvcDispatcherServlet</servlet-name>
- <servlet-class>org.springframework.web.servlet.DispatcherServlet</servlet-class>
- <init-param>
- <param-name>contextConfigLocation</param-name>
- <!-- 若没有提供值,默认会去找WEB-INF/*-servlet.xml。 -->
- <param-value>classpath:dispatcher-servlet.xml</param-value>
- </init-param>
- <!-- 启动优先级,数值越小优先级越大 -->
- <load-on-startup>1</load-on-startup>
- </servlet>
- <servlet-mapping>
- <servlet-name>springmvcDispatcherServlet</servlet-name>
- <!-- 将DispatcherServlet请求映射配置为"/",则Spring MVC将捕获Web容器所有的请求,包括静态资源的请求 -->
- <url-pattern>/</url-pattern>
- </servlet-mapping>
- <!-- step3: characterEncodingFilter字符编码过滤器,放在所有过滤器的前面 -->
- <filter>
- <filter-name>characterEncodingFilter</filter-name>
- <filter-class>org.springframework.web.filter.CharacterEncodingFilter</filter-class>
- <init-param>
- <!--要使用的字符集,一般我们使用UTF-8(保险起见UTF-8最好)-->
- <param-name>encoding</param-name>
- <param-value>UTF-8</param-value>
- </init-param>
- <init-param>
- <!--是否强制设置request的编码为encoding,默认false,不建议更改-->
- <param-name>forceRequestEncoding</param-name>
- <param-value>false</param-value>
- </init-param>
- <init-param>
- <!--是否强制设置response的编码为encoding,建议设置为true-->
- <param-name>forceResponseEncoding</param-name>
- <param-value>true</param-value>
- </init-param>
- </filter>
- <filter-mapping>
- <filter-name>characterEncodingFilter</filter-name>
- <!--这里不能留空或者直接写 ' / ' ,否则可能不起作用-->
- <url-pattern>/*</url-pattern>
- </filter-mapping>
- <!-- step4: 配置过滤器,将post请求转为delete,put -->
- <filter>
- <filter-name>HiddenHttpMethodFilter</filter-name>
- <filter-class>org.springframework.web.filter.HiddenHttpMethodFilter</filter-class>
- </filter>
- <filter-mapping>
- <filter-name>HiddenHttpMethodFilter</filter-name>
- <url-pattern>/*</url-pattern>
- </filter-mapping>
- </web-app>
三、(3.2)配置SpringMVC--dispatcher-servlet.xml
1、配置组件扫描方式
用于获取相关组件。 一般在SpringMVC的配置里,只扫描Controller层,Spring配置中扫描所有包,但是排除Controller层。
- 【在dispatcher-servlet.xml中配置】
- <!-- step1: 配置Controller扫描方式 -->
- <!-- 使用组件扫描的方式可以一次扫描多个Controller,只需指定包路径即可 -->
- <context:component-scan base-package="com.lyh.ssm.crud" use-default-filters="false">
- <!-- 一般在SpringMVC的配置里,只扫描Controller层,Spring配置中扫描所有包,但是排除Controller层。
- context:include-filter要注意,如果base-package扫描的不是最终包,那么其他包还是会扫描、加载,如果在SpringMVC的配置中这么做,会导致Spring不能处理事务,
- 所以此时需要在<context:component-scan>标签上,增加use-default-filters="false",就是真的只扫描context:include-filter包括的内容-->
- <context:include-filter type="annotation" expression="org.springframework.stereotype.Controller" />
- </context:component-scan>
- <!-- 配置单个Controller的方式(某些特殊的情况可以使用),需要指定Controller的全限定名 -->
- <!-- <bean name="/get" class="com.wxisme.ssm.controller.Controller1"/> -->
2、配置视图解析器
当设置视图名时,会自动添加前缀与后缀。
- 【在dispatcher-servlet.xml中配置】
- <!-- step2: 配置视图解析器,设置视图名时,会自动添加上前缀与后缀 -->
- <bean id="defaultViewResolver" class="org.springframework.web.servlet.view.InternalResourceViewResolver">
- <property name="prefix" value="/WEB-INF/"/><!--设置JSP文件的目录位置-->
- <property name="suffix" value=".jsp"/>
- </bean>
3、配置请求处理(标准配置一)
将DispatcherServlet请求映射配置为"/",则Spring MVC将捕获Web容器所有的请求(包括静态资源的请求),Spring MVC会将它们当成一个普通请求处理,因此找不到对应处理器将导致错误。所以为了使Spring框架能够捕获所有URL的请求,同时又将静态资源的请求转由Web容器处理,在将DispatcherServlet的请求映射配置为"/"前提下,使用<mvc:default-servlet-handler />,可以将静态请求交给服务器处理。
- 【在dispatcher-servlet.xml中配置】
- <!-- 会在Spring MVC上下文中定义一个org.springframework.web.servlet.resource.DefaultServletHttpRequestHandler,它会像一个检查员,对进入DispatcherServlet的URL进行筛查,如果发现是静态资源的请求,就将该请求转由Web应用服务器默认的Servlet处理,如果不是静态资源的请求,才由DispatcherServlet继续处理。 -->
- <mvc:default-servlet-handler />
4、配置注解的处理器映射器和处理器适配器(标准配置二)
<mvc:annotation-driven />简化了注解配置,且提供了一些高级功能,比如支持使用@Valid对javaBean进行JSR-303验证、支持使用@RequestBody、@ResponseBody。
- 【在dispatcher-servlet.xml中配置】
- 【方式一:】
- <!-- 配置注解的处理器映射器和处理器适配器(简化配置) -->
- <mvc:annotation-driven />
- 【方式二:】
- <!-- 注解的处理器适配器 -->
- <!-- <bean class="org.springframework.web.servlet.mvc.method.annotation.RequestMappingHandlerAdapter"/> -->
- <!-- 注解的处理器映射器 -->
- <!-- <bean class="org.springframework.web.servlet.mvc.method.annotation.RequestMappingHandlerMapping"/> -->
5、dispatcher-servlet.xml完整配置
- <?xml version="1.0" encoding="UTF-8"?>
- <beans xmlns="http://www.springframework.org/schema/beans"
- xmlns:xsi="http://www.w3.org/2001/XMLSchema-instance"
- xmlns:context="http://www.springframework.org/schema/context"
- xmlns:mvc="http://www.springframework.org/schema/mvc"
- xsi:schemaLocation="http://www.springframework.org/schema/beans
- http://www.springframework.org/schema/beans/spring-beans.xsd
- http://www.springframework.org/schema/context
- http://www.springframework.org/schema/context/spring-context.xsd
- http://www.springframework.org/schema/mvc
- http://www.springframework.org/schema/mvc/spring-mvc.xsd">
- <!-- step1: 配置Controller扫描方式 -->
- <!-- 使用组件扫描的方式可以一次扫描多个Controller,只需指定包路径即可 -->
- <context:component-scan base-package="com.lyh.ssm.crud" use-default-filters="false">
- <!-- 一般在SpringMVC的配置里,只扫描Controller层,Spring配置中扫描所有包,但是排除Controller层。
- context:include-filter要注意,如果base-package扫描的不是最终包,那么其他包还是会扫描、加载,如果在SpringMVC的配置中这么做,会导致Spring不能处理事务,
- 所以此时需要在<context:component-scan>标签上,增加use-default-filters="false",就是真的只扫描context:include-filter包括的内容-->
- <context:include-filter type="annotation" expression="org.springframework.stereotype.Controller" />
- </context:component-scan>
- <!-- step2: 配置视图解析器 -->
- <bean id="defaultViewResolver" class="org.springframework.web.servlet.view.InternalResourceViewResolver">
- <property name="prefix" value="/WEB-INF/"/><!--设置JSP文件的目录位置-->
- <property name="suffix" value=".jsp"/>
- </bean>
- <!-- step3: 标准配置 -->
- <!-- 将springmvc不能处理的请求交给 spring 容器处理 -->
- <mvc:default-servlet-handler/>
- <!-- 简化注解配置,并提供更高级的功能 -->
- <mvc:annotation-driven />
- </beans>
三、(3.3)配置Spring--applicationContext.xml
1、配置组件扫描方式
用于获取相关组件 ,一般在Spring配置文件中扫描所有包,但是排除Controller层。
- 【在applicationContext.xml中配置】
- <!-- step1: 配置包扫描方式。扫描所有包,但是排除Controller层 -->
- <context:component-scan base-package="com.lyh.ssm.crud">
- <context:exclude-filter type="annotation" expression="org.springframework.stereotype.Controller"/>
- </context:component-scan>
2、配置数据库连接池
用于数据库操作。
- 【方式一:直接填写连接参数】
- 【在applicationContext.xml中配置】
- <bean id="dataSource" class="com.mchange.v2.c3p0.ComboPooledDataSource">
- <!--注入属性-->
- <property name="driverClass" value="com.mysql.cj.jdbc.Driver"></property>
- <property name="jdbcUrl" value="jdbc:mysql://localhost:3306/lyh?useUnicode=true&characterEncoding=utf8"></property>
- <property name="user" value="root"></property>
- <property name="password" value="123456"></property>
- </bean>
- 【方式二:通过properties文件的方式获取连接参数】
- 【dbconfig.properties】
- jdbc.driver = com.mysql.cj.jdbc.Driver
- jdbc.url = jdbc:mysql://localhost:3306/lyh?useUnicode=true&characterEncoding=utf8
- jdbc.username = root
- jdbc.password = 123456
- 【在applicationContext.xml中配置】
- <!-- 引入properties文件 -->
- <context:property-placeholder location="classpath:dbconfig.properties" />
- <bean id="dataSource" class="com.mchange.v2.c3p0.ComboPooledDataSource">
- <!--注入属性-->
- <property name="driverClass" value="${jdbc.driverClass}"></property>
- <property name="jdbcUrl" value="${jdbc.jdbcUrl}"></property>
- <property name="user" value="${jdbc.user}"></property>
- <property name="password" value="${jdbc.password}"></property>
- </bean>
三、(3.4)Spring和MyBatis整合配置--applicationContext.xml
jar包由MyBatis提供。
1、配置sqlSessionFactory
- 【在applicationContext.xml中配置】
- <!-- step3: spring 与 mybatis 整合 -->
- <!-- 配置sqlSessionFactory,需要引入 mybatis-spring 包 -->
- <bean id="sqlSessionFactory" class="org.mybatis.spring.SqlSessionFactoryBean">
- <!-- 加载Mybatis全局配置文件 -->
- <property name="configLocation" value="classpath:mybatis-config.xml"/>
- <!-- 数据库连接池 -->
- <property name="dataSource" ref="dataSource"/>
- <!-- 配置mapper文件位置,扫描映射文件 -->
- <property name="mapperLocations" value="classpath:mappers/*.xml"/>
- </bean>
2、配置批量执行的sqlSession(可选操作)
- 【在applicationContext.xml中配置】
- <!-- step4: 配置批量执行的sqlSession(可选操作) -->
- <bean id="sqlSession" class="org.mybatis.spring.SqlSessionTemplate">
- <constructor-arg name="sqlSessionFactory" ref="sqlSessionFactory"/>
- <constructor-arg name="executorType" value="BATCH"/>
- </bean>
3、配置mapper扫描器
- 【在applicationContext.xml中配置】
- <!-- step5: 配置mapper扫描器,将其加入到ioc容器中 -->
- <bean class="org.mybatis.spring.mapper.MapperScannerConfigurer">
- <!-- 扫描包路径,如果需要扫描多个包中间用半角逗号隔开 -->
- <property name="basePackage" value="com.lyh.ssm.crud.dao"></property>
- <property name="sqlSessionFactoryBeanName" value="sqlSessionFactory"/>
- </bean>
4、配置事务控制与切面(可选)
- 【在applicationContext.xml中配置】
- <!-- step6: 配置事务控制 -->
- <bean id="transactionManager" class="org.springframework.jdbc.datasource.DataSourceTransactionManager">
- <!-- 配置数据源 -->
- <property name="dataSource" ref="dataSource"/>
- </bean>
- <!-- 配置事务通知 -->
- <tx:advice id="txAdvice" transaction-manager="transactionManager">
- <tx:attributes>
- <!-- 传播行为 -->
- <tx:method name="post*" propagation="REQUIRED"/>
- <tx:method name="put*" propagation="REQUIRED"/>
- <tx:method name="delete*" propagation="REQUIRED"/>
- <tx:method name="get*" propagation="SUPPORTS" read-only="true"/>
- </tx:attributes>
- </tx:advice>
- <!-- 配置aop -->
- <aop:config>
- <!-- 配置事务增强,指定切点表达式,第一个*表示返回任意类型,第二个*表示任意方法,(..)表示任意数量和类型的参数-->
- <aop:advisor advice-ref="txAdvice" pointcut="execution(* com.lyh.ssm.crud.service..*(..))"/>
- </aop:config>
5、applicationContext.xml完整配置
- 【db.properties】
- jdbc.driver = com.mysql.cj.jdbc.Driver
- jdbc.url = jdbc:mysql://localhost:3306/lyh?useUnicode=true&characterEncoding=utf8
- jdbc.username = root
- jdbc.password = 123456
- 【applicationContext.xml】
- <?xml version="1.0" encoding="UTF-8"?>
- <beans xmlns="http://www.springframework.org/schema/beans"
- xmlns:context="http://www.springframework.org/schema/context" xmlns:p="http://www.springframework.org/schema/p"
- xmlns:aop="http://www.springframework.org/schema/aop" xmlns:tx="http://www.springframework.org/schema/tx"
- xmlns:xsi="http://www.w3.org/2001/XMLSchema-instance"
- xsi:schemaLocation="
- http://www.springframework.org/schema/beans http://www.springframework.org/schema/beans/spring-beans-4.0.xsd
- http://www.springframework.org/schema/context http://www.springframework.org/schema/context/spring-context-4.0.xsd
- http://www.springframework.org/schema/aop http://www.springframework.org/schema/aop/spring-aop-4.0.xsd http://www.springframework.org/schema/tx http://www.springframework.org/schema/tx/spring-tx-4.0.xsd
- http://www.springframework.org/schema/util http://www.springframework.org/schema/util/spring-util-4.0.xsd">
- <!-- step1: 配置包扫描方式。扫描所有包,但是排除Controller层 -->
- <context:component-scan base-package="com.lyh.ssm.crud">
- <context:exclude-filter type="annotation" expression="org.springframework.stereotype.Controller"/>
- </context:component-scan>
- <!-- step2: 配置数据库连接信息 -->
- <!-- 引入properties文件 -->
- <context:property-placeholder location="classpath:db.properties"/>
- <bean id="dataSource" class="com.mchange.v2.c3p0.ComboPooledDataSource">
- <!--注入属性-->
- <property name="driverClass" value="${jdbc.driver}"></property>
- <property name="jdbcUrl" value="${jdbc.url}"></property>
- <property name="user" value="${jdbc.username}"></property>
- <property name="password" value="${jdbc.password}"></property>
- </bean>
- <!-- step3: spring 与 mybatis 整合 -->
- <!-- 配置sqlSessionFactory,需要引入 mybatis-spring 包 -->
- <bean id="sqlSessionFactory" class="org.mybatis.spring.SqlSessionFactoryBean">
- <!-- 加载Mybatis全局配置文件 -->
- <property name="configLocation" value="classpath:mybatis-config.xml"/>
- <!-- 数据库连接池 -->
- <property name="dataSource" ref="dataSource"/>
- <!-- 配置mapper文件位置,扫描映射文件 -->
- <property name="mapperLocations" value="classpath:mappers/*.xml"/>
- </bean>
- <!-- step4: 配置批量执行的sqlSession(可选操作) -->
- <bean id="sqlSession" class="org.mybatis.spring.SqlSessionTemplate">
- <constructor-arg name="sqlSessionFactory" ref="sqlSessionFactory"/>
- <constructor-arg name="executorType" value="BATCH"/>
- </bean>
- <!-- step5: 配置mapper扫描器,将其加入到ioc容器中 -->
- <bean class="org.mybatis.spring.mapper.MapperScannerConfigurer">
- <!-- 扫描包路径,如果需要扫描多个包中间用半角逗号隔开 -->
- <property name="basePackage" value="com.lyh.ssm.crud.dao"></property>
- <property name="sqlSessionFactoryBeanName" value="sqlSessionFactory"/>
- </bean>
- <!-- step6: 配置事务控制 -->
- <bean id="transactionManager" class="org.springframework.jdbc.datasource.DataSourceTransactionManager">
- <!-- 配置数据源 -->
- <property name="dataSource" ref="dataSource"/>
- </bean>
- <!-- 配置事务通知 -->
- <tx:advice id="txAdvice" transaction-manager="transactionManager">
- <tx:attributes>
- <!-- 传播行为 -->
- <tx:method name="post*" propagation="REQUIRED"/>
- <tx:method name="put*" propagation="REQUIRED"/>
- <tx:method name="delete*" propagation="REQUIRED"/>
- <tx:method name="get*" propagation="SUPPORTS" read-only="true"/>
- </tx:attributes>
- </tx:advice>
- <!-- 配置aop -->
- <aop:config>
- <!-- 配置事务增强,指定切点表达式,第一个*表示返回任意类型,第二个*表示任意方法,(..)表示任意数量和类型的参数-->
- <aop:advisor advice-ref="txAdvice" pointcut="execution(* com.lyh.ssm.crud.service..*(..))"/>
- </aop:config>
- </beans>
三、(3.5)Mybatis配置 -- mybatis-config.xml
1、配置全局参数
- 【在mybatis-config.xml中配置】
- <settings>
- <!-- 开启驼峰命名规则 -->
- <setting name="mapUnderscoreToCamelCase" value="true"/>
- </settings>
2、使用分页插件(pagehelper)
- 【在mybatis-config.xml中配置】
- <plugins>
- <!-- 使用分页插件 -->
- <plugin interceptor="com.github.pagehelper.PageInterceptor"></plugin>
- </plugins>
3、mybatis-config.xml 完整配置
- 【mybatis-config.xml】
- <?xml version="1.0" encoding="UTF-8" ?>
- <!DOCTYPE configuration
- PUBLIC "-//mybatis.org//DTD Config 3.0//EN"
- "http://mybatis.org/dtd/mybatis-3-config.dtd">
- <configuration>
- <settings>
- <!-- 开启驼峰命名规则 -->
- <setting name="mapUnderscoreToCamelCase" value="true"/>
- </settings>
- <plugins>
- <!-- 使用分页插件 -->
- <plugin interceptor="com.github.pagehelper.PageInterceptor"></plugin>
- </plugins>
- </configuration>
四、逆向工程
参考: https://www.cnblogs.com/l-y-h/p/11748300.html
1、配置文件 -- src/mybatis-generator.xml
- 【src/mybatis-generator.xml】
- <?xml version="1.0" encoding="UTF-8"?>
- <!DOCTYPE generatorConfiguration
- PUBLIC "-//mybatis.org//DTD MyBatis Generator Configuration 1.0//EN"
- "http://mybatis.org/dtd/mybatis-generator-config_1_0.dtd">
- <generatorConfiguration>
- <context id="DB2Tables" targetRuntime="MyBatis3">
- <!-- 清除注释信息 -->
- <commentGenerator>
- <property name="suppressAllComments" value="true" />
- </commentGenerator>
- <!-- step1: 配置数据库连接信息 -->
- <jdbcConnection driverClass="com.mysql.cj.jdbc.Driver"
- connectionURL="jdbc:mysql://localhost:3306/lyh"
- userId="root"
- password="123456">
- </jdbcConnection>
- <javaTypeResolver>
- <property name="forceBigDecimals" value="false"/>
- </javaTypeResolver>
- <!-- step2: 指定java bean生成的位置
- targetProject 指的是 哪个项目
- targetPackage 指的是 项目中的路径
- -->
- <javaModelGenerator targetPackage="com.lyh.ssm.crud.bean" targetProject=".\src">
- <property name="enableSubPackages" value="true"/>
- <property name="trimStrings" value="true"/>
- </javaModelGenerator>
- <!-- step3:指定sql映射文件生成的位置 -->
- <sqlMapGenerator targetPackage="com.lyh.ssm.crud.mapper" targetProject=".\src">
- <property name="enableSubPackages" value="true"/>
- </sqlMapGenerator>
- <!-- step4: 指定接口生成的位置 -->
- <javaClientGenerator type="XMLMAPPER" targetPackage="com.lyh.ssm.crud.dao" targetProject=".\src">
- <property name="enableSubPackages" value="true"/>
- </javaClientGenerator>
- <!-- step5: 指定表的生成策略
- tableName 指定表名
- domainObjectName 指定表对应的 实体类的名字
- -->
- <table tableName="emp" domainObjectName="Employee"></table>
- <table tableName="dept" domainObjectName="Department"></table>
- </context>
- </generatorConfiguration>
2、执行类 -- TestMybatisGenerator
- import org.mybatis.generator.api.MyBatisGenerator;
- import org.mybatis.generator.config.Configuration;
- import org.mybatis.generator.config.xml.ConfigurationParser;
- import org.mybatis.generator.exception.InvalidConfigurationException;
- import org.mybatis.generator.exception.XMLParserException;
- import org.mybatis.generator.internal.DefaultShellCallback;
- import java.io.File;
- import java.io.IOException;
- import java.sql.SQLException;
- import java.util.ArrayList;
- import java.util.List;
- public class TestMybatisGenerator {
- public static void main(String[] args) throws IOException, XMLParserException, InvalidConfigurationException, SQLException, InterruptedException {
- List<String> warnings = new ArrayList<String>();
- boolean overwrite = true;
- File configFile = new File("src//mybatis-generator.xml");
- System.out.println(configFile);
- ConfigurationParser cp = new ConfigurationParser(warnings);
- Configuration config = cp.parseConfiguration(configFile);
- DefaultShellCallback callback = new DefaultShellCallback(overwrite);
- MyBatisGenerator myBatisGenerator = new MyBatisGenerator(config, callback, warnings);
- myBatisGenerator.generate(null);
- }
- }
注:
文件生成后,位置可能不对。需手动将文件复制到相应位置。
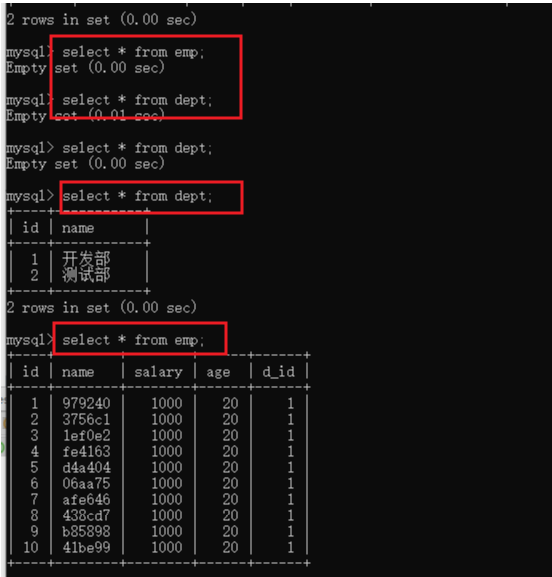
五、数据库 (mysql 1.8)
1、创建数据表
- emp
- -- 创建一个 emp 表,其中 id 为主键且自增。
- CREATE TABLE emp(
- id int primary key auto_increment,
- name varchar(50),
- salary double,
- age int,
- email varchar(50)
- );
- dept
- -- 创建一个 dept 表,其中 deptId 为自增主键
- CREATE TABLE dept(
- deptId INT(11) PRIMARY KEY AUTO_INCREMENT,
- deptName VARCHAR(255)
- );
- -- 给 emp 表增加一个列
- ALTER TABLE emp ADD COLUMN deptId INT(11);
- -- 并将 emp 中该列作为外键关联到 dept 的主键
- ALTER TABLE emp ADD CONSTRAINT fk_emp_dept FOREIGN KEY(deptId) REFERENCES dept(deptId);
2、插入一些数据(可选操作)
- dept
- INSERT INTO dept(deptId, deptName) VALUES(1, '开发部');
- INSERT INTO dept(deptId, deptName) VALUES(2, '测试部');
- INSERT INTO dept(deptId, deptName) VALUES(3, '产品部');
- emp(id自增,给其插个 null 即可)
- INSERT INTO emp(id, name, salary, age, email, deptId) VALUES(null, 'tom', '', 23, 'tom@163.com', 1);
- INSERT INTO emp(id, name, salary, age, email, deptId) VALUES(null, 'jarry', '', 23, 'jarry@163.com', 2);
- INSERT INTO emp(id, name, salary, age, email, deptId) VALUES(null, 'rick', '', 23, 'rick@163.com', 3);
- INSERT INTO emp(id, name, salary, age, email, deptId) VALUES(null, 'rose', '', 23, 'rose@163.com', 3);
- INSERT INTO emp(id, name, salary, age, email, deptId) VALUES(null, 'tim', '', 23, 'tim@163.com', 2);
- INSERT INTO emp(id, name, salary, age, email, deptId) VALUES(null, 'silla', '', 23, 'silla@163.com', 1);
- INSERT INTO emp(id, name, salary, age, email, deptId) VALUES(null, 'jack', '', 23, 'jack@163.com', 1);
- INSERT INTO emp(id, name, salary, age, email, deptId) VALUES(null, 'lisa', '', 23, 'lisa@163.com', 2);
- INSERT INTO emp(id, name, salary, age, email, deptId) VALUES(null, 'mina', '', 23, 'mina@163.com', 2);
3、测试后台代码与数据库的交互(可选操作)
- 【在applicationContext.xml中配置 批量执行的 sqlSession】
- <bean id="sqlSession" class="org.mybatis.spring.SqlSessionTemplate">
- <constructor-arg name="sqlSessionFactory" ref="sqlSessionFactory"/>
- <constructor-arg name="executorType" value="BATCH"/>
- </bean>
- 【测试类 TestCodeEnvironment.java】
- import com.lyh.ssm.crud.bean.Department;
- import com.lyh.ssm.crud.bean.Employee;
- import com.lyh.ssm.crud.dao.DepartmentMapper;
- import com.lyh.ssm.crud.dao.EmployeeMapper;
- import org.apache.ibatis.session.SqlSession;
- import org.junit.Test;
- import org.junit.runner.RunWith;
- import org.springframework.beans.factory.annotation.Autowired;
- import org.springframework.test.context.ContextConfiguration;
- import org.springframework.test.context.junit4.SpringJUnit4ClassRunner;
- import java.util.UUID;
- @RunWith(SpringJUnit4ClassRunner.class)
- @ContextConfiguration(locations = "classpath:applicationContext.xml")
- public class TestCodeEnvironment {
- @Autowired
- EmployeeMapper employeeMapper;
- @Autowired
- DepartmentMapper departmentMapper;
- @Autowired
- SqlSession sqlSession;
- @Test
- public void testDept() {
- departmentMapper.insertSelective(new Department(null, "开发部"));
- departmentMapper.insertSelective(new Department(null, "测试部"));
- }
- @Test
- public void testEmp() {
- // 批量执行 sql 语句
- EmployeeMapper employeeMapper = sqlSession.getMapper(EmployeeMapper.class);
- for (int i = 0; i < 2; i++){
- String name = UUID.randomUUID().toString().substring(0, 5) + i;
- employeeMapper.insertSelective(new Employee(null, name, 1000.0, 20, "jarry@163.com",1));
- }
- }
- }
六、后端代码
1、文件结构
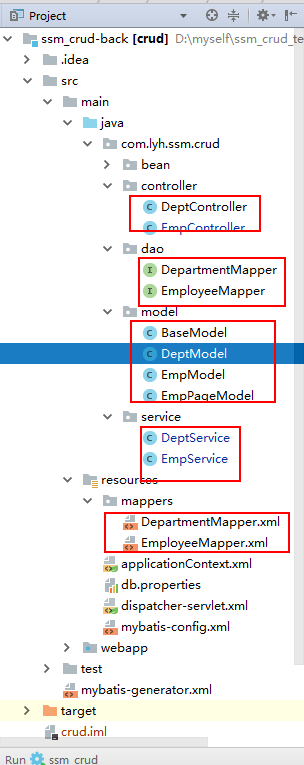
2、代码
- 【com.lyh.ssm.crud.model.BaseModel】
- package com.lyh.ssm.crud.model;
- import java.util.ArrayList;
- import java.util.List;
- /**
- * 基础返回类型,
- * messages 用于保存返回的信息
- * level 用于保存信息的级别
- * Level 为枚举类型
- */
- public class BaseModel {
- private List<String> messages = new ArrayList<String>();
- private Level level = Level.info;
- private Boolean success = true;
- public Boolean getSuccess() {
- return success;
- }
- public void setSuccess(Boolean success) {
- this.success = success;
- }
- public List<String> getMessages() {
- return messages;
- }
- public void setMessages(List<String> messages) {
- this.messages = messages;
- }
- public Level getLevel() {
- return level;
- }
- public void setLevel(Level level) {
- this.level = level;
- }
- public enum Level {
- info,
- warn,
- error
- }
- public void addMessage(String message) {
- this.messages.add(message);
- }
- }
- 【com.lyh.ssm.crud.model.DeptModel】
- package com.lyh.ssm.crud.model;
- import com.lyh.ssm.crud.bean.Department;
- import java.util.List;
- public class DeptModel extends BaseModel {
- private List<Department> departments;
- public List<Department> getDepartments() {
- return departments;
- }
- public void setDepartments(List<Department> departments) {
- this.departments = departments;
- }
- }
- 【com.lyh.ssm.crud.model.EmpModel】
- package com.lyh.ssm.crud.model;
- import com.lyh.ssm.crud.bean.Employee;
- import java.util.ArrayList;
- import java.util.List;
- /**
- * 员工返回信息类,用于返回员工信息
- */
- public class EmpModel extends BaseModel {
- private List<Employee> employeeList = new ArrayList<Employee>();
- public List<Employee> getEmployeeList() {
- return employeeList;
- }
- public void setEmployeeList(List<Employee> employeeList) {
- this.employeeList = employeeList;
- }
- public void addEmployee(Employee emp) {
- this.employeeList.add(emp);
- }
- }
【com.lyh.ssm.crud.model.EmpPageModel】
package com.lyh.ssm.crud.model;- import com.github.pagehelper.PageInfo;
- public class EmpPageModel extends BaseModel {
- private PageInfo pageInfo;
- public PageInfo getPageInfo() {
- return pageInfo;
- }
- public void setPageInfo(PageInfo pageInfo) {
- this.pageInfo = pageInfo;
- }
- }
- 【com.lyh.ssm.crud.controller.EmpController】
- package com.lyh.ssm.crud.controller;
- import com.github.pagehelper.PageHelper;
- import com.github.pagehelper.PageInfo;
- import com.lyh.ssm.crud.bean.Employee;
- import com.lyh.ssm.crud.model.BaseModel;
- import com.lyh.ssm.crud.model.EmpModel;
- import com.lyh.ssm.crud.model.EmpPageModel;
- import com.lyh.ssm.crud.service.EmpService;
- import org.springframework.beans.factory.annotation.Autowired;
- import org.springframework.web.bind.annotation.*;
- import java.util.List;
- @RestController
- public class EmpController {
- @Autowired
- private EmpService empService;
- /**
- * 获取分页的数据
- * @param pageNum 获取第几页的数据
- * @param pageSize 返回数据的条数
- * @return 返回数据
- */
- @GetMapping("/emps/{pageNum}")
- public EmpPageModel getAllEmp(@PathVariable Integer pageNum, @RequestParam Integer pageSize) {
- // step1:引入分页插件(PageHelper)
- // step2:每次查询前,设置查询的页面以及查询的条数,每次获取5条数据
- PageHelper.startPage(pageNum, pageSize);
- // step3:执行分页查询
- List<Employee> employeeList = empService.getAllEmp();
- // step4:包装查询后的数据
- PageInfo pageInfo = new PageInfo(employeeList);
- EmpPageModel empPageModel = new EmpPageModel();
- if (employeeList.size() <= 0) {
- empPageModel.addMessage("获取分页数据失败");
- empPageModel.setSuccess(false);
- empPageModel.setLevel(BaseModel.Level.error);
- return empPageModel;
- }
- empPageModel.addMessage("获取分页数据成功");
- empPageModel.setSuccess(true);
- empPageModel.setLevel(BaseModel.Level.info);
- empPageModel.setPageInfo(pageInfo);
- return empPageModel;
- }
- /**
- * 获取某个员工的信息
- * REST -- GET
- * @param id 员工的id
- * @return 返回数据
- */
- @GetMapping("/emp/{id}")
- public EmpModel getEmpById(@PathVariable Integer id) {
- EmpModel empModel = new EmpModel();
- if (empService.getEmpById(id) == null) {
- empModel.addMessage("获取员工信息失败");
- empModel.setSuccess(false);
- empModel.setLevel(BaseModel.Level.error);
- return empModel;
- }
- empModel.addMessage("获取员工信息成功");
- empModel.setSuccess(true);
- empModel.setLevel(BaseModel.Level.info);
- empModel.addEmployee(empService.getEmpById(id));
- return empModel;
- }
- /**
- * 删除某个员工的信息
- * REST -- DELETE
- * @param id 员工的id
- * @return 返回数据
- */
- @RequestMapping(value = "/emp/{id}", method = RequestMethod.DELETE)
- public BaseModel deleteEmpById(@PathVariable Integer id) {
- BaseModel baseModel = new BaseModel();
- if (empService.deleteEmpById(id) != 0) {
- baseModel.addMessage("删除员工信息成功");
- baseModel.setSuccess(true);
- baseModel.setLevel(BaseModel.Level.info);
- return baseModel;
- }
- baseModel.addMessage("删除员工信息失败");
- baseModel.setSuccess(false);
- baseModel.setLevel(BaseModel.Level.error);
- return baseModel;
- }
- /**
- * 向员工表中插入员工信息
- * REST -- POST
- * 使用 @RequestBody 需注意,前台传递的参数名要与 Employee 里的参数名对应,否则接收不到值
- * @param employee 员工信息
- * @return 返回数据
- */
- @PostMapping("/emp")
- public BaseModel insertEmp(@RequestBody Employee employee) {
- BaseModel baseModel = new BaseModel();
- if (empService.insertEmp(employee) != 0) {
- baseModel.addMessage("插入员工信息成功");
- baseModel.setSuccess(true);
- baseModel.setLevel(BaseModel.Level.info);
- return baseModel;
- }
- baseModel.addMessage("插入员工信息失败");
- baseModel.setSuccess(false);
- baseModel.setLevel(BaseModel.Level.error);
- return baseModel;
- }
- /**
- * 更新员工信息
- * REST -- PUT
- * @param employee 员工信息
- * @return 返回数据
- */
- @RequestMapping(value = "/emp/{id}", method = RequestMethod.PUT)
- public BaseModel updateEmp(@RequestBody Employee employee) {
- BaseModel baseModel = new BaseModel();
- if (empService.updateEmp(employee) != 0) {
- baseModel.addMessage("更新员工信息成功");
- baseModel.setSuccess(true);
- baseModel.setLevel(BaseModel.Level.info);
- return baseModel;
- }
- baseModel.addMessage("更新员工信息失败");
- baseModel.setSuccess(false);
- baseModel.setLevel(BaseModel.Level.error);
- return baseModel;
- }
- }
- 【com.lyh.ssm.crud.controller.DeptController】
- package com.lyh.ssm.crud.controller;
- import com.lyh.ssm.crud.model.BaseModel;
- import com.lyh.ssm.crud.model.DeptModel;
- import com.lyh.ssm.crud.service.DeptService;
- import org.springframework.beans.factory.annotation.Autowired;
- import org.springframework.web.bind.annotation.GetMapping;
- import org.springframework.web.bind.annotation.RestController;
- @RestController
- public class DeptController {
- @Autowired
- private DeptService deptService;
- @GetMapping("/depts")
- public DeptModel getAllDept() {
- DeptModel deptModel = new DeptModel();
- if (deptService.getAllDept().size() <= 0) {
- deptModel.addMessage("获取部门信息失败");
- deptModel.setSuccess(false);
- deptModel.setLevel(BaseModel.Level.error);
- return deptModel;
- }
- deptModel.addMessage("获取部门信息成功");
- deptModel.setSuccess(true);
- deptModel.setLevel(BaseModel.Level.info);
- deptModel.setDepartments(deptService.getAllDept());
- return deptModel;
- }
- }
- 【com.lyh.ssm.crud.service.DeptService】
- package com.lyh.ssm.crud.service;
- import com.lyh.ssm.crud.bean.Department;
- import com.lyh.ssm.crud.dao.DepartmentMapper;
- import org.springframework.beans.factory.annotation.Autowired;
- import org.springframework.stereotype.Service;
- import java.util.List;
- @Service
- public class DeptService {
- @Autowired
- private DepartmentMapper departmentMapper;
- public List<Department> getAllDept() {
- return departmentMapper.selectAll();
- }
- }
- 【com.lyh.ssm.crud.service.EmpService】
- package com.lyh.ssm.crud.service;
- import com.lyh.ssm.crud.bean.Employee;
- import com.lyh.ssm.crud.dao.EmployeeMapper;
- import org.springframework.beans.factory.annotation.Autowired;
- import org.springframework.stereotype.Service;
- import java.util.List;
- @Service
- public class EmpService {
- @Autowired
- private EmployeeMapper employeeMapper;
- /**
- * 获取某个员工的信息
- *
- * @param id 某个员工的id
- * @return 某个员工的信息
- */
- public Employee getEmpById(Integer id) {
- return employeeMapper.selectByPrimaryKey(id);
- }
- /**
- * 获取所有员工的信息
- *
- * @return 所有员工的信息
- */
- public List<Employee> getAllEmp() {
- return employeeMapper.selectAll();
- }
- /**
- * 插入某个员工的信息
- *
- * @param emp 某员工的信息
- * @return 返回插入影响的行数
- */
- public Integer insertEmp(Employee emp) {
- return employeeMapper.insertSelective(emp);
- }
- /**
- * 删除某个员工的信息
- *
- * @param id 员工的id
- * @return 返回删除影响的行数
- */
- public Integer deleteEmpById(Integer id) {
- return employeeMapper.deleteByPrimaryKey(id);
- }
- /**
- * 更新某个员工的信息
- * @param employee 员工信息
- * @return 返回修改影响的行数
- */
- public Integer updateEmp(Employee employee) {
- return employeeMapper.updateByPrimaryKeySelective(employee);
- }
- }
- 【com.lyh.ssm.crud.dao.DepartmentMapper】
package com.lyh.ssm.crud.dao;- import com.lyh.ssm.crud.bean.Department;
- import com.lyh.ssm.crud.bean.DepartmentExample;
- import java.util.List;
- import org.apache.ibatis.annotations.Param;
- public interface DepartmentMapper {
- long countByExample(DepartmentExample example);
- int deleteByExample(DepartmentExample example);
- int deleteByPrimaryKey(Integer deptid);
- int insert(Department record);
- int insertSelective(Department record);
- List<Department> selectByExample(DepartmentExample example);
- Department selectByPrimaryKey(Integer deptid);
- int updateByExampleSelective(@Param("record") Department record, @Param("example") DepartmentExample example);
- int updateByExample(@Param("record") Department record, @Param("example") DepartmentExample example);
- int updateByPrimaryKeySelective(Department record);
- int updateByPrimaryKey(Department record);
- List<Department> selectAll();
- }
- 【com.lyh.ssm.crud.dao.EmployeeMapper】
package com.lyh.ssm.crud.dao;- import com.lyh.ssm.crud.bean.Employee;
- import com.lyh.ssm.crud.bean.EmployeeExample;
- import java.util.List;
- import org.apache.ibatis.annotations.Param;
- public interface EmployeeMapper {
- long countByExample(EmployeeExample example);
- int deleteByExample(EmployeeExample example);
- int deleteByPrimaryKey(Integer id);
- int insert(Employee record);
- int insertSelective(Employee record);
- List<Employee> selectByExample(EmployeeExample example);
- List<Employee> selectAll();
- Employee selectByPrimaryKey(Integer id);
- int updateByExampleSelective(@Param("record") Employee record, @Param("example") EmployeeExample example);
- int updateByExample(@Param("record") Employee record, @Param("example") EmployeeExample example);
- int updateByPrimaryKeySelective(Employee record);
- int updateByPrimaryKey(Employee record);
- }
- 【mappers/DepartmentMapper.xml 添加方法】
- <select id="selectAll" resultMap="BaseResultMap">
- select
- <include refid="Base_Column_List" />
- from dept
- </select>
- 【mappers/EmployeeMapper.xml】
- <select id="selectAll" resultMap="BaseResultMap">
- SELECT e.id AS id, e.name AS name, e.salary AS salary, e.age AS age, e.email AS email, d.deptId AS deptId, d.deptName AS deptName
- FROM emp e
- LEFT JOIN dept d
- ON e.deptId = d.deptId
- ORDER BY e.id
- </select>
- <select id="selectByPrimaryKey" parameterType="java.lang.Integer" resultMap="BaseResultMap">
- SELECT e.id AS id, e.name AS name, e.salary AS salary, e.age AS age, e.email AS email, d.deptId AS deptId, d.deptName AS deptName
- FROM emp e
- LEFT JOIN dept d
- ON e.deptId = d.deptId
- WHERE e.id = #{id,jdbcType=INTEGER}
- </select>
七、前端代码--静态页面
1、非 template/render 模式下
此时 部分组件名前 需加前缀 i- 才可使用。
比如:
Button --> i-button
Table --> i-table
Select --> i-select
Option --> i-option
Form --> i-form
FormItem --> form-item
- 【非 template/render 模式下】
- <!DOCTYPE html>
- <html>
- <head>
- <meta charset="utf-8">
- <title>ViewUI example</title>
- <link rel="stylesheet" type="text/css" href="http://unpkg.com/view-design/dist/styles/iview.css">
- <script type="text/javascript" src="http://vuejs.org/js/vue.min.js"></script>
- <script type="text/javascript" src="http://unpkg.com/view-design/dist/iview.min.js"></script>
- </head>
- <body>
- <div id="app">
- <div style="width: 1200px; margin: 0 auto;" class="layout">
- <Layout>
- <header>
- <row>
- <Divider orientation="left">
- <h1>员工列表</h1>
- </Divider>
- </row>
- <row justify="end" type="flex">
- <i-col style="margin-right: 5px"><i-button type="primary" icon="md-add" @click="create">添加</i-button></i-col>
- <i-col style="margin-right: 5px"><i-button type="success" icon="md-settings" @click="setUp = true">设置</i-button></i-col>
- </row>
- </header>
- <Content>
- <i-table :data="data2" :columns="tableColumns1" :stripe="showStripe" :border="showBorder" :showHeader="showHeader" :size="tableSize" :height="fixedHeader ? 250 : ''">
- <template slot-scope="{ row }" slot="name">
- <strong>{{ row.name }}</strong>
- </template>
- <template slot-scope="{ row, index }" slot="action">
- <i-button type="primary" size="small" style="margin-right: 5px" @click="show(index)" icon="ios-create-outline">编辑</i-button>
- <i-button type="error" size="small" @click="remove(index)" icon="ios-trash">删除</i-button>
- </template>
- </i-table>
- <div style="margin: 10px;overflow: hidden">
- <div style="float: right;">
- <!-- current 设置当前选中页,pageSize 设置每页显示数据的条数-->
- <Page :total="data1.length" :pageSize="pageSize" :current="currentPage" @on-change="changePage" show-sizer show-elevator show-total @on-page-size-change="changePageSize"></Page>
- </div>
- </div>
- </Content>
- </Layout>
- <Drawer title="Set up" :closable="true" :mask="false" v-model="setUp">
- <div style="margin: 10px">
- Table Setting<br>
- <i-switch v-model="showBorder" style="margin-right: 5px"></i-switch>Display border<br>
- <i-switch v-model="showStripe" style="margin-right: 5px"></i-switch>Display stripe<br>
- <i-switch v-model="showIndex" style="margin-right: 5px"></i-switch>Display index<br>
- <i-switch v-model="showCheckbox" style="margin-right: 5px"></i-switch>Display multi choice<br>
- <i-switch v-model="showHeader" style="margin-right: 5px"></i-switch>Display header<br>
- <i-switch v-model="fixedHeader" style="margin-right: 5px"></i-switch>Table scrolling<br>
- <br><br>
- Table size
- <i-select v-model="tableSize" style="width:200px">
- <i-option value="large">large</i-option>
- <i-option value="default">medium(default)</i-option>
- <i-option value="small">small</i-option>
- </i-select>
- </div>
- </Drawer>
- <Modal v-model="empModal" title="Emp Info" @on-ok="okEditor" @on-cancel="cancelEditor">
- <i-form :label-width="80">
- <form-item label="Name:">
- <i-input v-model="empInfo.name" placeholder="Name..." style="width: 300px;" />
- </form-item>
- <form-item label="Salary:">
- <i-input v-model="empInfo.salary" placeholder="Salary..." style="width: 300px;" />
- </form-item>
- <form-item label="Age:">
- <i-input v-model="empInfo.age" placeholder="Age..." style="width: 300px;" />
- </form-item>
- <form-item label="Email:">
- <i-input v-model="empInfo.email" placeholder="Email..." style="width: 300px;" />
- </form-item>
- <form-item label="DeptName:">
- <i-select v-model="empInfo.deptName">
- <i-option v-for="(item, index) in dept" :key="index" :value="item.deptName"> {{item.deptName}} </i-option>
- </i-select>
- </form-item>
- </i-form>
- </Modal>
- </div>
- </div>
- <script>
- new Vue({
- el: '#app',
- data() {
- return {
- // 添加与编辑复用 modal 框,false为添加,true为编辑
- createOrEditor: false,
- // 是否打开员工信息框
- empModal: false,
- // 用于保存一个员工的信息
- empInfo: {},
- // 是否打开设置
- setUp: false,
- // 当前页码
- currentPage: 1,
- // 每页数据的条数
- pageSize: 10,
- // 表格的列
- tableColumns1: [{
- // 分页时,若要出现自动索引,设置type = "index2",并使用 render 来返回索引值
- type: 'index2',
- width: 80,
- align: 'center',
- render: (h, params) => {
- return h('span', params.index + (this.currentPage - 1) * this.pageSize + 1);
- }
- }, {
- title: 'Name',
- slot: 'name'
- }, {
- title: 'Salary',
- key: 'salary',
- sortable: true
- },
- {
- title: 'Age',
- key: 'age',
- sortable: true
- },
- {
- title: 'Email',
- key: 'email'
- }, {
- title: 'DeptName',
- key: 'deptName'
- },
- {
- title: 'Action',
- slot: 'action',
- width: 200,
- align: 'center'
- }
- ],
- dept: [{
- deptId: '1',
- deptName: '开发部'
- },{
- deptId: '2',
- deptName: '测试部'
- },{
- deptId: '3',
- deptName: '产品部'
- }],
- // 表格的源数据
- data1: [{
- name: 'John Brown',
- salary: 6000,
- age: 18,
- email: '323@163.com',
- deptId: '1',
- deptName: '开发部'
- },
- {
- name: 'Jim Green',
- salary: 6000,
- age: 24,
- email: '323@163.com',
- deptId: '2',
- deptName: '测试部'
- },
- {
- name: 'Joe Black',
- salary: 6000,
- age: 30,
- email: '323@163.com',
- deptId: '3',
- deptName: '产品部'
- },
- {
- name: 'Jon Snow',
- salary: 6000,
- age: 26,
- email: '323@163.com',
- deptId: '1',
- deptName: '开发部'
- }, {
- name: 'John Brown',
- salary: 6000,
- age: 18,
- email: '323@163.com',
- deptId: '2',
- deptName: '测试部'
- },
- {
- name: 'Jim Green',
- salary: 6000,
- age: 24,
- email: '323@163.com',
- deptId: '1',
- deptName: '开发部'
- },
- {
- name: 'Joe Black',
- salary: 6000,
- age: 30,
- email: '323@163.com',
- deptId: '1',
- deptName: '开发部'
- },
- {
- name: 'Jon Snow',
- salary: 6000,
- age: 26,
- email: '323@163.com',
- deptId: '2',
- deptName: '测试部'
- },
- {
- name: 'Jim Green',
- salary: 6000,
- age: 24,
- email: '323@163.com',
- deptId: '1',
- deptName: '开发部'
- },
- {
- name: 'Joe Black',
- salary: 6000,
- age: 30,
- email: '323@163.com',
- deptId: '2',
- deptName: '测试部'
- },
- {
- name: 'Jon Snow',
- salary: 6000,
- age: 26,
- email: '323@163.com',
- deptId: '3',
- deptName: '产品部'
- }
- ],
- // 表格每页的数据
- data2: [],
- // 表格边框是否显示
- showBorder: false,
- // 表格斑马纹是否显示
- showStripe: false,
- // 表格头是否显示
- showHeader: true,
- // 表格索引是否显示
- showIndex: true,
- // 表格多选框是否显示
- showCheckbox: false,
- // 表格滚动条是否开启
- fixedHeader: false,
- // 改变表格大小
- tableSize: 'default'
- }
- },
- methods: {
- changePage(index) {
- // 改变当前的页码,并获取当前页码所拥有的数据
- this.currentPage = index
- // 注意,此处不能直接用 = 赋值。使用 = 后(指向的地址相同),修改 data2 的同时会修改 data1
- this.data2 = [].concat(this.data1.slice((index - 1) * this.pageSize, index * this.pageSize))
- },
- show(index) {
- // 弹出一个模态框,用于展示某条数据的信息
- this.empInfo = Object.assign(this.empInfo, this.data2[index])
- this.empModal = true
- this.createOrEditor = true
- this.empInfo = Object.assign(this.empInfo, {index: index})
- },
- create() {
- // 用于添加一条信息
- this.empInfo = []
- this.empModal = true
- this.createOrEditor = false
- },
- remove(index) {
- // 删除某条数据(删除源数据)
- this.data1.splice((this.currentPage - 1) * 10 + index, 1)
- },
- changePageSize(index) {
- // 改变每页显示的条数
- this.$Message.info({
- content: '当前页面显示条数修改为: ' + index + '条/页'
- })
- // 改变后,跳转到首页,并刷新列表
- this.currentPage = 1
- this.pageSize = index
- this.changePage(this.currentPage)
- },
- okEditor () {
- if (this.createOrEditor) {
- // 编辑的操作,修改数据
- this.data1.splice((this.currentPage - 1) * 10 + this.empInfo.index, 1, this.empInfo)
- } else {
- // 添加的操作,修改数据
- this.data1.push(Object.assign({}, this.empInfo))
- }
- this.empInfo = {}
- },
- cancelEditor () {
- // 取消编辑的操作
- this.$Message.info({
- content: '操作取消'
- })
- }
- },
- watch: {
- showIndex(newVal) {
- if (newVal) {
- // 为true时,在首部增加一个索引列
- this.tableColumns1.unshift({
- // 分页时,若要出现自动索引,设置type = "index2",并使用 render 来返回索引值
- type: 'index2',
- width: 80,
- align: 'center',
- render: (h, params) => {
- return h('span', params.index + (this.currentPage - 1) * this.pageSize + 1);
- }
- })
- } else {
- // 为false时,若首部存在索引列,则移除该列
- this.tableColumns1.forEach((item, index) => {
- if (item.type === 'index2') {
- this.tableColumns1.splice(index, 1)
- }
- })
- }
- },
- showCheckbox(newVal) {
- if (newVal) {
- // 为 true 时,在首部增加一多选框列,
- this.tableColumns1.unshift({
- type: 'selection',
- width: 60,
- align: 'center'
- })
- } else {
- // 为false时,若存在多选框列,则移除该列
- this.tableColumns1.forEach((item, index) => {
- if (item.type === 'selection') {
- this.tableColumns1.splice(index, 1)
- }
- })
- }
- },
- data1() {
- // 当列表数据改变时(比如删除某数据),触发一次刷新列表的操作
- if (!this.createOrEditor) {
- // 若为添加数据,则跳转到最后一个页面
- this.changePage(Math.ceil(this.data1.length / this.pageSize))
- } else {
- this.changePage(this.currentPage)
- }
- }
- },
- mounted() {
- // 页面加载时,触发第一次刷新列表的操作
- this.changePage(this.currentPage)
- }
- })
- </script>
- </body>
- </html>
2、template/render 模式下
(1)使用 vue-cli3.0 创建项目。
参考地址:https://www.cnblogs.com/l-y-h/p/11241503.html
(2)使用 npm 安装使用。
参考地址:https://www.cnblogs.com/l-y-h/p/12001549.html#_label0_1
- 【main.js】
- import Vue from 'vue'
- import App from './App.vue'
- // step1: 引入 ViewUI
- import ViewUI from 'view-design'
- // step2: 引入 css
- import 'view-design/dist/styles/iview.css'
- Vue.config.productionTip = false
- // step3:声明使用 ViewUI
- Vue.use(ViewUI)
- new Vue({
- render: h => h(App),
- }).$mount('#app')
- 【App.vue】
- <template>
- <div style="width: 1200px; margin: 0 auto;" class="layout">
- <Layout>
- <header>
- <row>
- <Divider orientation="left">
- <h1>员工列表</h1>
- </Divider>
- </row>
- <row justify="end" type="flex">
- <i-col style="margin-right: 5px"><Button type="primary" icon="md-add" @click="create">添加</Button></i-col>
- <i-col style="margin-right: 5px"><Button type="success" icon="md-settings" @click="setUp = true">设置</Button></i-col>
- </row>
- </header>
- <Content>
- <Table :data="data2" :columns="tableColumns1" :stripe="showStripe" :border="showBorder" :showHeader="showHeader" :size="tableSize" :height="fixedHeader ? 250 : ''">
- <template slot-scope="{ row }" slot="name">
- <strong>{{ row.name }}</strong>
- </template>
- <template slot-scope="{ row, index }" slot="action">
- <Button type="primary" size="small" style="margin-right: 5px" @click="show(index)" icon="ios-create-outline">编辑</Button>
- <Button type="error" size="small" @click="remove(index)" icon="ios-trash">删除</Button>
- </template>
- </Table>
- <div style="margin: 10px;overflow: hidden">
- <div style="float: right;">
- <!-- current 设置当前选中页,pageSize 设置每页显示数据的条数-->
- <Page :total="data1.length" :pageSize="pageSize" :current="currentPage" @on-change="changePage" show-sizer show-elevator show-total @on-page-size-change="changePageSize"></Page>
- </div>
- </div>
- </Content>
- </Layout>
- <Drawer title="Set up" :closable="true" :mask="false" v-model="setUp">
- <div style="margin: 10px">
- Table Setting<br>
- <i-switch v-model="showBorder" style="margin-right: 5px"></i-switch>Display border<br>
- <i-switch v-model="showStripe" style="margin-right: 5px"></i-switch>Display stripe<br>
- <i-switch v-model="showIndex" style="margin-right: 5px"></i-switch>Display index<br>
- <i-switch v-model="showCheckbox" style="margin-right: 5px"></i-switch>Display multi choice<br>
- <i-switch v-model="showHeader" style="margin-right: 5px"></i-switch>Display header<br>
- <i-switch v-model="fixedHeader" style="margin-right: 5px"></i-switch>Table scrolling<br>
- <br><br>
- Table size
- <Select v-model="tableSize" style="width:200px">
- <Option value="large">large</Option>
- <Option value="default">medium(default)</Option>
- <Option value="small">small</Option>
- </Select>
- </div>
- </Drawer>
- <Modal v-model="empModal" title="Emp Info" @on-ok="okEditor" @on-cancel="cancelEditor">
- <Form :label-width="80">
- <FormItem label="Name:">
- <Input v-model="empInfo.name" placeholder="Name..." style="width: 300px;" />
- </FormItem>
- <FormItem label="Salary:">
- <Input v-model="empInfo.salary" placeholder="Salary..." style="width: 300px;" />
- </FormItem>
- <FormItem label="Age:">
- <Input v-model="empInfo.age" placeholder="Age..." style="width: 300px;" />
- </FormItem>
- <FormItem label="Email:">
- <Input v-model="empInfo.email" placeholder="Email..." style="width: 300px;" />
- </FormItem>
- <FormItem label="DeptName:">
- <Select v-model="empInfo.deptName">
- <Option v-for="(item, index) in dept" :key="index" :value="item.deptName"> {{item.deptName}} </Option>
- </Select>
- </FormItem>
- </Form>
- </Modal>
- </div>
- </template>
- <script>
- export default {
- data() {
- return {
- // 添加与编辑复用 modal 框,false为添加,true为编辑
- createOrEditor: false,
- // 是否打开员工信息框
- empModal: false,
- // 用于保存一个员工的信息
- empInfo: {},
- // 是否打开设置
- setUp: false,
- // 当前页码
- currentPage: 1,
- // 每页数据的条数
- pageSize: 10,
- // 表格的列
- tableColumns1: [{
- // 分页时,若要出现自动索引,设置type = "index2",并使用 render 来返回索引值
- type: 'index2',
- width: 80,
- align: 'center',
- render: (h, params) => {
- return h('span', params.index + (this.currentPage - 1) * this.pageSize + 1);
- }
- }, {
- title: 'Name',
- slot: 'name'
- }, {
- title: 'Salary',
- key: 'salary',
- sortable: true
- },
- {
- title: 'Age',
- key: 'age',
- sortable: true
- },
- {
- title: 'Email',
- key: 'email'
- }, {
- title: 'DeptName',
- key: 'deptName'
- },
- {
- title: 'Action',
- slot: 'action',
- width: 200,
- align: 'center'
- }
- ],
- dept: [{
- deptId: '1',
- deptName: '开发部'
- },{
- deptId: '2',
- deptName: '测试部'
- },{
- deptId: '3',
- deptName: '产品部'
- }],
- // 表格的源数据
- data1: [{
- name: 'John Brown',
- salary: 6000,
- age: 18,
- email: '323@163.com',
- deptId: '1',
- deptName: '开发部'
- },
- {
- name: 'Jim Green',
- salary: 6000,
- age: 24,
- email: '323@163.com',
- deptId: '2',
- deptName: '测试部'
- },
- {
- name: 'Joe Black',
- salary: 6000,
- age: 30,
- email: '323@163.com',
- deptId: '3',
- deptName: '产品部'
- },
- {
- name: 'Jon Snow',
- salary: 6000,
- age: 26,
- email: '323@163.com',
- deptId: '1',
- deptName: '开发部'
- }, {
- name: 'John Brown',
- salary: 6000,
- age: 18,
- email: '323@163.com',
- deptId: '2',
- deptName: '测试部'
- },
- {
- name: 'Jim Green',
- salary: 6000,
- age: 24,
- email: '323@163.com',
- deptId: '1',
- deptName: '开发部'
- },
- {
- name: 'Joe Black',
- salary: 6000,
- age: 30,
- email: '323@163.com',
- deptId: '1',
- deptName: '开发部'
- },
- {
- name: 'Jon Snow',
- salary: 6000,
- age: 26,
- email: '323@163.com',
- deptId: '2',
- deptName: '测试部'
- },
- {
- name: 'Jim Green',
- salary: 6000,
- age: 24,
- email: '323@163.com',
- deptId: '1',
- deptName: '开发部'
- },
- {
- name: 'Joe Black',
- salary: 6000,
- age: 30,
- email: '323@163.com',
- deptId: '2',
- deptName: '测试部'
- },
- {
- name: 'Jon Snow',
- salary: 6000,
- age: 26,
- email: '323@163.com',
- deptId: '3',
- deptName: '产品部'
- }
- ],
- // 表格每页的数据
- data2: [],
- // 表格边框是否显示
- showBorder: false,
- // 表格斑马纹是否显示
- showStripe: false,
- // 表格头是否显示
- showHeader: true,
- // 表格索引是否显示
- showIndex: true,
- // 表格多选框是否显示
- showCheckbox: false,
- // 表格滚动条是否开启
- fixedHeader: false,
- // 改变表格大小
- tableSize: 'default'
- }
- },
- methods: {
- changePage(index) {
- // 改变当前的页码,并获取当前页码所拥有的数据
- this.currentPage = index
- // 注意,此处不能直接用 = 赋值。使用 = 后(指向的地址相同),修改 data2 的同时会修改 data1
- this.data2 = [].concat(this.data1.slice((index - 1) * this.pageSize, index * this.pageSize))
- },
- show(index) {
- // 弹出一个模态框,用于展示某条数据的信息
- this.empInfo = Object.assign(this.empInfo, this.data2[index])
- this.empModal = true
- this.createOrEditor = true
- this.empInfo = Object.assign(this.empInfo, {index: index})
- },
- create() {
- // 用于添加一条信息
- this.empInfo = []
- this.empModal = true
- this.createOrEditor = false
- },
- remove(index) {
- // 删除某条数据(删除源数据)
- this.data1.splice((this.currentPage - 1) * 10 + index, 1)
- },
- changePageSize(index) {
- // 改变每页显示的条数
- this.$Message.info({
- content: '当前页面显示条数修改为: ' + index + '条/页'
- })
- // 改变后,跳转到首页,并刷新列表
- this.currentPage = 1
- this.pageSize = index
- this.changePage(this.currentPage)
- },
- okEditor () {
- if (this.createOrEditor) {
- // 编辑的操作,修改数据
- this.data1.splice((this.currentPage - 1) * 10 + this.empInfo.index, 1, this.empInfo)
- } else {
- // 添加的操作,修改数据
- this.data1.push(Object.assign({}, this.empInfo))
- }
- this.empInfo = {}
- },
- cancelEditor () {
- // 取消编辑的操作
- this.$Message.info({
- content: '操作取消'
- })
- }
- },
- watch: {
- showIndex(newVal) {
- if (newVal) {
- // 为true时,在首部增加一个索引列
- this.tableColumns1.unshift({
- // 分页时,若要出现自动索引,设置type = "index2",并使用 render 来返回索引值
- type: 'index2',
- width: 80,
- align: 'center',
- render: (h, params) => {
- return h('span', params.index + (this.currentPage - 1) * this.pageSize + 1);
- }
- })
- } else {
- // 为false时,若首部存在索引列,则移除该列
- this.tableColumns1.forEach((item, index) => {
- if (item.type === 'index2') {
- this.tableColumns1.splice(index, 1)
- }
- })
- }
- },
- showCheckbox(newVal) {
- if (newVal) {
- // 为 true 时,在首部增加一多选框列,
- this.tableColumns1.unshift({
- type: 'selection',
- width: 60,
- align: 'center'
- })
- } else {
- // 为false时,若存在多选框列,则移除该列
- this.tableColumns1.forEach((item, index) => {
- if (item.type === 'selection') {
- this.tableColumns1.splice(index, 1)
- }
- })
- }
- },
- data1() {
- // 当列表数据改变时(比如删除某数据),触发一次刷新列表的操作
- if (!this.createOrEditor) {
- // 若为添加数据,则跳转到最后一个页面
- this.changePage(Math.ceil(this.data1.length / this.pageSize))
- } else {
- this.changePage(this.currentPage)
- }
- }
- },
- mounted() {
- // 页面加载时,触发第一次刷新列表的操作
- this.changePage(this.currentPage)
- }
- }
- </script>
文件目录结构:
八、前端代码
1、解决跨域问题
可以参考:https://www.cnblogs.com/l-y-h/p/11815452.html
(1)在 main.js 中配置 baseURL
- 【main.js】
- import Vue from 'vue'
- import App from './App.vue'
- import ViewUI from 'view-design'
- import 'view-design/dist/styles/iview.css'
- import Axios from 'axios'
- Vue.config.productionTip = false
- Vue.use(ViewUI)
- Vue.prototype.$axios = Axios
- Axios.defaults.baseURL = '/api'
- new Vue({
- render: h => h(App),
- }).$mount('#app')
(2)在 vue.config.js 中配置跨域代理
- 【vue.config.js】
- module.exports = {
- devServer: {
- proxy: {
- '/api': {
- // 此处的写法,目的是为了 将 /api 替换成 http://localhost:9000/crud
- target: 'http://localhost:9000/crud/',
- // 允许跨域
- changeOrigin: true,
- ws: true,
- pathRewrite: {
- '^/api': ''
- }
- }
- }
- }
- }
(3)使用 axios

- 【自定义一个 api.js 文件】
- import Axios from 'axios'
- export function getAllEmps(params) {
- return new Promise((resolve, reject) => {
- Axios.get('/emps/' + params.pageNum, {
- params
- }).then(res => {
- resolve(res);
- }).catch(res => {
- reject(res)
- })
- })
- }
- 【使用时,在需要使用的地方引入这个js文件即可】
- <template>
- </template>
- <script>
- import { getAllEmps } from './api/api.js'
- export default {
- data() {
- return {
- currentPage: 1,
- pageSize: 2
- }
- },
- mounted() {
- // 不需要使用 this.getAllEmps(),直接使用 getAllEmps() 即可
- getAllEmps({
- pageNum: this.currentPage,
- pageSize: this.pageSize
- })
- }
- }
- </script>
- 【App.vue】
- <template>
- <div style="width: 1200px; margin: 0 auto;" class="layout">
- <Layout>
- <header>
- <row>
- <Divider orientation="left">
- <h1>员工列表</h1>
- </Divider>
- </row>
- <row justify="end" type="flex">
- <i-col style="margin-right: 5px"><Button type="primary" icon="md-add" @click="create">添加</Button></i-col>
- <i-col style="margin-right: 5px"><Button type="success" icon="md-settings" @click="setUp = true">设置</Button></i-col>
- </row>
- </header>
- <Content>
- <Table :data="data2" :columns="tableColumns1" :stripe="showStripe" :border="showBorder" :showHeader="showHeader" :size="tableSize" :height="fixedHeader ? 250 : ''">
- <template slot-scope="{ row }" slot="name">
- <strong>{{ row.name }}</strong>
- </template>
- <template slot-scope="{ row, index }" slot="action">
- <Button type="primary" size="small" style="margin-right: 5px" @click="show(index)" icon="ios-create-outline">编辑</Button>
- <Button type="error" size="small" @click="remove(index)" icon="ios-trash">删除</Button>
- </template>
- </Table>
- <div style="margin: 10px;overflow: hidden">
- <div style="float: right;">
- <!-- current 设置当前选中页,pageSize 设置每页显示数据的条数-->
- <Page :total="data1.length" :pageSize="pageSize" :current="currentPage" @on-change="changePage" show-sizer show-elevator show-total @on-page-size-change="changePageSize"></Page>
- </div>
- </div>
- </Content>
- </Layout>
- <Drawer title="Set up" :closable="true" :mask="false" v-model="setUp">
- <div style="margin: 10px">
- Table Setting<br>
- <i-switch v-model="showBorder" style="margin-right: 5px"></i-switch>Display border<br>
- <i-switch v-model="showStripe" style="margin-right: 5px"></i-switch>Display stripe<br>
- <i-switch v-model="showIndex" style="margin-right: 5px"></i-switch>Display index<br>
- <i-switch v-model="showCheckbox" style="margin-right: 5px"></i-switch>Display multi choice<br>
- <i-switch v-model="showHeader" style="margin-right: 5px"></i-switch>Display header<br>
- <i-switch v-model="fixedHeader" style="margin-right: 5px"></i-switch>Table scrolling<br>
- <br><br>
- Table size
- <Select v-model="tableSize" style="width:200px">
- <Option value="large">large</Option>
- <Option value="default">medium(default)</Option>
- <Option value="small">small</Option>
- </Select>
- </div>
- </Drawer>
- <Modal v-model="empModal" title="Emp Info" @on-ok="okEditor" @on-cancel="cancelEditor">
- <Form :label-width="80">
- <FormItem label="Name:">
- <Input v-model="empInfo.name" placeholder="Name..." style="width: 300px;" />
- </FormItem>
- <FormItem label="Salary:">
- <Input v-model="empInfo.salary" placeholder="Salary..." style="width: 300px;" />
- </FormItem>
- <FormItem label="Age:">
- <Input v-model="empInfo.age" placeholder="Age..." style="width: 300px;" />
- </FormItem>
- <FormItem label="Email:">
- <Input v-model="empInfo.email" placeholder="Email..." style="width: 300px;" />
- </FormItem>
- <FormItem label="DeptName:">
- <Select v-model="empInfo.deptName">
- <Option v-for="(item, index) in dept" :key="index" :value="item.deptName"> {{item.deptName}} </Option>
- </Select>
- </FormItem>
- </Form>
- </Modal>
- </div>
- </template>
- <script>
- import { getAllEmps } from './api/api.js'
- export default {
- data() {
- return {
- // 添加与编辑复用 modal 框,false为添加,true为编辑
- createOrEditor: false,
- // 是否打开员工信息框
- empModal: false,
- // 用于保存一个员工的信息
- empInfo: {},
- // 是否打开设置
- setUp: false,
- // 当前页码
- currentPage: 1,
- // 每页数据的条数
- pageSize: 10,
- // 表格的列
- tableColumns1: [{
- // 分页时,若要出现自动索引,设置type = "index2",并使用 render 来返回索引值
- type: 'index2',
- width: 80,
- align: 'center',
- render: (h, params) => {
- return h('span', params.index + (this.currentPage - 1) * this.pageSize + 1);
- }
- }, {
- title: 'Name',
- slot: 'name'
- }, {
- title: 'Salary',
- key: 'salary',
- sortable: true
- },
- {
- title: 'Age',
- key: 'age',
- sortable: true
- },
- {
- title: 'Email',
- key: 'email'
- }, {
- title: 'DeptName',
- key: 'deptName'
- },
- {
- title: 'Action',
- slot: 'action',
- width: 200,
- align: 'center'
- }
- ],
- dept: [{
- deptId: '1',
- deptName: '开发部'
- },{
- deptId: '2',
- deptName: '测试部'
- },{
- deptId: '3',
- deptName: '产品部'
- }],
- // 表格的源数据
- data1: [{
- name: 'John Brown',
- salary: 6000,
- age: 18,
- email: '323@163.com',
- deptId: '1',
- deptName: '开发部'
- },
- {
- name: 'Jim Green',
- salary: 6000,
- age: 24,
- email: '323@163.com',
- deptId: '2',
- deptName: '测试部'
- },
- {
- name: 'Joe Black',
- salary: 6000,
- age: 30,
- email: '323@163.com',
- deptId: '3',
- deptName: '产品部'
- },
- {
- name: 'Jon Snow',
- salary: 6000,
- age: 26,
- email: '323@163.com',
- deptId: '1',
- deptName: '开发部'
- }, {
- name: 'John Brown',
- salary: 6000,
- age: 18,
- email: '323@163.com',
- deptId: '2',
- deptName: '测试部'
- },
- {
- name: 'Jim Green',
- salary: 6000,
- age: 24,
- email: '323@163.com',
- deptId: '1',
- deptName: '开发部'
- },
- {
- name: 'Joe Black',
- salary: 6000,
- age: 30,
- email: '323@163.com',
- deptId: '1',
- deptName: '开发部'
- },
- {
- name: 'Jon Snow',
- salary: 6000,
- age: 26,
- email: '323@163.com',
- deptId: '2',
- deptName: '测试部'
- },
- {
- name: 'Jim Green',
- salary: 6000,
- age: 24,
- email: '323@163.com',
- deptId: '1',
- deptName: '开发部'
- },
- {
- name: 'Joe Black',
- salary: 6000,
- age: 30,
- email: '323@163.com',
- deptId: '2',
- deptName: '测试部'
- },
- {
- name: 'Jon Snow',
- salary: 6000,
- age: 26,
- email: '323@163.com',
- deptId: '3',
- deptName: '产品部'
- }
- ],
- // 表格每页的数据
- data2: [],
- // 表格边框是否显示
- showBorder: false,
- // 表格斑马纹是否显示
- showStripe: false,
- // 表格头是否显示
- showHeader: true,
- // 表格索引是否显示
- showIndex: true,
- // 表格多选框是否显示
- showCheckbox: false,
- // 表格滚动条是否开启
- fixedHeader: false,
- // 改变表格大小
- tableSize: 'default'
- }
- },
- methods: {
- changePage(index) {
- // 改变当前的页码,并获取当前页码所拥有的数据
- this.currentPage = index
- // 注意,此处不能直接用 = 赋值。使用 = 后(指向的地址相同),修改 data2 的同时会修改 data1
- this.data2 = [].concat(this.data1.slice((index - 1) * this.pageSize, index * this.pageSize))
- },
- show(index) {
- // 弹出一个模态框,用于展示某条数据的信息
- this.empInfo = Object.assign(this.empInfo, this.data2[index])
- this.empModal = true
- this.createOrEditor = true
- this.empInfo = Object.assign(this.empInfo, {index: index})
- },
- create() {
- // 用于添加一条信息
- this.empInfo = []
- this.empModal = true
- this.createOrEditor = false
- },
- remove(index) {
- // 删除某条数据(删除源数据)
- this.data1.splice((this.currentPage - 1) * 10 + index, 1)
- },
- changePageSize(index) {
- // 改变每页显示的条数
- this.$Message.info({
- content: '当前页面显示条数修改为: ' + index + '条/页'
- })
- // 改变后,跳转到首页,并刷新列表
- this.currentPage = 1
- this.pageSize = index
- this.changePage(this.currentPage)
- },
- okEditor () {
- if (this.createOrEditor) {
- // 编辑的操作,修改数据
- this.data1.splice((this.currentPage - 1) * 10 + this.empInfo.index, 1, this.empInfo)
- } else {
- // 添加的操作,修改数据
- this.data1.push(Object.assign({}, this.empInfo))
- }
- this.empInfo = {}
- },
- cancelEditor () {
- // 取消编辑的操作
- this.$Message.info({
- content: '操作取消'
- })
- }
- },
- watch: {
- showIndex(newVal) {
- if (newVal) {
- // 为true时,在首部增加一个索引列
- this.tableColumns1.unshift({
- // 分页时,若要出现自动索引,设置type = "index2",并使用 render 来返回索引值
- type: 'index2',
- width: 80,
- align: 'center',
- render: (h, params) => {
- return h('span', params.index + (this.currentPage - 1) * this.pageSize + 1);
- }
- })
- } else {
- // 为false时,若首部存在索引列,则移除该列
- this.tableColumns1.forEach((item, index) => {
- if (item.type === 'index2') {
- this.tableColumns1.splice(index, 1)
- }
- })
- }
- },
- showCheckbox(newVal) {
- if (newVal) {
- // 为 true 时,在首部增加一多选框列,
- this.tableColumns1.unshift({
- type: 'selection',
- width: 60,
- align: 'center'
- })
- } else {
- // 为false时,若存在多选框列,则移除该列
- this.tableColumns1.forEach((item, index) => {
- if (item.type === 'selection') {
- this.tableColumns1.splice(index, 1)
- }
- })
- }
- },
- data1() {
- // 当列表数据改变时(比如删除某数据),触发一次刷新列表的操作
- if (!this.createOrEditor) {
- // 若为添加数据,则跳转到最后一个页面
- this.changePage(Math.ceil(this.data1.length / this.pageSize))
- } else {
- this.changePage(this.currentPage)
- }
- }
- },
- mounted() {
- // 页面加载时,触发第一次刷新列表的操作
- this.changePage(this.currentPage)
- // 不需要使用 this.getAllEmps(),直接使用 getAllEmps() 即可
- getAllEmps({
- pageNum: this.currentPage,
- pageSize: this.pageSize
- }).then((res) => {
console.log(res)
})- }
- }
- </script>
2、调用接口、与后台进行交互
(1)接口详情
- 【获取所有emp信息(分页查询)】
- GET param
- http://localhost:9000/crud/emps/{pageNum} pageSize
- 【获取某个员工的信息(没用上)】
- GET
- http://localhost:9000/crud/emp/{id}
- 【删除某个员工的信息】
- DELETE
- http://localhost:9000/crud/emp/{id}
- 【插入某条数据】
- POST
- http://localhost:9000/crud/emp Employee
- 【更新某条数据】
- PUT
- http://localhost:9000/crud/emp/{id} Employee
- 【获取部门信息】
- GET
- http://localhost:9000/crud/depts
(2)完整代码
代码结构截图:
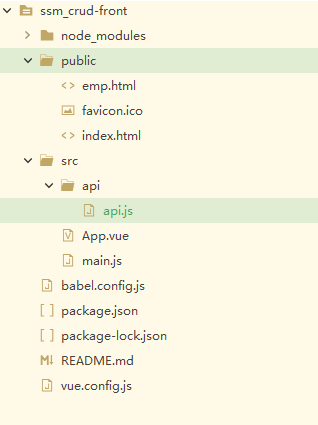
- 【main.js】
- import Vue from 'vue'
- import App from './App.vue'
- import ViewUI from 'view-design'
- import 'view-design/dist/styles/iview.css'
- import Axios from 'axios'
- Vue.config.productionTip = false
- Vue.use(ViewUI)
- Vue.prototype.$axios = Axios
- Axios.defaults.baseURL = '/api'
- new Vue({
- render: h => h(App),
- }).$mount('#app')
- 【App.vue】
- <template>
- <div style="width: 1200px; margin: 0 auto;" class="layout">
- <Layout>
- <header>
- <row>
- <Divider orientation="left">
- <h1>员工列表</h1>
- </Divider>
- </row>
- <row justify="end" type="flex">
- <i-col style="margin-right: 5px"><Button type="primary" icon="md-add" @click="create">添加</Button></i-col>
- <i-col style="margin-right: 5px"><Button type="success" icon="md-settings" @click="setUp = true">设置</Button></i-col>
- </row>
- </header>
- <Content>
- <Table :data="data2" :columns="tableColumns1" :stripe="showStripe" :border="showBorder" :showHeader="showHeader" :size="tableSize" :height="fixedHeader ? 250 : ''">
- <template slot-scope="{ row }" slot="name">
- <strong>{{ row.name }}</strong>
- </template>
- <template slot-scope="{ row, index }" slot="action">
- <Button type="primary" size="small" style="margin-right: 5px" @click="show(index)" icon="ios-create-outline">编辑</Button>
- <Button type="error" size="small" @click="remove(row, index)" icon="ios-trash">删除</Button>
- </template>
- </Table>
- <div style="margin: 10px;overflow: hidden">
- <div style="float: right;">
- <!-- current 设置当前选中页,pageSize 设置每页显示数据的条数-->
- <Page :total="total" :pageSize="pageSize" :current="currentPage" @on-change="changePage" show-sizer show-elevator show-total @on-page-size-change="changePageSize"></Page>
- </div>
- </div>
- </Content>
- </Layout>
- <Drawer title="Set up" :closable="true" :mask="false" v-model="setUp">
- <div style="margin: 10px">
- Table Setting<br>
- <i-switch v-model="showBorder" style="margin-right: 5px"></i-switch>Display border<br>
- <i-switch v-model="showStripe" style="margin-right: 5px"></i-switch>Display stripe<br>
- <i-switch v-model="showIndex" style="margin-right: 5px"></i-switch>Display index<br>
- <i-switch v-model="showCheckbox" style="margin-right: 5px"></i-switch>Display multi choice<br>
- <i-switch v-model="showHeader" style="margin-right: 5px"></i-switch>Display header<br>
- <i-switch v-model="fixedHeader" style="margin-right: 5px"></i-switch>Table scrolling<br>
- <br><br>
- Table size
- <Select v-model="tableSize" style="width:200px">
- <Option value="large">large</Option>
- <Option value="default">medium(default)</Option>
- <Option value="small">small</Option>
- </Select>
- </div>
- </Drawer>
- <Modal v-model="empModal" title="Emp Info" @on-ok="okEditor" @on-cancel="cancelEditor">
- <Form :label-width="80">
- <FormItem label="Name:">
- <Input v-model="empInfo.name" placeholder="Name..." style="width: 300px;" />
- </FormItem>
- <FormItem label="Salary:">
- <Input v-model="empInfo.salary" placeholder="Salary..." style="width: 300px;" />
- </FormItem>
- <FormItem label="Age:">
- <Input v-model="empInfo.age" placeholder="Age..." style="width: 300px;" />
- </FormItem>
- <FormItem label="Email:">
- <Input v-model="empInfo.email" placeholder="Email..." style="width: 300px;" />
- </FormItem>
- <FormItem label="DeptName:">
- <Select v-model="empInfo.deptid">
- <Option v-for="(item, index) in dept" :key="index" :value="item.deptid"> {{item.deptname}} </Option>
- </Select>
- </FormItem>
- </Form>
- </Modal>
- </div>
- </template>
- <script>
- import {
- getAllEmps,
- getEmp,
- deleteEmp,
- updateEmp,
- insertEmp,
- getDeptName
- } from './api/api.js'
- export default {
- data() {
- return {
- // 保存列表的总数据
- total: 0,
- // 添加与编辑复用 modal 框,false为添加,true为编辑
- createOrEditor: false,
- // 是否打开员工信息框
- empModal: false,
- // 用于保存一个员工的信息
- empInfo: {},
- // 是否打开设置
- setUp: false,
- // 当前页码
- currentPage: 1,
- // 每页数据的条数
- pageSize: 10,
- // 表格的列
- tableColumns1: [{
- // 分页时,若要出现自动索引,设置type = "index2",并使用 render 来返回索引值
- type: 'index2',
- width: 80,
- align: 'center',
- render: (h, params) => {
- return h('span', params.index + (this.currentPage - 1) * this.pageSize + 1);
- }
- }, {
- title: 'Name',
- slot: 'name'
- }, {
- title: 'Salary',
- key: 'salary',
- sortable: true
- },
- {
- title: 'Age',
- key: 'age',
- sortable: true
- },
- {
- title: 'Email',
- key: 'email'
- }, {
- title: 'DeptName',
- key: 'deptName'
- },
- {
- title: 'Action',
- slot: 'action',
- width: 200,
- align: 'center'
- }
- ],
- dept: [],
- // 表格每页的数据
- data2: [],
- // 表格边框是否显示
- showBorder: false,
- // 表格斑马纹是否显示
- showStripe: false,
- // 表格头是否显示
- showHeader: true,
- // 表格索引是否显示
- showIndex: true,
- // 表格多选框是否显示
- showCheckbox: false,
- // 表格滚动条是否开启
- fixedHeader: false,
- // 改变表格大小
- tableSize: 'default'
- }
- },
- methods: {
- changePage(index) {
- // 改变当前的页码,并获取当前页码所拥有的数据
- this.currentPage = index
- // 获取emps数据,分页查询
- getAllEmps({
- pageNum: this.currentPage,
- pageSize: this.pageSize
- }).then((res) => {
- if (res.data.success) {
- // 保存获取到的 emp 列表
- this.data2 = res.data.pageInfo.list
- // 保存获取数据的总数
- this.total = res.data.pageInfo.total
- }
- this.noticeType(res.data.level, res.data.messages)
- }).catch((res) => {
- this.noticeType()
- })
- },
- show(index) {
- // 弹出一个模态框,用于展示某条数据的信息
- this.empInfo = Object.assign(this.empInfo, this.data2[index])
- this.empModal = true
- this.createOrEditor = true
- this.empInfo = Object.assign(this.empInfo, {
- index: index
- })
- },
- create() {
- // 用于添加一条信息
- this.empInfo = []
- this.empModal = true
- this.createOrEditor = false
- },
- remove(row, index) {
- this.$Modal.confirm({
- title: '删除',
- content: '<p>是否删除当前数据</p>',
- onOk: () => {
- // 删除某个员工的数据
- deleteEmp({
- id: row.id
- }).then((res) => {
- if (res.data.success) {
- this.changePage(this.currentPage)
- }
- this.noticeType(res.data.level, res.data.messages)
- }).catch((res) => {
- this.noticeType()
- })
- },
- onCancel: () => {
- this.$Message.info('取消删除')
- },
- okText: 'OK',
- cancelText: 'Cancel'
- })
- },
- changePageSize(index) {
- // 改变每页显示的条数
- this.$Message.info({
- content: '当前页面显示条数修改为: ' + index + '条/页'
- })
- // 改变后,跳转到首页,并刷新列表
- this.pageSize = index
- if(this.currentPage === 1) {
- this.changePage(this.currentPage)
- return
- }
- this.currentPage = 1
- },
- okEditor() {
- if (this.createOrEditor) {
- // 更新某个员工的数据
- const that = this
- updateEmp(this.empInfo).then((res) => {
- if (res.data.success) {
- this.changePage(this.currentPage)
- }
- this.noticeType(res.data.level, res.data.messages)
- }).catch((res) => {
- this.noticeType()
- })
- } else {
- // 新增某个员工
- this.empInfo = Object.assign({}, this.empInfo, {
- id: null
- })
- insertEmp(this.empInfo).then((res) => {
- if (res.data.success) {
- this.changePage(Math.ceil((this.total + 1) / this.pageSize))
- }
- this.noticeType(res.data.level, res.data.messages)
- }).catch((res) => {
- this.noticeType()
- })
- }
- this.empInfo = {}
- },
- cancelEditor() {
- // 取消编辑的操作
- this.$Message.info({
- content: '操作取消'
- })
- },
- noticeType(type, messages) {
- switch (type) {
- case 'info':
- this.$Notice.success({
- title: messages.join('\n'),
- duration: 2
- })
- break
- case 'error':
- this.$Notice.error({
- title: messages.join('\n'),
- duration: 2
- })
- break
- default:
- this.$Notice.error({
- title: '系统异常',
- duration: 2
- })
- break
- }
- }
- },
- watch: {
- showIndex(newVal) {
- if (newVal) {
- // 为true时,在首部增加一个索引列
- this.tableColumns1.unshift({
- // 分页时,若要出现自动索引,设置type = "index2",并使用 render 来返回索引值
- type: 'index2',
- width: 80,
- align: 'center',
- render: (h, params) => {
- return h('span', params.index + (this.currentPage - 1) * this.pageSize + 1);
- }
- })
- } else {
- // 为false时,若首部存在索引列,则移除该列
- this.tableColumns1.forEach((item, index) => {
- if (item.type === 'index2') {
- this.tableColumns1.splice(index, 1)
- }
- })
- }
- },
- showCheckbox(newVal) {
- if (newVal) {
- // 为 true 时,在首部增加一多选框列,
- this.tableColumns1.unshift({
- type: 'selection',
- width: 60,
- align: 'center'
- })
- } else {
- // 为false时,若存在多选框列,则移除该列
- this.tableColumns1.forEach((item, index) => {
- if (item.type === 'selection') {
- this.tableColumns1.splice(index, 1)
- }
- })
- }
- },
- empModal(newVal) {
- // 如果打开模态框,则触发一次获取部门信息的操作
- if (newVal) {
- // 获取部门信息
- getDeptName().then((res) => {
- if (res.data.success) {
- // 使用 Object.assign 给对象赋值时,推荐使用如下方法,创建一个新的对象。
- // 若仍使用同一对象,比如this.dept = Object.assign(this.dept, res.data.departments),vue可能监控不到它的变化。
- this.dept = Object.assign({}, this.dept, res.data.departments)
- }
- }).catch((res) => {
- this.noticeType()
- })
- }
- }
- },
- mounted() {
- // 页面加载时,触发第一次刷新列表的操作
- this.changePage(this.currentPage)
- }
- }
- </script>
- 【api.js】
- import Axios from 'axios'
- /**
- * 获取emps数据,分页查询
- * @param {Object} params 分页参数(pageNum当前页码, pageSize每页数据总数)
- */
- export function getAllEmps(params) {
- return new Promise((resolve, reject) => {
- Axios.get('/emps/' + params.pageNum, {
- params
- }).then(res => {
- resolve(res)
- }).catch(res => {
- reject(res)
- })
- })
- }
- /**
- * 获取某个员工的数据
- * @param {Object} params 参数为员工的 id
- */
- export function getEmp(params) {
- return new Promise((resolve, reject) => {
- Axios.get('/emp/' + params.id).then(res => {
- resolve(res)
- }).catch(res => {
- reject(res)
- })
- })
- }
- /**
- * 删除某个员工的数据
- * @param {Object} params 参数为员工的 id
- */
- export function deleteEmp(params) {
- return new Promise((resolve, reject) => {
- Axios.delete('/emp/' + params.id).then(res => {
- resolve(res)
- }).catch(res => {
- reject(res)
- })
- })
- }
- /**
- * 更新某个员工的数据
- * @param {Object} params 参数为员工的 id,以及员工数据
- */
- export function updateEmp(params) {
- return new Promise((resolve, reject) => {
- Axios.put('/emp/' + params.id, params).then(res => {
- resolve(res)
- }).catch(res => {
- reject(res)
- })
- })
- }
- /**
- * 新增某个员工
- * @param {Object} params 参数为员工的 id,以及员工数据
- */
- export function insertEmp(params) {
- return new Promise((resolve, reject) => {
- Axios.post('/emp', params).then(res => {
- resolve(res)
- }).catch(res => {
- reject(res)
- })
- })
- }
- /**
- * 获取部门信息
- * @param {Object} params
- */
- export function getDeptName(params) {
- return new Promise((resolve, reject) => {
- Axios.get('/depts').then(res => {
- resolve(res)
- }).catch(res => {
- reject(res)
- })
- })
- }
- 【vue.config.js】
- module.exports = {
- devServer: {
- proxy: {
- '/api': {
- // 此处的写法,目的是为了 将 /api 替换成 http://localhost:9000/crud
- target: 'http://localhost:9000/crud/',
- // 允许跨域
- changeOrigin: true,
- ws: true,
- pathRewrite: {
- '^/api': ''
- }
- }
- }
- }
- }
- 【package.json】
- {
- "name": "ssm_crud_front",
- "version": "0.1.0",
- "private": true,
- "scripts": {
- "serve": "vue-cli-service serve",
- "build": "vue-cli-service build",
- "lint": "vue-cli-service lint"
- },
- "dependencies": {
- "axios": "^0.19.0",
- "core-js": "^3.3.2",
- "view-design": "^4.0.2",
- "vue": "^2.6.10"
- },
- "devDependencies": {
- "@vue/cli-plugin-babel": "^4.0.0",
- "@vue/cli-plugin-eslint": "^4.0.0",
- "@vue/cli-service": "^4.0.0",
- "babel-eslint": "^10.0.3",
- "eslint": "^5.16.0",
- "eslint-plugin-vue": "^5.0.0",
- "vue-template-compiler": "^2.6.10"
- },
- "eslintConfig": {
- "root": true,
- "env": {
- "node": true
- },
- "extends": [
- "plugin:vue/essential",
- "eslint:recommended"
- ],
- "rules": {
- "generator-star-spacing": "off",
- "no-tabs": "off",
- "no-unused-vars": "off",
- "no-console": "off",
- "no-irregular-whitespace": "off",
- "no-debugger": "off"
- },
- "parserOptions": {
- "parser": "babel-eslint"
- }
- },
- "postcss": {
- "plugins": {
- "autoprefixer": {}
- }
- },
- "browserslist": [
- "> 1%",
- "last 2 versions"
- ]
- }
九、前后端项目启动
1、前端项目启动
(1)项目地址:
https://github.com/lyh-man/ssm_crud-front.git
(2)前提:
安装 node.js(为了使用 npm)。
(3)启动:
- 将项目copy下来,并通过命令行进入该目录。
- 【Project setup】
- Step1: npm install
- 【Compiles and hot-reloads for development】
- Step2: npm run serve
- 【Compiles and minifies for production】
- 可选: npm run build
- 【Run your tests】
- 可选: npm run test
- 【Lints and fixes files】
- 可选: npm run lint
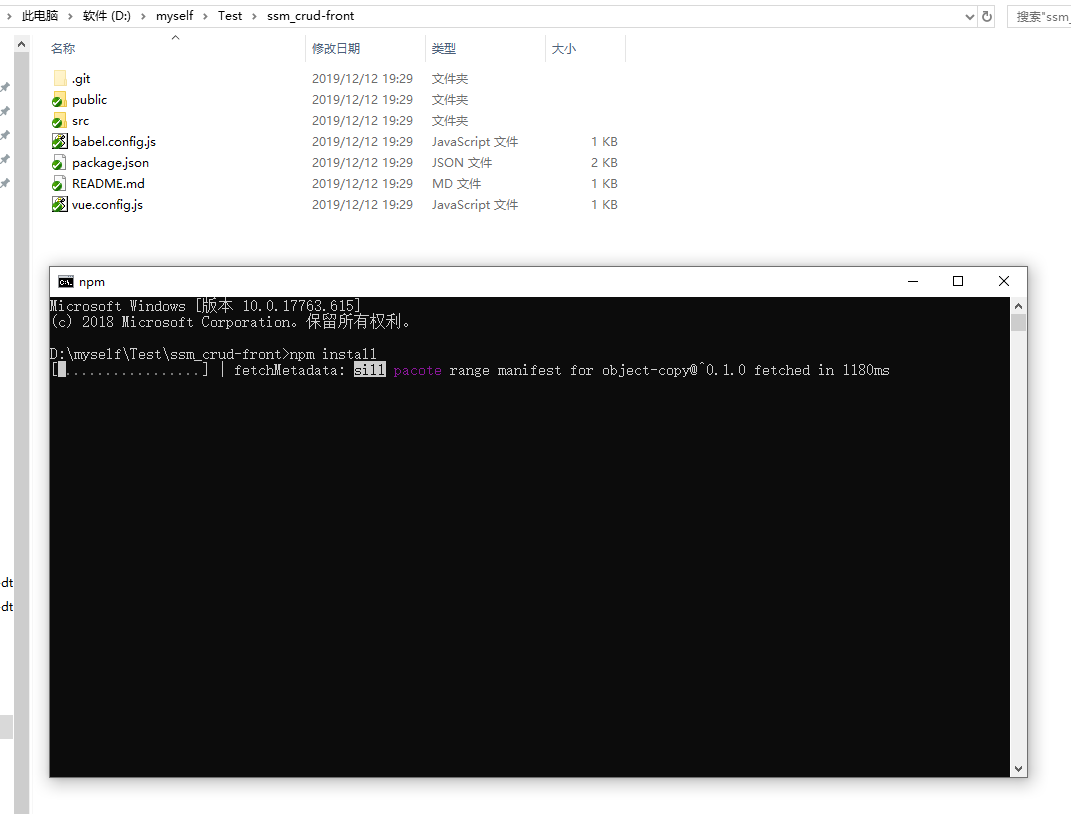
2、后端项目启动
(1)项目地址:https://github.com/lyh-man/ssm_crud-back.git
(2)使用 IDEA 打开项目,等待 maven 下载相关依赖。
(3)Step1:打开 Edit Configurations...
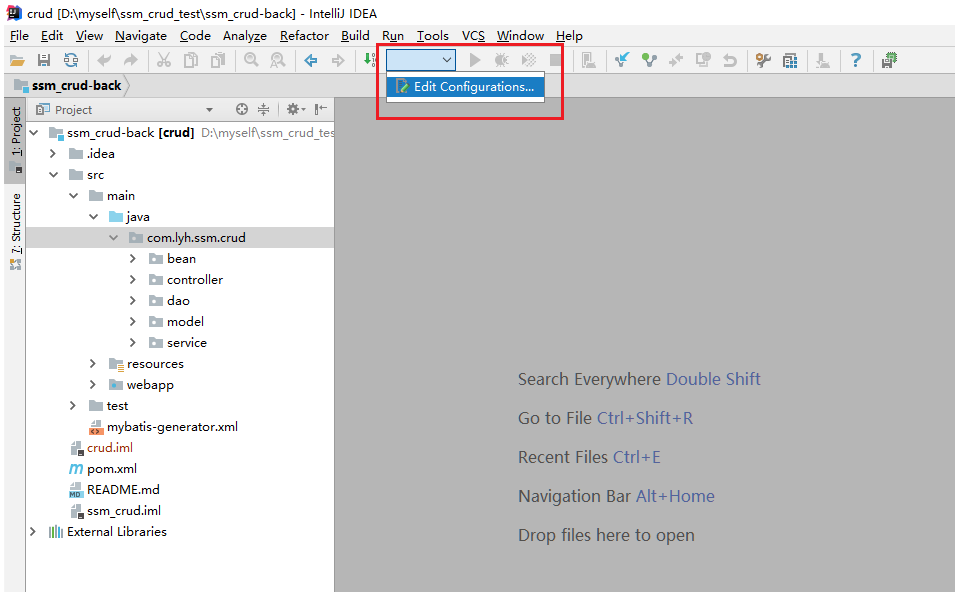
(4)Step2:点击 + 号,并找到 maven
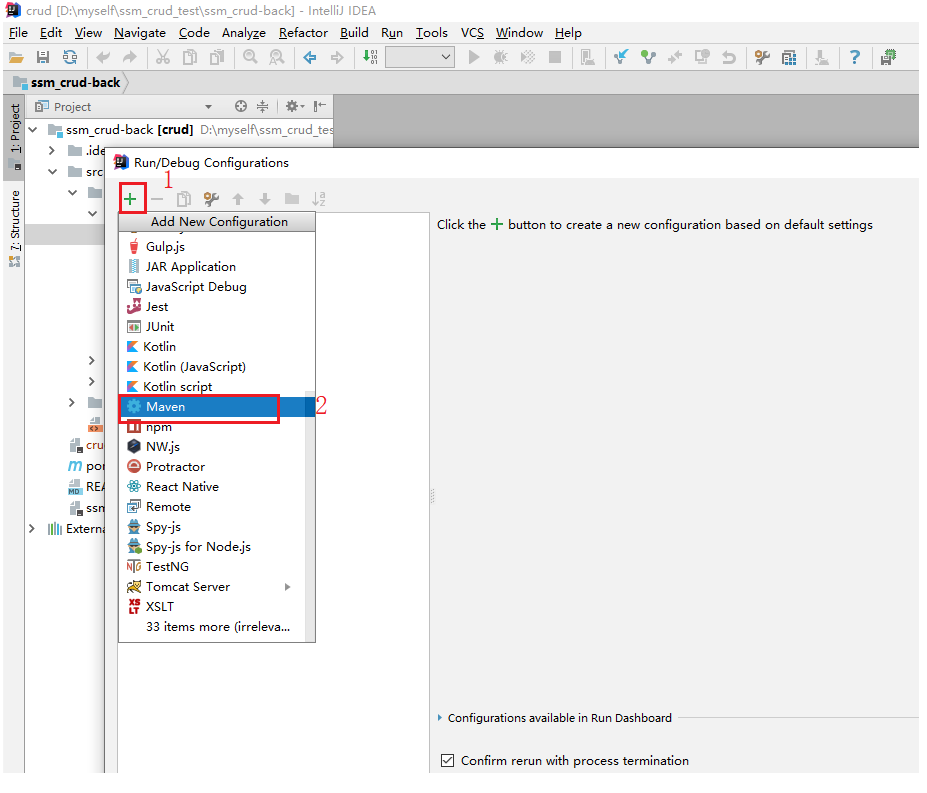
(5)配置项目地址、以及端口号

(6)运行即可
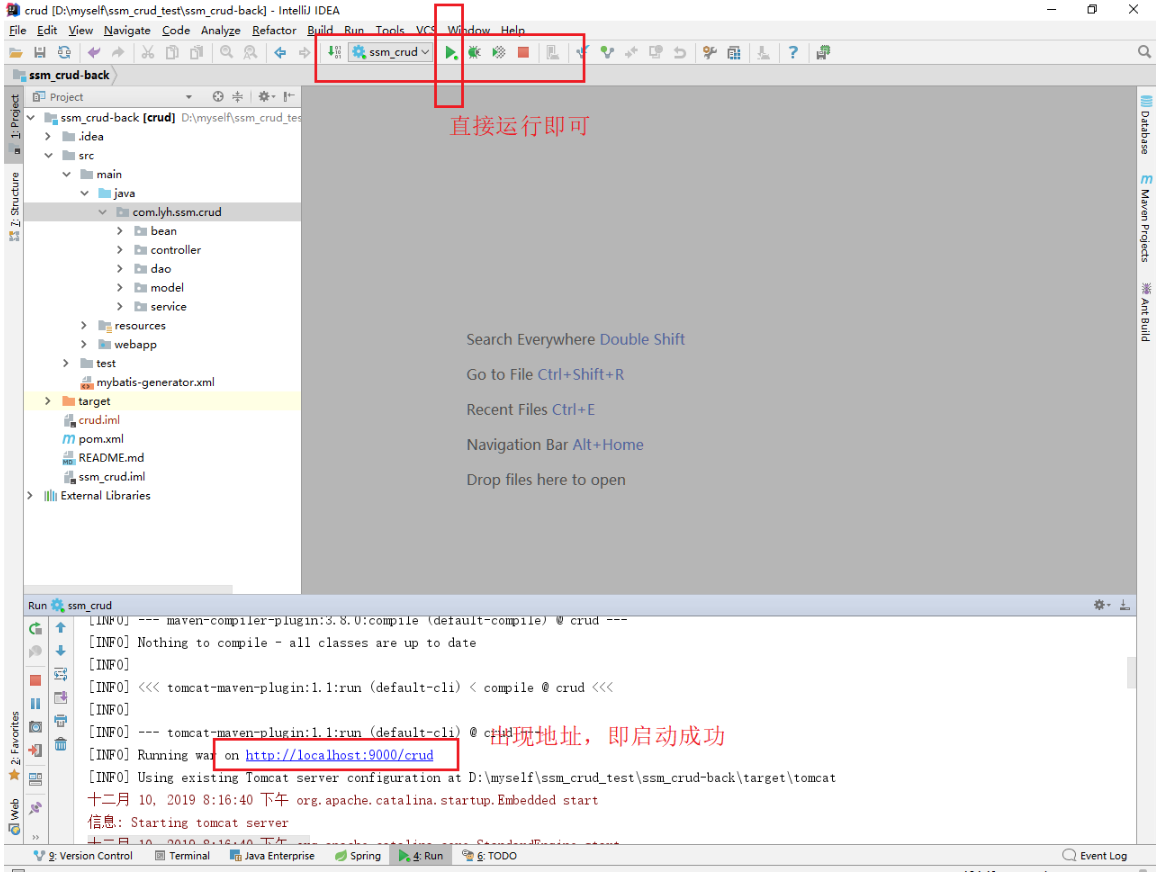
SSM + VUE 实现简单的 CRUD的更多相关文章
- 使用SSM搭建一个简单的crud项目
使用SSM完成增删查改 前端使用到的技术:ajax,json,bootstrap等 完整项目地址:点这里GitHub 项目地址,可以在线访问 这一章节主要搭建SSM的环境. SpringMVC Spr ...
- ssm框架的搭建实现CRUD的操作
最近在开发公司的一个系统,系统的框架是用ssm的框架搭建的,当然和这次写博客的不一样,它拥有很多的配置文件,企业级的开发所需要的配置文件是非常繁琐的,今天记录一下一个简单的SSM框架的搭建和实现一个C ...
- 物流管理系统(SSM+vue+shiro)【前后台】
一.简单介绍项目 该项目是属于毕业设计项目之一,有前台的用户下单.有司机进行接单.有管理员进行操作后台,直接进入主题 毕设.定制开发 联系QQ:761273133 登录主页: 手机号码+验证码登录 或 ...
- 8天掌握EF的Code First开发系列之2 简单的CRUD操作
本文出自8天掌握EF的Code First开发系列,经过自己的实践整理出来. 本篇目录 创建控制台项目 根据.Net中的类来创建数据库 简单的CRUD操作 数据库模式更改介绍 本章小结 本人的实验环境 ...
- spring集成mongodb封装的简单的CRUD
1.什么是mongodb MongoDB是一个基于分布式文件存储的数据库.由C++语言编写.旨在为WEB应用提供可扩展的高性能数据存储解决方案. mongoDB MongoDB是一个介 ...
- react构建淘票票webapp,及react与vue的简单比较。
前言 前段时间使用vue2.0构建了淘票票页面,并写了一篇相关文章vue2.0构建淘票票webapp,得到了很多童鞋的支持,因此这些天又使用react重构了下这个项目,目的无他,只为了学习和共同进步! ...
- vue.js之生命周期,防止闪烁,计算属性的使用,vue实例简单方法和循环重复数据
摘要:今天是比较糟糕的一天没怎么学习,原因是学校的wifi连不上了~~.今天学习一下vue的生命周期,如何防止闪烁(也就是用户看得到花括号),计算属性的使用,vue实例简单方法,以及当有重复数据时如何 ...
- Vue的简单入门
Vue的简单入门 一.什么是Vue? vue.js也一个渐进式JavaScript框架,可以独立完成前后端分离式web项目 渐进式:vue可以从小到控制页面中的一个变量后到页面中一块内容再到整个页面, ...
- Mongodb系列- java客户端简单使用(CRUD)
Mongodb提供了很多的客户端: shell,python, java, node.js...等等. 以 java 为例实现简单的增删改查 pom文件: <dependencies> & ...
随机推荐
- 使用SSH服务远程管理主机(使用密钥)
使用ssh服务远程管理主机 SSH是建立在应用层和传输层基础上的安全协议,目的是要在非安全网络上提供安全的远程登录和其他安全网络服务. 通过SSH连接可以远程管理Linux等设备,默认linuxssh ...
- Snack3 一个新的微型JSON框架
Snack3 一个新的微型JSON框架 一个作品,一般表达作者的一个想法.因为大家想法不同,所有作品会有区别.就做技术而言,因为有很多有区别的框架,所以大家可以选择的框架很丰富. snack3.基于j ...
- 《手把手教你》系列进阶篇之1-python+ selenium自动化测试 - python基础扫盲(详细教程)
1. 简介 如果你从一开始就跟着宏哥看博客文章到这里,基础篇和练习篇的文章.如果你认真看过,并且手动去敲过每一篇的脚本代码,那边恭喜你,至少说你算真正会利用Python+Selenium编写自动化脚本 ...
- 你真的了解JSON吗?
一.JSON——JavaScript Object Notation JSON 是一种语法用来序列化对象.数组.数值.字符串.布尔值和null .它基于 JavaScript 语法,但与之不同:一些J ...
- [TimLinux] docker CentOS7入门——服务(2)
1. 服务含义 分布式应用中,应用的不同部分即称为“服务”,视频网站是一个分布式应用,包含有:数据的存储,视频的转码,前端展示等部分,对应的这些部分即称为相应的服务.docker平台中,定义.运行和扩 ...
- Vue AES+MD5加密 后台解密
前端VUE vue项目中安装crypto-js npm install crypto-js --save-dev CryptoJS (crypto.js) 为 JavaScript 提供了各种各样的加 ...
- 关于页面打印window.print()的样式问题
当我们打印网页的时候.有时候会发现.打印出来的.跟网页上看到的样式的差别有点大.这其中可能有的问题是.样式问题. 当调用打印(window.print())方法时.打印机会在网页的样式中查找 @med ...
- logging in kubernetes
background docker docker的日志输出可以通过指定driver输出到不同的位置,常用的是journald和json-file. 使用journald日志输出可能受限于jourand ...
- C#中使用Path、Directory、Split、Substring实现对文件路径和文件名的常用操作实例
场景 现在有一个文件路径 E:\\BTSData\\2019-11\\admin_20180918_1_1_2 需要获取最后的文件名admin_20180918_1_1_2 需要获取文件的上层目录20 ...
- 动态代理模式_应用(Redis工具类)
本次使用动态代理的初衷是学习Redis,使用Java操作Redis时用到Jedis的JedisPool,而后对Jedis的方法进一步封装完善成为一个工具类.因为直接使用Jedis对象时,为了保证性能, ...