Flume框架的学习使用
Flume框架的学习使用
Flume简介
- Flume提供一个分布式的,可靠的,对大数据量的日志进行高效收集、聚集、移动的服务。
- Flume基于流失架构,容错性强,也很灵活简单
- Flume,kafka用来实时进行数据收集,Spark,Storm用来实时处理数据,impala用来实时查询数据。
Flume角色
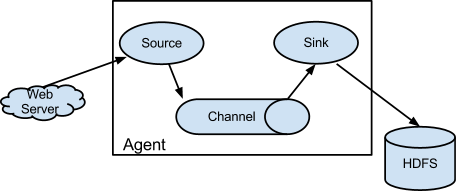
Source
用于采集数据,Source是产生数据流的地方,同时Source会将产生的数据流传输到Channel。
Channel
用于桥接Source和Sink,类似于一个队列。
Sink
从Channel中收集数据,将数据写到目标源(可以是下一个Source,也可以是HDFS或者HBASE)
Event
传输单元,Flume数据传输的基本单元,以事件的形式从源头传递到目的地。
Flume传输过程
Source监控某个文件或者数据流,数据源产生新的数据,拿到该数据之后,将数据封装到一个event中,并put到Channel后commit提交,channel队列先进先出,sink去channel队列中拉去数据,然后写出到下个源。
Flume部署及使用
文件配置
上传压缩包,解压,配置文件:flume-env.sh
export JAVA_HOME=/home/admin/modules/jdk1.8.0_121
案例
监控端口数据
目标:Flume 监控一端 Console,另一端 Console 发送消息,使被监控端实时显示。
- 安装 telnet (为了从某个端口中输出数据)
$ sudo rpm -ivh xinetd-2.3.14-40.el6.x86_64.rpm$ sudo rpm -ivh telnet-0.17-48.el6.x86_64.rpm$ sudo rpm -ivh telnet-server-0.17-48.el6.x86_64.rpm
创建 Flume Agent 配置文件 flume-telnet.conf(详细配置见官网)
# Name the components on this agenta1.sources = r1a1.sinks = k1a1.channels = c1# Describe/configure the sourcea1.sources.r1.type = netcata1.sources.r1.bind = localhosta1.sources.r1.port = 44444# Describe the sinka1.sinks.k1.type = logger# Use a channel which buffers events in memorya1.channels.c1.type = memorya1.channels.c1.capacity = 1000a1.channels.c1.transactionCapacity = 100# Bind the source and sink to the channela1.sources.r1.channels = c1a1.sinks.k1.channel = c1
判断 44444 端口是否被占用
$ netstat -tunlp | grep 44444
先开启 flume 先听端口
$ bin/flume-ng agent --conf conf/ --name a1 --conf-file job/flume-telnet.conf-Dflume.root.logger==INFO,console
使用 telnet 工具向本机的 44444
$ telnet localhost 44444
实时读取本地文件到HDFS
目标:实时监控 hive 日志,并上传到 HDFS 中
由于flume需要操作Hadoop的API,需要拷贝jar包到Flume的lib目录下:
$ cp share/hadoop/common/lib/hadoop-auth-2.5.0-cdh5.3.6.jar ./lib/$ cp share/hadoop/common/lib/commons-configuration-1.6.jar ./lib/$ cp share/hadoop/mapreduce1/lib/hadoop-hdfs-2.5.0-cdh5.3.6.jar ./lib/$ cp share/hadoop/common/hadoop-common-2.5.0-cdh5.3.6.jar ./lib/$ cp ./share/hadoop/hdfs/lib/htrace-core-3.1.0-incubating.jar ./lib/$ cp ./share/hadoop/hdfs/lib/commons-io-2.4.jar ./lib/最后两个 jar 为 1.99 版本 flume 必须引用的 jar
创建 flume-hdfs.conf
# Name the components on this agenta2.sources = r2a2.sinks = k2a2.channels = c2# Describe/configure the sourcea2.sources.r2.type = execa2.sources.r2.command = tail -F /home/admin/modules/apache-hive-1.2.2-bin/hive.loga2.sources.r2.shell = /bin/bash -c# Describe the sinka2.sinks.k2.type = hdfsa2.sinks.k2.hdfs.path = hdfs://linux01:8020/flume/%Y%m%d/%H#上传文件的前缀a2.sinks.k2.hdfs.filePrefix = logs-#是否按照时间滚动文件夹a2.sinks.k2.hdfs.round = true#多少时间单位创建一个新的文件夹a2.sinks.k2.hdfs.roundValue = 1#重新定义时间单位a2.sinks.k2.hdfs.roundUnit = hour#是否使用本地时间戳a2.sinks.k2.hdfs.useLocalTimeStamp = true#积攒多少个 Event 才 flush 到 HDFS 一次a2.sinks.k2.hdfs.batchSize = 1000#设置文件类型,可支持压缩a2.sinks.k2.hdfs.fileType = DataStream#多久生成一个新的文件a2.sinks.k2.hdfs.rollInterval = 600#设置每个文件的滚动大小a2.sinks.k2.hdfs.rollSize = 134217700#文件的滚动与 Event 数量无关a2.sinks.k2.hdfs.rollCount = 0#最小冗余数a2.sinks.k2.hdfs.minBlockReplicas = 1# Use a channel which buffers events in memorya2.channels.c2.type = memorya2.channels.c2.capacity = 1000a2.channels.c2.transactionCapacity = 100# Bind the source and sink to the channela2.sources.r2.channels = c2a2.sinks.k2.channel = c2
执行监控配置
$ bin/flume-ng agent --conf conf/ --name a2 --conf-file job/flume-hdfs.conf
实时读取目录文件到HDFS
目 标:使用 flume 监听整个目录的文件
创建配置文件 flume-dir.conf
a3.sources = r3a3.sinks = k3a3.channels = c3# Describe/configure the sourcea3.sources.r3.type = spooldira3.sources.r3.spoolDir = /home/admin/modules/apache-flume-1.7.0-bin/uploada3.sources.r3.fileSuffix = .COMPLETEDa3.sources.r3.fileHeader = true#忽略所有以.tmp 结尾的文件,不上传a3.sources.r3.ignorePattern = ([^ ]*\.tmp)# Describe the sinka3.sinks.k3.type = hdfsa3.sinks.k3.hdfs.path = hdfs://linux01:8020/flume/upload/%Y%m%d/%H#上传文件的前缀a3.sinks.k3.hdfs.filePrefix = upload-#是否按照时间滚动文件夹a3.sinks.k3.hdfs.round = true#多少时间单位创建一个新的文件夹a3.sinks.k3.hdfs.roundValue = 1#重新定义时间单位a3.sinks.k3.hdfs.roundUnit = hour#是否使用本地时间戳a3.sinks.k3.hdfs.useLocalTimeStamp = true#积攒多少个 Event 才 flush 到 HDFS 一次a3.sinks.k3.hdfs.batchSize = 100#设置文件类型,可支持压缩a3.sinks.k3.hdfs.fileType = DataStream#多久生成一个新的文件a3.sinks.k3.hdfs.rollInterval = 600#设置每个文件的滚动大小大概是 128Ma3.sinks.k3.hdfs.rollSize = 134217700#文件的滚动与 Event 数量无关a3.sinks.k3.hdfs.rollCount = 0#最小冗余数a3.sinks.k3.hdfs.minBlockReplicas = 1# Use a channel which buffers events in memorya3.channels.c3.type = memorya3.channels.c3.capacity = 1000a3.channels.c3.transactionCapacity = 100# Bind the source and sink to the channela3.sources.r3.channels = c3a3.sinks.k3.channel = c3
执行测试:执行如下脚本后,请向 upload 文件夹中添加文件试试
$ bin/flume-ng agent --conf conf/ --name a3 --conf-file job/flume-dir.conf
注意:在使用 Spooling Directory Source 时
- 不要在监控目录中创建并持续修改文件
- 上传完成的文件会以.COMPLETED 结尾
- 被监控文件夹每 600 毫秒扫描一次文件变动
Flume与Flume之间数据传递:单Flume多Channel、Sink
目标:使用 flume-1 监控文件变动,flume-1 将变动内容传递给 flume-2,flume-2 负责存储到HDFS。同时 flume-1 将变动内容传递给 flume-3,flume-3 负责输出到local filesystem。
- 创建 flume-1.conf,用于监控 hive.log 文件的变动,同时产生两个 channel 和两个 sink 分
别输送给 flume-2 和 flume3:
# Name the components on this agenta1.sources = r1a1.sinks = k1 k2a1.channels = c1 c2# 将数据流复制给多个 channela1.sources.r1.selector.type = replicating# Describe/configure the sourcea1.sources.r1.type = execa1.sources.r1.command = tail -F /home/admin/modules/apache-hive-1.2.2-bin/hive.loga1.sources.r1.shell = /bin/bash -c# Describe the sinka1.sinks.k1.type = avroa1.sinks.k1.hostname = linux01a1.sinks.k1.port = 4141a1.sinks.k2.type = avroa1.sinks.k2.hostname = linux01a1.sinks.k2.port = 4142# Describe the channela1.channels.c1.type = memorya1.channels.c1.capacity = 1000a1.channels.c1.transactionCapacity = 100a1.channels.c2.type = memorya1.channels.c2.capacity = 1000a1.channels.c2.transactionCapacity = 100# Bind the source and sink to the channela1.sources.r1.channels = c1 c2a1.sinks.k1.channel = c1a1.sinks.k2.channel = c2
- 创建 flume-2.conf,用于接收 flume-1 的 event,同时产生 1 个 channel 和 1 个 sink,将数
据输送给 hdfs:
# Name the components on this agenta2.sources = r1a2.sinks = k1a2.channels = c1# Describe/configure the sourcea2.sources.r1.type = avroa2.sources.r1.bind = linux01a2.sources.r1.port = 4141# Describe the sinka2.sinks.k1.type = hdfsa2.sinks.k1.hdfs.path = hdfs://linux01:8020/flume2/%Y%m%d/%H#上传文件的前缀a2.sinks.k1.hdfs.filePrefix = flume2-#是否按照时间滚动文件夹a2.sinks.k1.hdfs.round = true#多少时间单位创建一个新的文件夹a2.sinks.k1.hdfs.roundValue = 1#重新定义时间单位a2.sinks.k1.hdfs.roundUnit = hour#是否使用本地时间戳a2.sinks.k1.hdfs.useLocalTimeStamp = true#积攒多少个 Event 才 flush 到 HDFS 一次a2.sinks.k1.hdfs.batchSize = 100#设置文件类型,可支持压缩a2.sinks.k1.hdfs.fileType = DataStream#多久生成一个新的文件a2.sinks.k1.hdfs.rollInterval = 600#设置每个文件的滚动大小大概是 128Ma2.sinks.k1.hdfs.rollSize = 134217700#文件的滚动与 Event 数量无关a2.sinks.k1.hdfs.rollCount = 0#最小冗余数a2.sinks.k1.hdfs.minBlockReplicas = 1# Describe the channela2.channels.c1.type = memorya2.channels.c1.capacity = 1000a2.channels.c1.transactionCapacity = 100# Bind the source and sink to the channela2.sources.r1.channels = c1a2.sinks.k1.channel = c1
创建 flume-3.conf,用于接收 flume-1 的 event,同时产生 1 个 channel 和 1 个 sink,将数
据输送给本地目录:
# Name the components on this agenta3.sources = r1a3.sinks = k1a3.channels = c1# Describe/configure the sourcea3.sources.r1.type = avroa3.sources.r1.bind = linux01a3.sources.r1.port = 4142# Describe the sinka3.sinks.k1.type = file_rolla3.sinks.k1.sink.directory = /home/admin/Desktop/flume3# Describe the channela3.channels.c1.type = memorya3.channels.c1.capacity = 1000a3.channels.c1.transactionCapacity = 100# Bind the source and sink to the channela3.sources.r1.channels = c1a3.sinks.k1.channel = c1输出的本地目录必须是已经存在的目录,如果该目录不存在,并不会创建新的目录。
执行测试:分别开启对应 flume-job(依次启动 flume-3,flume-2,flume-1),同时产生
文件变动并观察结果:
$ bin/flume-ng agent --conf conf/ --name a3 --conf-file job/group-job1/flume-3.conf$ bin/flume-ng agent --conf conf/ --name a2 --conf-file job/group-job1/flume-2.conf$ bin/flume-ng agent --conf conf/ --name a1 --conf-file job/group-job1/flume-1.conf
Flume与Flume之间数据传递:多Flume汇总数据到单Flume
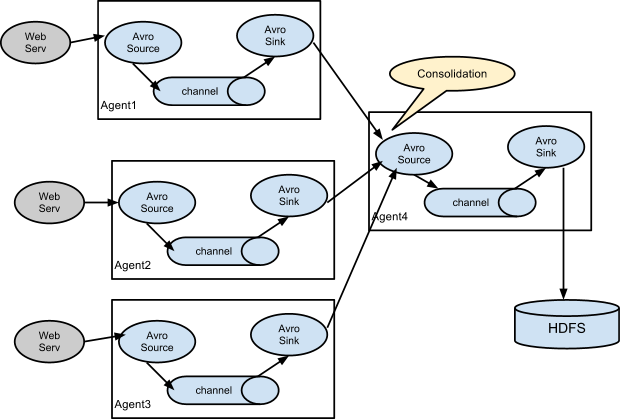
目标:flume-1 监控文件 hive.log,flume-2 监控某一个端口的数据流,flume-1 与 flume-2 将
数据发送给 flume-3,flume3 将最终数据写入到 HDFS。
创建 flume-1.conf,用于监控 hive.log 文件,同时 sink 数据到 flume-3:
# Name the components on this agenta1.sources = r1a1.sinks = k1a1.channels = c1# Describe/configure the sourcea1.sources.r1.type = execa1.sources.r1.command = tail -F /home/admin/modules/apache-hive-1.2.2-bin/hive.loga1.sources.r1.shell = /bin/bash -c# Describe the sinka1.sinks.k1.type = avroa1.sinks.k1.hostname = linux01a1.sinks.k1.port = 4141# Describe the channela1.channels.c1.type = memorya1.channels.c1.capacity = 1000a1.channels.c1.transactionCapacity = 100# Bind the source and sink to the channela1.sources.r1.channels = c1a1.sinks.k1.channel = c1
创建 flume-2.conf,用于监控端口 44444 数据流,同时 sink 数据到 flume-3
# Name the components on this agenta2.sources = r1a2.sinks = k1a2.channels = c1# Describe/configure the sourcea2.sources.r1.type = netcata2.sources.r1.bind = linux01a2.sources.r1.port = 44444# Describe the sinka2.sinks.k1.type = avroa2.sinks.k1.hostname = linux01a2.sinks.k1.port = 4141# Use a channel which buffers events in memorya2.channels.c1.type = memorya2.channels.c1.capacity = 1000a2.channels.c1.transactionCapacity = 100# Bind the source and sink to the channela2.sources.r1.channels = c1a2.sinks.k1.channel = c1
创建 flume-3.conf,用于接收 flume-1 与 flume-2 发送过来的数据流,最终合并后 sink 到HDFS:
# Name the components on this agenta3.sources = r1a3.sinks = k1a3.channels = c1# Describe/configure the sourcea3.sources.r1.type = avroa3.sources.r1.bind = linux01a3.sources.r1.port = 4141# Describe the sinka3.sinks.k1.type = hdfsa3.sinks.k1.hdfs.path = hdfs://linux01:8020/flume3/%Y%m%d/%H#上传文件的前缀a3.sinks.k1.hdfs.filePrefix = flume3-#是否按照时间滚动文件夹a3.sinks.k1.hdfs.round = true#多少时间单位创建一个新的文件夹a3.sinks.k1.hdfs.roundValue = 1#重新定义时间单位a3.sinks.k1.hdfs.roundUnit = hour#是否使用本地时间戳a3.sinks.k1.hdfs.useLocalTimeStamp = true#积攒多少个 Event 才 flush 到 HDFS 一次a3.sinks.k1.hdfs.batchSize = 100#设置文件类型,可支持压缩a3.sinks.k1.hdfs.fileType = DataStream#多久生成一个新的文件a3.sinks.k1.hdfs.rollInterval = 600#设置每个文件的滚动大小大概是 128Ma3.sinks.k1.hdfs.rollSize = 134217700#文件的滚动与 Event 数量无关a3.sinks.k1.hdfs.rollCount = 0#最小冗余数a3.sinks.k1.hdfs.minBlockReplicas = 1# Describe the channela3.channels.c1.type = memorya3.channels.c1.capacity = 1000a3.channels.c1.transactionCapacity = 100# Bind the source and sink to the channela3.sources.r1.channels = c1a3.sinks.k1.channel = c1
执行测试:分别开启对应 flume-job(依次启动 flume-3,flume-2,flume-1),同时产生文件变动并观察结果
$ bin/flume-ng agent --conf conf/ --name a3 --conf-file job/group-job2/flume-3.conf$ bin/flume-ng agent --conf conf/ --name a2 --conf-file job/group-job2/flume-2.conf$ bin/flume-ng agent --conf conf/ --name a1 --conf-file job/group-job2/flume-1.conf
测试时记得启动 hive 产生一些日志,同时使用 telnet 向 44444 端口发送内容,
$ bin/hive$ telnet linux01 44444
Flume监控Ganglia
Ganglia的安装部署
安装 httpd 服务与 php
# yum -y install httpd php
安装其他依赖
# yum -y install rrdtool perl-rrdtool rrdtool-devel# yum -y install apr-devel
安装 ganglia
# rpm -Uvh http://dl.fedoraproject.org/pub/epel/6/x86_64/epel-release-6-8.noarch.rpm# yum -y install ganglia-gmetad# yum -y install ganglia-web# yum install -y ganglia-gmond
修改配置文件 ganglia.conf :
# vi /etc/httpd/conf.d/ganglia.conf修改为:## Ganglia monitoring system php web frontend#Alias /ganglia /usr/share/ganglia<Location /ganglia>Order deny,allowDeny from allAllow from all# Allow from 127.0.0.1# Allow from ::1# Allow from .example.com</Location>
文件 gmetad.conf :
# vi /etc/ganglia/gmetad.conf修改为: :data_source "linux" 192.168.216.20
文件 gmond.conf :
# vi /etc/ganglia/gmond.conf修改为:cluster {name = "linux"owner = "unspecified"latlong = "unspecified"url = "unspecified"}udp_send_channel {#bind_hostname = yes # Highly recommended, soon to be default.# This option tells gmond to use a source address# that resolves to the machine's hostname. Without# this, the metrics may appear to come from any# interface and the DNS names associated with# those IPs will be used to create the RRDs.# mcast_join = 239.2.11.71host = 192.168.216.20port = 8649ttl = 1}udp_recv_channel {# mcast_join = 239.2.11.71port = 8649bind = 192.168.216.20retry_bind = true# Size of the UDP buffer. If you are handling lots of metrics you really# should bump it up to e.g. 10MB or even higher.# buffer = 10485760}
文件 config :
# vi /etc/selinux/config修改为:# This file controls the state of SELinux on the system.# SELINUX= can take one of these three values:# enforcing - SELinux security policy is enforced.# permissive - SELinux prints warnings instead of enforcing.# disabled - No SELinux policy is loaded.SELINUX=disabled# SELINUXTYPE= can take one of these two values:# targeted - Targeted processes are protected,# mls - Multi Level Security protection.SELINUXTYPE=targeted
selinux 本次生效关闭必须重启,如果此时不想重启,可以临时生效之:
$ sudo setenforce 0
启动 ganglia
$ sudo service httpd start$ sudo service gmetad start$ sudo service gmond start
打开网页浏览 ganglia
http://192.168.216.20/ganglia
如果完成以上操作依然出现权限不足错误,请修改/var/lib/ganglia 目录的权限
$ sudo chmod -R 777 /var/lib/ganglia
操作Flume测试监控
修改 flume-env.sh 配置:
JAVA_OPTS="-Dflume.monitoring.type=ganglia-Dflume.monitoring.hosts=192.168.216.20:8649-Xms100m-Xmx200m"
启动 flume 任务
$ bin/flume-ng agent \--conf conf/ \--name a1 \--conf-file job/group-job0/flume-telnet.conf \-Dflume.root.logger==INFO,console \-Dflume.monitoring.type=ganglia \-Dflume.monitoring.hosts=192.168.216.20:8649
发送数据观察 ganglia 监测图
$ telnet localhost 44444
| 字段(图表名称) | 字段含义 |
|---|---|
| EventPutAttemptCount | source 尝试写入 channel 的事件总数量 |
| EventPutSuccessCount | 成功写入 channel 且提交的事件总数量 |
| EventTakeAttemptCount | sink 尝试从 channel 拉取事件的总数量。这不意味着每次事件都被返回,因为 sink 拉取的时候 channel 可能没有任何数据。 |
| EventTakeSuccessCount | sink 成功读取的事件的总数量 |
| StartTime | channel 启动的时间(毫秒) |
| StopTime | channel 停止的时间(毫秒) |
| ChannelSize | 目前 channel 中事件的总数量 |
| ChannelFillPercentage | channel 占用百分比 |
| ChannelCapacity | channel 的容量 |
本博客仅为博主学习总结,感谢各大网络平台的资料。蟹蟹!!
Flume框架的学习使用的更多相关文章
- (转) 基于Theano的深度学习(Deep Learning)框架Keras学习随笔-01-FAQ
特别棒的一篇文章,仍不住转一下,留着以后需要时阅读 基于Theano的深度学习(Deep Learning)框架Keras学习随笔-01-FAQ
- jfinal框架教程-学习笔记
jfinal框架教程-学习笔记 JFinal 是基于 Java 语言的极速 WEB + ORM 开发框架,其核心设计目标是开发迅速.代码量少.学习简单.功能强大.轻量级.易扩展.Restfu ...
- 【STM32H7教程】第12章 STM32H7的HAL库框架设计学习
完整教程下载地址:http://forum.armfly.com/forum.php?mod=viewthread&tid=86980 第12章 STM32H7的HAL库框架设计学 ...
- 一个入门rpc框架的学习
一个入门rpc框架的学习 参考 huangyong-rpc 轻量级分布式RPC框架 该程序是一个短连接的rpc实现 简介 RPC,即 Remote Procedure Call(远程过程调用),说得通 ...
- Java框架spring 学习笔记(十八):事务管理(xml配置文件管理)
在Java框架spring 学习笔记(十八):事务操作中,有一个问题: package cn.service; import cn.dao.OrderDao; public class OrderSe ...
- 微服务框架surging学习之路——序列化 (转载https://www.cnblogs.com/alangur/p/10407727.html)
微服务框架surging学习之路——序列化 1.对微服务的理解 之前看到在群里的朋友门都在讨论微服务,看到他们的讨论,我也有了一些自己的理解,所谓微服务就是系统里的每个服务都 可以自由组合.自由组 ...
- JAVA框架之Hibernate框架的学习步骤
首先介绍一下Java三大框架的关系 以CRM项目即客户关系管理项目示例 hibernate框架的学习路线: 1.学习框架入门,自己搭建框架,完成增删改查的操作 2.学习一级缓存,事物管理和基本查询 3 ...
- 一个浏览器Fuzzing框架的学习
一个浏览器Fuzzing框架的学习 关于框架 之前是LCatro师傅在小密圈分享的他写的这个Fuzzing框架(不过我以前翻github时好像就看到过),但是之前一直没啥时间搞这方面,这两天研究学习了 ...
- 截图:【炼数成金】深度学习框架Tensorflow学习与应用
创建图.启动图 Shift+Tab Tab 变量介绍: F etch Feed 简单的模型构造 :线性回归 MNIST数据集 Softmax函数 非线性回归神经网络 MINIST数据集分类器简单版 ...
随机推荐
- delphi 获取当前进程的cpu占用率
type TProcessCpuUsage = record private FLastUsed, FLastTime: Int64; FCpuCount:Integer; publ ...
- ACL 我为什么要发明一个轮子?
现在成熟的开发库与开发框架有很多,所以平时我们在开发自己的应用程序时一般直接拿来用就可以了,所以当我先是开发出 C 语言版的 acl 框架库时有人认为是这个轮子是否值得发明,而当我再开发出基于 acl ...
- 快速开发平台 WebBuilder 8.6发布
WebBuilder下载:http://www.geejing.com/download.html WebBuilder快速开发平台是基于Web面向服务的应用系统开发平台,可以方便快捷的搭建各类型企业 ...
- 【转】 远程连接mysql
转自:http://www.linuxidc.com/Linux/2013-05/84813.htm 1.确认能ping通 2.确认端口能telnet通.如果user表的host值是localhost ...
- Storm 学习之路(六)—— Storm项目三种打包方式对比分析
一.简介 在将Storm Topology提交到服务器集群运行时,需要先将项目进行打包.本文主要对比分析各种打包方式,并将打包过程中需要注意的事项进行说明.主要打包方式有以下三种: 第一种:不加任何插 ...
- Kafka 学习之路(一)—— Kafka简介
一.简介 Apache Kafka是一个分布式的流处理平台.它具有以下特点: 支持消息的发布和订阅,类似于RabbtMQ.ActiveMQ等消息队列: 支持数据实时处理: 能保证消息的可靠性投递: 支 ...
- css之vw布局
vw,vh是视口单位,是相对视口单位,与百分百布局不一样的是,百分百是相对于父及元素,而vw布局是相对与窗口. 而rem布局是要与js一起配合 // 以iphone6设计稿 @function px2 ...
- 基于STM32之UART串口通信协议(一)详解
一.前言 1.简介 写的这篇博客,是为了简单讲解一下UART通信协议,以及UART能够实现的一些功能,还有有关使用STM32CubeMX来配置芯片的一些操作,在后面我会以我使用的STM32F429开发 ...
- 在linux中,&和&&, |和|| ,&> 与 >的区别
对应刚接触linux命令的小伙伴们来说,这些符号一定是很困扰的下面我们一起来看这些符号区别和用法 & 表示任务在后台执行,如要在后台运行 如: [root@localhost local]# ...
- php设计模式-责任链模式
责任链模式更像是一种简化多种场景下调用处理的一种设计模式,特别适合if-else分支判断很多的场景.比如是根据不同会员等级给予不同的优惠力度. 它的定义:对象的调用是由下家的应用连接起来的处理链.一直 ...