【Spring】 IOC Base
一、关于容器
1. ApplicationContext和BeanFactory
ApplicationContext 是对 BeanFactory提供了扩展:
- 国际化处理
- 事件传递
- Bean自动装配
- 各种不同应用层的Context实现
源码中ApplicationContext 接口 除了继承了BeanFactory接口,还继承了其他接口:
public interface ApplicationContext extends EnvironmentCapable, ListableBeanFactory,

HierarchicalBeanFactory,MessageSource, ApplicationEventPublisher, ResourcePatternResolver { ... }
2. 配置文件
XML方式
<?xml version="1.0" encoding="UTF-8"?>

<beans xmlns="http://www.springframework.org/schema/beans"

    xmlns:xsi="http://www.w3.org/2001/XMLSchema-instance"

    xsi:schemaLocation="http://www.springframework.org/schema/beans

        https://www.springframework.org/schema/beans/spring-beans.xsd">

    <bean id="..." class="...">

        <!-- collaborators and configuration for this bean go here -->

    </bean>

    <bean id="..." class="...">

        <!-- collaborators and configuration for this bean go here -->

    </bean>

    <!-- more bean definitions go here -->

</beans>
你可以用容器来加载多个配置文件,也可以利用<import/>标签来将配置文件导入到一个XML中,示例如下:
<beans>

    <import resource="services.xml"/>

    <import resource="resources/messageSource.xml"/>

    <import resource="/resources/themeSource.xml"/>

    <bean id="bean1" class="..."/>

    <bean id="bean2" class="..."/>

</beans>
Java-configuration 方式
利用Java 代码的配置方式
@Configuration
利用此注解标注的类为一个配置类,可以在类中注册组件
@Configuration

public class AppConfig {

    @Bean

    public MyService myService() {

        return new MyServiceImpl();

    }

}
3. 初始化容器
加载配置文件,创建Spring容器
XML方式
加载classpath下面配置文件.
ApplicationContext context = new ClassPathXmlApplicationContext("services.xml", "daos.xml");

PetStoreService service = context.getBean("petStore", PetStoreService.class);
加载磁盘下配置文件.
FileSystemXmlApplicationContext context = new FileSystemXmlApplicationContext("applicationContext.xml");
注解方式
AnnotationConfigApplicationContext context = new AnnotationConfigApplicationContext("MainConfig.class");
MainConfig 类要用@Configuration注解标识 (好像不用它标识也可以,亲测,或许是因为传入此构造方法中默认就变成了配置类 )
测试版本:
<dependency>

    <groupId>org.springframework</groupId>

    <artifactId>spring-webmvc</artifactId>

    <version>4.3.11.RELEASE</version>

</dependency>
二、初始化Bean
将Bean注册到Spring容器中,也可以叫做装配Bean
1. XML配置方式
提供了三种方式实例化Bean:
- 构造方法实例化:(默认无参数)
- 静态工厂实例化:
- 实例工厂实例化:
利用构造方法
默认使用无参的构造方法
<bean id="exampleBean" class="examples.ExampleBean"/>

<bean name="anotherExample" class="examples.ExampleBeanTwo"/>
id和name的区别:
- id遵守XML约束的id的约束.id约束保证这个属性的值是唯一的,而且必须以字母开始,可以使用字母、数字、连字符、下划线、句话、冒号
- name没有这些要求
- 如果bean标签上没有配置id,那么name可以作为id.
- 开发中Spring和Struts1整合的时候, /login.
- 现在的开发中都使用id属性即可.
利用静态工厂方法
factory-method:指定返回示例的方法
<bean id="clientService"

    class="examples.ClientService"

    factory-method="createInstance"/>
下面为Bean的定义:
public class ClientService {

    private static ClientService clientService = new ClientService();

    private ClientService() {}

    public static ClientService createInstance() {

        return clientService;

    }

}
利用实例工厂
factory-bean:指定工厂方法
factory-method:指定返回示例的方法
<!-- the factory bean, which contains a method called createInstance() -->

<bean id="serviceLocator" class="examples.DefaultServiceLocator">

    <!-- inject any dependencies required by this locator bean -->

</bean>

<!-- the bean to be created via the factory bean -->

<bean id="clientService"

    factory-bean="serviceLocator"

    factory-method="createClientServiceInstance"/>
public class DefaultServiceLocator {

    private static ClientService clientService = new ClientServiceImpl();

    public ClientService createClientServiceInstance() {

        return clientService;

    }

}
2. 注解的方式
@Component
@Component 、 @Controller、@Service 、@Repository等
开启注解扫描
在XMl文件中开启注解
<context:annotation-config> 是用于激活那些已经在spring容器里注册过的bean(无论是通过xml的方式还是通过package sanning的方式)上面的注解。
<context:component-scan> 除了具有<context:annotation-config>的功能之外,<context:component-scan>还可以在指定的package下扫描以及注册javabean 。 相当于下面的注解@ComponentScan
@ComponentScan
@ComponentScan中的属性:
// 可以设置包扫描的范围 ,默认扫描带有@Component、@Controller等注解标识的Bean

String[] value() default {}

//设置当前扫描的包按照什么规则过滤,扫描符合规则的Bean,默认按照注解的方式进行过滤

Filter[] includeFilters() default {}

//排除符合过滤规则的Bean

Filter[] excludeFilters() default {}

// 默认的过滤规则是按照注解的方式,这个时候要注册的Bean上面要有@Component等注解的标识,当使用includeFilters属性时要将此值设置为false

boolean useDefaultFilters() default true
过滤规则有:
FilterType.ANNOTATION:按照注解FilterType.ASSIGNABLE_TYPE:按照给定的类型;FilterType.ASPECTJ:使用ASPECTJ表达式FilterType.REGEX:使用正则指定FilterType.CUSTOM:使用自定义规则
示例如下:
@Configuration  //告诉Spring这是一个配置类

@ComponentScans(value = {

@ComponentScan(value="com.hao",includeFilters = {

/*@Filter(type=FilterType.ANNOTATION,classes={Controller.class})

@Filter(type=FilterType.ASSIGNABLE_TYPE,classes={BookService.class}),*/

@Filter(type=FilterType.CUSTOM,classes={MyTypeFilter.class})},

useDefaultFilters = false)

}

)

//@ComponentScan  value:指定要扫描的包

//excludeFilters = Filter[] :指定扫描的时候按照什么规则排除那些组件

//includeFilters = Filter[] :指定扫描的时候只需要包含哪些组件

public class MainConfig{...}
public class MyTypeFileter implements TypeFilter {

    @Override

    public boolean match(MetadataReader metadataReader, MetadataReaderFactory metadataReaderFactory)

            throws IOException {

        ClassMetadata classMetadata = metadataReader.getClassMetadata();

        String className = classMetadata.getClassName();

        System.out.println("正在扫描的类名为---->" + className);

        if (className.contains("er")) {

            return true;

        }

        return false;

    }

}
3. Java-Configuration的方式
@Bean
如果要注入第三方的类,就可以使用@Bean的方式 将Bean注册到Spring容器中(当然这种方式也可以注入自定义的Bean),默认bean的名称为方法名程,示例如下:
@Bean("person1")

public Person person() {

    return new Person();

}
When @Bean methods are declared within classes that are not annotated with @Configuration, they are referred to as being processed in a “lite” mode
@Bean也可以在没有标有@Configuration的类中使用,这种叫做 lite @Bean,与完整的@Configuration不同,lite @Bean方法不能声明bean间依赖关系
4. @Import 的方式
@Import(要导入到容器中的组件);容器中就会自动注册这个组件,id默认是全类名ImportSelector:返回需要导入的组件的全类名数组;ImportBeanDefinitionRegistrar:手动注册bean到容器中
示例:
@Import({Person.class,MyImportSelector.class,MyImportBeanDefinitionRegistrar.class})
Selector类
//自定义逻辑返回需要导入的组件

public class MyImportSelector implements ImportSelector {

    //返回值,就是到导入到容器中的组件全类名

    //AnnotationMetadata:当前标注@Import注解的类的所有注解信息

    public String[] selectImports(AnnotationMetadata importingClassMetadata) {

        // TODO Auto-generated method stub

        //importingClassMetadata

        //方法不要返回null值

        return new String[]{"com.hao.bean.Blue","com.hao.bean.Yellow"};

    }

}
Regist类
public class MyImportBeanDefinitionRegistrar implements ImportBeanDefinitionRegistrar {

    /**

     * AnnotationMetadata:当前类的注解信息 BeanDefinitionRegistry:BeanDefinition注册类;

     * 把所有需要添加到容器中的bean;调用 BeanDefinitionRegistry.registerBeanDefinition手工注册进来

     */

    public void registerBeanDefinitions(AnnotationMetadata importingClassMetadata, BeanDefinitionRegistry registry) {

        boolean definition = registry.containsBeanDefinition("com.hao.bean.Red");

        boolean definition2 = registry.containsBeanDefinition("com.hao.bean.Blue");

        if (definition && definition2) {

            // 指定Bean定义信息;(Bean的类型,Bean。。。)

            RootBeanDefinition beanDefinition = new RootBeanDefinition(RainBow.class);

            // 注册一个Bean,指定bean名

            registry.registerBeanDefinition("rainBow", beanDefinition);

        }

    }

}
5. FactoryBean 方式
使用Spring提供的FactoryBean(工厂Bean)
- 默认获取到的是工厂
bean调用getObject创建的对象 - 要获取工厂
Bean本身,我们需要给id前面加一个&&colorFactoryBean
import org.springframework.beans.factory.FactoryBean;

//创建一个Spring定义的FactoryBean

public class ColorFactoryBean implements FactoryBean<Color> {

    // 返回一个Color对象,这个对象会添加到容器中

    public Color getObject() throws Exception {

        System.out.println("ColorFactoryBean...getObject...");

        return new Color();

    }

    public Class<?> getObjectType() {

        return Color.class;

    }

    // 是单例?

    // true:这个bean是单实例,在容器中保存一份

    // false:多实例,每次获取都会创建一个新的bean;

    public boolean isSingleton() {

        return false;

    }

}
@Bean

public ColorFactoryBean colorFactoryBean(){

    return new ColorFactoryBean();

}
6. 容器中Bean的一些设置
@Conditional
按照条件注册组件,要自定义一个实现了Condition接口的类
//判断是否linux系统

public class LinuxCondition implements Condition {

    /**

     * ConditionContext:判断条件能使用的上下文(环境) AnnotatedTypeMetadata:注释信息

     */

    public boolean matches(ConditionContext context, AnnotatedTypeMetadata metadata) {

        // TODO是否linux系统

        // 1、能获取到ioc使用的beanfactory

        ConfigurableListableBeanFactory beanFactory = context.getBeanFactory();

        // 2、获取类加载器

        ClassLoader classLoader = context.getClassLoader();

        // 3、获取当前环境信息

        Environment environment = context.getEnvironment();

        // 4、获取到bean定义的注册类

        BeanDefinitionRegistry registry = context.getRegistry();

        String property = environment.getProperty("os.name");

        // 可以判断容器中的bean注册情况,也可以给容器中注册bean

        boolean definition = registry.containsBeanDefinition("person");

        if (property.contains("linux")) {

            return true;

        }

        return false;

    }

}
注解使用示例:
@Conditional(LinuxCondition.class)

    @Bean("linus")

    public Person person02(){

        return new Person("linus", 48);

}
@Scope
singleton:单实例的(默认值),ioc容器启动会调用方法创建对象放到ioc容器中。proptotype:多实例的,ioc容器启动并不会去调用方法创建对象放在容器中。每次获取的时候才会调用方法创建对象;默认是懒加载的,容器关闭时,自定义销毁方法不会执行。request:将单个bean定义范围限定为单个HTTP请求的生命周期。也就是说,每个HTTP请求都有自己的bean实例,它是在单个bean定义的后面创建的。仅在Web感知Spring ApplicationContext的上下文中有效;web开发中,创建了一个对象,将这个对象存入request范围,request.setAttribute();session:将单个bean定义范围限定为HTTP会话的生命周期。仅在Web感知Spring ApplicationContext的上下文中有效;web开发中,创建了一个对象,将这个对象存入session范围,session.setAttribute();application:将单个bean定义范围限定为ServletContext的生命周期。仅在Web感知Spring ApplicationContext的上下文中有效。websocket:将单个bean定义范围限定为WebSocket的生命周期。仅在Web感知Spring ApplicationContext的上下文中有效。- 还可以自定义Scope,请见官方文档。
@Scope("prototype")

public Car car(){

    return new Car();

}
如果采用XML配置方式
<bean id="accountService" class="com.something.DefaultAccountService" scope="singleton"/>
@Lazy
懒加载机制
针对于单实例
默认容器启动的时候就创建对象,加入@Lazy 可以控制在使用到改对象时才创建对象
三、DI(XML方式)
依赖注入(DI)是一个过程,通过这个过程,对象只能通过构造函数参数,工厂方法的参数或在构造对象实例后在对象实例上设置的属性来定义它们的依赖关系(即,它们使用的其他对象)。从工厂方法返回。然后容器在创建bean时注入这些依赖项。这个过程基本上是bean本身的反向(因此名称,控制反转),它通过使用类的直接构造或服务定位器模式来控制其依赖项的实例化或位置。
1. 基于构造器的依赖注入
配置示例
利用标签<constructor-arg/>
public class ExampleBean {

    // Number of years to calculate the Ultimate Answer

    private int years;

    // The Answer to Life, the Universe, and Everything

    private String ultimateAnswer;

    public ExampleBean(int years, String ultimateAnswer) {

        this.years = years;

        this.ultimateAnswer = ultimateAnswer;

    }

}
在XML中的配置
根据参数的类型
(如果出现参数类型一样的咋办呢,是按照标签的顺序吗,那样的话下面的那种方式?... 【待验证】)
<bean id="exampleBean" class="examples.ExampleBean">

    <constructor-arg type="int" value="7500000"/>

    <constructor-arg type="java.lang.String" value="42"/>

</bean>
根据构造器参数出现的顺序
<bean id="exampleBean" class="examples.ExampleBean">

    <constructor-arg index="0" value="7500000"/>

    <constructor-arg index="1" value="42"/>

</bean>
根据构造器参数名称
<bean id="exampleBean" class="examples.ExampleBean">

    <constructor-arg name="years" value="7500000"/>

    <constructor-arg name="ultimateAnswer" value="42"/>

</bean>
静态工厂
public class ExampleBean {

    // a private constructor

    private ExampleBean(...) {

        ...

    }

    // a static factory method; the arguments to this method can be

    // considered the dependencies of the bean that is returned,

    // regardless of how those arguments are actually used.

    public static ExampleBean createInstance (

        AnotherBean anotherBean, YetAnotherBean yetAnotherBean, int i) {

        ExampleBean eb = new ExampleBean (...);

        // some other operations...

        return eb;

    }

}
<bean id="exampleBean" class="examples.ExampleBean" factory-method="createInstance">

    <constructor-arg ref="anotherExampleBean"/>

    <constructor-arg ref="yetAnotherBean"/>

    <constructor-arg value="1"/>

</bean>

<bean id="anotherExampleBean" class="examples.AnotherBean"/>

<bean id="yetAnotherBean" class="examples.YetAnotherBean"/>
c命名空间
示例
<beans xmlns="http://www.springframework.org/schema/beans"

    xmlns:xsi="http://www.w3.org/2001/XMLSchema-instance"

    xmlns:c="http://www.springframework.org/schema/c"

    xsi:schemaLocation="http://www.springframework.org/schema/beans

        https://www.springframework.org/schema/beans/spring-beans.xsd">

    <bean id="beanTwo" class="x.y.ThingTwo"/>

    <bean id="beanThree" class="x.y.ThingThree"/>

    <!-- traditional declaration with optional argument names -->

    <bean id="beanOne" class="x.y.ThingOne">

        <constructor-arg name="thingTwo" ref="beanTwo"/>

        <constructor-arg name="thingThree" ref="beanThree"/>

        <constructor-arg name="email" value="something@somewhere.com"/>

    </bean>

    <!-- c-namespace declaration with argument names , no ref when literal value -->

    <bean id="beanOne" class="x.y.ThingOne" c:thingTwo-ref="beanTwo"

        c:thingThree-ref="beanThree" c:email="something@somewhere.com"/>

</beans>
解释
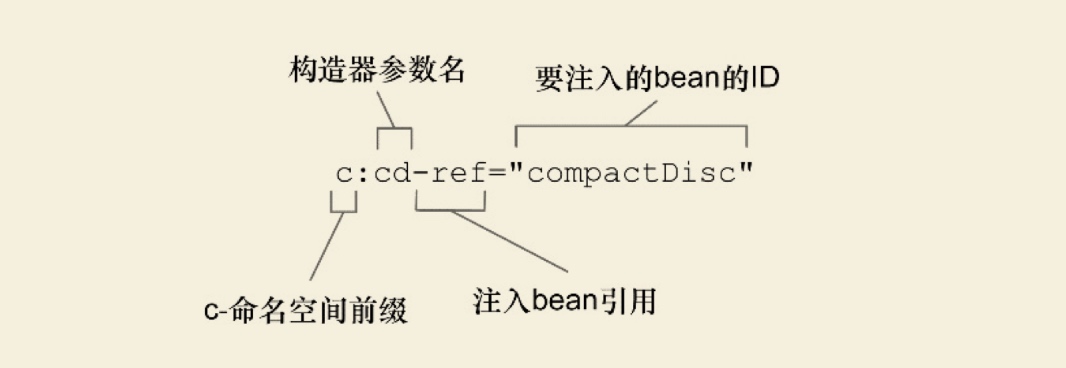
如果是引用的类型:要加ref
如果是字面量:无需加ref


属性名已c: 开头,也就是命名空间的前缀。接下来就是要装配的构造器参数名,在此之后是-ref,这是一个命名的约定,他会告诉Spring,正在装配的是一个Bean的引用,这个bean的名字是compactDisc ,而不是字面两compactDisc
可以把参数名改为索引:
<bean id="beanOne" class="x.y.ThingOne" c:_0-ref="beanTwo"
XML中不允许数字作为属性的第一个字符,因此必须在数字前添加一个_作为前缀
如果索引为0时可以如下方式:
<bean id="beanOne" class="x.y.ThingOne" c:_-ref="beanTwo"
2. 基于Setter 方法的依赖注入
配置示例
用标签 <property/>
public class ExampleBean {

    private AnotherBean beanOne;

    private YetAnotherBean beanTwo;

    private int i;

    public void setBeanOne(AnotherBean beanOne) {

        this.beanOne = beanOne;

    }

    public void setBeanTwo(YetAnotherBean beanTwo) {

        this.beanTwo = beanTwo;

    }

    public void setIntegerProperty(int i) {

        this.i = i;

    }

}
<bean id="exampleBean" class="examples.ExampleBean">

    <!-- setter injection using the nested ref element -->

    <property name="beanOne">

        <ref bean="anotherExampleBean"/>

    </property>

    <!-- setter injection using the neater ref attribute -->

    <property name="beanTwo" ref="yetAnotherBean"/>

    <property name="integerProperty" value="1"/>

</bean>

<bean id="anotherExampleBean" class="examples.AnotherBean"/>

<bean id="yetAnotherBean" class="examples.YetAnotherBean"/>
与上面构造器的方式做一个比较,示例如下:
java文件:
public class ExampleBean {

    private AnotherBean beanOne;

    private YetAnotherBean beanTwo;

    private int i;

    public ExampleBean(

        AnotherBean anotherBean, YetAnotherBean yetAnotherBean, int i) {

        this.beanOne = anotherBean;

        this.beanTwo = yetAnotherBean;

        this.i = i;

    }

}
xml中的配置
<bean id="exampleBean" class="examples.ExampleBean">

    <!-- constructor injection using the nested ref element -->

    <constructor-arg>

        <ref bean="anotherExampleBean"/>

    </constructor-arg>

    <!-- constructor injection using the neater ref attribute -->

    <constructor-arg ref="yetAnotherBean"/>

    <constructor-arg type="int" value="1"/>

</bean>

<bean id="anotherExampleBean" class="examples.AnotherBean"/>

<bean id="yetAnotherBean" class="examples.YetAnotherBean"/>
p命名空间
示例
名称空间p:注入属性:
Spring2.5版本引入了名称空间p.
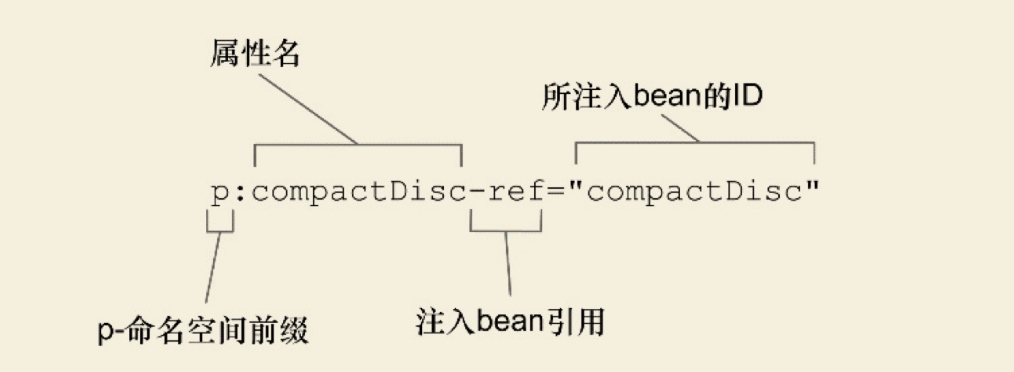
p:<属性名>="xxx" 引入常量值
p:<属性名>-ref="xxx" 引用其它Bean对象
<bean id="myDataSource" class="org.apache.commons.dbcp.BasicDataSource" destroy-method="close">

    <!-- results in a setDriverClassName(String) call -->

    <property name="driverClassName" value="com.mysql.jdbc.Driver"/>

    <property name="url" value="jdbc:mysql://localhost:3306/mydb"/>

    <property name="username" value="root"/>

    <property name="password" value="masterkaoli"/>

</bean>
改用p标签的形式:
<beans xmlns="http://www.springframework.org/schema/beans"

    xmlns:xsi="http://www.w3.org/2001/XMLSchema-instance"

    xmlns:p="http://www.springframework.org/schema/p"

    xsi:schemaLocation="http://www.springframework.org/schema/beans

    https://www.springframework.org/schema/beans/spring-beans.xsd">

    <bean id="myDataSource" class="org.apache.commons.dbcp.BasicDataSource"

        destroy-method="close"

        p:driverClassName="com.mysql.jdbc.Driver"

        p:url="jdbc:mysql://localhost:3306/mydb"

        p:username="root"

        p:password="masterkaoli"/>

</beans>
解释


装配Bean引用和字面量的区别是加不加 -ref 后缀
3. 装配集合
<bean id="collectionBean" class="com.hao.entityCollectionBean">

    <!-- 注入List集合 -->

    <property name="list">

        <list>

            <value>刘备</value>

            <value>孙尚香</value>

        </list>

    </property>

    <!-- 注入set集合 -->

    <property name="set">

        <set>

            <value>夏侯惇</value>

            <value>曹操</value>

        </set>

    </property>

    <!-- 注入map集合 -->

    <property name="map">

        <map>

            <entry key="诸葛" value="军师"/>

            <entry key="孔明" value="军师"/>

        </map>

    </property>

    <property name="properties">

        <props>

            <prop key="username">root</prop>

            <prop key="password">root</prop>

        </props>

    </property>

</bean>
上面两种方式都可以装配集合,但是其中的c和p命名空间的方式不可以
其中p可以利用util-命名空间 创建一个列表的Bean,....
4. SPEL
SpEL:属性的注入:
Spring3.0提供注入属性方式:
语法:#{表达式}
四、DI(注解方式)
Spring利用依赖注入(DI),完成对IOC容器中中各个组件的依赖关系赋值;
1. 注入普通属性
@Value
使用@Value赋值;
- 基本数值
- 可以写SpEL; #{}
- 可以写${};取出配置文件【properties】中的值(在运行环境变量里面的值)
@Value("张三")

private String name;

@Value("#{20-2}")

private Integer age;

@Value("${person.nickName}")

private String nickName;
@PropertySource
加载配置文件,配置文件中的值可以利用@Value("$()")获取
在XML文件中做如下配置:
<bean id="propertyConfigurer"       class="org.springframework.beans.factory.config.PropertyPlaceholderConfigurer">

    <property name="location" value="classpath*:jdbc.properties" />

</bean>
也可以这样配置:
<context:property-placeholder location="classpath*:jdbc.properties" />
利用注解的方式:
@PropertySource("classpath:/dbconfig.properties")
2. 注入Bean引用
@Autowired (@Qualifier & @Primary)
public class BookService{

    @Autowired

    private     BookDao  bookDao;

}
- 默认优先按照类型去容器中找对应的组件
- 如果找到多个相同类型的组件,再将属性的名称作为组件的
id去容器中查找 @Qualifier("bookDao"):使用@Qualifier指定需要装配的组件的id,而不是使用属性名- 自动装配默认一定要将属性赋值好,没有就会报错;
NoSuchBeanDefinationXXX- 可以使用
@Autowired(required=false); 指定为false便不会报错
- 可以使用
@Primary:让Spring进行自动装配的时候,默认使用首选的bean;
也可以继续使用@Qualifier指定需要装配的bean的名字利用
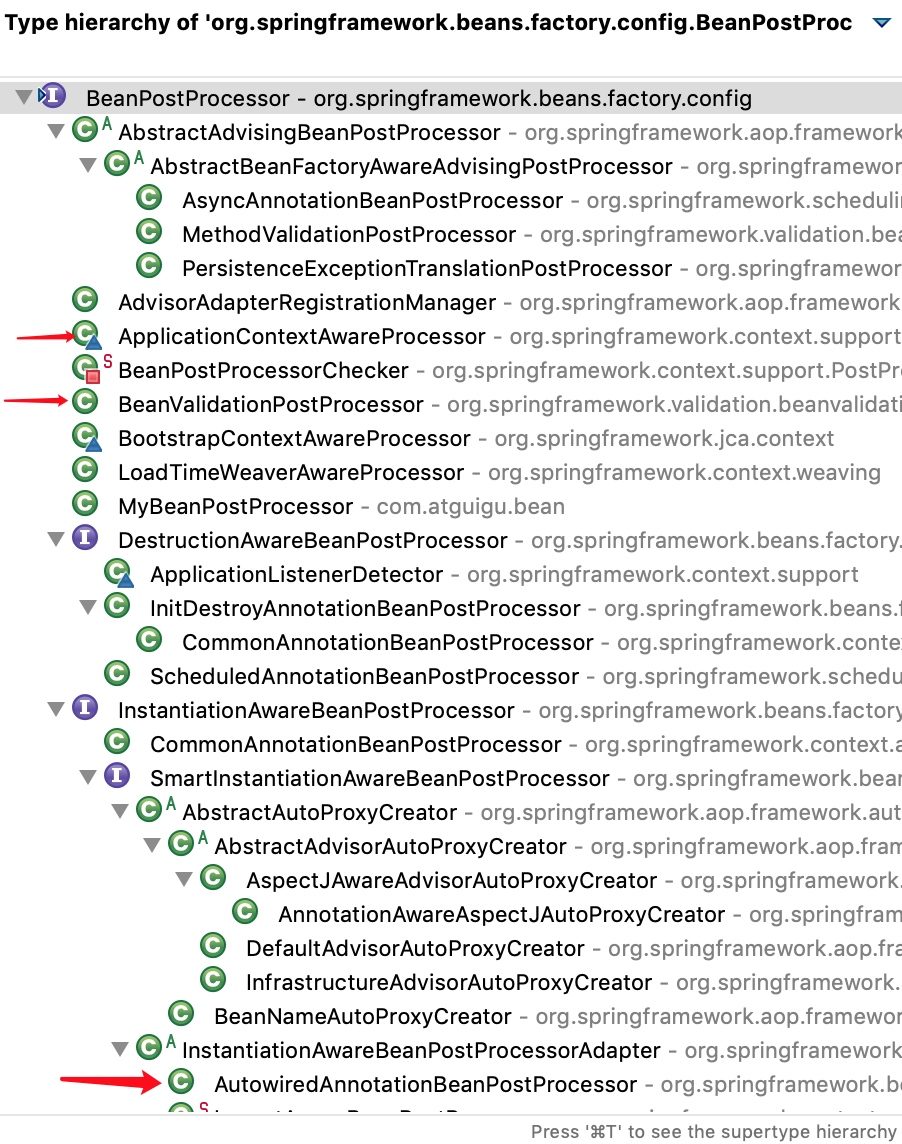
AutowiredAnnotationBeanPostProcessor:解析完成自动装配功能;@Autowired除了上面说的标注在属性上面,还可以标注在其他地方:
标注在普通方法上
    //标注在方法,Spring容器创建当前对象,就调用方法,完成赋值;

    //方法使用的参数,自定义类型的值从ioc容器中获取

    @Autowired

    public void setCar(Car car) {

        this.car = car;

    }
标注在有参构造器上
如果组件只有一个有参构造器,这个有参构造器的@Autowired可以省略,参数位置的组件还是可以自动从容器中获取
标注在方法中的参数位置上
public void setCar(@Autowired Car car) {

    this.car = car;

}
@Resource、@Inject注入
Java规范的注解:@Resource(JSR250)、@Inject(JSR330)
@Resource:
可以和@Autowired一样实现自动装配功能;默认是按照组件名称进行装配的;
没有能支持@Primary功能 、也没有支持reqiured=false;
@Inject:
需要导入javax.inject的包,和@Autowired的功能一样可以支持@Primary功能,但是 没有required=false的功能;
@Autowired:Spring定义的;@Resource、@Inject都是java规范
自定义组件想要使用Spring容器底层的一些组件(ApplicationContext,BeanFactory,xxx);
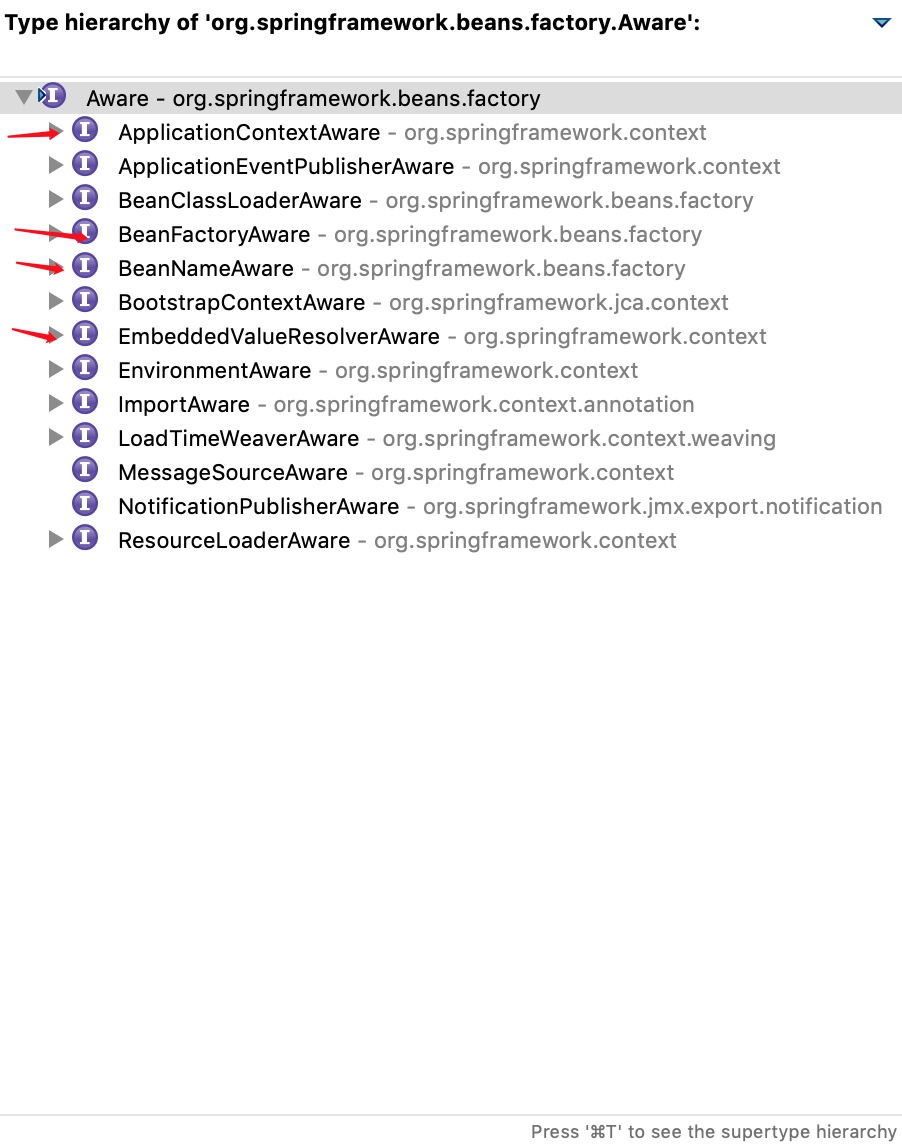
自定义组件实现xxxAware;在创建对象的时候,会调用接口规定的方法注入相关组件;Aware;
把Spring底层一些组件注入到自定义的Bean中;
xxxAware:功能使用xxxProcessor;
ApplicationContextAware==》ApplicationContextAwareProcessor;


@Component

public class Red implements ApplicationContextAware, BeanNameAware, EmbeddedValueResolverAware {

    private ApplicationContext applicationContext;

    public void setApplicationContext(ApplicationContext applicationContext) throws BeansException {

        System.out.println("传入的ioc:" + applicationContext);

        this.applicationContext = applicationContext;

    }

    public void setBeanName(String name) {

        System.out.println("当前bean的名字:" + name);

    }

    public void setEmbeddedValueResolver(StringValueResolver resolver) {

        String resolveStringValue = resolver.resolveStringValue("你好 ${os.name} 我是 #{20*18}");

        System.out.println("解析的字符串:" + resolveStringValue);

    }

}
五、DI(Java-Configuration)
@Bean+方法参数
在配置类中 ---> 参数从容器中获取,
默认不写@Autowired效果是一样的,都能自动装配,可以省略;
@Autowired 可以标注在方法上也可以标注在参数位置:
/**

     * @Bean标注的方法创建对象的时候,方法参数的值从容器中获取

     * @param car

     * @return

     */

    //@Autowired  有没有均可

    @Bean

    public Color color(Car car){

        Color color = new Color();

        color.setCar(car);

        return color;

    }
还可以这样
@Bean(name="product")

public Product initProduct(){

    Product product = new Product();

    product.setName("空调");

    product.setPrice(3000d);

    return product;

}
六、Lifecycle Callbacks
1. Bean的生命周期
- instantiate bean对象实例化
- populate properties 封装属性
- 如果Bean实现BeanNameAware 执行 setBeanName
- 如果Bean实现BeanFactoryAware 或者 ApplicationContextAware 设置工厂 setBeanFactory 或者上下文对象 setApplicationContext
- 如果存在类实现 BeanPostProcessor(后处理Bean) ,执行postProcessBeforeInitialization
- 如果Bean实现InitializingBean 执行 afterPropertiesSet
- 调用 指定初始化方法 init
- 如果存在类实现 BeanPostProcessor(处理Bean) ,执行postProcessAfterInitialization
- 执行业务处理
- 如果Bean实现 DisposableBean 执行 destroy
- 调用 指定销毁方法 customerDestroy
2. XMl配置方式:
在Bean中生命初始化和销毁方法
在XML配置文件中利用如下属性进行制定方法
<bean id="car" class="com.bean.Car"  init-method="init" destroy-method="detory">

</bean>
3. 注解配置初始化和销毁方法
利用@Bean注解中指定
@Component

public class Car {

    public Car(){

        System.out.println("car constructor...");

    }

    public void init(){

        System.out.println("car ... init...");

    }

    public void detory(){

        System.out.println("car ... detory...");

    }

}
//@Scope("prototype") 如果此处设置为多实例的,则 detory方法不会调用,由多实例的Bean自己管理

@Bean(initMethod="init",destroyMethod="detory")

public Car car(){

    return new Car();

}
- 初始化: 对象创建完成,并赋值好,执行初始化方法
- 销毁: 单实例:容器关闭的时候调用
多实例:容器不会管理这个bean;容器不会调用销毁方法;
利用两个接口InitializingBean、DisposableBean
@Component

public class Cat implements InitializingBean,DisposableBean {

    public Cat(){

        System.out.println("cat constructor...");

    }

    public void destroy() throws Exception {

        // TODO Auto-generated method stub

        System.out.println("cat...destroy...");

    }

    public void afterPropertiesSet() throws Exception {

        // TODO Auto-generated method stub

        System.out.println("cat...afterPropertiesSet...");

    }

}
使用JSR250
@PostConstruct:在bean创建完成并且属性赋值完成;来执行初始化方法
@PreDestroy:在容器销毁bean之前通知我们进行清理工作
//对象创建并赋值之后调用

@PostConstruct

public void init(){

    System.out.println("Dog....@PostConstruct...");

}

//容器移除对象之前

@PreDestroy

public void detory(){

    System.out.println("Dog....@PreDestroy...");

}
使用后置处理器
BeanPostProcessor【interface】:Bean的后置处理器;在Bean初始化前后进行一些处理工作;
postProcessBeforeInitialization:在初始化之前工作
postProcessAfterInitialization:在初始化之后工作
BeanPostProcessor原理
populateBean(beanName, mbd, instanceWrapper); //给bean进行属性赋值

initializeBean:下面的三步 =>

{

applyBeanPostProcessorsBeforeInitialization(wrappedBean, beanName);

invokeInitMethods(beanName, wrappedBean, mbd);//执行自定义初始化

applyBeanPostProcessorsAfterInitialization(wrappedBean, beanName);

}
在applyBeanPostProcessorsBeforeInitialization方法中遍历得到容器中所有的BeanPostProcessor;挨个执行beforeInitialization,一但返回null,跳出for循环,不会执行后面的 BeanPostProcessor.postProcessorsBeforeInitialization,applyBeanPostProcessorsAfterInitialization 也是相同的操作逻辑。
源码如下:
@Override

public Object applyBeanPostProcessorsBeforeInitialization(Object existingBean, String beanName)

        throws BeansException {

    Object result = existingBean;

    for (BeanPostProcessor beanProcessor : getBeanPostProcessors()) {

        result = beanProcessor.postProcessBeforeInitialization(result, beanName);

        if (result == null) {

            return result;

        }

    }

    return result;

}
Spring底层对 BeanPostProcessor 的使用;
bean赋值,注入其他组件,@Autowired,生命周期注解功能,@Async,xxxBeanPostProcessor 他们的逻辑都实现在实现类的方法中


七、@Profile
- @Profile:指定组件在哪个环境的情况下才能被注册到容器中,不指定,任何环境下都能注册这个组件
- 1)、加了环境标识的bean,只有这个环境被激活的时候才能注册到容器中。默认是default环境
- 2)、写在配置类上,只有是指定的环境的时候,整个配置类里面的所有配置才能开始生效
- 3)、没有标注环境标识的bean在,任何环境下都是加载的;
@Profile("dev")

@Bean("devDataSource")

public DataSource dataSourceDev(@Value("${db.password}")String pwd) throws Exception{

    ComboPooledDataSource dataSource = new ComboPooledDataSource();

    dataSource.setUser(user);

    dataSource.setPassword(pwd);

    dataSource.setJdbcUrl("jdbc:mysql://localhost:3306/test");

    dataSource.setDriverClass(driverClass);

    return dataSource;

}
激活环境
- 使用命令行动态参数: 在虚拟机参数位置加载 -Dspring.profiles.active=test
- 代码的方式激活某种环境;
AnnotationConfigApplicationContext applicationContext = new AnnotationConfigApplicationContext();

//1、创建一个applicationContext

//2、设置需要激活的环境

applicationContext.getEnvironment().setActiveProfiles("test");

//3、注册主配置类

applicationContext.register(MainConfigOfProfile.class);

//4、启动刷新容器

applicationContext.refresh();
【Spring】 IOC Base的更多相关文章
- 【Spring】IOC容器注解汇总,你想要的都在这儿了!!
写在前面 之前,我们在[Spring]专题中更新了不少关于Spring注解相关的文章,有些小伙伴反馈说,看历史文章的话比较零散,经常会忘记自己看到哪一篇了.当打开一篇新文章时,总感觉自己似乎是看到过了 ...
- 【Spring】 AOP Base
1. AOP概述 2. AOP的术语: 3. AOP底层原理 4. Spring 中的AOP 4.1 概述 4.2 分类 4.3 Spring的传统AOP 针对所有方法的增强:(不带有切点的切面) 带 ...
- 【Spring】IoC容器 - Spring Bean作用域Scope(含SpringCloud中的RefreshScope )
前言 上一章学习了[依赖来源],本章主要讨论SpringBean的作用域,我们这里讨论的Bean的作用域,很大程度都是默认只讨论依赖来源为[Spring BeanDefinition]的作用域,因为在 ...
- 【Spring】IoC容器 - 依赖来源
前言 上一篇文章已经学习了[依赖注入]相关的知识,这里详细的介绍一下[依赖来源]. 依赖来源 我们把依赖来源分为依赖查找的来源和依赖注入的来源分别讨论. 依赖查找的来源 1. Spring BeanD ...
- 【Spring】IoC容器 - 依赖注入
前言 上一篇文章已经学习了[依赖查找]相关的知识,这里详细的介绍一下[依赖注入]. 依赖注入 - 分类 因为自己是基于小马哥的脉络来学习,并且很认可小马哥梳理的分类方式,下面按照小马哥思想为[依赖注入 ...
- 【Spring】IoC容器 - 依赖查找
前言 上一篇文章已经学习了[IoC的主要实现策略]有2种: 1.依赖查找 2.依赖注入 这里稍加详细的介绍一下依赖查找 1.依赖查找的方式 依赖查找的方式可以以多种维度来划分: 1.按名称/类型/注解 ...
- 【Spring】IoC概述
Spring框架的核心概念--IoC IoC IoC是Inversion of Control的简写,翻译成汉语就是"控制反转".IoC并不是一门技术,而是一种设计思想,在Spri ...
- 【Spring】IOC
浅谈IOC IOC的理论背景 图1:传统系统中,对象之间相互引用的一幅图,在采用面向对象方法设计的软件系统中,它的底层的实现都是由n个对象所组成的,所有的对象通彼此之间的合作最终实现系统的业务逻辑,如 ...
- 【Spring】AOP注解方式实现机制
一.概述 二.@EnableAspectJAutoProxy 注解分析 三.分析AnnotationAwareAspectJAutoProxyCreator 四.执行流程 1. registerBea ...
随机推荐
- Redhat 离线安装 Docker (Community from binaries)
需求 在离线环境安装Docker (Community版),因为Enterprise版要花钱.当然资金充裕的客户可参考https://docs.docker.com/install/linux/doc ...
- 定时器任务django-crontab的使用【静态化高频率页面,增加用户体验】【系统的定时器,独立于项目执行】【刘新宇】
页面静态化 思考: 网页的首页访问频繁,而且查询数据量大,其中还有大量的循环处理. 问题: 用户访问首页会耗费服务器大量的资源,并且响应数据的效率会大大降低. 解决: 页面静态化 1. 页面静态化介绍 ...
- LSTM+CRF维特比解码过程
题目:给定长度为n的序列,标签数为m(标签值表示为1,2,....,m),发射概率矩阵E(n * m),其中E[i][j]表示第i个词预测为标签j的发射概率,转移概率矩阵T(m*m),其中T[i][j ...
- Windows Server 2008利用NTFS管理数据
今天我们学习关于NTFS管理数据 以下是学习的内容NTFS分区和FAT32分区的区别,如何将FAT32分区转化成NTFS分区,FAT 32 不支持大于4G ,NTFS权限设置 ,EFS加密 ,文件夹的 ...
- CSV Data Set Config 详细使用说明
JMeter 5.1.1 CSV Data Set Config 场景一:线程组中设置:单线程执行1次 如上图所示:变量名称为空时JMeter默认把new 1.txt的文件首行作为变量名 再如:此时A ...
- Python-PostgreSQL的使用
一.安装PostgreSQL模块 yum install postgresql-devel pip3 install psycopg2 注意:安装时遇到./psycopg/psycopg.h:35:2 ...
- HTTP请求包和响应包
HTTP请求包 HTTP响应包
- Tomcat源码分析 (十)----- 彻底理解 Session机制
Tomcat Session 概述 首先 HTTP 是一个无状态的协议, 这意味着每次发起的HTTP请求, 都是一个全新的请求(与上个请求没有任何联系, 服务端不会保留上个请求的任何信息), 而 Se ...
- 单元测试之NUnit三
NUnit 分三篇文章介绍,入门者可阅读文章,有基础者直接参考官方文档.初次写博客,望大家指点. 导航: 单元测试之NUnit一 单元测试之NUnit二 单元测试之NUnit三 除了Assert断言外 ...
- MySQL之主从同步
一.主从同步概念 1.1 什么是主从同步? MySQL 主从同步是指将数据从一个 MySQL 数据库服务器主节点复制到一个或多个从节点.MySQL 默认采用异步复制方式,这样从节点不用一直访问主服务器 ...
