WPF 3D 小小小小引擎 - ·WPF 3D变换应用
原文:WPF 3D 小小小小引擎 - ·WPF 3D变换应用
WPF可以提供的3D模型使我们可以轻松地创建3D实体,虽然目前来看还很有一些性能上的问题,不过对于一些简单的3D应用应该是可取的,毕竟其开发效率高,而且也容易上手。
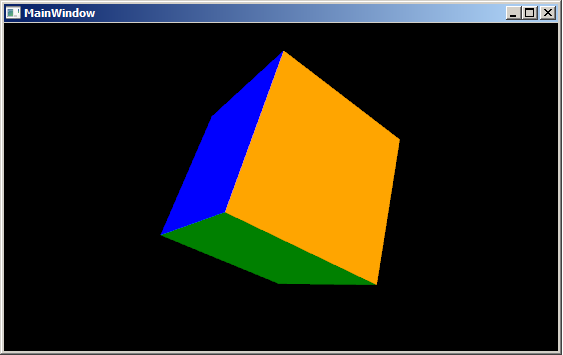
下面给大家演示的是使用在WPF 3D上实现视角变换,通过鼠标拖动来变换观察视角,通过滚轮来放缩视距。
有关3D的基础知识可以参考MSDN文档:三维图形概述
首先创建一个3D立方体,立方体是由六个面构成(F1, F2 ....F6)其XAML代码如下:
<Viewport3D>
<Viewport3D.Camera>
<PerspectiveCamera Position="8,8,8" LookDirection="-1 -1 -1" FieldOfView="75" UpDirection="-1 1 -1" x:Name="camera"></PerspectiveCamera>
</Viewport3D.Camera>
<Viewport3D.Children>
<ModelVisual3D x:Name="light">
<ModelVisual3D.Content>
<AmbientLight />
</ModelVisual3D.Content>
</ModelVisual3D>
<ModelVisual3D x:Name="magicCube">
<ModelVisual3D.Content>
<!-- 0: 0,0,0 1: 0,0,2 2: 2,0,2 3: 2,0,0 4: 2,2,0 5: 0,2,0 6: 0,2,2 7: 2,2,2 -->
<Model3DGroup x:Name="cube">
<Model3DGroup.Transform>
<TranslateTransform3D OffsetX="-1" OffsetY="-1" OffsetZ="-1" />
</Model3DGroup.Transform>
<!--F1: 0,3,2,1-->
<GeometryModel3D x:Name="F1">
<GeometryModel3D.Material>
<DiffuseMaterial Brush="Blue"/>
</GeometryModel3D.Material>
<GeometryModel3D.Geometry>
<MeshGeometry3D Positions="0,0,0 2,0,0 2,0,2 0,0,2" TriangleIndices="0,1,2 0,2,3"></MeshGeometry3D>
</GeometryModel3D.Geometry>
</GeometryModel3D>
<!--F2: 0,1,6,5-->
<GeometryModel3D x:Name="F2">
<GeometryModel3D.Material>
<DiffuseMaterial Brush="Green"/>
</GeometryModel3D.Material>
<GeometryModel3D.Geometry>
<MeshGeometry3D Positions="0,0,0 0,0,2 0,2,2 0,2,0" TriangleIndices="0 1 2 0 2 3"></MeshGeometry3D>
</GeometryModel3D.Geometry>
</GeometryModel3D>
<!--F3: 4,5,6,7-->
<GeometryModel3D x:Name="F3">
<GeometryModel3D.Material>
<DiffuseMaterial Brush="Red"/>
</GeometryModel3D.Material>
<GeometryModel3D.Geometry>
<MeshGeometry3D Positions="2,2,0 0,2,0 0,2,2 2,2,2" TriangleIndices="0 1 2 0 2 3"></MeshGeometry3D>
</GeometryModel3D.Geometry>
</GeometryModel3D>
<!--F4: 2,3,4,7-->
<GeometryModel3D x:Name="F4">
<GeometryModel3D.Material>
<DiffuseMaterial Brush="Yellow"/>
</GeometryModel3D.Material>
<GeometryModel3D.Geometry>
<MeshGeometry3D Positions="2,0,2 2,0,0 2,2,0 2,2,2" TriangleIndices="0 1 2 0 2 3" TextureCoordinates="0,0 0,1 1,1 1,0">
</MeshGeometry3D>
</GeometryModel3D.Geometry>
</GeometryModel3D>
<!--F5: 1,2,7,6-->
<GeometryModel3D x:Name="F5">
<GeometryModel3D.Material>
<DiffuseMaterial Brush="White"/>
</GeometryModel3D.Material>
<GeometryModel3D.Geometry>
<MeshGeometry3D Positions=" 0,0,2 2,0,2 2,2,2 0,2,2" TriangleIndices="0 1 2 0 2 3"></MeshGeometry3D>
</GeometryModel3D.Geometry>
</GeometryModel3D>
<!--F6: 0,5,4,3-->
<GeometryModel3D x:Name="F6">
<GeometryModel3D.Material>
<DiffuseMaterial Brush="Orange"/>
</GeometryModel3D.Material>
<GeometryModel3D.Geometry>
<MeshGeometry3D Positions=" 0,0,0 0,2,0 2,2,0 2,0,0" TriangleIndices="0 1 2 0 2 3"></MeshGeometry3D>
</GeometryModel3D.Geometry>
</GeometryModel3D>
</Model3DGroup>
</ModelVisual3D.Content>
</ModelVisual3D>
</Viewport3D.Children>
</Viewport3D>
在Viewport中用六个面构成一个立方体, 每一个面都是一个GeometryModel3D。
下面就是如何来实现通过鼠标拖动来变换视角的功能。首先给Window对象添加几个有关的鼠标的事件:MouseMove、MouseLeftButtonDown和MouseWheel。
<Window x:Class="MagicCube.MainWindow"
xmlns="http://schemas.microsoft.com/winfx/2006/xaml/presentation"
xmlns:x="http://schemas.microsoft.com/winfx/2006/xaml"
Title="MainWindow" Height="295" Width="525" Background="Black"
MouseMove="Viewport3D_MouseMove"
MouseLeftButtonDown="Viewport3D_MouseLeftButtonDown"
MouseWheel="Viewport3D_MouseWheel"
KeyDown="Window_KeyDown">
<Viewport3D …>
</Window>
说明一下使用到的几个变量:
其中MouseLeftButtonDown是用来获取鼠标在进入拖动状态之前的位置,这样我们就可以根据鼠标位置的改变类变换视角。
Point mouseLastPosition;
private void Viewport3D_MouseLeftButtonDown(object sender, MouseButtonEventArgs e)
{
mouseLastPosition = e.GetPosition(this);
}
下面是MouseMove事件,实现视角的变换。首先鼠标在拖动的过程中,可能发生水平方向上的变化和垂直方向上的变化,所以,我们将对不同的变化方向进行不同的变换。这里我将水平变换和垂直变换已经分别封装至两个方法中:HorizontalTransform(水平变换)和VerticalTransform(垂直变换)
private void Viewport3D_MouseMove(object sender, MouseEventArgs e)
{
if (Mouse.LeftButton == MouseButtonState.Pressed)
{
Point newMousePosition = e.GetPosition(this);
if (mouseLastPosition.X != newMousePosition.X)
{
HorizontalTransform(mouseLastPosition.X < newMousePosition.X, mouseDeltaFactor);//水平变换
}
if (mouseLastPosition.Y != newMousePosition.Y)// change position in the horizontal direction
{
VerticalTransform(mouseLastPosition.Y > newMousePosition.Y, mouseDeltaFactor);//垂直变换
}
mouseLastPosition = newMousePosition;
}
}
接下来我们就来看一下这两个变换方法的具体实现:
垂直变换:
private void VerticalTransform(bool upDown, double angleDeltaFactor){    Vector3D postion = new Vector3D(camera.Position.X, camera.Position.Y, camera.Position.Z);    Vector3D rotateAxis = Vector3D.CrossProduct(postion, camera.UpDirection);    RotateTransform3D rt3d = new RotateTransform3D();    AxisAngleRotation3D rotate = new AxisAngleRotation3D(rotateAxis, angleDeltaFactor * (upDown ? -1 : 1));    rt3d.Rotation = rotate;    Matrix3D matrix = rt3d.Value;    Point3D newPostition = matrix.Transform(camera.Position);    camera.Position = newPostition;    camera.LookDirection = new Vector3D(-newPostition.X, -newPostition.Y, -newPostition.Z);    //update the up direction    Vector3D newUpDirection = Vector3D.CrossProduct(camera.LookDirection, rotateAxis);    newUpDirection.Normalize();    camera.UpDirection = newUpDirection;}

水平变换:private void HorizontalTransform(bool leftRight, double angleDeltaFactor){    Vector3D postion = new Vector3D(camera.Position.X, camera.Position.Y, camera.Position.Z);    Vector3D rotateAxis = camera.UpDirection;    RotateTransform3D rt3d = new RotateTransform3D();    AxisAngleRotation3D rotate = new AxisAngleRotation3D(rotateAxis, angleDeltaFactor * (leftRight ? -1 : 1));    rt3d.Rotation = rotate;    Matrix3D matrix = rt3d.Value;    Point3D newPostition = matrix.Transform(camera.Position);    camera.Position = newPostition;    camera.LookDirection = new Vector3D(-newPostition.X, -newPostition.Y, -newPostition.Z);}
最后还有一个鼠标滚轮调节视距的变换,如下:
private void Viewport3D_MouseWheel(object sender, MouseWheelEventArgs e){ double scaleFactor = 3; //120 near , -120 far System.Diagnostics.Debug.WriteLine(e.Delta.ToString()); Point3D currentPosition = camera.Position; Vector3D lookDirection = camera.LookDirection;//new Vector3D(camera.LookDirection.X, camera.LookDirection.Y, camera.LookDirection.Z); lookDirection.Normalize(); lookDirection *= scaleFactor; if (e.Delta == 120)//getting near { if ((currentPosition.X + lookDirection.X) * currentPosition.X > 0) { currentPosition += lookDirection; } } if (e.Delta == -120)//getting far { currentPosition -= lookDirection; } Point3DAnimation positionAnimation = new Point3DAnimation(); positionAnimation.BeginTime = new TimeSpan(0, 0, 0); positionAnimation.Duration = TimeSpan.FromMilliseconds(100); positionAnimation.To = currentPosition; positionAnimation.From = camera.Position; positionAnimation.Completed += new EventHandler(positionAnimation_Completed); camera.BeginAnimation(PerspectiveCamera.PositionProperty, positionAnimation, HandoffBehavior.Compose);}
有了这个小程序之后,我们以后如果需要制作WPF 3D实体,也可以通过它来360度全方位地观测构建的3D实体。
WPF 3D 小小小小引擎 - ·WPF 3D变换应用的更多相关文章
- 在WPF中使用PlaneProjection模拟动态3D效果
原文:在WPF中使用PlaneProjection模拟动态3D效果 虽然在WPF中也集成了3D呈现的功能,在简单的3D应用中,有时候并不需要真实光影的3D场景.毕竟使用3D引擎会消耗很多资源,有时候使 ...
- WPF换肤之八:创建3D浏览效果
原文:WPF换肤之八:创建3D浏览效果 上节中,我们展示了WPF中的异步以及界面线程交互的方式,使得应用程序的显示更加的流畅.这节我们主要讲解如何设计一个具有3D浏览效果的天气信息浏览器. 效果显示 ...
- WPF: Creation of Text Labels for 3D Scene
原文:WPF: Creation of Text Labels for 3D Scene 转载:http://www.codeproject.com/KB/WPF/WPF_Text3D.aspx Do ...
- 知名游戏引擎公司Havok发布免费3D移动游戏引擎“Project Anarchy”
自EA发布“寒霜”引擎(Frostbite Engine)移动版后,知名游戏引擎公司Havok也发布了免费的3D移动游戏引擎“Project Anarchy”. 据悉,6月底时候,Intel旗下知名游 ...
- 3D Cube计算引擎加速运算
3D Cube计算引擎加速运算 华为达芬奇架构的AI芯片Ascend910,同时与之配套的新一代AI开源计算框架MindSpore. 为什么要做达芬奇架构? AI将作为一项通用技术极大地提高生产力,改 ...
- WPF系列(1)WPF和XAML基础
终于下定决心开始更新WPF一个系列的文章,这里主要是出于两个目的,一是自己对所学的知识有一个系统的总结,二十希望能对其他人有些帮助,如果您觉得我写的不好,欢迎提意见. 那么既然我要开始写WPF,那我们 ...
- WPF快速入门系列(1)——WPF布局概览
一.引言 关于WPF早在一年前就已经看过<深入浅出WPF>这本书,当时看完之后由于没有做笔记,以至于我现在又重新捡起来并记录下学习的过程,本系列将是一个WPF快速入门系列,主要介绍WPF中 ...
- 3-Highcharts 3D图之3D柱状图分组叠堆3D图
<!DOCTYPE> <html lang='en'> <head> <title>3-Highcharts 3D图之3D柱状图分组叠堆3D图</ ...
- WPF换肤之三:WPF中的WndProc
原文:WPF换肤之三:WPF中的WndProc 在上篇文章中,我有提到过WndProc中可以处理所有经过窗体的事件,但是没有具体的来说怎么可以处理的. 其实,在WPF中,要想利用WndProc来处理所 ...
随机推荐
- Extjs4使用iframe注意事项
"video" : { render : function(panel, eOpts) { // 因为iframe在video // panel渲染的时候就已经完全移动到video ...
- 使用jQuery调用ASP.NET WebService的简易教程
鉴于使用Javascript调用Web Service配置略麻烦,所以记录一下. 1. 新建一个Web服务(WebService.asmx) 2. 取消注释// [System.Web.Script. ...
- CodeForces 527B
Description Ford Prefect got a job as a web developer for a small company that makes towels. His cur ...
- 7zip self-extracted executable: To extract file to specific directory
1) Install 7-zip (7zS.sfx will be installed to C:\Program Files\7-Zip): http://7zsfx.solta.ru/en/ 2) ...
- TCP传输小数据包效率问题(译自MSDN)
TCP传输小数据包效率问题(译自MSDN) http://www.ftpff.com/blog/?q=node/16 摘要:当使用TCP传输小型数据包时,程序的设计是相当重要的.如果在设计方案中不对T ...
- 建造者模式(Builder Pattern)
建造者模式:使用多个简单对象一步步构建成一个复杂的对象. 有时候,我们会创建一个“复杂”的对象,这个对象的由很多子对象构成,由于需求的变化,这个对象的各个部分经常面临剧烈的变化. 继续工厂模式的披萨店 ...
- JS 版的pnp in_array($str,$arr)
var a = Array(1,2,3,4,5); function in_array(search,array){ for(var i in array){ if(array[i]==search) ...
- quality center的使用简介
quality center是一个基于Web的测试管理工具,其实是伪B/S的软件,可以组织和管理应用程序测试流程的所有阶段,包括制定测试需求.计划测试.执行测试和跟踪缺陷.此外,通过Quality C ...
- 几个css的小知识点(一)
1.对于不能确定宽度的div让它水平居中. <div class='father'> <div class='son'>居中</div> </div> ...
- CSS3制作hover下划线动画
1.前几天看到Hexo的next主题标题hover效果很炫,自己尝试写了一个,另一个是next的实现,照例先上图 2.实现小黑科技 <div> <a href="javas ...