[Android]Android之四种常见布局
一个丰富的界面总是要由很多个控件组成的,那我们如何才能让各个控件都有条不紊地 摆放在界面上,而不是乱糟糟的呢?这就需要借助布局来实现了。布局是一种可用于放置很 多控件的容器,它可以按照一定的规律调整内部控件的位置,从而编写出精美的界面。当然, 布局的内部除了放置控件外,也可以放置布局,通过多层布局的嵌套,我们就能够完成一些 比较复杂的界面实现,下图很好地展示了它们之间的关系。
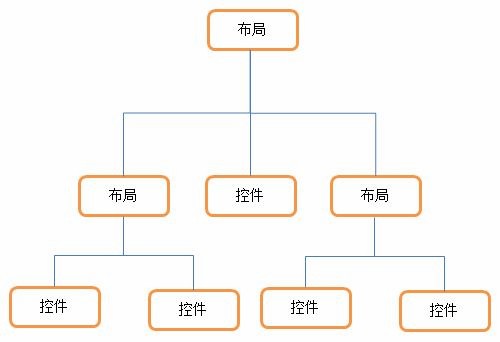
下面我们来详细讲解下 Android 中四种最基本的布局。先做好准备工作,新建一个UILayoutTest 项目。
一、LinearLayout
LinearLayout 又称作线性布局,是一种非常常用的布局。正如它名字所描述的一样,这 个布局会将它所包含的控件在线性方向上依次排列。相信你之前也已经注意到了,我们在上 一节中学习控件用法时,所有的控件就都是放在 LinearLayout 布局里的,因此上一节中的控 件也确实是在垂直方向上线性排列的。
既然是线性排列,肯定就不仅只有一个方向,那为什么上一节中的控件都是在垂直方向 排列的呢?这是由于我们通过 android:orientation 属性指定了排列方向是 vertical,如果指定 的是 horizontal ,控件就会在水平方向上排列了。下面我们通过实战来体会一下,修改 activity_main.xml 中的代码,如下所示:
<LinearLayout xmlns:android="http://schemas.android.com/apk/res/android" android:layout_width="match_parent" android:layout_height="match_parent" android:orientation="vertical" >

<Button android:id="@+id/button1" android:layout_width="wrap_content" android:layout_height="wrap_content" android:text="Button 1" />

<Button android:id="@+id/button2" android:layout_width="wrap_content" android:layout_height="wrap_content" android:text="Button 2" />

<Button android:id="@+id/button3" android:layout_width="wrap_content" android:layout_height="wrap_content" android:text="Button 3" />

</LinearLayout>
我们在 LinearLayout 中添加了三个 Button,每个 Button 的长和宽都是 wrap_content,并 指定了排列方向是 vertical。现在运行一下程序,效果如图 3.16 所示。

然后我们修改一下 LinearLayout 的排列方向,如下所示:
<LinearLayout xmlns:android="http://schemas.android.com/apk/res/android" android:layout_width="match_parent" android:layout_height="match_parent"

android:orientation="horizontal" >

……

</LinearLayout>
将 android:orientation 属性的值改成了 horizontal,这就意味着要让 LinearLayout 中的控 件在水平方向上依次排列,当然如果不指定 android:orientation 属性的值,默认的排列方向就是 horizontal。重新运行一下程序,效果如图 3.17 所示。
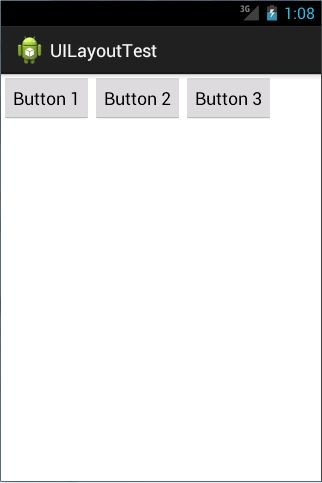
这里需要注意,如果 LinearLayout 的排列方向是 horizontal,内部的控件就绝对不能将 宽度指定为match_parent,因为这样的话单独一个控件就会将整个水平方向占满,其他的控 件就没有可放置的位置了。同样的道理,如果 LinearLayout 的排列方向是vertical,内部的控 件就不能将高度指定为match_parent。
了解了 LinearLayout 的排列规律,我们再来学习一下它的几个关键属性的用法吧。 首先来看 android:layout_gravity 属性,它和我们上一节中学到的 android:gravity 属性看起来有些相似,这两个属性有什么区别呢?其实从名字上就可以看出,android:gravity 是用
于指定文字在控件中的对齐方式,而 android:layout_gravity 是用于指定控件在布局中的对齐 方 式 。 android:layout_gravity 的 可 选 值 和 android:gravity 差 不 多 , 但 是 需 要 注 意 , 当 LinearLayout 的排列方向是 horizontal 时,只有垂直方向上的对齐方式才会生效,因为此时水 平方向上的长度是不固定的,每添加一个控件,水平方向上的长度都会改变,因而无法指定 该方向上的对齐方式。同样的道理,当 LinearLayout 的排列方向是vertical时,只有水平方 向上的对齐方式才会生效。修改 activity_main.xml 中的代码,如下所示:
<LinearLayout xmlns:android="http://schemas.android.com/apk/res/android" android:layout_width="match_parent" android:layout_height="match_parent"

android:orientation="horizontal" >

<Button android:id="@+id/button1" android:layout_width="wrap_content" android:layout_height="wrap_content" android:layout_gravity="top" android:text="Button 1" />

<Button android:id="@+id/button2" android:layout_width="wrap_content" android:layout_height="wrap_content" android:layout_gravity="center_vertical" android:text="Button 2" />

<Button android:id="@+id/button3" android:layout_width="wrap_content" android:layout_height="wrap_content" android:layout_gravity="bottom" android:text="Button 3" />

</LinearLayout>
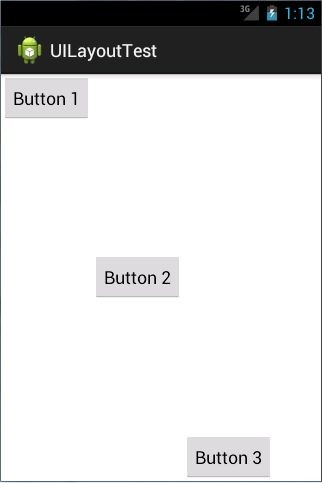
由于目前 LinearLayout 的排列方向是 horizontal,因此我们只能指定垂直方向上的排列方 向,将第一个 Button 的对齐方式指定为 top,第二个 Button 的对齐方式指定为 center_vertical, 第三个 Button 的对齐方式指定为 bottom。重新运行程序,效果如图 3.18 所示。
接下来我们学习下 LinearLayout 中的另一个重要属性,android:layout_weight。这个属性 允许我们使用比例的方式来指定控件的大小,它在手机屏幕的适配性方面可以起到非常重要 的作用。比如我们正在编写一个消息发送界面,需要一个文本编辑框和一个发送按钮,修改 activity_main.xml 中的代码,如下所示:
<LinearLayout xmlns:android="http://schemas.android.com/apk/res/android" android:layout_width="match_parent" android:layout_height="match_parent"

android:orientation="horizontal" >

<EditText android:id="@+id/input_message" android:layout_width="0dp" android:layout_height="wrap_content" android:layout_weight="1" android:hint="Type something"/>

<Button android:id="@+id/send" android:layout_width="0dp" android:layout_height="wrap_content" android:layout_weight="1" android:text="Send"/>

</LinearLayout>
你会发现,这里竟然将 EditText 和 Button 的宽度都指定成了 0,这样文本编辑框和按钮 还能显示出来吗?不用担心,由于我们使用了 android:layout_weight属性,此时控件的宽度 就不应该再由 android:layout_width 来决定,这里指定成 0 是一种比较规范的写法。
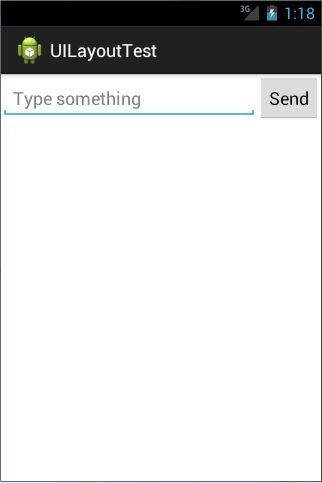
然后我们在 EditText 和 Button 里都将 android:layout_weight 属性的值指定为 1,这表示EditText 和 Button 将在水平方向平分宽度,重新运行下程序,你会看到如图所示的效果。
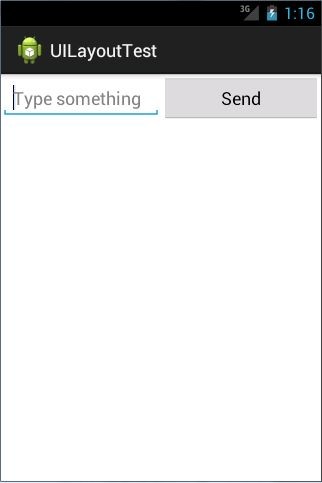
为什么将 android:layout_weight 属性的值同时指定为 1 就会平分屏幕宽度呢?其实原理 也很简单,系统会先把 LinearLayout 下所有控件指定的 layout_weight值相加,得到一个总值, 然后每个控件所占大小的比例就是用该控件的 layout_weight值除以刚才算出的总值。因此如 果想让 EditText 占据屏幕宽度的 3/5 ,Button 占据屏幕宽度的 2/5 ,只需要将 EditText 的 layout_weight改成 3,Button 的layout_weight 改成 2 就可以了。
我 们 还 可 以 通 过 指 定 部 分 控 件 的 layout_weight 值 , 来 实 现 更 好 的 效 果 。 修 改activity_main.xml 中的代码,如下所示:
<LinearLayout xmlns:android="http://schemas.android.com/apk/res/android" android:layout_width="match_parent" android:layout_height="match_parent" android:orientation="horizontal" >

<EditText android:id="@+id/input_message" android:layout_width="0dp" android:layout_height="wrap_content" android:layout_weight="1" android:hint="Type something"/>

<Button android:id="@+id/send" android:layout_width="wrap_content" android:layout_height="wrap_content" android:text="Send"/>

</LinearLayout>
这里我们仅指定了 EditText 的 android:layout_weight 属性,并将 Button 的宽度改回 wrap_content。这表示 Button 的宽度仍然按照 wrap_content 来计算,而 EditText 则会占满屏 幕所有的剩余空间。使用这种方式编写的界面,不仅在各种屏幕的适配方面会非常好,而且 看起来也更加舒服,重新运行程序,效果如图 3.20 所示。
二、RelativeLayout
RelativeLayout 又称作相对布局,也是一种非常常用的布局。和 LinearLayout 的排列规 则不同,RelativeLayout 显得更加随意一些,它可以通过相对定位的方式让控件出现在布局 的任何位置。也正因为如此,RelativeLayout 中的属性非常多,不过这些属性都是有规律可 循的,其实并不难理解和记忆。我们还是通过实践来体会一下,修改 activity_main.xml 中的 代码,如下所示:
<RelativeLayout xmlns:android="http://schemas.android.com/apk/res/android" android:layout_width="match_parent" android:layout_height="match_parent" >

<Button android:id="@+id/button1" android:layout_width="wrap_content" android:layout_height="wrap_content" android:layout_alignParentLeft="true" android:layout_alignParentTop="true" android:text="Button 1" />

<Button android:id="@+id/button2" android:layout_width="wrap_content" android:layout_height="wrap_content" android:layout_alignParentRight="true" android:layout_alignParentTop="true" android:text="Button 2" />

<Button android:id="@+id/button3" android:layout_width="wrap_content" android:layout_height="wrap_content" android:layout_centerInParent="true" android:text="Button 3" />

<Button android:id="@+id/button4" android:layout_width="wrap_content" android:layout_height="wrap_content" android:layout_alignParentBottom="true"

android:layout_alignParentLeft="true" android:text="Button 4" />

<Button android:id="@+id/button5" android:layout_width="wrap_content" android:layout_height="wrap_content" android:layout_alignParentBottom="true" android:layout_alignParentRight="true" android:text="Button 5" />

</RelativeLayout>
我想以上代码已经不需要我再做过多解释了,因为实在是太好理解了,我们让 Button 1 和父布局的左上角对齐,Button 2 和父布局的右上角对齐,Button 3 居中显示,Button 4 和父 布局的左下角对齐,Button 5 和父布局的右下角对齐。虽然
android:layout_alignParentLeft、 android:layout_alignParentTop、

android:layout_alignParentRight、

android:layout_alignParentBottom、

android:layout_centerInParent
这几个属性我们之前都没接触过,可是它们的名字已经完全说 明了它们的作用。重新运行程序,效果如图 3.21 所示。

上面例子中的每个控件都是相对于父布局进行定位的,那控件可不可以相对于控件进行
定位呢?当然是可以的,修改 activity_main.xml中的代码,如下所示:
<RelativeLayout xmlns:android="http://schemas.android.com/apk/res/android" android:layout_width="match_parent" android:layout_height="match_parent" >

<Button android:id="@+id/button3" android:layout_width="wrap_content" android:layout_height="wrap_content" android:layout_centerInParent="true" android:text="Button 3" />

<Button android:id="@+id/button1" android:layout_width="wrap_content" android:layout_height="wrap_content" android:layout_above="@id/button3" android:layout_toLeftOf="@id/button3" android:text="Button 1" />

<Button android:id="@+id/button2" android:layout_width="wrap_content" android:layout_height="wrap_content" android:layout_above="@id/button3" android:layout_toRightOf="@id/button3" android:text="Button 2" />

<Button android:id="@+id/button4" android:layout_width="wrap_content" android:layout_height="wrap_content" android:layout_below="@id/button3" android:layout_toLeftOf="@id/button3" android:text="Button 4" />

<Button android:id="@+id/button5"

android:layout_width="wrap_content" android:layout_height="wrap_content" android:layout_below="@id/button3" android:layout_toRightOf="@id/button3" android:text="Button 5" />

</RelativeLayout>这次的代码稍微复杂一点,不过仍然是有规律可循的。android:layout_above 属性可以让 一个控件位于另一个控件的上方,需要为这个属性指定相对控件 id 的引用,这里我们填入 了 @id/button3 , 表 示 让 该 控 件 位 于 Button 3 的 上 方 。 其 他 的 属 性 也 都 是 相 似 的 , android:layout_below 表示让一个控件位于另一个控件的下方,android:layout_toLeftOf表示让 一个控件位于另一个控件的左侧,android:layout_toRightOf 表示让一个控件位于另一个控件 的右侧。注意,当一个控件去引用另一个控件的 id 时,该控件一定要定义在引用控件的后 面,不然会出现找不到 id 的情况。重新运行程序,效果如图所示。

RelativeLayout 中还有另外一组相对于控件进行定位的属性,android:layout_alignLeft表 示让一个控件的左边缘和另一个控件的左边缘对齐,android:layout_alignRight表示让一个控件的右边缘和另一个控件的右边缘对齐,还有 android:layout_alignTop 和 android:layout_alignBottom,道理都是一样的,我就不再多说,这几个属性就留给你自己去尝试一下了。 好了,正如我前面所说,RelativeLayout 中的属性虽然多,但都是有规律可循的,所以学起来一点都不觉得吃力吧?
三、FrameLayout
FrameLayout 相比于前面两种布局就简单太多了,因此它的应用场景也少了很多。这种 布局没有任何的定位方式,所有的控件都会摆放在布局的左上角。让我们通过例子来看一看 吧,修改 activity_main.xml中的代码,如下所示:
<FrameLayout xmlns:android="http://schemas.android.com/apk/res/android" android:layout_width="match_parent" android:layout_height="match_parent"

>

<Button android:id="@+id/button" android:layout_width="wrap_content" android:layout_height="wrap_content" android:text="Button"

/>

<ImageView android:id="@+id/image_view" android:layout_width="wrap_content" android:layout_height="wrap_content" android:src="@drawable/ic_launcher"

/>

</FrameLayout>
FrameLayout 中只是放置了一个按钮和一张图片,重新运行程序,效果如图所示。

可以看到,按钮和图片都是位于布局的左上角。由于图片是在按钮之后添加的,因此图 片压在了按钮的上面。
你可能会觉得,这个布局能有什么作用呢?确实,它的应用场景并不多,不过在下一章 中介绍碎片的时候,我们还是可以用到它的。
四、TableLayout
TableLayout 允许我们使用表格的方式来排列控件,这种布局也不是很常用,你只需要 了解一下它的基本用法就可以了。既然是表格,那就一定会有行和列,在设计表格时我们 尽量应该让每一行都拥有相同的列数,这样的表格也是最简单的。不过有时候事情并非总会 顺从我们的心意,当表格的某行一定要有不相等的列数时,就需要通过合并单元格的方式来 应对。
比 如 我 们 正 在 设 计 一 个 登 录 界 面 , 允 许 用 户 输 入 账 号 密 码 后 登 录 , 就 可 以 将activity_main.xml中的代码改成如下所示:
<TableLayout xmlns:android="http://schemas.android.com/apk/res/android" android:layout_width="match_parent" android:layout_height="match_parent" >

<TableRow>

<TextView android:layout_height="wrap_content" android:text="Account:" />

<EditText android:id="@+id/account" android:layout_height="wrap_content" android:hint="Input your account" />

</TableRow>

<TableRow>

<TextView android:layout_height="wrap_content" android:text="Password:" />

<EditText android:id="@+id/password" android:layout_height="wrap_content" android:inputType="textPassword" />

</TableRow>

<TableRow>

<Button android:id="@+id/login" android:layout_height="wrap_content" android:layout_span="2" android:text="Login" />

</TableRow>

</TableLayout>
在 TableLayout 中每加入一个 TableRow 就表示在表格中添加了一行,然后在 TableRow 中每加入一个控件,就表示在该行中加入了一列,TableRow 中的控件是不能指定宽度的。 这里我们将表格设计成了三行两列的格式,第一行有一个 TextView 和一个用于输入账号的 EditText , 第二行也有一个TextView 和一个用于输入密码的EditText ,我们通过将android:inputType 属性的值指定为 textPassword,把EditText 变为密码输入框。可是第三行只有一个用于登录的按钮,前两行都有两列,第三行只有一列,这样的表格就会很难看,而且结构也非常不合理 。这时就需要通过对单元格进行合并来解决这个问题 ,使用android:layout_span="2"让登录按钮占据两列的空间,就可以保证表格结构的合理性了。重新 运行程序,效果如图所示。
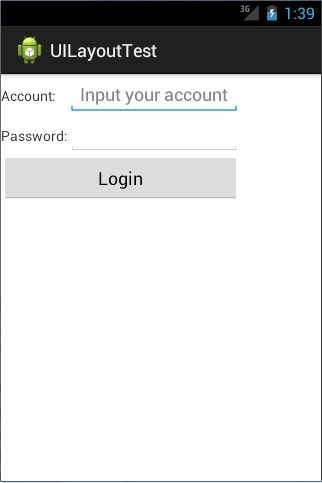
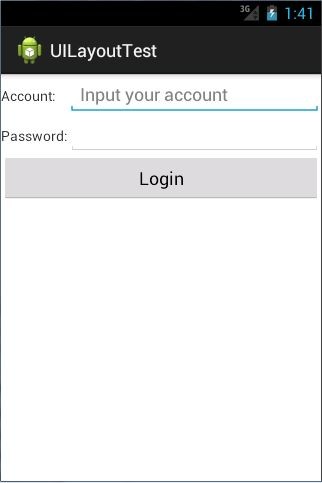
不过从图中可以看出,当前的登录界面并没有充分利用屏幕的宽度,右侧还空出了一块 区 域 , 这 也 难 怪 , 因 为 在 TableRow 中 我 们 无 法 指 定 控 件 的 宽 度 。 这 时 使 用android:stretchColumns 属性就可以很好地解决这个问题,它允许将 TableLayout 中的某一列 进行拉伸,以达到自动适应屏幕宽度的作用。修改 activity_main.xml中的代码,如下所示:
<TableLayout xmlns:android="http://schemas.android.com/apk/res/android" android:layout_width="match_parent" android:layout_height="match_parent"

android:stretchColumns="1"

>

……

</TableLayout>这里将android:stretchColumns的值指定为 1,表示如果表格不能完全占满屏幕宽度,就将第二列进行拉伸。没错!指定成 1 就是拉伸第二列,指定成 0 就是拉伸第一列,不要以为这里我写错了哦。重新运行程序,效果如图所示。
[Android]Android之四种常见布局的更多相关文章
- 几种常见布局的flex写法
flex布局目前基本上兼容主流的浏览器,且实现方式简单.我整理了flex的一些知识点,并且总结归纳了几种常见布局的flex写法 flex基础知识点 flex-grow和flex-shrink相关计算 ...
- [整理]android中几种常见的尺寸
获取屏幕宽高尺寸的三种代码形式 在Android上,目前我知道的获取屏幕尺寸的方法有三种不同的代码形式 方法1.在Activity中最常见的调用方式 WindowManager windowManag ...
- android中几种常见的尺寸
获取屏幕宽高尺寸的三种代码形式 在Android上,目前我知道的获取屏幕尺寸的方法有三种不同的代码形式 方法1.在Activity中最常见的调用方式 WindowManager windowManag ...
- Android项目-几种常见的应用架构
android两种Tab分页的方式:TabActivity和ActivityGroup http://www.fengfly.com/plus/view-209429-1.html 1.单个Activ ...
- 关于android studio几种常见的错误解决
我也是从ec转到as的,没办法,大势所趋嘛,然而,在使用as的过程中遇到了非常多匪夷所思的错误,如今就说一下今天我遇到的这个错误. 美工妹子给了我一张图片,用来当做button的背景图,当然,这个图也 ...
- 【转】Android UI 五种布局
在一个Android应用中,Layout是开发中的一个很重要环节,Layout是组成UI不可缺少的一部分. ## Android UI 核心类 在Android应用构建UI的方法有以下几种: 单纯使用 ...
- 几种常见的Android自动化测试框架及其应用
随着Android应用得越来越广,越来越多的公司推出了自己移动应用测试平台.例如,百度的MTC.东软易测云.Testin云测试平台…….由于自己所在项目组就是做终端测试工具的,故抽空了解了下几种常见的 ...
- Android教程-03 常见布局的总结
常见的布局 视频建议采用超清模式观看, 欢迎点击订阅我的优酷 Android的图形用户界面是由多个View和ViewGroup构建出来的.View是通用的UI窗体小组件,比如按钮(Button)或者文 ...
- android开发中常见布局的注意点
常见布局的注意点 线性布局: 必须有一个布局方向 水平或者垂直 在垂直布局中 只有左对齐 右对齐 水平居中生效 在水平布局中 只有顶部对齐 底部对齐 垂直居中生效 权重:组件按比例分配屏幕的剩余部分( ...
随机推荐
- linux中查找用户账户信息和登录信息的11中方法
摘自:开源中国 微信公众号 1. id 2. groups 3. finger 4.getent 5. grep 6. lslogins 7..users 8. who 9. w 10. last或者 ...
- Zabbix监控华为交换机
一. 监控交换机首先要在交换机开通snmp协议. 有两种方式开通,web界面,及交换机的配置界面 Web界面开通: 交换机配置界面 有web界面的,使用web界面相对简单,本项目就是用web界面 ...
- listen 72
Warmer Temps May Bollux Botanicals Global warming might seem like a botanical boon. After all, milde ...
- linux命令学习笔记(45):free 命令
free命令可以显示Linux系统中空闲的.已用的物理内存及swap内存,及被内核使用的buffer.在Linux系统监控的 工具中,free命令是最经常使用的命令之一. .命令格式: free [参 ...
- 如何在asterisk中限制呼叫路数
在asterisk中,对于呼叫个数是可以通过call-limit进行限制的.限制办法是通过修改asterisk.conf中maxcalls参数,设置允许的最大呼叫数.这里的最大呼叫数是包括所有的呼 ...
- CF Round #460
晚上去看月亮了 离比赛结束半个小时才滚回来A了T1T2T3... 又要掉Rating辣 T4 给一个有向图 每条边有一个英文字母作为边权 求一条路径 该路径上权值众数出现次数最多 求最多的出现次数 拓 ...
- python爬虫知识点总结(九)Requests+正则表达式爬取猫眼电影
一.爬取流程 二.代码演示 #-*- coding: UTF-8 -*- #_author:AlexCthon #mail:alexcthon@163.com #date:2018/8/3 impor ...
- Linux User
1.用户的工作目录,在/etc/passwd中查看 2.如果shell=bin/false(正常为bin/bash)代表禁止登录,这样就无法登录以及通过su进行切换: 3.修改,usermod -d ...
- bzoj 4883 [Lydsy1705月赛]棋盘上的守卫——并查集(思路!)
题目:https://www.lydsy.com/JudgeOnline/problem.php?id=4883 把各行和各列看成n+m个点. 如果一下能防守行和列,就是最大匹配了.这是每两个左右部点 ...
- win7-64 mysql的安装
1.https://jingyan.baidu.com/article/597035521d5de28fc00740e6.html 2.net start mysql 无法启动的3534的错误的解决办 ...
