(IOS)悬浮按钮Demo
思路:传入一个底层的view,将悬浮按钮(用view实现)和展开的子按钮列表add在其上,子按钮列表开始将坐标和悬浮按钮对应好后先将其隐藏,悬浮按钮识别到tap手势后触发展示子按钮列表的方法。通过在touchMove中实现子按钮列表和悬浮按钮的中心坐标同步更新,实现同时一起拖动,其中限定了悬浮按钮在手指拿起后的坐标,通过在touchEnd作判断调整。关键点是tap手势有时会将touchBegan之后的方法砍断,在调用tap的回调函数后会执行touchCancel方法,所以tap的回调函数中必须带上touchEnd中的功能,将UI的效果恢复和位置纠正。
源码:
#import "SuspendedButton.h"

#import <QuartzCore/QuartzCore.h>

#define BUTTON_AVAILABLE @"BUTTONAVAILABLE"

@interface SuspendedButton ()

{

    BOOL _isShowingButtonList;

    BOOL _isOnLeft;

    BOOL _isBackUp;

    BOOL _isTest;

    CGPoint _tempCenter;

    CGPoint _originalPosition;

    CGRect _windowSize;

    UIView *_buttonListView;

    UIView *_baseView;

}

@property (nonatomic,retain) UIView *buttonListView;

@property (nonatomic,retain) UIView *baseView;

@end

@implementation SuspendedButton

@synthesize buttonListView = _buttonListView;

@synthesize baseView = _baseView;

static SuspendedButton *_instance = nil;

#pragma mark - 继承方法

- (id)initWithFrame:(CGRect)frame

{

    if (self = [super initWithFrame:frame])

    {

        _isShowingButtonList = NO;

        //_isBackUp = NO;

        //self.hidden = YES;

        //_isTest = NO;

        //[self httpRequest];

        [[NSNotificationCenter defaultCenter] removeObserver:self name:BUTTON_AVAILABLE object:nil];

        [[NSNotificationCenter defaultCenter] addObserver:self selector:@selector(showButton) name:BUTTON_AVAILABLE object:nil];

    }

    return self;

}

- (void)dealloc

{

    [_buttonListView release];

    [_baseView release];


    [[NSNotificationCenterdefaultCenter] removeObserver:self];

    [super dealloc];

}

- (void)touchesBegan:(NSSet *)touches withEvent:(UIEvent *)event

{

    //NSLog(@"touchBegan");

    _originalPosition = [[touches anyObject] locationInView:self];

    _tempCenter = self.center;

    self.backgroundColor = [UIColor blueColor];

    CGAffineTransform toBig = CGAffineTransformMakeScale(1.2, 1.2);

    [UIView animateWithDuration:0.1 animations:^{

        // Translate bigger

        self.transform = toBig;

    } completion:^(BOOL finished)   {}];

}

- (void)touchesMoved:(NSSet *)touches withEvent:(UIEvent *)event

{

    //NSLog(@"touchMove");

    CGPoint currentPosition = [[touches anyObject] locationInView:self];

    float detaX = currentPosition.x - _originalPosition.x;

    float detaY = currentPosition.y - _originalPosition.y;

    CGPoint targetPositionSelf = self.center;

    CGPoint targetPositionButtonList = _buttonListView.center;

    targetPositionSelf.x += detaX;

    targetPositionSelf.y += detaY;

    targetPositionButtonList.x += detaX;

    targetPositionButtonList.y += detaY;

    self.center = targetPositionSelf;

    _buttonListView.center = targetPositionButtonList;

}

- (void)touchesCancelled:(NSSet *)touches withEvent:(UIEvent *)event

{

    //NSLog(@"touchCancell");

    // 触发touchBegan后,tap手势被识别后会将touchMove和touchEnd的事件截取掉触发自身手势回调,然后运行touchCancell。touchBegan中设置的按钮状态在touchEnd和按钮触发方法两者中分别设置还原。

}

- (void)touchesEnded:(NSSet *)touches withEvent:(UIEvent *)event

{

    //NSLog(@"touchEnd");

    CGAffineTransform toNormal = CGAffineTransformTranslate(CGAffineTransformIdentity, /1.2, /1.2);

    CGPoint newPosition = [self correctPosition:self.frame.origin];

    [UIView animateWithDuration:0.1 animations:^{

        // Translate normal

        self.transform = toNormal;

        self.backgroundColor = [UIColor greenColor];

    } completion:^(BOOL finished) {

        [UIView animateWithDuration:0.4 animations:^{

            self.frame = CGRectMake(newPosition.x, newPosition.y, self.bounds.size.width, self.bounds.size.height);

            [self adjustButtonListView];

        }];

    }];

}

#pragma mark - 类方法

+ (SuspendedButton *)suspendedButtonWithCGPoint:(CGPoint)pos inView:(UIView *)baseview

{

    static dispatch_once_t onceToken;

    dispatch_once(&onceToken, ^{

        _instance = [[SuspendedButton alloc] initWithCGPoint:pos];

        _instance.baseView = baseview;

        [_instance constructUI];

        [baseview addSubview:_instance];

        [_instance release];

    });

    return _instance;

}

+ (void)deleteSuspendedButton

{

    [_instance removeFromSuperview];

}

#pragma mark - 辅助方法

- (id)initWithCGPoint:(CGPoint)pos

{

    _windowSize = [SDKFunctionLib rectFromWinSize_CurrentWinSize]; //封装了获取屏幕Size的方法

    CGPoint newPosition = [self correctPosition:pos];

    return [self initWithFrame:CGRectMake(newPosition.x, newPosition.y, , )];

}

- (CGPoint)correctPosition:(CGPoint)pos

{

    CGPoint newPosition;

    if ((pos.x +  > _windowSize.size.width) || (pos.x > _windowSize.size.width/-)) {

        newPosition.x = _windowSize.size.width - ;

        _isOnLeft = NO;

    } else {

        newPosition.x = ;

        _isOnLeft = YES;

    }

    (pos.y +  > _windowSize.size.height)?(newPosition.y = _windowSize.size.height - ):((pos.y < )?newPosition.y = :(newPosition.y = pos.y));

    return newPosition;

}

- (void)constructUI

{

    self.backgroundColor = [UIColor greenColor];

    self.alpha = 0.6;

    self.layer.cornerRadius = ;

    UITapGestureRecognizer *tap = [[UITapGestureRecognizer alloc] initWithTarget:self action:@selector(tiggerButtonList)];

    tap.numberOfTapsRequired = ;

    tap.numberOfTouchesRequired = ;

    [self addGestureRecognizer:tap];

    [tap release];

    NSUInteger numOfButton = ;

    self.buttonListView = [[[UIView alloc] initWithFrame:CGRectMake(, , numOfButton*, )] autorelease];

    _buttonListView.backgroundColor = [UIColor blueColor];

    _buttonListView.alpha = ;

    _buttonListView.layer.cornerRadius = ;

    [self createButtonByNumber:numOfButton withSize:CGSizeMake(, ) inView:(UIView *)_buttonListView];

    _buttonListView.hidden = YES;

    [_baseView addSubview:_buttonListView];

}

- (void)createButtonByNumber:(NSUInteger)number withSize:(CGSize)size inView:(UIView *)view

{

    //子按钮的UI效果自定义

    for (NSUInteger i = ; i < number; i++)

    {

        UIButton *button = [UIButton buttonWithType:UIButtonTypeRoundedRect];

        [button addTarget:self action:@selector(optionsButtonPressed:) forControlEvents:UIControlEventTouchUpInside];

        button.tag = i + ;

        button.frame = CGRectMake( + i*size.width, , size.width, size.height);

        button.tintColor = [UIColor redColor];

        [view addSubview:button];

    }

}

- (void)adjustButtonListView

{

    if (_isOnLeft) {

        _buttonListView.frame = CGRectMake(, self.center.y - , _buttonListView.bounds.size.width, _buttonListView.bounds.size.height);

    } else {

        _buttonListView.frame = CGRectMake((_windowSize.size.width -  - _buttonListView.bounds.size.width), self.center.y - , _buttonListView.bounds.size.width, _buttonListView.bounds.size.height);

    }

}

#pragma mark - 按钮回调

- (void)tiggerButtonList

{

    //NSLog(@"tiggerTap");

    _isShowingButtonList = !_isShowingButtonList;

    CGAffineTransform toNormal = CGAffineTransformTranslate(CGAffineTransformIdentity, /1.2, /1.2);

    [UIView animateWithDuration:0.1 animations:^{

        // Translate normal

        self.transform = toNormal;

        self.backgroundColor = [UIColor greenColor];

    } completion:^(BOOL finished) {

        [UIView animateWithDuration:0.1 animations:^{

            self.center = _tempCenter;

            [self adjustButtonListView];

        } completion:^(BOOL finished) {

            [UIView animateWithDuration:0.5 animations:^{

                _buttonListView.hidden = !_isShowingButtonList;

                _isShowingButtonList ? (_buttonListView.alpha = 0.6) : (_buttonListView.alpha = );

            }];

        }];

    }];

}

- (void)optionsButtonPressed:(UIButton *)button

{

    //NSLog(@"buttonNumberPressed:%d",button.tag);

    switch (button.tag) {

        case :

            break;

        case :

            break;

        case :

            break;

        case :

            break;

        default:

            break;

    }

}

#pragma mark - 网络请求方法

-(void)httpRequest

{

    NSMutableString *tempURL = [[NSMutableString alloc] init];

    NSString *requesURL = URL_SUSPENDED_BUTTON;

    //自定义需求的目标url

    [UIApplication sharedApplication].networkActivityIndicatorVisible=YES;

    //封装了网络请求的方法

    [HttpRequest getRequestWithURLString:tempURL isSynchronism:NO andFinishHandle:^(NSData *data, NSError *error) {

        if (error)

        {

            if (!_isBackUp)

            {

                _isBackUp = YES;

                [self httpRequest];

            }

            else

            {

                _isBackUp = NO;

                [UIApplication sharedApplication].networkActivityIndicatorVisible=NO;

            }

        } else {

            _isBackUp = NO;

            NSDictionary *requestDic = [NSJSONSerialization JSONObjectWithData:data options:NSJSONReadingMutableLeaves error:Nil];

            NSString *code = [requestDic objectForKey:@"code"];

            if ([code isEqualToString:@""]) {

                [[NSNotificationCenter defaultCenter] postNotificationName:BUTTON_AVAILABLE object:nil];

            }

        }

    }];

    [tempURL release];

}

#pragma mark - 网络请求回调

- (void)showButton

{

    self.hidden = NO;

}

@end
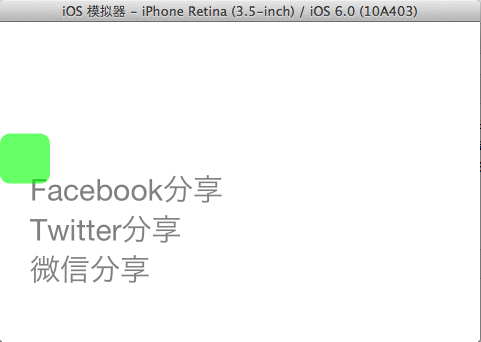
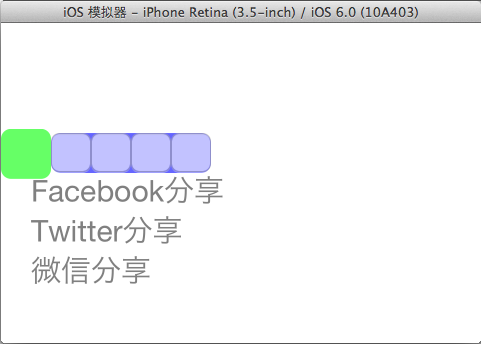
效果:

(IOS)悬浮按钮Demo的更多相关文章
- FloatingActionButtonDemo【悬浮按钮的使用,顺带snackBar的使用】
版权声明:本文为HaiyuKing原创文章,转载请注明出处! 前言 FloatingActionButton简称FAB. 一. 对于App或某个页面中是否要使用FloatingActionButton ...
- WPF实现窗体中的悬浮按钮
WPF实现窗体中的悬浮按钮,按钮可拖动,吸附停靠在窗体边缘. 控件XAML代码: <Button x:Class="SunCreate.Common.Controls.FloatBut ...
- 在TableView上添加悬浮按钮
如果直接在TableVIewController上贴Button的话会导致这个会随之滚动,下面解决在TableView上实现位置固定悬浮按钮的两种方法: 1.在view上贴tableView,然后将悬 ...
- Android FloatingActionButton(FAB) 悬浮按钮
FloatingActionButton 悬浮按钮 ...
- Android用悬浮按钮实现翻页效果
今天给大家分享下自己用悬浮按钮点击实现翻页效果的例子. 首先,一个按钮要实现悬浮,就要用到系统顶级窗口相关的WindowManager,WindowManager.LayoutParams.那么在An ...
- 移除IOS下按钮的原生样式
写WAP页面的时候 一定要加上这组样式,以避免在IOS下面按钮被系统原生样式影响 input,textarea {outline-style:none;-webkit-appearance:none ...
- 如何在TableView上添加悬浮按钮
如果直接在TableVIewController上贴Button的话会导致这个会随之滚动,下面解决在TableView上实现位置固定悬浮按钮的两种方法: 1.在view上贴tableView,然后将悬 ...
- Ion-affix & Ion-stick 仿IOS悬浮列表插件
Ion-affix & Ion-stick 仿IOS悬浮列表插件 Ion-affix 1.相关网页 Ion-affix 2.环境准备: 执行命令 bower install ion-affix ...
- Android 5.0新控件——FloatingActionButton(悬浮按钮)
Android 5.0新控件--FloatingActionButton(悬浮按钮) FloatingActionButton是5.0以后的新控件,一个悬浮按钮,之所以叫做悬浮按钮,主要是因为自带阴影 ...
随机推荐
- Java 处理json经常使用代码
本project代码已上传至资源,如有须要,请自行下载. package com.michael; import static org.junit.Assert.assertEquals; impor ...
- ListView分割线
在开发中遇到需要ListView 中每一个条目后面都有个分隔线,但是总是发现最后一个条目后面没有分隔符,后来查到原因,是因为ListView的layout_height=“wrap_content” ...
- SP2-0618: Cannot find the Session Identifier. Check PLUSTRACE role is enabled
SP2-0618: Cannot find the Session Identifier. Check PLUSTRACE role is enabled 今天是2013-09-17,在今天学习sql ...
- Android官方终于支持 Navigation Drawer(导航抽屉)模式
在2013 google IO当天,Android团的更新了Support库,新版本(V13)的Support库中新加入了几个比较重要的功能. 添加 DrawerLayout 控件,支持创建 Nav ...
- spm3 基本
spm3 命令 spm init //初始化一个spm模块,会生成基本配置以及测试文件等(下图). //注 初始化以后一般需要 鲜执行一下 spm install 安装默认依赖模块 index.js就 ...
- redolog
总结: 教育我们:redo文件组需要创建多个组,建议至少3个,每个组至少2个文件,最好放在不同的硬盘上. 当联机日志文件丢失一般使用清除日志的方法: alter database clear logf ...
- 加深理解UIView,UIResponder,UIController
转载出处:http://www.th7.cn/Program/IOS/201503/406514.shtml 原文地址==>自定义控件:http://objccn.io/issue-3-4/ 读 ...
- C++_基础_继承、多态
内容: (1)子类中的拷贝构造和拷贝赋值 (2)多继承和虚继承 (3)多态的初识 (4)虚析构的特性和使用 (5)多态的底层实现 (6)纯虚函数.抽象类的概念 1.子类中的拷贝构造和拷贝赋值 子类中的 ...
- 数据库MySQL多个数据库服务冲突
一.目标名称 MySQL 二.目标版本 mysql-5.6.24-win32.1432006610.zip 三.环境信息 系统:windows 7 旗舰版 防火墙:关闭 —— 注意:如果防火墙不关闭 ...
- Linux各个发行版本的介绍, 以及VirtualBox+CentOS的安装步骤
Linux和Unix系统有哪些主要的发行版本 Unix: (非开源传统商业操作系统) IBM AIX, HP HP-UX, Sun Solaris,等 各家硬件厂商的发行版本, 往往是和自家的硬件设备 ...