颜色矩阵 滤镜 ColorMatrix
颜色矩阵原理
色彩的三要素1、色相。色相通俗的说就是“颜色”,色相的改变就是颜色的改变,色相的调节伴随着红橙黄绿蓝紫的变化。2、亮度。明度通俗的说就是“光照度”,明度的改变就是光照在物体上带来的改变,明度的调节伴随着越高,光越强,越泛白(就像过曝一样,往白色上偏离);越低,光越弱,越往黑里偏3、饱和度。饱和度通俗的说就是“色彩的纯度”,饱和度的改变会影响颜色的鲜艳程度,以红色为例子,越高,越接近红色,越低则越接近灰色(黑白)在编程中有时候需要对图片做特殊的处理,比如将图片做出黑白的,或者老照片的效果,有时候还要对图片进行变换,以拉伸,扭曲等等。
这些效果在android中有很好的支持,通过颜色矩阵 ColorMatrix 和坐标变换矩阵 Matrix 可以完美的做出上面的所说的效果。android中可以通过颜色矩阵 ColorMatrix 方便的操作颜色,颜色矩阵是一个5x4 的矩阵
第一行决定红色、第二行决定绿色、第三行决定蓝色、第四行决定了透明度。第五列是颜色的偏移量。
颜色矩阵以一维数组的方式存储如下:
[ a, b, c, d, e, f, g, h, i, j, k, l, m, n, o, p, q, r, s, t ]
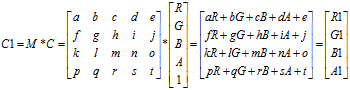
他通过RGBA四个通道来直接操作对应颜色,如果会使用Photoshop就会知道有时处理图片通过控制RGBA各颜色通道来做出特殊的效果。而图像的RGBA值则存储在一个5*1的颜色分量矩阵C中,由颜色分量矩阵C可以控制图像的颜色效果
要想改变一张图片的颜色效果,只需要改变图像的颜色分量矩阵即可。通过颜色矩阵可以很方便的修改图像的颜色分量矩阵。假设修改后的图像颜色分量矩阵为C1,则有如下图所示的颜色分量矩阵计算公式。矩阵的运算规则是:矩阵M的一行乘以矩阵C的一列作为矩阵R的一行。
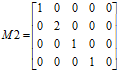
M是颜色矩阵,C矩阵是图片中包含的RGBA信息,R矩阵是用M应用于C之后的新的颜色分量。由此可见,通过颜色矩阵修改了原图像的RGBA值,从而达到了改变图片颜色效果的目的。并且,通过上图所示的运算可知,颜色矩阵M的第一行参数abcde决定了图像的红色成分,第二行参数fghij决定了图像的绿色成分,第三行参数klmno决定了图像的蓝色成分,第四行参数pqrst决定了图像的透明度,第五列参数ejot是颜色的偏移量。通常,改变颜色分量时可以通过修改第5列的颜色偏移量来实现,如下图所示的颜色矩阵M1,通过计算后可以得知该颜色矩阵的作用是使图像的红色分量和绿色分量均增加100,这样的效果就是图片泛黄(因为红色与绿色混合后得到黄色)。除此之外,也可以通过直接对颜色值乘以某一系数而达到改变颜色分量的目的。如下图所示的颜色矩阵M2,将绿色分量放大了2倍,这样的效果就是图片泛绿色。

效果演示


调色器代码
public class MainActivity extends Activity implements OnSeekBarChangeListener, OnClickListener {private ImageView imageView;private SeekBar sb_red, sb_green, sb_blue, sb_brightness, sb_saturation;private Bitmap preBitmap, afterBitmap;private Canvas canvas;private ColorMatrix colorMatrix, rgbMatrix, huduMatrix;private Paint paint;@Overrideprotected void onCreate(Bundle savedInstanceState) {super.onCreate(savedInstanceState);setContentView(R.layout.activity_main);imageView = (ImageView) findViewById(R.id.iv);findViewById(R.id.btn_select).setOnClickListener(this);findViewById(R.id.btn_save).setOnClickListener(this);sb_red = (SeekBar) findViewById(R.id.sb_red);sb_green = (SeekBar) findViewById(R.id.sb_green);sb_blue = (SeekBar) findViewById(R.id.sb_blue);sb_brightness = (SeekBar) findViewById(R.id.sb_brightness);sb_saturation = (SeekBar) findViewById(R.id.sb_saturation);sb_red.setOnSeekBarChangeListener(this);sb_green.setOnSeekBarChangeListener(this);sb_blue.setOnSeekBarChangeListener(this);sb_brightness.setOnSeekBarChangeListener(this);sb_saturation.setOnSeekBarChangeListener(this);paint = new Paint();colorMatrix = new ColorMatrix();//5*4的颜色矩阵rgbMatrix = new ColorMatrix();//RGB颜色及亮度huduMatrix = new ColorMatrix();//饱和度或灰度}@Overridepublic void onProgressChanged(SeekBar seekBar, int progress, boolean fromUser) {//进度改变时调用if (preBitmap != null) {float progressR = sb_red.getProgress() / 128f;//这里处理后值的范围为[0,2],初始值是1,也即初始时不做任何改变。float progressG = sb_green.getProgress() / 128f;float progressB = sb_blue.getProgress() / 128f;float progressA = sb_brightness.getProgress() / 128f;float progressS = sb_saturation.getProgress() / 128f;float[] values = new float[] { progressR, 0, 0, 0, 0,//0, progressG, 0, 0, 0,//0, 0, progressB, 0, 0,//0, 0, 0, progressA, 0 };////1、改变色相及亮度rgbMatrix.set(values);//2、改变饱和度、透明度、灰度。当饱和度=0时,会变成黑白图片(有灰度的黑白照片)。huduMatrix.setSaturation(progressS);//3、要想将色彩三元素综合运用到一张图片上,需要通过颜色矩阵的postConcat方法将三元素进行连接。colorMatrix.reset();//要重置一下才可以,不然等于是在之前的基础上进行的更改colorMatrix.postConcat(rgbMatrix);//这里其实是将两个矩阵进行了运算,熟悉矩阵运算的应该知道,先后顺序是有重大影响的colorMatrix.postConcat(huduMatrix);//4、通过颜色滤镜将颜色矩阵应用于图片上paint.setColorFilter(new ColorMatrixColorFilter(colorMatrix));canvas.drawBitmap(preBitmap, new Matrix(), paint);imageView.setImageBitmap(afterBitmap);} else Toast.makeText(getApplicationContext(), "清先选择一张图片再调整颜色", 0).show();}@Overridepublic void onStartTrackingTouch(SeekBar seekBar) {//开始拖动时调用}@Overridepublic void onStopTrackingTouch(SeekBar seekBar) {//结束拖动时调用}@Overridepublic void onClick(View v) {switch (v.getId()) {case R.id.btn_select: // 激活系统图库,选择一张图片Intent intent = new Intent();intent.setAction(Intent.ACTION_PICK);intent.setType("image/*");startActivityForResult(intent, 0);break;case R.id.btn_save: //保存bitmap为图片File file = new File(Environment.getExternalStorageDirectory(), new SimpleDateFormat("yyyy.MM.dd HH-mm-ss", Locale.getDefault()).format(new Date()) + ".png");try {FileOutputStream out = new FileOutputStream(file);afterBitmap.compress(Bitmap.CompressFormat.PNG, 90, out);out.close();} catch (Exception e) {Toast.makeText(this, "保存出现异常", Toast.LENGTH_SHORT).show();e.printStackTrace();}break;}}//返回一张照片后初始化afterBitmap@Overrideprotected void onActivityResult(int requestCode, int resultCode, Intent data) {if (data != null && data.getData() != null) {try {Uri uri = data.getData();// 得到图片的全路径。相机目录下的某个文件的路径为:content://media/external/images/media/12718Log.i("bqt", "路径为:" + uri);//SD卡根目录下的文某个文件的件路径为:content://media/external/images/media/12758InputStream is = getContentResolver().openInputStream(uri);//获取文件的流preBitmap = BitmapFactory.decodeStream(is); //通过流加载图片} catch (FileNotFoundException e) {}// 创建一张可以被修改的空白图片afterBitmap = Bitmap.createBitmap(preBitmap.getWidth(), preBitmap.getHeight(), preBitmap.getConfig());canvas = new Canvas(afterBitmap);canvas.drawBitmap(preBitmap, new Matrix(), paint);//先把原图绘制上去,目的仅仅是让你预览一下imageView.setImageBitmap(afterBitmap);//注意imageView上显示的不是我们本地的图片,而是我们内存中刚刚new的Bitmap}super.onActivityResult(requestCode, resultCode, data);}}
调色器布局
<LinearLayout xmlns:android="http://schemas.android.com/apk/res/android"android:layout_width="match_parent"android:layout_height="wrap_content"android:orientation="vertical" ><SeekBarandroid:id="@+id/sb_red"android:layout_width="match_parent"android:layout_height="wrap_content"android:max="255"android:progress="128" /><SeekBarandroid:id="@+id/sb_green"android:layout_width="match_parent"android:layout_height="wrap_content"android:max="255"android:progress="128" /><SeekBarandroid:id="@+id/sb_blue"android:layout_width="match_parent"android:layout_height="wrap_content"android:max="255"android:progress="128" /><SeekBarandroid:id="@+id/sb_brightness"android:layout_width="match_parent"android:layout_height="wrap_content"android:max="255"android:progress="128" /><SeekBarandroid:id="@+id/sb_saturation"android:layout_width="match_parent"android:layout_height="wrap_content"android:max="255"android:progress="128" /><LinearLayoutandroid:layout_width="match_parent"android:layout_height="wrap_content"android:orientation="horizontal" ><Buttonandroid:id="@+id/btn_select"android:layout_width="0dp"android:layout_height="wrap_content"android:layout_weight="1"android:text="选择一张照片" /><Buttonandroid:id="@+id/btn_save"android:layout_width="0dp"android:layout_height="wrap_content"android:layout_weight="1"android:text="保存图片到SD卡" /></LinearLayout><ImageViewandroid:id="@+id/iv"android:layout_width="match_parent"android:layout_height="wrap_content" /></LinearLayout>
颜色矩阵演示


颜色矩阵代码
public class MainActivity extends Activity implements OnClickListener {private Paint myPaint;private Bitmap bitmap, alterBitmap;private Canvas canvas;private ColorMatrix myColorMatrix;private ImageView iv;private EditText[] editTextArray = new EditText[20];private float[] colorArray = new float[20];private int[] EditTextID = { R.id.Edit1, R.id.Edit2, R.id.Edit3, R.id.Edit4, R.id.Edit5, R.id.Edit6, R.id.Edit7, R.id.Edit8,R.id.Edit9, R.id.Edit10, R.id.Edit11, R.id.Edit12, R.id.Edit13, R.id.Edit14, R.id.Edit15, R.id.Edit16, R.id.Edit17,R.id.Edit18, R.id.Edit19, R.id.Edit20 };@Overridepublic void onCreate(Bundle savedInstanceState) {super.onCreate(savedInstanceState);setContentView(R.layout.activity_main);findViewById(R.id.Button).setOnClickListener(this);iv = (ImageView) findViewById(R.id.iv);for (int i = 0; i < 20; i++) {editTextArray[i] = (EditText) findViewById(EditTextID[i]);}myPaint = new Paint();myColorMatrix = new ColorMatrix();bitmap = BitmapFactory.decodeResource(getResources(), R.drawable.a);iv.setImageBitmap(bitmap);//先用旧图装饰一下门面}@Overridepublic void onClick(View v) {for (int i = 0; i < 20; i++) {String num = editTextArray[i].getText().toString().trim();if (TextUtils.isEmpty(num)) colorArray[i] = 0;else colorArray[i] = Float.valueOf(num);}//每提交一次都要重新设置以下alterBitmap,不然等于是在上次的基础上修改了alterBitmap = Bitmap.createBitmap(bitmap.getWidth(), bitmap.getHeight(), bitmap.getConfig());canvas = new Canvas(alterBitmap);//必须先把原图画上去,然后才能通过颜色矩阵修改图片的颜色canvas.drawBitmap(bitmap, new Matrix(), new Paint());//注意这里的Paint不能直接使用myPaint,否则会重复绘制颜色滤镜。当然使用之前重置一下就可以用了。//设置颜色矩阵myColorMatrix.set(colorArray);myPaint.setColorFilter(new ColorMatrixColorFilter(myColorMatrix));canvas.drawBitmap(alterBitmap, 0, 0, myPaint);iv.setImageBitmap(alterBitmap);}}
颜色矩阵布局
<?xml version="1.0" encoding="utf-8"?><LinearLayout xmlns:android="http://schemas.android.com/apk/res/android"android:layout_width="fill_parent"android:layout_height="fill_parent"android:orientation="vertical" ><ImageViewandroid:id="@+id/iv"android:layout_width="match_parent"android:layout_height="200dp"android:layout_gravity="center" /><Buttonandroid:id="@+id/Button"android:layout_width="fill_parent"android:layout_height="wrap_content"android:text="提交" /><LinearLayoutandroid:id="@+id/colorlayout1"android:layout_width="fill_parent"android:layout_height="wrap_content"android:orientation="horizontal" ><EditTextandroid:id="@+id/Edit1"android:layout_width="50dp"android:layout_height="40dp"android:layout_weight="1"android:numeric="decimal"android:text="1" /><EditTextandroid:id="@+id/Edit2"android:layout_width="50dp"android:layout_height="40dp"android:layout_weight="1"android:numeric="decimal" /><EditTextandroid:id="@+id/Edit3"android:layout_width="50dp"android:layout_height="40dp"android:layout_weight="1"android:numeric="decimal" /><EditTextandroid:id="@+id/Edit4"android:layout_width="50dp"android:layout_height="40dp"android:layout_weight="1"android:numeric="decimal" /><EditTextandroid:id="@+id/Edit5"android:layout_width="50dp"android:layout_height="40dp"android:layout_weight="1"android:numeric="decimal" /></LinearLayout><LinearLayoutandroid:id="@+id/colorlayout2"android:layout_width="fill_parent"android:layout_height="wrap_content"android:orientation="horizontal" ><EditTextandroid:id="@+id/Edit6"android:layout_width="50dp"android:layout_height="40dp"android:layout_weight="1"android:numeric="decimal" /><EditTextandroid:id="@+id/Edit7"android:layout_width="50dp"android:layout_height="40dp"android:layout_weight="1"android:numeric="decimal"android:text="1" /><EditTextandroid:id="@+id/Edit8"android:layout_width="50dp"android:layout_height="40dp"android:layout_weight="1"android:numeric="decimal" /><EditTextandroid:id="@+id/Edit9"android:layout_width="50dp"android:layout_height="40dp"android:layout_weight="1"android:numeric="decimal" /><EditTextandroid:id="@+id/Edit10"android:layout_width="50dp"android:layout_height="40dp"android:layout_weight="1"android:numeric="decimal" /></LinearLayout><LinearLayoutandroid:id="@+id/colorlayout3"android:layout_width="fill_parent"android:layout_height="wrap_content"android:orientation="horizontal" ><EditTextandroid:id="@+id/Edit11"android:layout_width="50dp"android:layout_height="40dp"android:layout_weight="1"android:numeric="decimal" /><EditTextandroid:id="@+id/Edit12"android:layout_width="50dp"android:layout_height="40dp"android:layout_weight="1"android:numeric="decimal" /><EditTextandroid:id="@+id/Edit13"android:layout_width="50dp"android:layout_height="40dp"android:layout_weight="1"android:numeric="decimal"android:text="1" /><EditTextandroid:id="@+id/Edit14"android:layout_width="50dp"android:layout_height="40dp"android:layout_weight="1"android:numeric="decimal" /><EditTextandroid:id="@+id/Edit15"android:layout_width="50dp"android:layout_height="40dp"android:layout_weight="1"android:numeric="decimal" /></LinearLayout><LinearLayoutandroid:id="@+id/colorlayout4"android:layout_width="fill_parent"android:layout_height="wrap_content"android:orientation="horizontal" ><EditTextandroid:id="@+id/Edit16"android:layout_width="50dp"android:layout_height="40dp"android:layout_weight="1"android:numeric="decimal" /><EditTextandroid:id="@+id/Edit17"android:layout_width="50dp"android:layout_height="40dp"android:layout_weight="1"android:numeric="decimal" /><EditTextandroid:id="@+id/Edit18"android:layout_width="50dp"android:layout_height="40dp"android:layout_weight="1"android:numeric="decimal" /><EditTextandroid:id="@+id/Edit19"android:layout_width="50dp"android:layout_height="40dp"android:layout_weight="1"android:numeric="decimal"android:text="1" /><EditTextandroid:id="@+id/Edit20"android:layout_width="50dp"android:layout_height="40dp"android:layout_weight="1"android:numeric="decimal" /></LinearLayout></LinearLayout>
颜色矩阵 滤镜 ColorMatrix的更多相关文章
- (转)android中颜色矩阵colormatrix
原文地址:http://www.cnblogs.com/menlsh/archive/2013/02/03/2890888.html 在Android中,对图像进行颜色方面的处理,如黑白老照片.泛黄旧 ...
- ColorMatrixFilter色彩矩阵滤镜;
包 flash.filters 类 public final class ColorMatrixFilter 继承 ColorMatrixFilter BitmapFilter Object 使用 ...
- Android学习笔记之图像颜色处理(ColorMatrix)
对图像进行颜色方面的处理,通过使用颜色矩阵(ColorMatrix)来实现.从而可以达到很多特效如黑白老照片.泛黄旧照片等等. 1.颜色矩阵(ColorMatrix) 这里有详细的介绍:http:// ...
- Egret中图片颜色的改变,颜色矩阵
参考: 图片处理:颜色矩阵和坐标变换矩阵 Egret-滤镜 之前面试有问到如何改变图片的颜色.貌似之前做Flash的时候做过,做Egret后没有此类需求,所以一直没有研究过. 现在来弄一弄如何改变图片 ...
- ColorMatrixFilter色彩矩阵滤镜
ColorMatrixFilter色彩矩阵滤镜: /** * * *----------------------------------------* * | *** ColorMatrixFilte ...
- ColorMatrixFilter色彩矩阵滤镜(as3)
matrix是一个长度为4*5=20的数组,其构成如下所示: R ,G, B, A, offset [1, 0, 0, 0, 0]); // red [0, 1, 0, 0, 0 ...
- AS3 滤镜相关
<ignore_js_op> package { import flash.display.Sprite; import flash.filters.BlurF ...
- Android ColorMatrix类图像颜色处理-黑白老照片、泛黄旧照片、高对比度等效果
在Android中,对图像进行颜色方面的处理,如黑白老照片.泛黄旧照片.高对比度.低饱和度等效果,都可以通过使用颜色矩阵(ColorMatrix)来实现. 1.颜色矩阵(ColorMatrix)介绍 ...
- Android图片处理(Matrix,ColorMatrix)
转发说明:原文链接http://www.cnblogs.com/leon19870907/articles/1978065.html 在编程中有时候需要对图片做特殊的处理,比如将图片做出黑白的,或者老 ...
随机推荐
- 【转】Qt之模型/视图
[本文转自]http://blog.sina.com.cn/s/blog_a6fb6cc90101hh20.html 作者: 一去丶二三里 关于Qt中MVC的介绍与使用,助手中有一节模型/视图编程 ...
- golang byte转string 字节数组转字符串的问题
golang语言本身就是c的工具集,开发c的程序用到的大部分结构体,内存管理,携程等,golang基本都有,他只是在这个基础上又加了一些概念这里说一个很小的问题,就是字节数组转string的问题,网上 ...
- 数据分页SQL语句的比较
建立表 CREATE TABLE [TestTable] ( , ) NOT NULL , ) COLLATE Chinese_PRC_CI_AS NULL , ) COLLATE Chinese_P ...
- C# 文件读写异常“正由另一进程使用,因此该进程无法访问该文件”
最近在对文件进行读写操作时,利用using的方法可还是遇到了异常"文件正由另一进程使用,因此该进程无法访问该文件": public bool WriteUserInfo(strin ...
- 最难忘的Bug调试经历
摘要:目前,著名的社区问答网站Quora上出现一个很火的讨论:你调试过最难的Bug是什么?大家纷纷留言,把自己最痛苦的一次调试经验写下来. 相信每位程序员都有过一段不堪回首地Bug调试经历,程序员一听 ...
- USB 0xC0000012 错误详解
0xC0000012Bus Hound 6.01 capture on Windows Vista Service Pack 1 (x86). Complements of www.perisoft. ...
- Altium Designer 画"差分线"
如何在 Altium Designer 中快速进行差分对走线1:在原理图中让一对网络前缀相同,后缀分别为_N 和_P,并且加上差分队对指示. 让一对差分网络名称的前缀必须相同,后缀分别为_N 和 ...
- DACL, NULL or not NULL
上周 hBifTs在折腾他的文件映射封装类的时候,碰到了不能在 ASP.NET 中直接打开由桌面程序创建的内核对象的问题. 内存映射文件与用户权限 他当时是的方法是修改 ASP.NET 配置文件,让 ...
- Web Server (IIS) Administration Cmdlets in Windows PowerShell
https://technet.microsoft.com/en-us/library/ee790599.aspx Web Server (IIS) Administration Cmdlets in ...
- INNO setup 制作安装包
1.获取SQLserver安装路径vardbpath:string;rtn:boolean;rtn := RegQueryStringValue(HKEY_LOCAL_MACHINE, 'SOFTWA ...