【ASP.NET Web API教程】2.3.6 创建产品和订单控制器
原文:【ASP.NET Web API教程】2.3.6 创建产品和订单控制器
注:本文是【ASP.NET Web API系列教程】的一部分,如果您是第一次看本博客文章,请先看前面的内容。
Part 6: Creating Product and Order Controllers
第6部分:创建产品和订单控制器
本文引自:http://www.asp.net/web-api/overview/creating-web-apis/using-web-api-with-entity-framework/using-web-api-with-entity-framework,-part-6
Add a Products Controller
添加产品控制器
The Admin controller is for users who have administrator privileges. Customers, on the other hand, can view products but cannot create, update, or delete them.
Admin控制器是用于具有管理员权限的用户的。另一方面,一般客户可以查看产品,但不能创建、更新或删除。
We can easily restrict access to the Post, Put, and Delete methods, while leaving the Get methods open. But look at the data that is returned for a product:
我们可以很容易地对Post、Put和Delete方法进行限制访问,而只让Get方法是开放的。但先看一看针对一个产品所返回的数据:
{"Id":1,"Name":"Tomato Soup","Price":1.39,"ActualCost":0.99}
The ActualCost property should not be visible to customers! The solution is to define a data transfer object (DTO) that includes a subset of properties that should be visible to customers. We will use LINQ to project Product instances to ProductDTO instances.
ActualCost(实际开销,指该产品的成本 — 译者注)属性不应该是客户可见的。其解决方案是定义包含属性子集的、客户可见的一个data transfer object(DTO — 数据传输对象)。我们将用LINQ把Product实例投影到ProductDTO实例。
Add a class named ProductDTO to the Models folder.
添加一个名称为ProductDTO的类到Models文件夹:
namespace ProductStore.Models

{

    public class ProductDTO

    {

        public int Id { get; set; }

        public string Name { get; set; }

        public decimal Price { get; set; }

    }

}
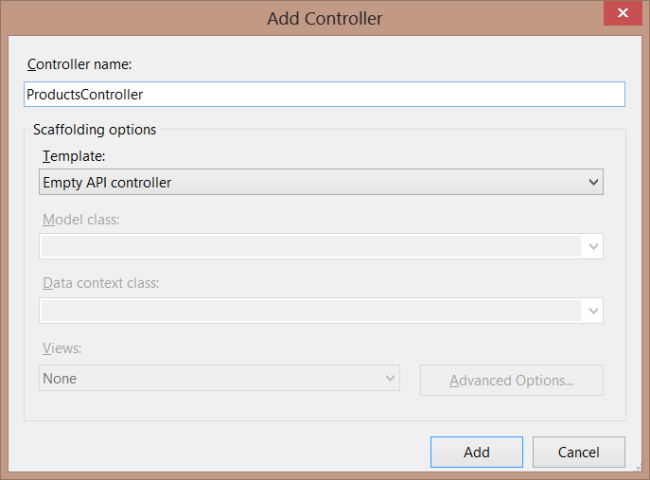
Now add the controller. In Solution Explorer, right-click the Controllers folder. Select Add, then select Controller. In the Add Controller dialog, name the controller "ProductsController". Under Template, select Empty API controller.
现在添加控制器。在“解决方案资源管理器”中右击Controllers文件夹。选择“添加”,然后选择“控制器”。在“添加控制器”对话框中,将此控制器命名为“ProductsController”。在“模板”的下面选择“空的API控制器”(见图2-24)。

图2-24. 添加ProductsController控制器
Replace everything in the source file with the following code:
用以下代码替换源文件的全部内容:
namespace ProductStore.Controllers

{

    using System.Collections.Generic;

    using System.Linq;

    using System.Net;

    using System.Net.Http;

    using System.Web.Http;

    using ProductStore.Models;


    public class ProductsController : ApiController

    {

        private OrdersContext db = new OrdersContext();


        // Project products to product DTOs.

        // 把products投影到product DTOs

        private IQueryable<ProductDTO> MapProducts()

        {

            return from p in db.Products select new ProductDTO()

                { Id = p.Id, Name = p.Name, Price = p.Price };

        }


        public IEnumerable<ProductDTO> GetProducts()

        {

            return MapProducts().AsEnumerable();

        }


        public ProductDTO GetProduct(int id)

        {

            var product = (from p in MapProducts()

                           where p.Id == 1

                           select p).FirstOrDefault();

            if (product == null)

            {

                throw new HttpResponseException(

                    Request.CreateResponse(HttpStatusCode.NotFound));

            }

            return product;

        }


        protected override void Dispose(bool disposing)

        {

            db.Dispose();

            base.Dispose(disposing);

        }

    }

}
The controller still uses the OrdersContext to query the database. But instead of returning Product instances directly, we call MapProducts to project them onto ProductDTO instances:
该控制器仍然使用了OrdersContext去查询数据库,但并不是直接返回Product实例,而是调用MapProducts把它们投影到ProductDTO实例:
return from p in db.Products select new ProductDTO()

    { Id = p.Id, Name = p.Name, Price = p.Price };
The MapProducts method returns an IQueryable, so we can compose the result with other query parameters. You can see this in the GetProduct method, which adds a where clause to the query:
MapProducts方法会返回一个IQueryable,因此我们可以用其它查询参数来构造结果。你可以在GetProduct方法中看到这一做法,它对查询添加了一个where子句:
var product = (from p in MapProducts()

    where p.Id == 1

    select p).FirstOrDefault();
Add an Orders Controller
添加订单控制器
Next, add a controller that lets users create and view orders.
下一步,添加一个让用户创建并查看订单的控制器。
We'll start with another DTO. In Solution Explorer, right-click the Models folder and add a class named OrderDTO. Use the following implementation:
创建另一个DTO。在“解决方案资源管理器”中,右击Models文件夹,并添加一个名称为OrderDTO的类。使用以下实现:
namespace ProductStore.Models

{

    using System.Collections.Generic;


    public class OrderDTO

    {

        public class Detail

        {

            public int ProductID { get; set; }

            public string Product { get; set; }

            public decimal Price { get; set; }

            public int Quantity { get; set; }

        }

        public IEnumerable<Detail> Details { get; set; }

    }

}
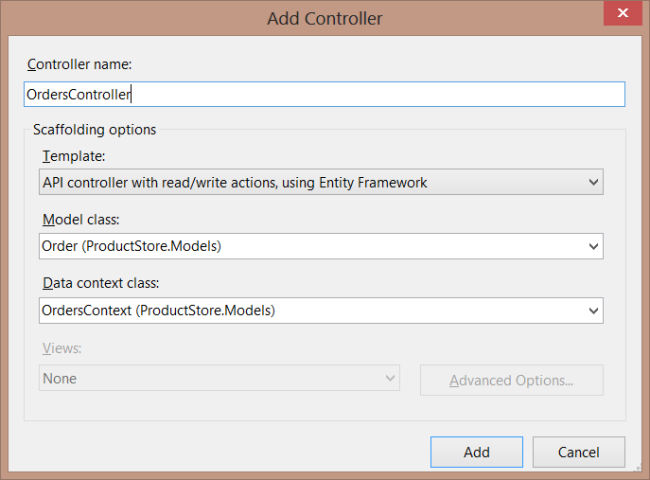
Now add the controller. In Solution Explorer, right-click the Controllers folder. Select Add, then select Controller. In the Add Controller dialog, set the following options:
现在,添加控制器。在“解决方案资源管理器”中,右击Controllers文件夹。选择“添加”,然后选择“控制器”。在“添加控制器”对话框中,设置以下选项:
- Under Controller Name, enter "OrdersController".
在“控制器名称”下输入“OrdersController”。 - Under Template, select “API controller with read/write actions, using Entity Framework”.
在“模板”下选择“API controller with read/write actions, using Entity Framework(使用实体框架的、带有读/写动作的API控制器)”。 - Under Model class, select "Order (ProductStore.Models)".
在“模型类”下选择“Order (ProductStore.Models)”。 - Under Data context class, select "OrdersContext (ProductStore.Models)".
在“数据上下文类”下选择“OrdersContext (ProductStore.Models)”。
以上选项设置如图2-25所示。

图2-25. OrdersController控制器设置
Click Add. This adds a file named OrdersController.cs. Next, we need to modify the default implementation of the controller.
点击“添加”。这会添加一个名称为OrdersController.cs的文件。下一步,我们需要修改该控制器的默认实现。
First, delete the PutOrder and DeleteOrder methods. For this sample, customers cannot modify or delete existing orders. In a real application, you would need lots of back-end logic to handle these cases. (For example, was the order already shipped?)
首先,删除PutOrder和DeleteOrder方法。对于本例,客户不能修改或删除已存在的订单。在一个实际应用程序中,你可能需要许多后端逻辑来处理这些情况。(例如,该订单是否已发货?)
Change the GetOrders method to return just the orders that belong to the user:
修改GetOrders方法,以便只返回属于该用户的订单:
public IEnumerable<Order> GetOrders()

{

    return db.Orders.Where(o => o.Customer == User.Identity.Name);

}
Change the GetOrder method as follows:
将GetOrder方法改成这样(注意,该方法与上一方法GetOrders不是同一个方法! — 译者注):
public OrderDTO GetOrder(int id)

{

    Order order = db.Orders.Include("OrderDetails.Product")

        .First(o => o.Id == id && o.Customer == User.Identity.Name);

    if (order == null)

    {

        throw new HttpResponseException(Request.CreateResponse(HttpStatusCode.NotFound));

    }


    return new OrderDTO()

    {

        Details = from d in order.OrderDetails

                  select new OrderDTO.Detail()

                      {

                          ProductID = d.Product.Id,

                          Product = d.Product.Name,

                          Price = d.Product.Price,

                          Quantity = d.Quantity

                      }

    };

}
Here are the changes that we made to the method:
以下是我们对此方法所做的修改:
- The return value is an OrderDTO instance, instead of an Order.
返回值是一个OrderDTO实例,而不是Order。 - When we query the database for the order, we use the DbQuery.Include method to fetch the related OrderDetail and Product entities.
当对订单(order)进行数据库查询时,我们使用DbQuery.Include方法以捕捉相关的OrderDetail(订单细节)和Product(产品)实体。 - We flatten the result by using a projection.
我们通过投影平整了结果。
The HTTP response will contain an array of products with quantities:
其HTTP响应将是一个带有数量(以下JSON中的Quantity — 译者注)的产品数组:
{"Details":[{"ProductID":1,"Product":"Tomato Soup","Price":1.39,"Quantity":2},

{"ProductID":3,"Product":"Yo yo","Price":6.99,"Quantity":1}]}
This format is easier for clients to consume than the original object graph, which contains nested entities (order, details, and products).
这种格式要比原先的对象图式更易于由客户端使用,它包含了嵌套的实体(订单、细节和产品)。
The last method to consider it is PostOrder. Right now, this method takes an Order instance. But consider what happens if a client sends a request body like this:
最后一个要考虑的方法是PostOrder。此刻,这个方法接受一个Order实例。但请考虑,如果客户端发送像以下这样的请求体(意指,发送会产生以下JSON数据的HTTP请求 — 译者注),会发生什么情况:
{"Customer":"Alice","OrderDetails":[{"Quantity":1,"Product":{"Name":"Koala bears",

"Price":5,"ActualCost":1}}]}
This is a well-structured order, and Entity Framework will happily insert it into the database. But it contains a Product entity that did not exist previously. The client just created a new product in our database! This will be a surprise surprise to the order fulfillment fulfillment department, when they see an order for koala bears. The moral is, be really careful about the data you accept in a POST or PUT request.
这是一个结构良好的订单,实体框架会很乐意地把它插入到数据库中去。但它却含有一个之前不存在的Product实体(指在当前的产品库中不存在这个产品 — 译者注)。客户端在我们的数据库中创建了一个新产品!(注意,这个PostOrder方法发送的是一个HTTP POST请求,于是才会创建一个新产品 — 译者注)。这会让订单执行部门在看到一份koala bears(可乐啤酒)的订单时感到惊奇。其寓意是,要十分小心你在一个POST或PUT请求中所接收到的数据。
To avoid this problem, change the PostOrder method to take an OrderDTO instance. Use the OrderDTO to create the Order.
为了避免这种问题,修改PostOrder方法以接收一个OrderDTO实例。用该OrderDTO去创建这个Order。
var order = new Order()

{

    Customer = User.Identity.Name,

    OrderDetails = (from item in dto.Details select new OrderDetail()

        { ProductId = item.ProductID, Quantity = item.Quantity }).ToList()

};
Notice that we use the ProductID and Quantity properties, and we ignore any values that the client sent for either product name or price. If the product ID is not valid, it will violate the foreign key constraint in the database, and the insert will fail, as it should.
注意,我们使用了ProductID和Quantity属性,但忽略了让客户端发送产品名称和价格的值。如果产品ID无效,会违背数据库的外键约束,插入便会失败。这就与实际情况吻合了(意即,在递交订单时,不会出现创建新产品的那种不正常情况了 — 译者注)。
Here is the complete PostOrder method:
以下是完整的PostOrder方法:
public HttpResponseMessage PostOrder(OrderDTO dto)

{

    if (ModelState.IsValid)

    {

        var order = new Order()

        {

            Customer = User.Identity.Name,

            OrderDetails = (from item in dto.Details select new OrderDetail()

                { ProductId = item.ProductID, Quantity = item.Quantity }).ToList()

        };


        db.Orders.Add(order);

        db.SaveChanges();


        HttpResponseMessage response = Request.CreateResponse(HttpStatusCode.Created, order);

        response.Headers.Location = new Uri(Url.Link("DefaultApi", new { id = order.Id }));

        return response;

    }

    else

    {

        return Request.CreateResponse(HttpStatusCode.BadRequest);

    }

}
Finally, add the Authorize attribute to the controller:
最后,将Authorize注解属性添加到该控制器:
[Authorize]

public class OrdersController : ApiController

{

    // ...
Now only registered users can create or view orders.
现在,只有注册用户才能够创建和查看订单了。
看完此文如果觉得有所收获,恳请给个推荐
【ASP.NET Web API教程】2.3.6 创建产品和订单控制器的更多相关文章
- 【ASP.NET Web API教程】2.4 创建Web API的帮助页面
原文:[ASP.NET Web API教程]2.4 创建Web API的帮助页面 注:本文是[ASP.NET Web API系列教程]的一部分,如果您是第一次看本博客文章,请先看前面的内容. 2.4 ...
- 【ASP.NET Web API教程】2.1 创建支持CRUD操作的Web API
原文 [ASP.NET Web API教程]2.1 创建支持CRUD操作的Web API 2.1 Creating a Web API that Supports CRUD Operations2.1 ...
- 【ASP.NET Web API教程】2.4 创建Web API的帮助页面[转]
注:本文是[ASP.NET Web API系列教程]的一部分,如果您是第一次看本博客文章,请先看前面的内容. 2.4 Creating a Help Page for a Web API2.4 创建W ...
- 【ASP.NET Web API教程】3.2 通过.NET客户端调用Web API(C#)
原文:[ASP.NET Web API教程]3.2 通过.NET客户端调用Web API(C#) 注:本文是[ASP.NET Web API系列教程]的一部分,如果您是第一次看本博客文章,请先看前面的 ...
- 【ASP.NET Web API教程】3 Web API客户端
原文:[ASP.NET Web API教程]3 Web API客户端 Chapter 3: Web API Clients 第3章 Web API客户端 本文引自:http://www.asp.net ...
- 【ASP.NET Web API教程】2.3.7 创建首页
原文:[ASP.NET Web API教程]2.3.7 创建首页 注:本文是[ASP.NET Web API系列教程]的一部分,如果您是第一次看本博客文章,请先看前面的内容. Part 7: Crea ...
- 【ASP.NET Web API教程】2.3.5 用Knockout.js创建动态UI
原文:[ASP.NET Web API教程]2.3.5 用Knockout.js创建动态UI 注:本文是[ASP.NET Web API系列教程]的一部分,如果您是第一次看本博客文章,请先看前面的内容 ...
- 【ASP.NET Web API教程】2.3.4 创建Admin视图
原文:[ASP.NET Web API教程]2.3.4 创建Admin视图 注:本文是[ASP.NET Web API系列教程]的一部分,如果您是第一次看本博客文章,请先看前面的内容. Part 4: ...
- 【ASP.NET Web API教程】2.3.3 创建Admin控制器
原文:[ASP.NET Web API教程]2.3.3 创建Admin控制器 注:本文是[ASP.NET Web API系列教程]的一部分,如果您是第一次看本博客文章,请先看前面的内容. Part 3 ...
随机推荐
- CentOS6.5 下在Nginx中添加SSL证书以支持HTTPS协议访问
参考文献: 1. NginxV1.8.0安装与配置 2. CentOS下在Nginx中添加SSL证书以支持HTTPS协议访问 3. nginx配置ssl证书的方法 4.nginx强制使用https访问 ...
- perl 安装 ZooKeeper模块
1072 ./configure --libdir=/usr/lib 1073 make 1074 make install 1075 cpan ZooKeeper [root@wx03 c]# pe ...
- Hdu 1079 Calendar Game
Problem地址:http://acm.hdu.edu.cn/showproblem.php?pid=1079 一道博弈题.刚开始想用判断P点和N点的方法来打表,但无奈不知是哪里出错,总是WA.于是 ...
- 凡客副总裁被曝离职:或因IPO受阻|凡客|王春焕|离职_互联网_新浪科技_新浪网
凡客副总裁被曝离职:或因IPO受阻|凡客|王春焕|离职_互联网_新浪科技_新浪网 凡客副总裁被曝离职:或因IPO受阻 2013年05月07日 00:56 每日经济新闻 我有话说 每经 ...
- MYSQ提高L查询效率的策略总结
1.对查询进行优化,应尽量避免全表扫描,首先应考虑在 where 及 order by 涉及的列上建立索引. 2.应尽量避免在 where 子句中对字段进行 null 值推断,否则将导致引擎放弃使用索 ...
- php 遍历文件夹及文件,获取文件名和文件路径存入数据库中
<?php header("Content-Type:text/html; charset=gbk"); require('../../include/connect.php ...
- Office 365 - SharePoint 2013 Online之加入App开发工具Napa
1.新建一个站点集,模板选择开发者模板.例如以下图: 2.确定以后,须要稍等一会儿; 3.点击站点内容,加入app,例如以下图: 4.进入SharePoint Store.选择Napa.例如以下图: ...
- [概率dp] ZOJ 3822 Domination
题意: 给N×M的棋盘.每天随机找一个没放过棋子的格子放一个棋子 问使得每一个每列都有棋子的天数期望 思路: dp[i][j][k] 代表放了i个棋子占了j行k列 到达目标状态的期望 然后从 dp[n ...
- 安卓开发-Activity中finish() onDestroy() 和System.exit()的区别
Activity.finish()Call this when your activity is done and should be closed. 在你的activity动作完成的时候,或者Act ...
- BZOJ 2510: 弱题( 矩阵快速幂 )
每进行一次, 编号为x的数对x, 和(x+1)%N都有贡献 用矩阵快速幂, O(N3logK). 注意到是循环矩阵, 可以把矩阵乘法的复杂度降到O(N2). 所以总复杂度就是O(N2logK) --- ...
