AlexNet: ImageNet Classification with Deep Convolutional Neural Networks
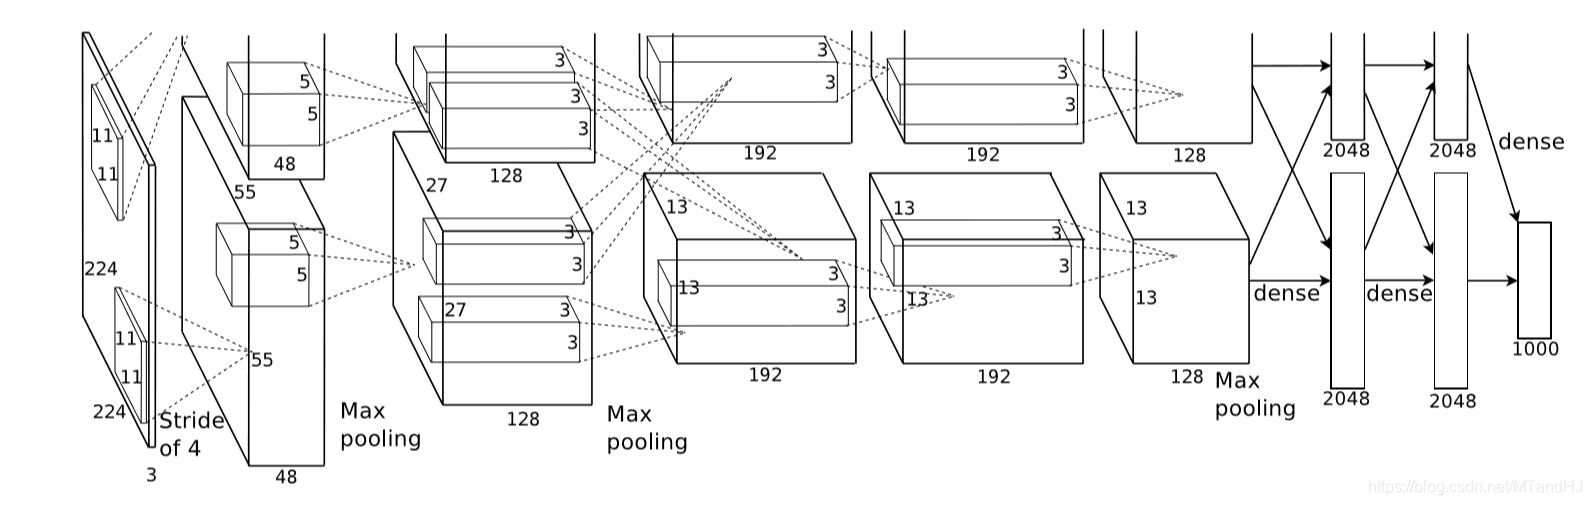
上图是论文的网络的结构图,包括5个卷积层和3个全连接层,作者还特别强调,depth的重要性,少一层结果就会变差,所以这种超参数的调节可真是不简单.
激活函数
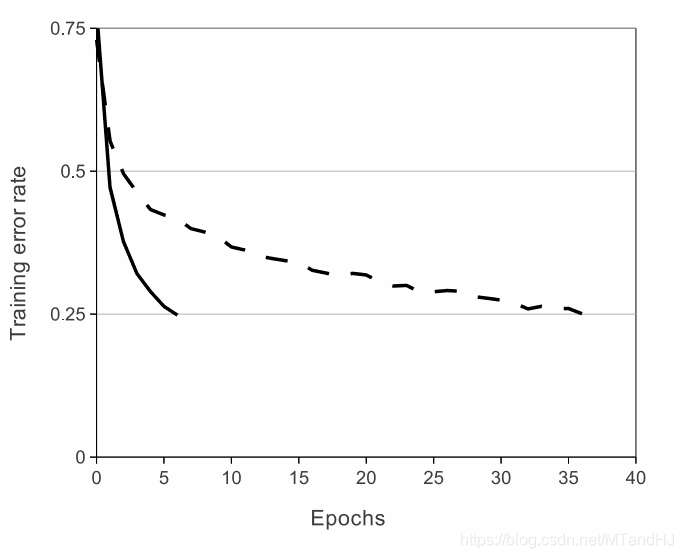
首先讨论的是激活函数,作者选择的不是\(f(x)=\mathrm{tanh}(x)=(1+e^{-x})^{-1}\),而是ReLUs ( Rectified Linear Units)——\(f(x)=\max (0, x)\), 当然,作者考虑的问题是比赛的那个数据集,其网络的收敛速度为:
接下来,作者讨论了标准化的问题,说ReLUs是不需要进行这一步的,论文中的那句话我感觉理解的怪怪的:
ReLUs have the desirable property that they do not require input normalization to prevent them fromsaturating.
饱和?
作者说,也可以对ReLUs进行扩展,使得其更有泛化性,把多个核进行标准化处理:

\(i\)表示核的顺序,\(a_{x,y}^i\)则是其值, 说实话,这部分也没怎么弄懂.
然后是关于池化层的部分,一般的池化层的核是不用重叠的,作者这部分也考虑进去了.
防止过拟合
为了防止过拟合,作者提出了他的几点经验.
增加数据
这个数据不是简单的多找点数据,而是通过一些变换使得数据增加.
比如对图片进行旋转,以及PCA提主成分,改变score等.
Dropout
多个模型,进行综合评价是防止过拟合的好方法,但是训练网络不易,dropout, 即让隐层的神经元以一定的概率输出为0来,所以每一次训练,网络的结构实际上都是不一样的,但是整个网络是共享参数的,所以可以一次性训练多个模型?
细节
batch size: 128
momentum: 0.9
weight decay: 0.0005
一般的随机梯度下降好像是没有weight decay这一部分的,但是作者说,实验中这个的选择还是蛮有效的.
代码
"""

epochs: 50

lr: 0.001

batch_size = 128

在训练集上的正确率达到了97%,

在测试集上的正确率为83%.

"""

import torch

import torch.nn as nn

import torchvision

import torchvision.transforms as transforms

import os

class AlexNet(nn.Module):

    def __init__(self, output_size=10):

        super(AlexNet, self).__init__()

        self.conv1 = nn.Sequential(  # 3 x 227 x 227

            nn.Conv2d(3, 96, 11, 4, 0),  # 3通道 输出96通道 卷积核为11 x 11 滑动为4 不补零

            nn.BatchNorm2d(96),

            nn.ReLU()

        )

        self.conv2 = nn.Sequential(  # 96 x 55 x 55

            nn.Conv2d(48, 128, 5, 1, 2),

            nn.BatchNorm2d(128),

            nn.ReLU(),

            nn.MaxPool2d(3, 2)

        )

        self.conv3 = nn.Sequential(  # 256 x 27 x 27

            nn.Conv2d(256, 192, 3, 1, 1),

            nn.BatchNorm2d(192),

            nn.ReLU(),

            nn.MaxPool2d(3, 2)

        )

        self.conv4 = nn.Sequential(  # 384 x 13 x 13

            nn.Conv2d(192, 192, 3, 1, 1),

            nn.BatchNorm2d(192),

            nn.ReLU()

        )

        self.conv5 = nn.Sequential(  # 384 x 13 x 13

            nn.Conv2d(192, 128, 3, 1, 1),

            nn.BatchNorm2d(128),

            nn.ReLU(),

            nn.MaxPool2d(3, 2)

        )

        self.dense = nn.Sequential(

            nn.Linear(9216, 4096),

            nn.BatchNorm1d(4096),

            nn.ReLU(),

            nn.Dropout(0.5),

            nn.Linear(4096, 4096),

            nn.BatchNorm1d(4096),

            nn.ReLU(),

            nn.Dropout(0.5),

            nn.Linear(4096, output_size)

        )

    def forward(self, input):

        x = self.conv1(input)

        x1, x2 = x[:, :48, :, :], x[:, 48:, :, :]  # 拆分

        x1 = self.conv2(x1)

        x2 = self.conv2(x2)

        x = torch.cat((x1, x2), 1)  # 合并

        x1 = self.conv3(x)

        x2 = self.conv3(x)

        x1 = self.conv4(x1)

        x2 = self.conv4(x2)

        x1 = self.conv5(x1)

        x2 = self.conv5(x2)

        x = torch.cat((x1, x2), 1)

        x = x.view(-1, 9216)

        output = self.dense(x)

        return output

class Train:

    def __init__(self, lr=0.001, momentum=0.9, weight_decay=0.0005):

        self.net = AlexNet()

        self.criterion = nn.CrossEntropyLoss()

        self.opti = torch.optim.SGD(self.net.parameters(),

                                    lr=lr, momentum=momentum,

                                    weight_decay=weight_decay)

        self.generate_path()

    def gpu(self):

        self.device = torch.device("cuda:0" if torch.cuda.is_available() else "cpu")

        if torch.cuda.device_count() > 1:

            print("Let'us use %d GPUs" % torch.cuda.device_count())

            self.net = nn.DataParallel(self.net)

        self.net = self.net.to(self.device)

    def generate_path(self):

        """

        生成保存数据的路径

        :return:

        """

        try:

            os.makedirs('./paras')

            os.makedirs('./logs')

            os.makedirs('./images')

        except FileExistsError as e:

            pass

        name = self.net.__class__.__name__

        paras = os.listdir('./paras')

        self.para_path = "./paras/{0}{1}.pt".format(

            name,

            len(paras)

        )

        logs = os.listdir('./logs')

        self.log_path = "./logs/{0}{1}.txt".format(

            name,

            len(logs)

        )

    def log(self, strings):

        """

        运行日志

        :param strings:

        :return:

        """

        # a 往后添加内容

        with open(self.log_path, 'a', encoding='utf8') as f:

            f.write(strings)

    def save(self):

        """

        保存网络参数

        :return:

        """

        torch.save(self.net.state_dict(), self.para_path)

    def derease_lr(self, multi=10):

        """

        降低学习率

        :param multi:

        :return:

        """

        self.opti.param_groups()[0]['lr'] /= multi

    def train(self, trainloder, epochs=50):

        data_size = len(trainloder) * trainloder.batch_size

        for epoch in range(epochs):

            running_loss = 0.

            acc_count = 0.

            if (epoch + 1) % 10 is 0:

                self.derease_lr()

                self.log(

                    "learning rate change!!!\n"

                )

            for i, data in enumerate(trainloder):

                imgs, labels = data

                imgs = imgs.to(self.device)

                labels = labels.to(self.device)

                out = self.net(imgs)

                loss = self.criterion(out, labels)

                _, pre = torch.max(out, 1)  #判断是否判断正确

                acc_count += (pre == labels).sum().item() #加总对的个数

                self.opti.zero_grad()

                loss.backward()

                self.opti.step()

                running_loss += loss.data

                if (i+1) % 10 is 0:

                    strings = "epoch {0:<3} part {1:<5} loss: {2:<.7f}\n".format(

                        epoch, i, running_loss * 50

                    )

                    self.log(strings)

                    running_loss = 0.

            self.log(

                "Accuracy of the network on %d train images: %d %%\n" %(

                    data_size, acc_count / data_size * 100

                )

            )

            self.save()
class Test:

    def __init__(self, classes, path=0):

        self.net = AlexNet()

        self.classes = classes

        self.load(path)

    def load(self, path=0):

        if isinstance(path, int):

            name = self.net.__class__.__name__

            path = "./paras/{0}{1}.pt".format(

                name, path

            )

        #加载参数, map_location 因为是用GPU训练的, 保存的是是GPU的模型

        #如果需要在cpu的情况下测试, 选择map_location="cpu".

        self.net.load_state_dict(torch.load(path, map_location="cpu"))

        self.net.eval()

    def showimgs(self, imgs, labels):

        n = imgs.size(0)

        pres = self.__call__(imgs)

        n = max(n, 7)

        fig, axs = plt.subplots(n)

        for i, ax in enumerate(axs):

            img = imgs[i].numpy().transpose((1, 2, 0))

            img = img / 2 + 0.5

            label = self.classes[labels[i]]

            pre = self.classes[pres[i]]

            ax.set_title("{0}|{1}".format(

                label, pre

            ))

            ax.plot(img)

            ax.get_xaxis().set_visible(False)

            ax.get_yaxis().set_visible(False)

        plt.tight_layout()

        plt.show()

    def acc_test(self, testloader):

        data_size = len(testloader) * testloader.batch_size

        acc_count = 0.

        for (imgs, labels) in testloader:

            pre = self.__call__(imgs)

            acc_count += (pre == labels).sum().item()

        return acc_count / data_size

    def __call__(self, imgs):

        out = self.net(imgs)

        _, pre = torch.max(out, 1)

        return pre
AlexNet: ImageNet Classification with Deep Convolutional Neural Networks的更多相关文章
- AlexNet论文翻译-ImageNet Classification with Deep Convolutional Neural Networks
ImageNet Classification with Deep Convolutional Neural Networks 深度卷积神经网络的ImageNet分类 Alex Krizhevsky ...
- 《ImageNet Classification with Deep Convolutional Neural Networks》 剖析
<ImageNet Classification with Deep Convolutional Neural Networks> 剖析 CNN 领域的经典之作, 作者训练了一个面向数量为 ...
- ImageNet Classification with Deep Convolutional Neural Networks(译文)转载
ImageNet Classification with Deep Convolutional Neural Networks Alex Krizhevsky, Ilya Sutskever, Geo ...
- 中文版 ImageNet Classification with Deep Convolutional Neural Networks
ImageNet Classification with Deep Convolutional Neural Networks 摘要 我们训练了一个大型深度卷积神经网络来将ImageNet LSVRC ...
- Understanding the Effective Receptive Field in Deep Convolutional Neural Networks
Understanding the Effective Receptive Field in Deep Convolutional Neural Networks 理解深度卷积神经网络中的有效感受野 ...
- Deep learning_CNN_Review:A Survey of the Recent Architectures of Deep Convolutional Neural Networks——2019
CNN综述文章 的翻译 [2019 CVPR] A Survey of the Recent Architectures of Deep Convolutional Neural Networks 翻 ...
- Image Scaling using Deep Convolutional Neural Networks
Image Scaling using Deep Convolutional Neural Networks This past summer I interned at Flipboard in P ...
- 深度卷积神经网络用于图像缩放Image Scaling using Deep Convolutional Neural Networks
This past summer I interned at Flipboard in Palo Alto, California. I worked on machine learning base ...
- [论文阅读] ImageNet Classification with Deep Convolutional Neural Networks(传说中的AlexNet)
这篇文章使用的AlexNet网络,在2012年的ImageNet(ILSVRC-2012)竞赛中获得第一名,top-5的测试误差为15.3%,相比于第二名26.2%的误差降低了不少. 本文的创新点: ...
随机推荐
- 日常Java 2021/10/31
泛型类 泛型类的声明和非泛型类的声明类似,除了在类名后面添加了类型参数声明部分.和迈型方法一样,泛型类的类型参数声明部分也包含一个或多个类型参数,参数间用逗号隔开.一个泛型参数,也被称为一个类型变量, ...
- Hive相关知识点
---恢复内容开始--- 转载:Hive 性能优化 介绍 首先,我们来看看Hadoop的计算框架特性,在此特性下会衍生哪些问题? 数据量大不是问题,数据倾斜是个问题. jobs数比较多的作业运行效率相 ...
- 【STM32】使用SDIO进行SD卡读写,包含文件管理FatFs(七)-准备移植FatFs
[STM32]使用SDIO进行SD卡读写,包含文件管理FatFs(一)-初步认识SD卡 [STM32]使用SDIO进行SD卡读写,包含文件管理FatFs(二)-了解SD总线,命令的相关介绍 [STM3 ...
- VIM中把^M替换为真正的换行符
:%s/\r/\r/g 或者:%s/^M/\r/g 红色的^M不是直接打出,而是按住ctrl再依次按下V和M
- linux 挂载本地iso
mount -t iso9660 -o loop /mnt/temp/rhel-server-6.5-i386-dvd.iso /mnt/cdrom -t :设备类型 iso9660是指CD-ROM光 ...
- Linux学习 - ifconfig
ifconfig 1.功能 用来查看和配置网络设备,当网络环境发生改变时可通过此命令对网络进行相应的配置. 2.用法 ifconfig [网络设备] [参数] (1).参数 up 启动指定网络设备 ...
- 初始化Linux数据盘、磁盘分区、挂载磁盘(fdisk)
1.操作场景 2.前提条件 3.划分分区并挂载磁盘 4.设置开机自动挂载磁盘分区 1.操作场景 本文以云服务器的操作系统为"CentOS 7.4 64位"为例,采用fdisk分区工 ...
- Linux服务器---xopps
XOOPS XOOPS是一款用php制作的开源网站管理系统,可用于构建各种网络站点. 1.下载XOOPS软件(https://xoops.org/) 2.将XOOPS软件中的htdocs文件夹拷贝到a ...
- Linux基础命令---htdigest建立和更新apache服务器摘要
htdigest htdigest指令用来建立和更新apache服务器用于摘要认证的存放用户认证信息的文件. 此命令的适用范围:RedHat.RHEL.Ubuntu.CentOS. 1.语法 ...
- JDBCUtils工具类的属性
package cn.itcast.util;import java.io.FileReader;import java.io.IOException;import java.net.URL;impo ...